Pulse PRO Automate RTI 스마트 셰이드 컨트롤 사용자 가이드

PULSE PRO 자동화VIEW
Automate 전동 쉐이드를 RTI 제어 시스템에 완벽하게 통합하여 Automate 경험을 한층 더 향상시키세요. Automate Pulse PRO는 개별 쉐이드 제어 및 양방향 통신 기능을 통해 강력한 통합 기능을 제공하며, 쉐이드 위치와 배터리 잔량을 실시간으로 업데이트합니다. 이더넷(CAT 5) 및 2.4GHz 무선 연결을 모두 지원하는 Pulse PRO는 허브 뒷면의 RJ45 포트를 통해 손쉽게 접근하여 홈 오토메이션과 원활하게 통합할 수 있습니다. 각 허브는 최대 30개의 쉐이드를 지원하여 모든 홈 오토메이션 설정에 적합한 다재다능한 솔루션입니다.
시작하기:
In order to integrate your motorized window treatments with RTI Control System, you will need to have:
- Downloaded the free Automate Pulse PRO via the Apple App Store (available under iPhone /iPad apps) or the Google Play Store.
- Purchased one or more Automate Pulse PRO depending on size of the space and additional repeaters if is required.
- Integrated your motorized window treatments onto Automate Shades App.
포함된 지침:
- Set up instructions for both the Automate Shades App & Automate Pulse PRO.
- RTI Driver Installation Specification.
- RTI Control System Driver Operating Guide.
- Integration Diagram.
- Integration FAQ’s.
개정 내역:
- Initial release of the driver.
일반 정보:
- The Automate Pulse PRO Operating Guide for information on setup of the system. This driver is for control and feedback only. Setup of the Automate Pulse PRO Hub must be completed prior to setting up driver. Contact Rollease Acmeda for information on how to complete setup using the Hub and App. This driver is for the Automate Pulse PRO Hub only and control motors (i.e. shades) via TCP Communication.
연결 설정: The Network TCP is the only method for communicating with the Pulse PRO Hub. Enter the IP Address of the Hub in the TCP Address field.
MOTOR COUNT (i.e. Shade Count): Enter the number of motors (Shades) that this Pulse PRO is controlling using the App to have the same capability on RTI Control System Driver.
MOTOR NAME (i.e. Shade Naming): Enter a unique name for each motor (i.e. shade). When the driver is running on the processor, the Motor or Shade name is updated automatically accordingly named on the Automate Shades App.
MOTOR ADDRESS (i.e. Shade Address): Enter the motor address that corresponds to the motor (i.e. shade) to be controlled. This address is acquired during the Automate App setup on the system.
DRIVER COMMAND: The control commands are available for movement of motors (i.e. shades) up and down as well as adjusting the shade to a discrete level by entering a value as a percentage.
DRIVER VARIABLES: Feedback variables are available for initialization state, connection state, and motor (i.e. shade) specific.
DRIVER INSTALATION:
- 장비 포장 풀기:
• In this case, were used XP3 Processor and a KX3 Touch Panel to exemplify the communication between the RTI Control System and Automate Pulse PRO.
• XP3 – Use provided power supply to power up processor. Also connect to network (make sure to use ethernet connection and not RS-232). If you have a POE connection, then the XP-3 can be powered that way as well.
• KX3 – Use provided power supply (has a RJ-45 end) to power the KX3 through the Control Port on the back of the unit. Connect this to the network as well. If you have a POE connection, then the KX3 can be powered that way as well. - 압축 해제 file 드라이버와 s를 포함하는ample file. 드라이버를 복사하세요 file (Rollease Pulse.rtidriver) to Integration Designer’s Control Driver Library (Documents\Integration Designer\Control Drivers). We will open the sample file in Integration Designer APEX
- Load Integration Designer APEX onto your computer and launch software.
- Open provided Integration Designer APEX file (롤리스 펄스 Sample File.apex)에서 File 메뉴.

- Use the Automate Shades App to get the Hub IP address. On Manage Hub screen, you have the full Hub information. Enter “Hub IP Address” as one variable on the connection settings on Integration Designer Software.

- 이 전에서amp2개의 모터/쉐이드만 사용했습니다. 모터 "개수"에 따라 아래 목록에 표시되는 모터 개수가 결정됩니다. 해당 목록에 있는 각 모터에 고유한 "모터 이름"을 추가하고, 기기 화면의 Automate Shades 앱에서 사용 가능한 모터 수에 따라 각 쉐이드의 "모터 주소"를 입력하세요.

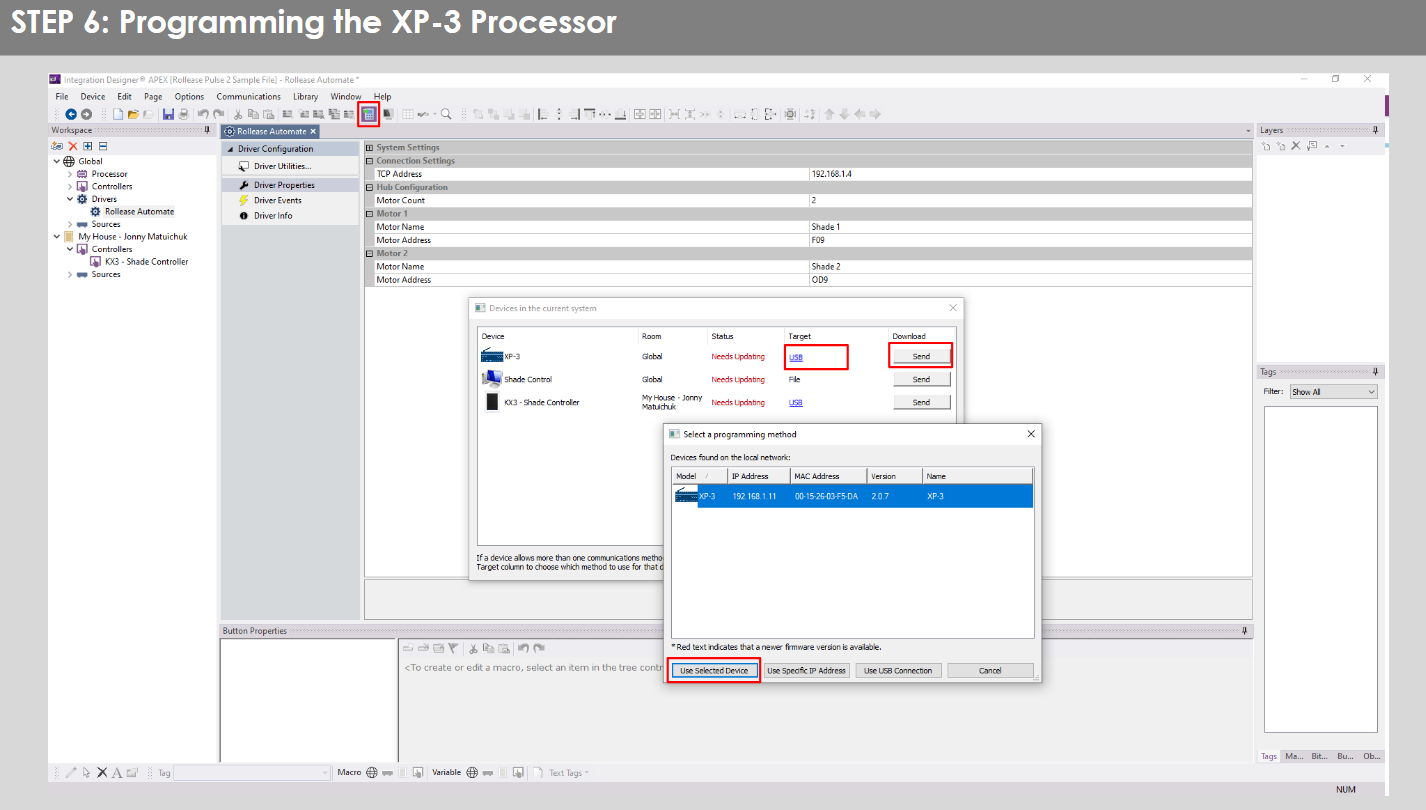
- Click on the “Download” icon from the top toolbar. This will open a screen with all devices available on Integration Designer. After that, click on the “USB” link that corresponds to your processor (in this case for the XP-3) in the Target column. When clicking that, a new window will open that shows all processors in your system. Select that one it corresponds to your processor and click on “Use Select Device”. Then after the window closes click the “Send” button in the Download column.
- Repeat the same process for KX3 Touch Pad.

- There is also a Virtual Panel control provided in the file 그러면 컴퓨터의 컨트롤러가 생성됩니다.


- To launch the Virtual Panel, click the “Send” button like you did with the previous devices. Since this is a virtual device you will be directed to save the Virtual Panel to a location on your computer.

- Once you save the Virtual Panel it will launch.

일반적인 실수:
- "IP 주소" 구성 줄에 잘못된 IP 주소를 입력했습니다.
If you’re failing to communicate with the devices, double check this!
RTI 제어 시스템 연결:

자주 묻는 질문:
Q. No Pulse PRO detected.
A. Automate Pulse PRO가 올바른 네트워크에 연결되어 있는지 확인하고, Automate Shades 앱을 사용하여 IP 주소를 확보하고 네트워크와 계속 통신하는지 확인하세요.
Q. 음영 제한이 제대로 설정되지 않았습니다.
A. Calibrate shade limits with your Rollease Acmeda remote before setting the appropriate open and close time within RTI Control System.
Q. 쉐이드가 전혀 움직이지 않아요.
A. Make sure the selected Pulse PRO Hub is the correct Pulse PRO Hub for the shade to be controlled. Confirm the correct bindings are set in the RIT Control System connections tab between the Pulse PRO Hub and Shade drivers.
Q. We get unexpected responses from the RTI system, or “?” symbols
A. 이더넷 포트 또는 Wi-Fi를 사용하는 모든 연결이 제대로 작동하는지 확인하십시오. 누락된 연결은 원하지 않거나 예상치 못한 결과를 초래하는 것으로 알려져 있습니다.
지원 리소스:
추가 지원이 필요하면 판매점에 문의하거나 다음을 방문하십시오. web사이트에서 www.rolleaseacmeda.com
문서 / 리소스
 |
AUTOMATE Pulse PRO Automate RTI 스마트 쉐이드 컨트롤 [PDF 파일] 사용자 가이드 RTI, Pulse PRO Automate RTI 스마트 쉐이드 컨트롤, Automate RTI 스마트 쉐이드 컨트롤, 스마트 쉐이드 컨트롤, 쉐이드 컨트롤 |