1. 서론
구매해주셔서 감사합니다asing the VANBAR DC509 4K Digital Inner Mirror Drive Recorder. This manual provides detailed instructions for installation, operation, and maintenance to ensure optimal performance and longevity of your device. Please read this manual thoroughly before use and keep it for future reference.
2. 제품 특징
- Genuine Mirror Replacement Design: Replaces your vehicle's original rearview mirror for a seamless, integrated look and eliminates shaking during driving.
- 4K 울트라 HD 녹화: 선명하고 자세한 음식 사진을 촬영합니다.tage with a high-resolution IMX415 sensor.
- Split Camera System: Front and rear cameras are separate, allowing flexible positioning for optimal viewing angles and preventing obstruction of the driver's view.
- 자동 밝기 조절: Equipped with a light sensor to automatically adjust screen brightness for clear visibility in various lighting conditions, day or night.
- HDR/WDR Technology: Enhances image quality in high-contrast environments, reducing overexposure and underexposure.
- 내장 GPS: Records driving route, speed, and location data.
- 주차 모니터링 : Provides 24-hour surveillance with impact detection and time-lapse recording, featuring battery protection.
- Electromagnetic Interference (EMI) Countermeasures: Designed to minimize interference with other vehicle electronics.
- LED Signal Light Compatible: Ensures proper recording of LED traffic signals.
- Anti-Glare Film & Anti-Dazzle Glass: Reduces reflections and glare for improved visibility.
- 방수 후면 카메라: 야외 사용에 적합한 내구성 있는 디자인입니다.
3. 패키지 내용
모든 품목이 모두 있고 상태가 양호한지 확인하세요.
- VANBAR DC509 Digital Inner Mirror Unit
- Front Camera (Split Type)
- 후방 카메라
- Dedicated Mount (Type 1, compatible with 90%+ Japanese car models)
- Power Cable with Built-in GPS Antenna
- 후방 카메라 케이블
- Parking Monitoring Power Cable (with battery protection)
- 64GB microSD 카드
- Anti-Glare Film
- 사용 설명서 (본 문서)
Note: If a different mount is required for your specific car model, please contact VANBAR customer support.
4. 설정 및 설치
4.1. Mirror Unit Installation
- 차량의 원래 후면 커버를 조심스럽게 제거하십시오.view mirror from its base.
- Align the dedicated mount with the mirror unit.
- Insert the screw from the mirror unit into the hole of the mounting bracket.
- Secure the mirror unit to the bracket using the provided fixing screw.
- Insert the screw into the bracket and fix it to the edge mount on your vehicle's windshield.

Image: Step-by-step guide for installing the main mirror unit.
The genuine mirror replacement design ensures a stable installation, eliminating vibrations during driving for clear recording.
4.2. 전면 카메라 설치
- Attach the split front camera directly to the front windshield in an optimal position that does not obstruct your view.
- Adjust the camera angle as needed. The split design allows for flexible positioning.

Image: Illustrates the flexible installation of the split front camera, showing adjustable lens and stable image recording.
4.3. 후방 카메라 설치
- Mount the waterproof rear camera at the rear of your vehicle, typically above the license plate or on the rear window.
- Route the rear camera cable discreetly to the main mirror unit.
4.4. 배선 및 전원 연결
- Connect the power cable (with built-in GPS antenna) to the mirror unit and route it to your vehicle's power source (e.g., cigarette lighter socket or fuse box).
- For parking monitoring, connect the dedicated parking monitoring power cable to the vehicle's fuse box (ACC, constant power, and ground). This cable includes battery protection to prevent discharge.
- Ensure all wiring is hidden for a clean installation and to prevent interference with driving.

Image: Comparison of traditional wiring vs. hidden wiring design for a neat setup.
4.5. MicroSD 카드 삽입
- Insert the provided 64GB microSD card into the designated slot on the mirror unit. Ensure it is inserted correctly until it clicks into place.
5. 사용 설명서
5.1. 전원 켜기/끄기
- The device will automatically power on and begin recording when your vehicle's ignition is turned on.
- 시동을 끄면 자동으로 전원이 꺼집니다.
5.2. 화면 조작
- The 10-inch IPS touch screen allows for intuitive control.
- Swipe left or right to switch between front and rear camera views.
- Tap on the screen to access menu options and settings.
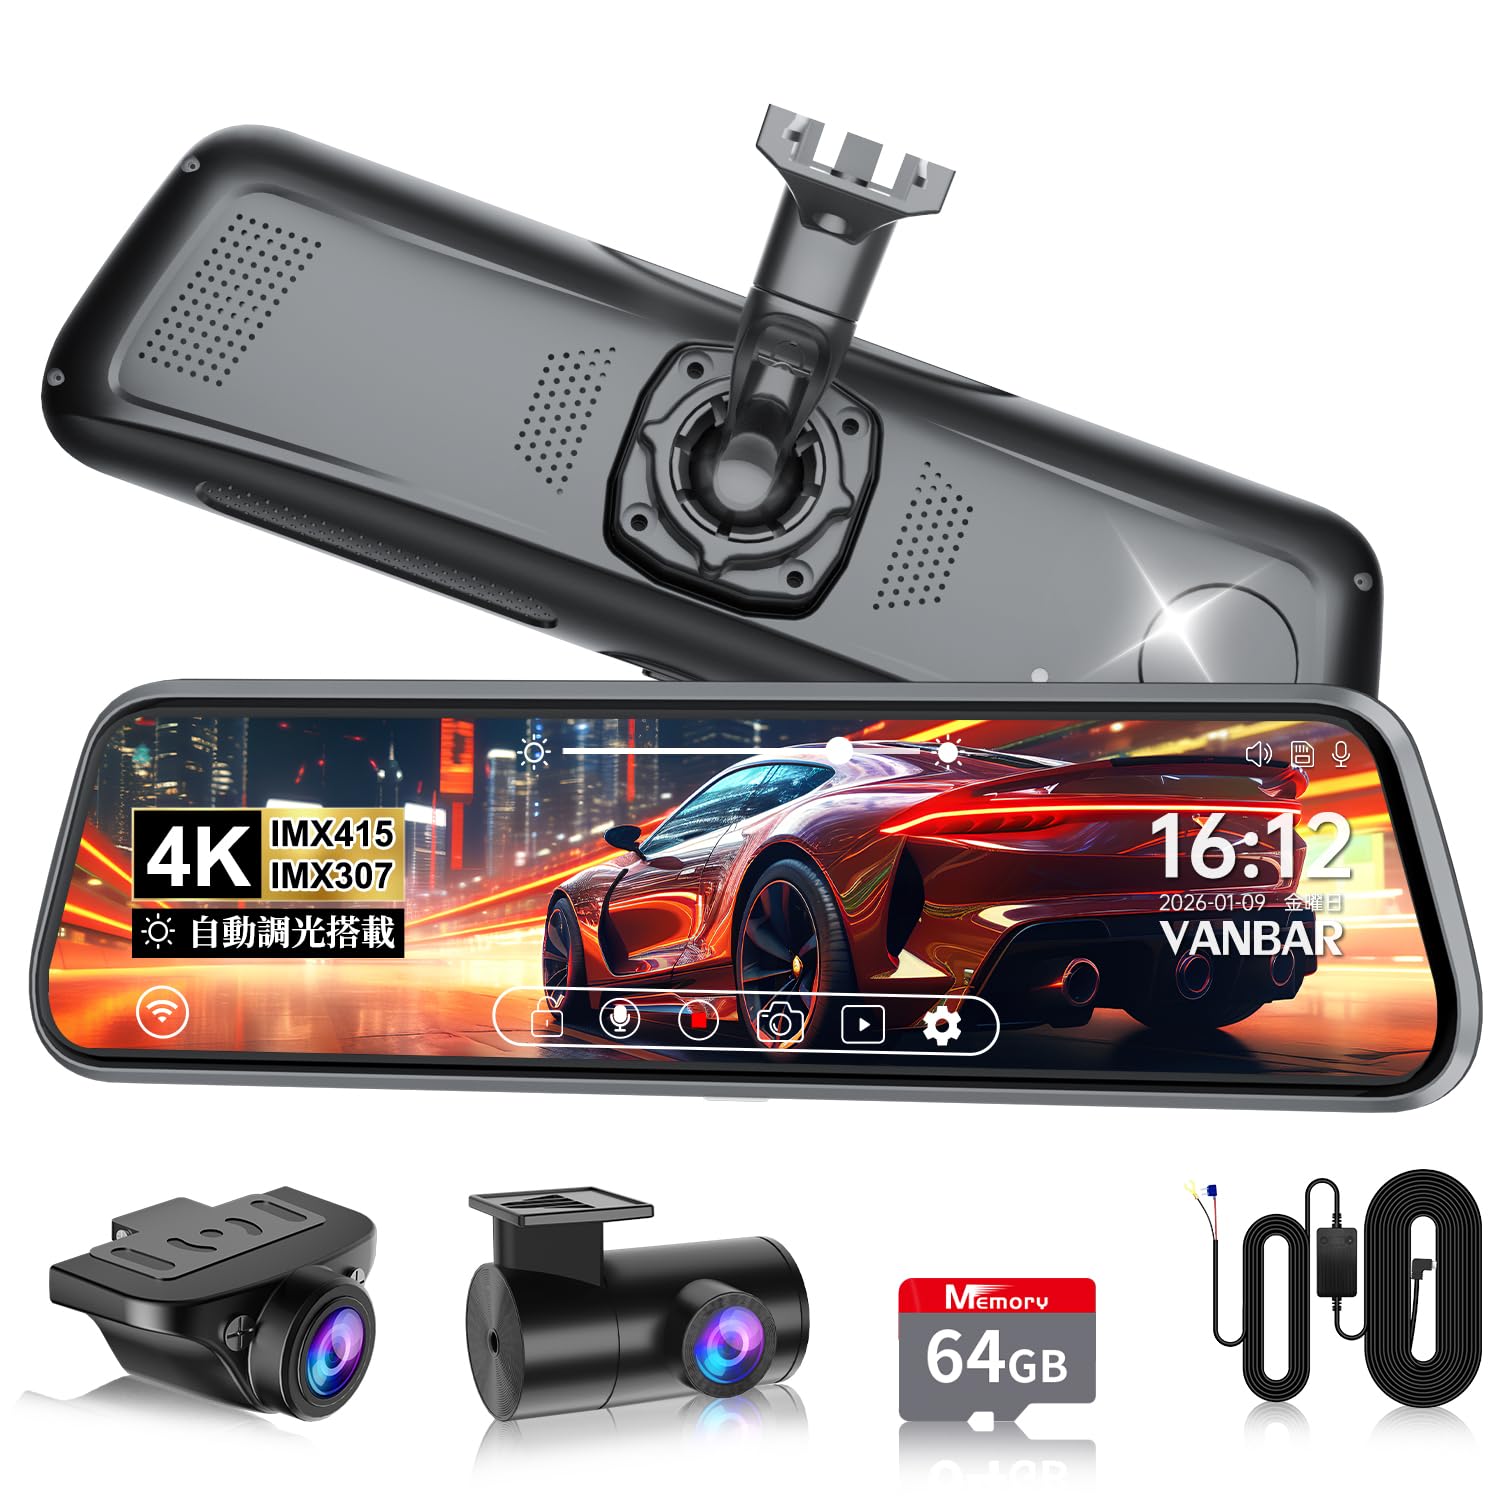
Image: The main display of the VANBAR DC509 showing the digital rearview 거울 기능.
5.3. 자동 밝기 조절
- The built-in light sensor automatically adjusts the screen brightness based on ambient light conditions. No manual adjustment is typically needed.
- This feature ensures clear visibility during bright daylight and prevents glare in tunnels or at night.

Image: Demonstrates the automatic brightness adjustment feature of the display.
5.4. 녹음 모드
- 루프 녹음: 이 장치는 지속적으로 기록하며 가장 오래된 데이터를 덮어씁니다. files 메모리 카드가 가득 찼을 때.
- G-센서(비상 녹화): In case of a sudden impact or collision, the built-in 3-axis G-sensor detects the event and automatically locks the current recording file to prevent it from being overwritten. Sensitivity is 10-level adjustable.
- 주차 모니터링 : When the vehicle is parked, the device can record impacts (impact detection) or use time-lapse recording for extended surveillance. The parking monitoring cable protects your car battery.

Image: Explains the 72-hour parking monitoring function with impact detection, time-lapse recording, and low voltag전자 보호.
5.5. GPS 기능
- The built-in GPS antenna records your vehicle's location, speed, and driving route.
- 이 데이터는 viewed using a dedicated player software on a computer, providing crucial evidence in case of an incident.

Image: Illustrates the GPS tracking feature, showing route and speed data on a map interface.
5.6. Reverse Assist
- When the vehicle is put into reverse gear, the screen automatically displays the rear camera view with adjustable guide lines to assist with parking.

Image: Shows the adjustable back guide lines feature for safe reversing.
6. 유지관리
- 렌즈 청소: Use a soft, lint-free cloth to gently wipe the camera lenses. Avoid using abrasive cleaners or solvents.
- 화면 청소: Use a microfiber cloth specifically designed for electronic screens. Do not spray cleaning solutions directly onto the screen.
- MicroSD 카드 관리: Regularly format the microSD card (at least once a month) through the device's settings to ensure optimal recording performance and prevent data corruption. Back up any important files를 포맷하기 전에.
- 펌웨어 업데이트: Check the official VANBAR website periodically for firmware updates. Keeping your device's firmware up-to-date can improve performance and add new features.
7. 문제 해결
| 문제 | 가능한 원인 | 해결책 |
|---|---|---|
| 장치의 전원이 켜지지 않습니다. | 전원 공급이 안 됨, 연결이 느슨함. | Check power cable connection. Ensure vehicle ignition is on. |
| 녹음이 중지되거나 정지됩니다. | MicroSD card error; card full; low-quality card. | Format the microSD card. Replace with a high-speed, reputable brand microSD card if issues persist. |
| 이미지가 흐릿하거나 불분명합니다. | Dirty lens; protective film still on lens. | Clean camera lenses. Remove any protective films. |
| GPS 신호를 수신하지 못했습니다. | Poor satellite reception; device not positioned correctly. | Ensure the GPS antenna (integrated into the power cable) has a clear view of the sky. Avoid metallic obstructions. |
| Interference with radio/other electronics. | 전자기 간섭. | The DC509 has EMI countermeasures. If interference occurs, try rerouting cables away from sensitive electronics or using ferrite cores. |
If you encounter problems not listed here or if solutions do not resolve the issue, please contact VANBAR customer support.
8. 사양
| 특징 | 세부 사항 |
|---|---|
| 모델 번호 | DC509 |
| 화면 크기 | 10 인치 IPS |
| 화면 밝기 | 1200칸델라/제곱미터 |
| 전면 카메라 센서 | 소니 IMX415 |
| 비디오 해상도 | 4K (Front), Full HD (Rear) |
| 렌즈 조리개 | F1.8 |
| View잉 각도 | 앞쪽 170°, 뒤쪽 150° |
| GPS | 내장형 |
| G센서 | 3-axis, 10-level adjustable |
| 주차 모니터링 | Impact Detection, Time-lapse, Battery Protection |
| 저장 | Supports microSD card (64GB included) |
| 특별 기능 | HDR/WDR, Automatic Brightness Adjustment, LED Signal Compatible, Electromagnetic Interference Countermeasures, Waterproof Rear Camera |
| 치수 | 29.2 x 11 x 9.8 cm; 1.17 kg (Package Size) |
9. 보증 및 지원
The VANBAR DC509 Digital Inner Mirror Drive Recorder comes with a 3년 보증 구매일로부터. 본 보증은 정상적인 사용 중 발생한 제조상의 결함 및 고장에 적용됩니다.
For technical support, warranty claims, or inquiries regarding mount compatibility for your vehicle, please contact VANBAR customer support through the retailer where you purchased the product or visit the official VANBAR web대지.
Please have your purchase receipt and product model number (DC509) ready when contacting support.


