1. 서론
This manual provides detailed instructions for the installation and operation of your ANYFAR Wireless CarPlay/Android Auto Decoder Adapter. This device is designed to upgrade your vehicle's infotainment system, offering enhanced connectivity and features while retaining the original car controls.
1.1 호환 차량 모델
이 디코더는 특히 다음과 호환됩니다. 2012–2015 Audi A8 models equipped with the MMI 3G system설치를 진행하기 전에 차량과의 호환성을 확인하십시오.
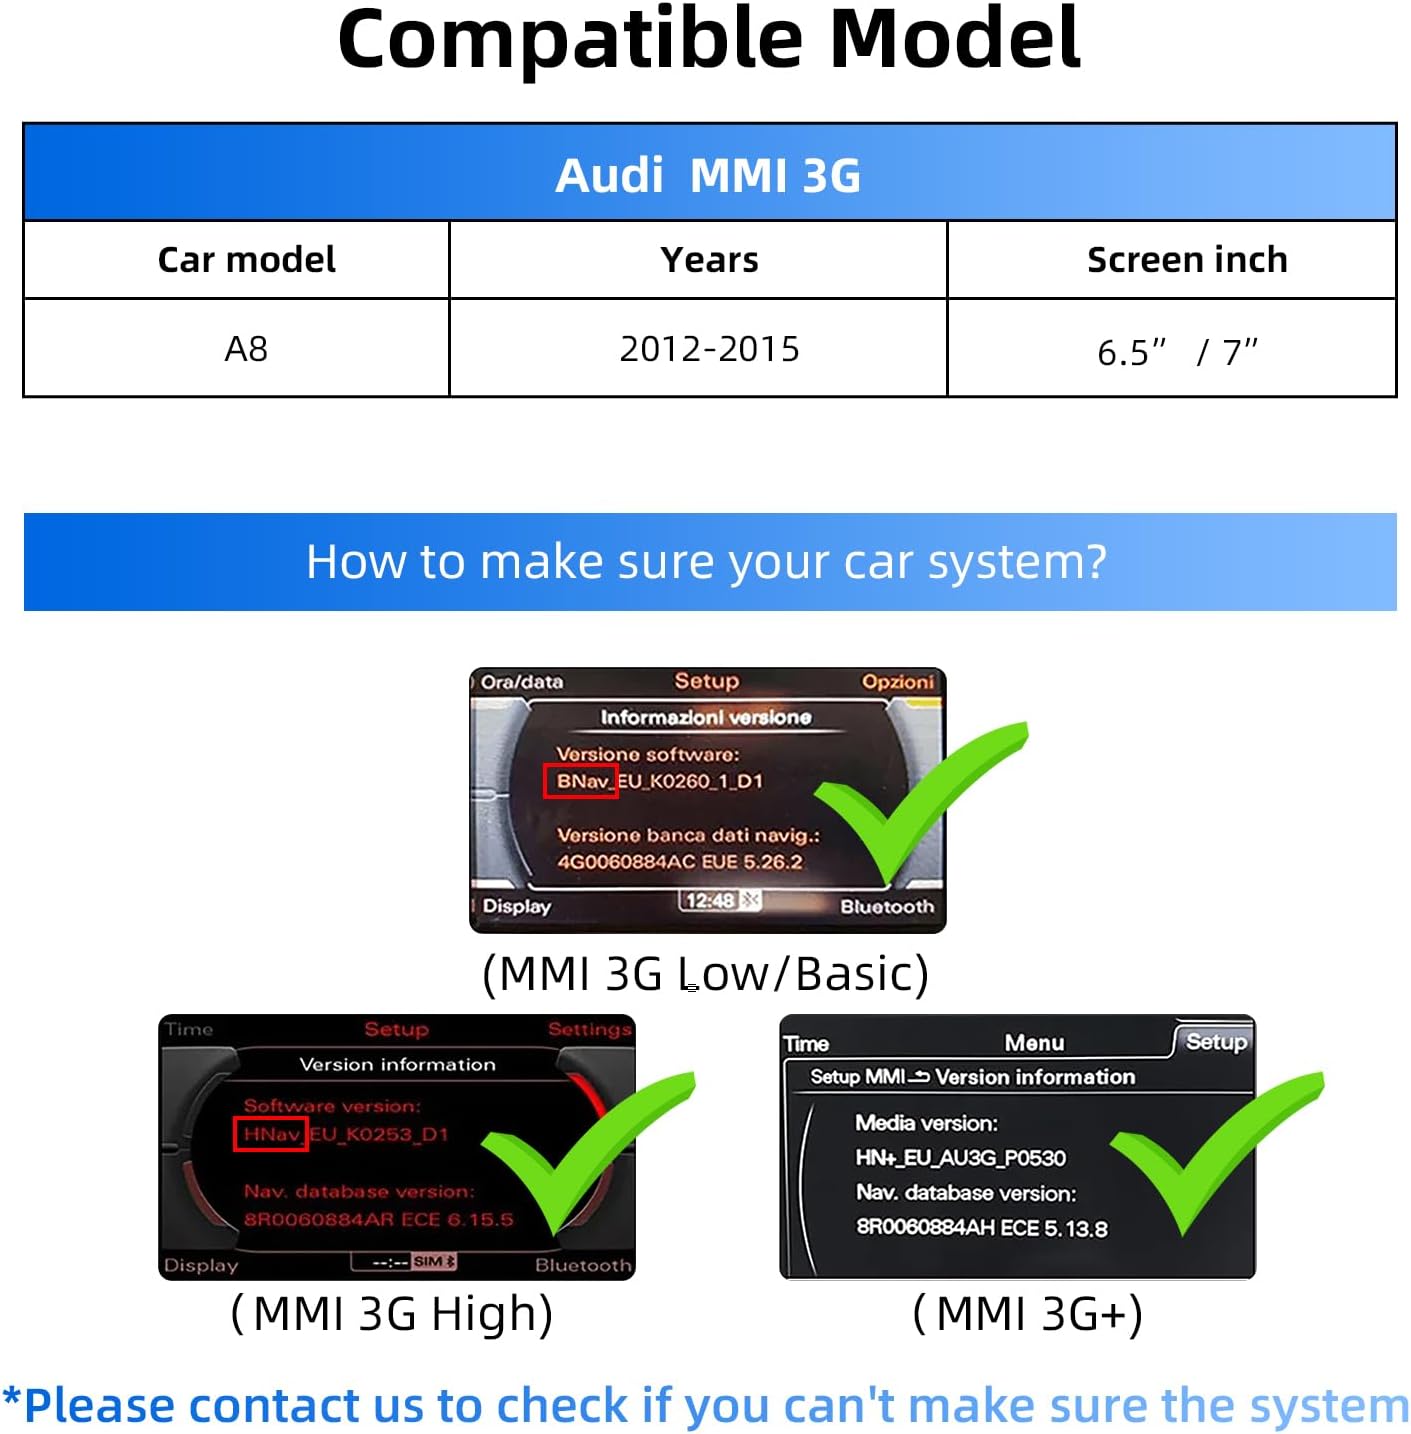
Image: Compatibility table showing Audi MMI 3G models and years.
1.2 주요 특징
- 무선 CarPlay 및 Android Auto: Enjoy full smartphone integration without cables.
- 미러 링크 및 USB 드라이브 재생: Mirror your phone's display or play media from a USB drive.
- 차량용 하이파이 오디오: Digital transmission for high-quality, uninterrupted sound.
- 차량의 원래 제어 장치를 유지하십시오: Continue using your touchscreen, voice control, physical buttons, and knobs.
- 후방 카메라 입력 지원: Connect a backup or front camera for enhanced safety.
2. 패키지 내용
패키지에 모든 품목이 들어 있는지 확인하세요.
- ANYFAR Decoder Box
- RCA/USB 케이블
- 파워 하네스
- LVDS IN/OUT Cable
- 와이파이 안테나
- 사용 설명서 (본 문서)

Image: The decoder box, RCA/USB cable, power harness, LVDS cables, and WiFi antenna.
3. 설치 가이드
중요한: Before starting the installation, turn off the car and disconnect the power to prevent electrical damage.
Video: Detailed installation guide for the ANYFAR CarPlay Decoder in an Audi vehicle.
3.1 분해 단계
- Remove Passenger Side Glove Compartment Panel: Use a plastic trim tool to carefully detach the side cover panel of the passenger-side glove compartment. Slowly pry up the edge of the panel and remove it.
- Remove Horizontal Panel Screws: Remove the upper 8mm screw on the side, then remove the lower 8mm screw.
- Open Glove Compartment & Remove Screws: Open the glove compartment. Remove the first screw on the upper part inside the compartment. Then remove the second screw.
- Remove Horizontal Trim Strip: Using a plastic trim tool, pry open and gradually remove the horizontal trim strip along its bottom edge.
- Remove Small Panel Below Screen: Continue to pry open and remove the small panel below the screen.
- Remove Screen Screws: Use an 8mm tool to remove the screw on the right side of the screen, then the screw on the left side of the screen.
- Remove Center Console Air Outlet Screws: On the center console, remove four screws from above the passenger side glove compartment to below the steering wheel in the driver's seat. This allows the entire central control air outlet component to be removed. Remove the first, second, and third screws.
- Remove Steering Wheel Screws: Finally, remove the screws under the steering wheel.
- Unplug Cross Panel Clips: Use a plastic pry bar to unplug the red clips on the cross panel so that the central air outlet component can be removed later.
- Remove Horizontal Center Console Air Vent Component: Remove the entire horizontal center console air vent component. When disassembling, pay attention to the clips at the edge. Hold it in one hand and release the clip by holding it upward with the other hand. Then the whole air outlet component is removed.
- Remove Bottom Glove Compartment Screws: Next, remove the bottom two screws from the glove compartment.
- Remove Interior Left Side Glove Compartment Screws: In the interior left side of the Audi glove compartment, remove the screws.
- Remove Audio Multimedia Unit: Then remove the audio multimedia unit.
- Extract LVDS Wiring Harness: Extract the LVDS wiring harness of the audio multimedia unit.
3.2 Wiring & Connection
- LVDS 케이블을 연결하세요: Connect one end of the product's LVDS IN/OUT wiring harness to the wire end that was just pulled out from the original multimedia unit, and plug the other end into the LVDS interface of the Audi decoder box.
- Unplug Original Power Plug: Unplug the multimedia power plug of the original car audio.
- Connect Power Cable Bundle: Remove the power cable bundle from the product packaging box and connect the non-clasp connector to the original vehicle power cable. The power cable for audio and multimedia is connected to the snap-on connector.
- 경로 전선: Pass several original wire ends of the vehicle through the bottom rear part of the glove compartment and route them to the front. This will facilitate placing the Audi decoder inside the glove compartment later.
- 디코더 박스 연결: The white connector of the power cable is inserted into the white socket on the left side of the Audi decoder box. Plug the blue end of the LVDS wiring harness into the LVDS interface of the Audi decoder. The RCA/USB wiring harness is inserted into another white port of the Audi decoder box. Insert the WiFi antenna into the Audi decoder box.
3.3 재조립
Install all components back in accordance with the disassembly steps in reverse order. After installation, testing is required to check the screen display and switching functions.
4. 설정 및 페어링
4.1 블루투스 페어링
To enable wireless CarPlay or Android Auto, you need to pair your smartphone via Bluetooth with the decoder adapter. Follow these steps:
- On your car's screen, switch to the CarPlay/Android Auto interface.
- 스마트폰에서 다음 경로로 이동하세요. 설정 > 블루투스.
- 검색 available devices and select the device name displayed on your car's screen (e.g., "CAR-6094").
- 휴대폰과 차량 화면 모두에서 페어링 요청을 확인하세요.
- 메시지가 표시되면 연락처와 즐겨찾기 동기화를 허용합니다.

Image: Bluetooth pairing process between a smartphone and the car's infotainment system.
5. 사용 설명서
5.1 시스템 간 전환
The adapter allows seamless switching between the original Audi MMI system and the CarPlay/Android Auto interface. Use the designated button or control on your car's console to toggle between the systems.

Image: Car screen displaying CarPlay, OEM system, and Android Auto interfaces, demonstrating the dual system switch.
5.2 CarPlay/Android Auto 사용
Once connected, your car's screen will display the CarPlay or Android Auto interface. You can navigate through apps using the original car controls (touchscreen, steering wheel buttons, MMI knob) or voice commands.
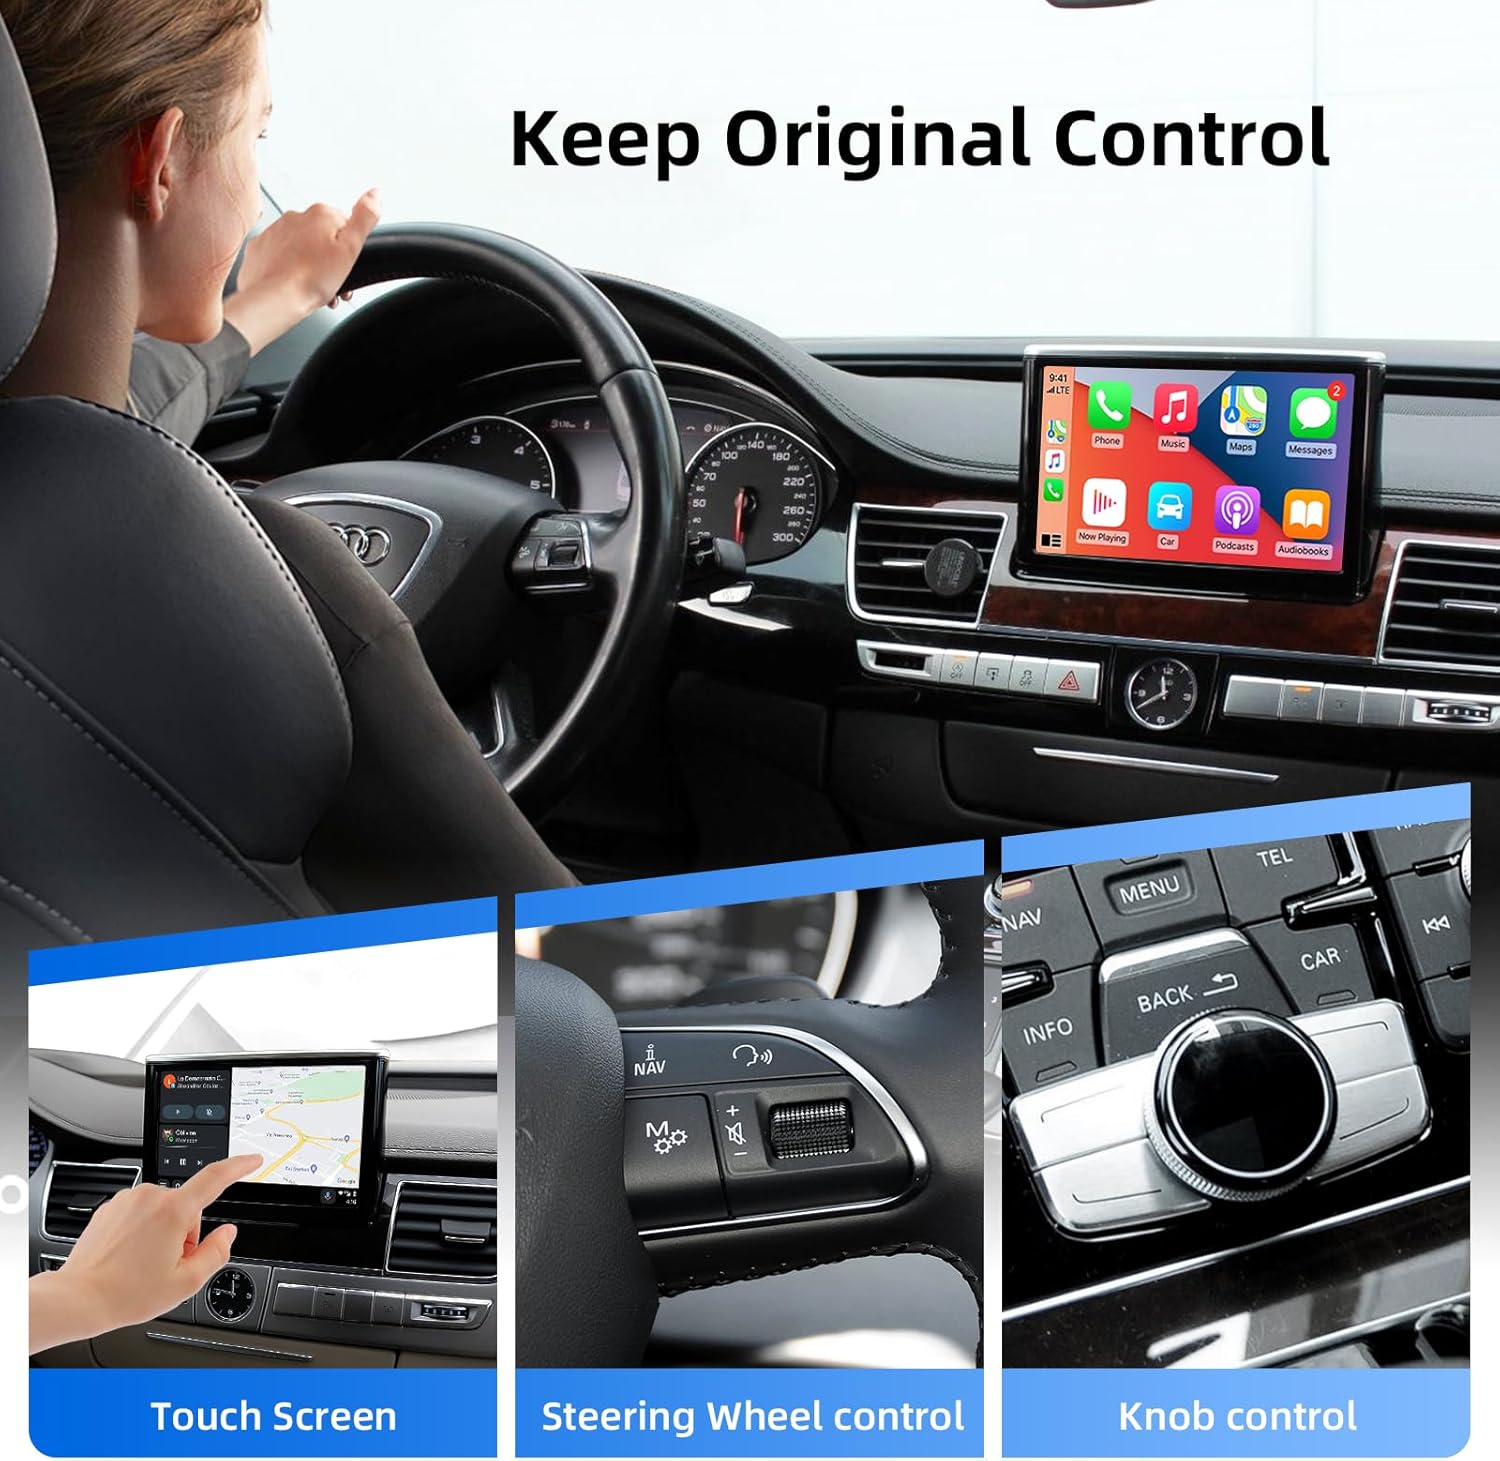
Image: Demonstrates how original car controls (touchscreen, steering wheel, knob) are retained and functional with the adapter.
5.3 음성 제어
Activate your smartphone's voice assistant (Siri for CarPlay, Google Assistant for Android Auto) using the dedicated voice control button on your steering wheel or by saying the wake word. This allows for hands-free operation of navigation, music, calls, and messages.

Image: Illustration of the Smart Voice Assistant feature, supporting both Siri and Google Voice for hands-free operation.
5.4 미러 링크
The Mirror Link feature allows you to cast your phone's screen directly onto the car's display. This is ideal for viewing videos or other content from your device.

Image: A smartphone screen is mirrored onto the car's display, showcasing the Mirror Link functionality.
6. 유지관리
To ensure the longevity and optimal performance of your ANYFAR Decoder Adapter, follow these maintenance guidelines:
- Keep the device and connections clean and free from dust or debris.
- 장치를 극한의 온도나 습기에 노출시키지 마십시오.
- Ensure all cables are securely connected to prevent signal loss or intermittent functionality.
- Periodically check for firmware updates from the manufacturer to ensure compatibility and access to new features.
7. 문제 해결
If you encounter any issues with your ANYFAR Decoder Adapter, please refer to the following common troubleshooting steps:
- 디스플레이 없음/검은 화면:
- Check all cable connections, especially the LVDS cables, to ensure they are securely plugged in.
- Verify that the car's power is properly connected to the decoder.
- Ensure the correct input source is selected on your car's MMI system.
- 소리 없음:
- Check the audio output settings on both your smartphone and the car's MMI system.
- Ensure the AUX input is selected on your car's audio system if required.
- CarPlay/Android Auto Not Connecting Wirelessly:
- Ensure Bluetooth is enabled on your smartphone and paired with the decoder.
- Check your phone's Wi-Fi settings; some systems use Wi-Fi for data transfer after initial Bluetooth pairing.
- 스마트폰과 차량의 인포테인먼트 시스템을 재시작하세요.
- 원래 컨트롤이 작동하지 않습니다:
- Verify that all original wiring harnesses are correctly reconnected.
- Ensure the decoder is receiving power and functioning correctly.
If the issue persists after trying these steps, please contact ANYFAR customer support for further assistance.
8. 사양
| 특징 | 세부 사항 |
|---|---|
| 모델 번호 | RM-AD3505Q |
| 패키지 크기 | 10.63 x 6.69 x 4.33 인치 |
| 품목 무게 | 1.76파운드 |
| 연결 기술 | USB |
| 컨트롤러 유형 | 핸드 컨트롤 |
| 특징 | 핸즈프리 통화 |
| 호환 장치 | 스마트폰 |
| 커넥터 유형 | 마이크로 USB |
| 오디오 출력 모드 | 스테레오 재생 |
9. 보증 및 지원
ANYFAR products are designed for reliability and performance. For warranty information and customer support, please refer to the documentation included with your purchase or visit the official ANYFAR web사이트. 보증 청구를 위해 구매 증빙 자료로 구매 영수증을 보관하세요.
기술 지원이나 문의 사항이 있으시면 ANYFAR 공식 고객 서비스 센터로 연락해 주십시오.


