1. 서론
구매해주셔서 감사합니다asing the Eyoyo EM21A 22-Inch Monitor and TVI/CVI/AHD to HDMI Converter Adapter. This product is designed for continuous surveillance applications, offering a 22-inch Full HD display and a versatile converter for various security camera signals. This manual provides detailed instructions for setup, operation, and maintenance to ensure optimal performance and longevity of your device.
2. 중요한 안전 정보
- 제품을 사용하기 전에 모든 지침을 주의 깊게 읽으십시오.
- 이 설명서를 향후 참고용으로 보관하세요.
- 기기를 비, 습기 또는 극한의 온도에 노출시키지 마세요.
- 과열을 방지하려면 적절한 환기를 유지하세요.
- 제조업체에서 제공한 전원 어댑터만 사용하세요.
- 기기를 직접 분해하거나 수리하지 마십시오. 모든 정비는 자격을 갖춘 기술자에게 맡기십시오.
- Clean the device with a soft, dry cloth. Avoid liquid cleaners.
3. 패키지 내용
개봉 시 포장 내용물을 확인해 주세요. 내용물이 누락되었거나 손상된 경우 판매점에 문의하세요.
- Eyoyo EM21A 22-Inch Monitor
- TVI/CVI/AHD to HDMI Converter Adapter
- 모니터용 전원 어댑터
- Power Adapter for Converter
- HDMI 케이블
- 사용 설명서 (본 문서)
- Monitor Stand (if applicable)
4. 제품 오버view
4.1. Eyoyo EM21A 22-Inch Monitor
The Eyoyo EM21A monitor is designed for continuous 24/7 surveillance. It features a 1920x1080 Full HD display with 99% sRGB color accuracy and 300cd/m² brightness, ensuring clear and vibrant visuals. A 75Hz refresh rate and 5ms response time provide smooth performance for security and surveillance applications.

Image 1: Eyoyo EM21A Monitor in a 24/7 monitoring setup. The screen shows four distinct camera feeds, illustrating its capability for continuous surveillance.
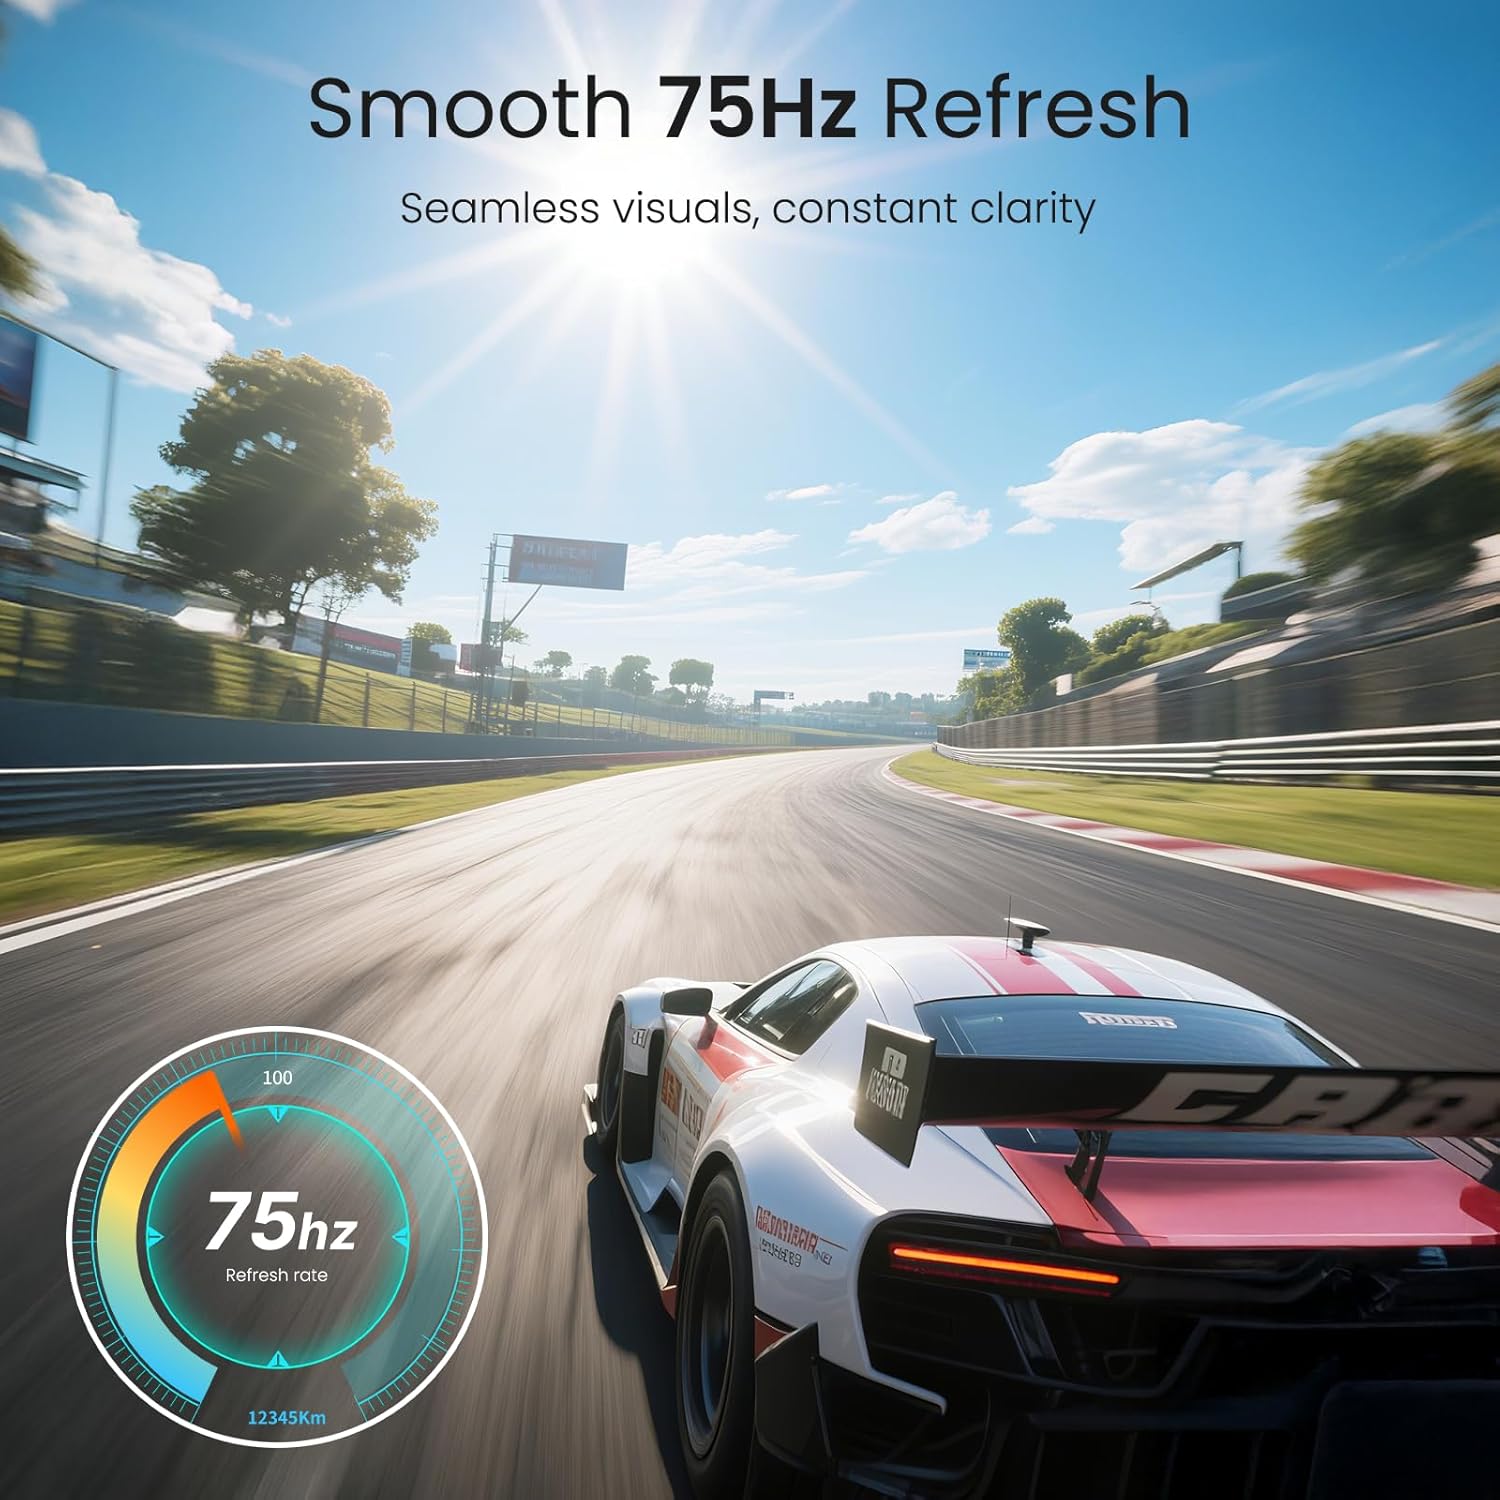
Image 2: Visual representation of the monitor's 75Hz refresh rate, highlighting its ability to deliver seamless and clear visuals.

이미지 3: 후면 view of the Eyoyo EM21A monitor, detailing its multiple interface options including BNC, USB, Audio, AV, HDMI, VGA, and DC power. The image also shows the monitor's adjustable tilt feature.
The monitor offers versatile connectivity with HDMI, VGA, AV, BNC, and USB ports, making it compatible with DVR/NVR systems, computers, and gaming consoles.
4.2. TVI/CVI/AHD to HDMI Converter Adapter
This converter adapter facilitates the connection of TVI, CVI, AHD, and CVBS security camera signals to an HDMI monitor. It supports plug-and-play functionality and automatically recognizes input signals, outputting resolutions up to 1080P HDMI. Additionally, it features a 4K HD CVI/TVI/AHD/CVBS BNC loop output, preserving image brightness, contrast, and color without loss.

Image 4: Illustration of the converter's function, demonstrating how CVI, CVBS, AHD, and TVI camera signals are converted to 1080P HDMI for display on the monitor.
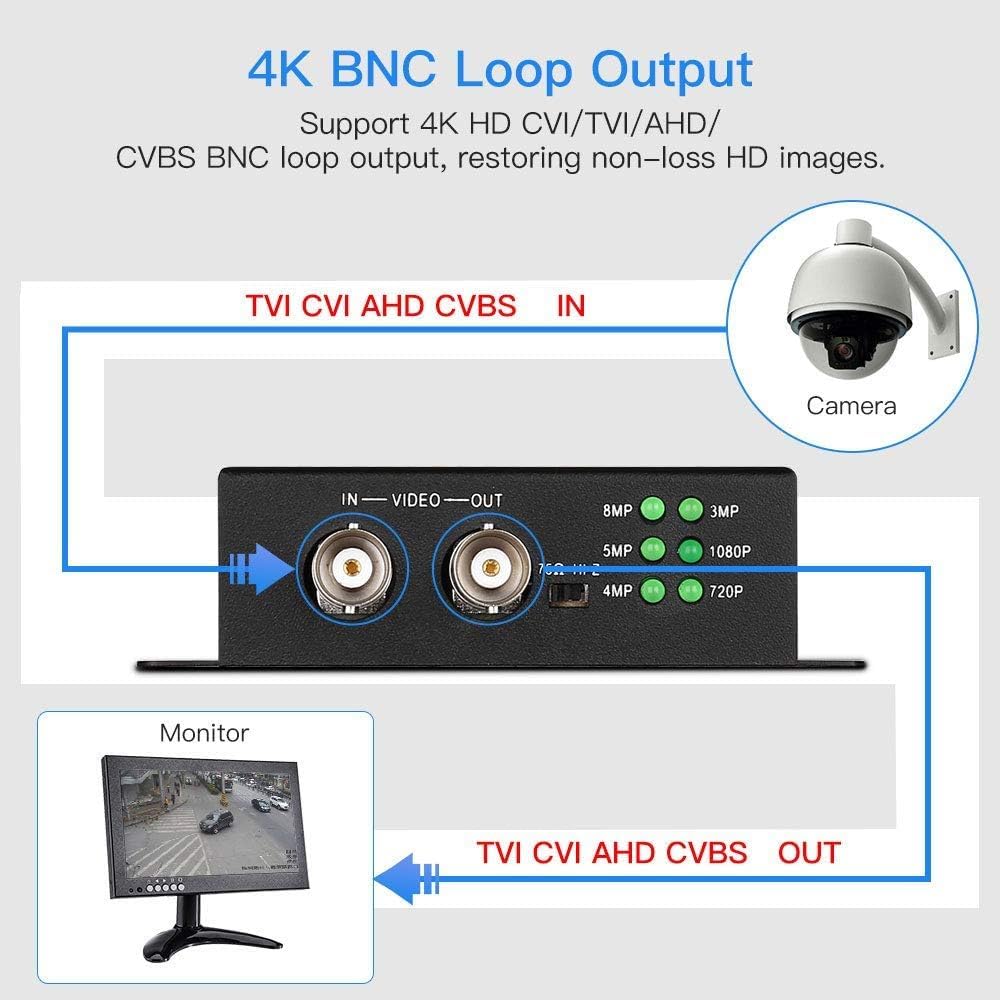
Image 5: Diagram explaining the 4K BNC Loop Output. A security camera connects to the converter's BNC IN, and a BNC OUT connects to a monitor, allowing signal pass-through.

Image 6: Illustration of simultaneous BNC and HDMI output from the converter. A single camera input is split to a BNC output for a tester monitor and an HDMI output for a main monitor.

Image 7: Close-up of the converter showing indicator lights for automatic resolution recognition (720P to 8MP). A table details supported resolutions and frame rates for CVI, TVI, and AHD inputs.
5. 설정 지침
5.1. 모니터 조립
- 모니터와 스탠드 구성품을 포장에서 조심스럽게 꺼내세요.
- Attach the stand base to the stand neck, securing it with the provided screws.
- Connect the assembled stand to the back of the monitor, ensuring it clicks into place or is secured with screws.
- 모니터를 안정적이고 평평한 표면에 놓으십시오.
5.2. Connecting the Converter
- Connect your TVI/CVI/AHD/CVBS security camera to the BNC IN port on the converter using a BNC cable.
- Connect the converter's HDMI 출력 port to the monitor's HDMI 입력 port using the provided HDMI cable.
- 선택 과목: If you need a BNC loop output, connect the converter's BNC 출력 port to another BNC monitor or device.
- 선택 과목: If using the 75Ω/HI-Z impedance switch (refer to Image 7):
- 때 IN port is connected to a security camera and the 밖으로 port is not connected to a DVR/monitor, set the impedance switch to 75Ω.
- 때 밖으로 port is connected to a DVR/monitor, set the impedance switch to 하이지.
5.3. Connecting the Monitor Directly (without converter)
The EM21A monitor can also be used directly with other video sources:
- HDMI 연결: Connect an HDMI cable from your device (e.g., DVR, NVR, PC) to the monitor's HDMI 입력 포트.
- VGA 연결: Connect a VGA cable from your device to the monitor's VGA 입력 포트.
- AV 연결: Connect an AV cable from your device to the monitor's AV IN ports (Yellow for Video, Red/White for Audio).
- BNC Connection: Connect a BNC cable from your security camera (CVBS only) or DVR to the monitor's BNC IN 포트.
5.4. 전원 켜기
- Connect the monitor's power adapter to the 직류전원 port on the monitor, then plug it into a power outlet.
- Connect the converter's power adapter to the converter's power input, then plug it into a power outlet.
- 모니터의 전원 버튼을 눌러 켭니다.
- The converter is typically plug-and-play and will power on automatically when connected to power.
6. 사용 설명서
6.1. Monitor Controls
The monitor typically features control buttons (often on the front or bottom bezel) for navigating the On-Screen Display (OSD) menu. Common buttons include:
- 전원 버튼: 모니터를 켜거나 끕니다.
- 메뉴 버튼: OSD 메뉴를 엽니다.
- 위/아래/왼쪽/오른쪽 버튼: 메뉴 옵션을 탐색하고 설정을 조정합니다.
- 입력/확인 버튼: 선택 사항을 확인합니다.
- 입력/소스 버튼: Cycles through available input sources (HDMI, VGA, AV, BNC).
6.2. OSD 메뉴 탐색
- 를 누르세요 메뉴 OSD 메뉴를 열려면 버튼을 클릭하세요.
- Use the navigation buttons to select categories such as Picture, Color, OSD Settings, or Input Source.
- 누르다 엔터/확인 하위 메뉴로 들어가거나 설정을 확인하려면.
- Adjust values using the navigation buttons.
- 누르다 메뉴 again or an 출구 button (if available) to close the OSD menu.
6.3. Using the Converter
The converter is designed for ease of use:
- Once powered on and connected, the converter will automatically detect the input signal type (TVI/CVI/AHD/CVBS).
- The resolution indicator lights on the converter (refer to Image 7) will illuminate to show the detected input resolution.
- The converted HDMI signal will be output to the connected monitor.
7. 유지관리
- 화면 청소: 부드럽고 보풀이 없는 천으로 화면을 부드럽게 닦으세요. 잘 지워지지 않는 얼룩의 경우,ampen the cloth slightly with water or a screen-specific cleaning solution. Do not spray liquid directly onto the screen.
- C 청소asing: Use a soft, dry cloth to wipe the monitor and converter casing. 연마성 세척제나 용제 사용을 피하세요.
- 통풍: Ensure that the ventilation openings on the monitor and converter are not blocked to prevent overheating.
- 사용하지 않을 때 전원 끄기: For extended periods of inactivity, it is recommended to power off both the monitor and converter and unplug them from the power outlet.
8. 문제 해결
8.1. 힘이 없다
- Ensure both the monitor and converter power adapters are securely connected to the device and a working power outlet.
- 다른 장치를 연결해 전원 콘센트가 작동하는지 확인하세요.
- 모니터의 전원 버튼이 눌러져 있는지 확인하십시오.
8.2. 신호 없음 / 검은 화면
- Confirm all video cables (BNC, HDMI, VGA, AV) are securely connected to both the source device and the monitor/converter.
- If using the converter, ensure the camera is connected to the BNC IN and the monitor to the HDMI 출력.
- 를 누르세요 입력/소스 button on the monitor to cycle through available inputs and select the correct one (e.g., HDMI for converter output).
- Check the camera or source device to ensure it is powered on and outputting a signal.
- If using the converter, check the resolution indicator lights to confirm it is detecting an input signal.
- Verify the 75Ω/HI-Z impedance switch on the converter is set correctly according to your connection (refer to Section 5.2).
8.3. Distorted or Poor Image Quality
- 모든 케이블이 올바르게 연결되어 있고 손상되지 않았는지 확인하십시오.
- Adjust the monitor's display settings (brightness, contrast, sharpness) via the OSD menu.
- Check the resolution output of your source device or converter to ensure it is compatible with the monitor.
- If using the converter, ensure the input signal from the camera is stable and clear.
9. 사양
9.1. Eyoyo EM21A 22-Inch Monitor
| 화면 크기 | 22 인치 |
| 해결 | 1920x1080 풀 HD |
| 새로 고침 빈도 | 75Hz |
| 응답 시간 | 5ms |
| 명도 | 300cd/m² |
| 색상 정확도 | 99% sRGB |
| 입력 인터페이스 | HDMI, VGA, AV, BNC, USB |
| 용법 | 24/7 Surveillance, CCTV, Camera Monitor |
9.2. TVI/CVI/AHD to HDMI Converter Adapter
| 입력 신호 | TVI, CVI, AHD, CVBS |
| 출력 신호 | HDMI (1080P), BNC Loop Output (4K HD CVI/TVI/AHD/CVBS) |
| HDMI 출력 해상도 | 최대 1080P |
| BNC Loop Output Resolution | 최대 4K(8MP) |
| 특징 | Plug and Play, Automatic Signal Recognition, Impedance Switch (75Ω/HI-Z) |
Note: For detailed supported resolutions and frame rates for CVI, TVI, and AHD inputs, please refer to Image 7 in Section 4.2.
10. 보증 및 지원
Eyoyo 제품은 뛰어난 신뢰성과 성능을 위해 설계되었습니다. 본 제품에는 제조사 표준 보증이 적용됩니다. 제품 패키지에 동봉된 보증서를 참조하시거나 Eyoyo 공식 웹사이트를 방문하십시오. web자세한 보증 약관은 해당 사이트에서 확인하세요.
For technical support, troubleshooting assistance, or service inquiries, please contact Eyoyo customer support through the contact information provided on the official Eyoyo website or your purchase documentation. When contacting support, please have your product model (EM21A) and purchase details ready.