1. 서론
Thank you for choosing the VANBAR DC209Pro-02 4K Split Mirror Dash Cam. This device is designed to enhance your driving safety and provide reliable recording of your journeys. It features a high-resolution front camera, a waterproof rear camera, advanced driver assistance systems (BSD and LCA), GPS functionality, and 24-hour parking monitoring. Please read this manual thoroughly before installation and operation to ensure proper use and optimal performance.
2. 주요 특징
- Ultra HD 4K Front & 2.5K Rear Recording: 선명하고 자세한 음식 사진을 촬영합니다.tage with an 8-megapixel IMX415 sensor for the front camera and 2.5K for the rear, ensuring critical details like license plates are visible.
- 분할형 디자인: The front camera is separate from the main mirror unit, allowing for flexible installation and a wider, clearer front view.
- 사각지대 감지(BSD) 및 차선 변경 보조(LCA): Advanced driver assistance systems that detect vehicles in your blind spots or rapidly approaching from behind in adjacent lanes, providing visual and audible alerts.
- Super Night Vision with HDR: Equipped with an F1.8 bright lens and HDR technology, the dash cam provides excellent visibility in low-light conditions, capturing clear images even at night or in tunnels.
- GPS 기능 통합: Records driving speed, direction, and location data along with video footage, which can be reviewed on a computer to track your route.
- 24시간 주차 모니터링: Automatically records when impact is detected while parked, providing security against hit-and-runs or vandalism. Requires a hardwire kit (included).
- G-센서 및 루프 레코딩: The built-in G-sensor detects sudden impacts and automatically locks the current video file to prevent it from being overwritten. Loop recording ensures continuous recording by overwriting the oldest files 메모리 카드가 가득 찼을 때.
- 음성 제어: Allows hands-free operation for various functions, enhancing driving safety.
- Adjustable Backup Camera: The rear camera supports horizontal and vertical image reversal, and the backup guidelines can be adjusted to suit your vehicle, displaying the adjusted angle on subsequent uses.
- Type-C Power Cable: Upgraded to Type-C for improved charging speed, stability, durability, and heat resistance compared to traditional Type-B cables.
- TS Format Recording: Utilizes TS (MPEG2-TS) format for faster transfer speeds and enhanced data integrity, preventing data loss during recording errors.
- 128GB MicroSD Card Included: Comes with a Class 10 high-durability 128GB microSD card, ready for immediate use.
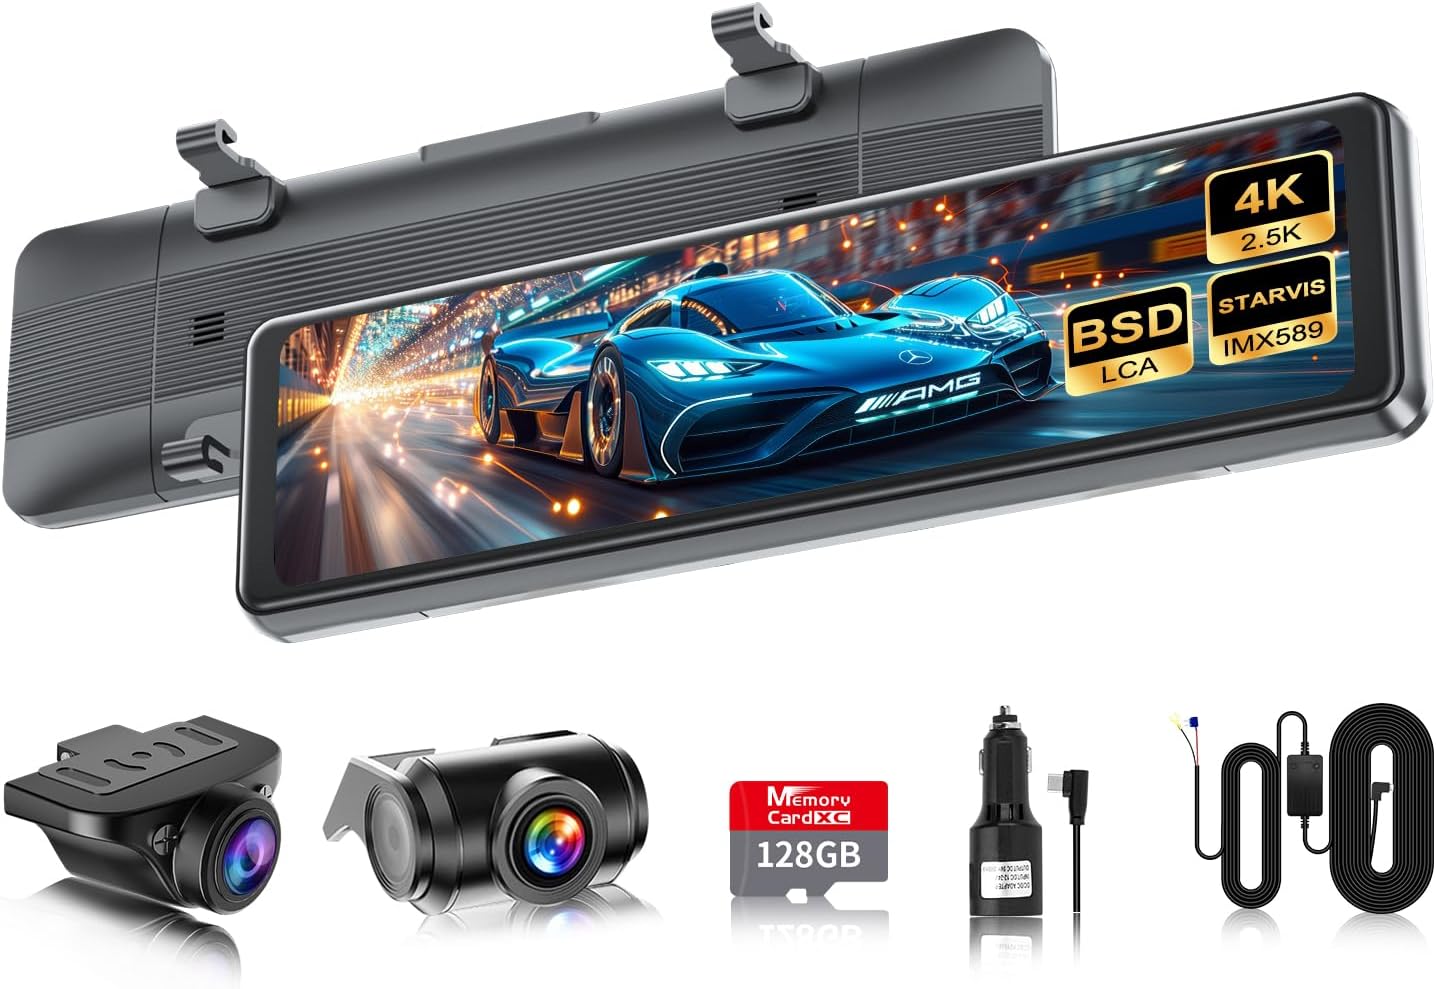
Image: The VANBAR DC209Pro-02 dash cam main unit, separate front camera, rear camera, 128GB microSD card, car charger, and power cables.

Image: Visual representation of the dash cam's key features including 4K UHD, IPS display, BSD, LCA, anti-interference, voice control, 24-hour parking monitoring, GPS, night vision, impact recording, loop recording, and backup guidelines.
3. 설정 가이드
3.1 설치 전 확인
Before installing the device in your vehicle, connect the power cable and perform a functional test. Use the included cigarette lighter cable for this test. This ensures the device is working correctly before permanent installation.
3.2 MicroSD 카드 삽입
Insert the included 128GB Class 10 microSD card into the designated slot on the main unit. Ensure it is inserted correctly until it clicks into place.
3.3 Main Unit Installation (Mirror Dash Cam)
- 차량의 기존 후방 미러 위에 메인 미러 유닛을 부착하십시오.view mirror using the provided rubber straps. Ensure it is securely fastened and does not obstruct your view.
- Adjust the angle of the mirror unit for optimal view주고받음.
3.4 Front Camera Installation (Split Type)
- Mount the separate front camera on your windshield, ideally behind the original rearview mirror, to ensure a clear and unobstructed view 앞으로의 길에 대하여.
- Connect the front camera cable to the main mirror unit. Route the cable neatly along the windshield trim to avoid interference with driving.

Image: Illustration of the split-type front camera installation, showing how it provides a wider and clearer field of view compared to integrated designs.
3.5 후방카메라 설치
The included rear camera cable is 8 meters long. If a longer cable is required, please contact customer support. For some vehicle types, a dedicated bracket may be necessary for installation; consult our service center if needed.
- Mount the waterproof rear camera at the rear of your vehicle, typically above the license plate or on the rear window.
- Route the rear camera cable from the back of the vehicle to the main mirror unit, ensuring it is secured and protected from external elements.
- 후방 카메라 케이블을 본체에 연결합니다.

Image: Depicts the rear camera installation and the options for horizontal and vertical image reversal to adapt to different mounting positions.
3.6 전원 연결
- Standard Power (Cigarette Lighter): Connect the Type-C power cable to the main unit and the cigarette lighter adapter to your vehicle's 12V power outlet. The device will power on/off with your vehicle's ignition.
- 24-Hour Parking Monitoring (Hardwire Kit): Use the included hardwire cable to connect the dash cam directly to your vehicle's fuse box. This enables continuous power for 24-hour parking monitoring. Refer to the hardwire kit instructions for detailed installation.

Image: Shows the Type-C power cable connection via cigarette lighter adapter and the hardwire cable for enabling 24-hour parking monitoring.
4. 사용 설명서
4.1 전원 켜기/끄기
- 오토매틱: The device will automatically power on and begin recording when the vehicle's ignition is turned on (if connected via cigarette lighter or hardwire kit). It will power off automatically when the ignition is turned off.
- 수동 : Press and hold the power button on the side of the unit to manually turn it on or off.
4.2 터치스크린 인터페이스
The DC209Pro-02 features an 11-inch IPS full touch panel for easy navigation. The user interface is designed for intuitive operation, with clear icons for various functions.

Image: Shows the intuitive UI design with various icons for functions like recording, playback, settings, and BSD/LCA adjustments.
4.3 녹음 모드
- 연속 루프 녹음: The device records continuously in short segments (e.g., 1, 3, or 5 minutes). When the microSD card is full, the oldest unlocked files는 자동으로 덮어씌워집니다.
- G-Sensor (Impact Recording): In the event of a sudden impact or collision, the built-in G-sensor automatically detects it and locks the current video file루프 기록으로 인해 덮어쓰기가 방지됩니다.
- 주차 모니터링 : When the vehicle is parked and the hardwire kit is installed, the dash cam will automatically start recording if it detects an impact, providing surveillance for your parked vehicle.
4.4 Driver Assistance Systems (BSD & LCA)
- 사각지대 감지(BSD): Detects obstacles (vehicles or pedestrians) in your blind spots. It displays a frame (blue for safe distance, yellow for dangerous distance) on the screen and provides an audible warning to alert the driver.
- 차선 변경 보조 시스템(LCA): Detects vehicles rapidly approaching from behind in adjacent lanes. It displays an orange indicator on the left or right side of the monitor (depending on the direction of the approaching vehicle) and provides an audible warning.
- 조정: Both BSD and LCA sensitivity, speed, and detection range can be adjusted through the device settings to match your driving habits.

Image: Illustrates how the BSD system detects vehicles in blind spots with visual frames and how the LCA system alerts for rapidly approaching vehicles in adjacent lanes.
4.5 음성 제어
The device supports voice commands for functions such as starting/stopping recording, taking photos, and switching display modes. Refer to the on-screen prompts or the full instruction manual for a list of available commands.
4.6 GPS Data Review
Recorded GPS data (speed, direction, location) can be reviewed using dedicated player software on a computer. This allows you to visualize your driving route alongside the video footage.

Image: Demonstrates the GPS tracking feature, showing how recorded video can be viewed with an overlay of the vehicle's route on a map.
4.7 후방 카메라 기능
When shifting into reverse, the rear camera display automatically appears on the screen, and the camera angle adjusts downwards. The length and angle of the backup guidelines can be freely adjusted to match your vehicle. These adjustments are saved for future use.

Image: Illustrates the adjustable backup guidelines, showing how they can be moved up, down, left, and right to assist with parking maneuvers.
5. 유지관리
5.1 MicroSD 카드 관리
- Regularly format the microSD card (e.g., once a month) to maintain optimal recording performance and prevent data corruption. This can be done through the device settings.
- While the included card is high-durability, frequent overwriting can eventually degrade any memory card. Consider replacing the microSD card periodically (e.g., annually) for best reliability.
5.2 청소
- Use a soft, dry cloth to clean the main unit's screen and camera lenses. Avoid abrasive materials or chemical cleaners that could damage the surfaces.
- Ensure the rear camera lens is clean for clear rear view 푸tage, especially after driving in adverse weather conditions.
5.3 온도 고려 사항
The device is designed to withstand various temperatures. However, prolonged exposure to extreme heat (e.g., direct sunlight in a parked car during summer) or extreme cold can affect performance and lifespan. If possible, park in shaded areas or remove the device during extreme conditions.
6. 문제 해결
| 문제 | 가능한 원인 | 해결책 |
|---|---|---|
| 장치의 전원이 켜지지 않습니다. | Loose power connection, faulty power adapter, vehicle's power outlet issue. | Check all power connections. Ensure the cigarette lighter adapter is fully inserted or the hardwire kit is correctly installed. Test the power outlet with another device. |
| 녹음이 중단되거나 file손상되었습니다. | MicroSD card is full, faulty microSD card, incompatible microSD card, card not formatted. | Format the microSD card regularly. Ensure you are using the included Class 10 high-durability card or a similar high-quality card. Replace the card if issues persist. |
| Image is blurry or unclear (especially at night). | Dirty camera lens, protective film still on lens, extreme lighting conditions. | Clean the camera lenses. Ensure any protective films are removed. While the device has night vision, extreme darkness or bright headlights can still affect clarity. |
| Text (e.g., license plates) appears reversed. | Incorrect image flip setting for the rear camera. | Access the settings menu and adjust the horizontal/vertical flip options for the rear camera until the text appears correctly. |
| BSD/LCA alerts are too frequent or not appearing. | Sensitivity settings are too high/low, sensor obstruction. | Adjust the sensitivity and detection range settings for BSD/LCA in the menu. Ensure the rear camera lens is clean and unobstructed. |
| GPS 데이터가 기록되지 않았거나 정확하지 않습니다. | GPS module not connected, poor satellite signal. | Ensure the GPS module is properly connected and placed where it has a clear view 하늘의. |
7. 사양
| 특징 | 세부 사항 |
|---|---|
| 상표 | 반바 |
| 모델명 | VANBAR Drive Recorder Mirror Type |
| 제품 모델 번호 | DC209PRO |
| 크기 | DC209Pro-02 |
| 제품 치수 | 27.3 x 4.5 x 7.1cm; 1.18kg |
| 전면 카메라 해상도 | 4K(3840*2160P) |
| 후면 카메라 해상도 | 2.5K(2560*1440P) |
| 감지기 | IMX415 CMOS Sensor |
| 표시하다 | 11-inch IPS Full Touch Panel |
| 특별 기능 | G-Sensor, Parking Monitor, Voice Alert, Voice Control, Reverse Assist, BSD, LCA, GPS, WDR, Night Vision, Loop Recording |
| 포함된 구성 요소 | Charging cable, 128GB MicroSD card, Hardwire cable, Anti-reflection film, User Manual |
| 배터리 포함 | 아니요 |
8. 보증 및 지원
VANBAR is committed to providing high-quality products and excellent customer service. If you encounter any issues or have questions regarding your DC209Pro-02 dash cam, please do not hesitate to contact our support team.
- Extended Cord Offer: Participate in our activities to receive an extended cord free of charge (no shipping or handling fees). Please contact us if needed.
- 지원팀에 문의: For any inquiries, technical assistance, or warranty claims, please reach out to VANBAR customer support via phone, email, or LINE.

Image: Illustration indicating customer support availability via phone, email, and LINE.


