중요한 안전 정보
Please read this manual carefully before installation and use. Keep this manual for future reference.
- 중량 용량: 최대 하중 33파운드(15kg)를 초과하지 마십시오. 이 한도를 초과하면 심각한 부상이나 재산 피해가 발생할 수 있습니다.
- 모니터 크기: The monitor arm supports monitors up to 42 inches. The VESA extender supports monitors from 17 to 35 inches. Ensure your monitor's size and weight are within these limits.
- VESA 호환성: The arm supports VESA patterns 75x75mm and 100x100mm. The extender converts these to 200x100mm and 200x200mm. Verify your monitor's VESA pattern before installation.
- 책상 두께: C-CLamp requires a desk thickness between 0.39 inches (10mm) and 2.76 inches (70mm). Ensure your desk can support the combined weight of the arm, monitor, and extender.
- 집회: Assemble the product according to the instructions. Improper assembly may cause damage or serious personal injury.
- 움직이는 부품: This product contains moving parts. Exercise caution during adjustment to avoid pinching or crushing injuries.
- 유지: Periodically check all screws and connections to ensure they are secure. Retighten as necessary.
패키지 내용
Verify that all components are present and undamaged before proceeding with installation. If any parts are missing or damaged, please contact MOUNTUP customer support.
- 모니터 암 어셈블리
- C-Clamp 베이스
- VESA Extender Bracket (2 pieces)
- VESA Extender Plate
- 하드웨어 키트(나사, 와셔, 스페이서, 육각 렌치)

이미지: 이상view of the MOUNTUP Heavy Duty Single Monitor Arm, including the main arm, C-clamp, and the VESA extender components.
명세서
| 상표 | 마운트업 |
| 모델 | Heavy Duty Single Monitor Arm with VESA Extender |
| Monitor Arm Compatibility | Monitors up to 42 inches |
| VESA Extender Compatibility | Monitors 17-35 inches |
| 중량 용량 | 4.4 - 33파운드(2 - 15kg) |
| VESA Patterns (Arm) | 75x75mm, 100x100mm |
| VESA Patterns (Extender) | Converts to 200x100mm, 200x200mm, 150x150mm, 100x200mm |
| 책상 두께(C-Cl)amp) | 0.39~2.76인치(10~70mm) |
| 높이 범위 | 9.3~22.1인치 |
| 최대 확장 | 23.8인치 |

Image: Illustration highlighting the monitor arm's robust load capacity of up to 33 lbs.

Image: Diagram showing the monitor arm's height adjustment range from 9.3 to 22.1 inches and a maximum extension of 23.8 inches.
설정 및 설치
Step 1: Install the C-Clamp 베이스
- C-cl 배치amp base on the edge of your desk.
- Ensure the desk thickness is between 0.39 and 2.76 inches.
- C-cl을 조입니다amp screw until the base is securely fastened to the desk. Do not overtighten.

Image: The monitor arm's C-clamp securely attached to a desk, demonstrating its stable mounting.
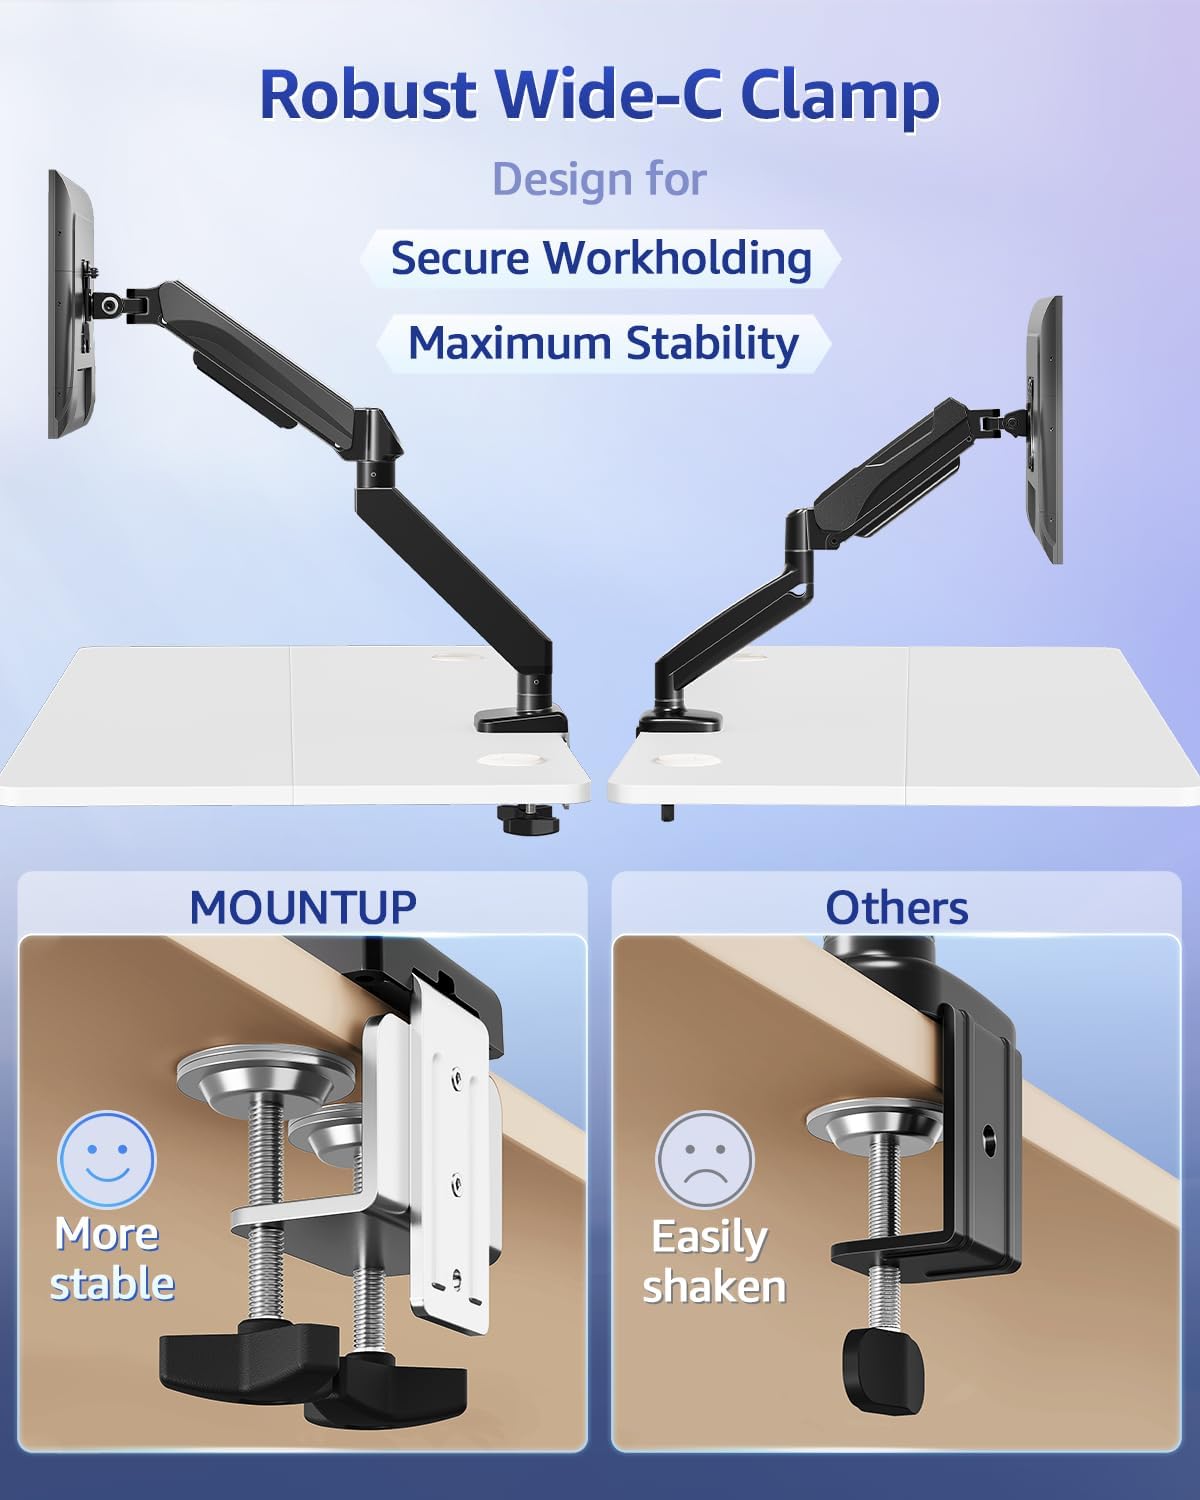
Image: A visual comparison highlighting the wider and more stable design of the MOUNTUP C-clamp compared to a standard clamp.
Step 2: Assemble the VESA Extender (if needed)
If your monitor has a VESA pattern larger than 100x100mm (e.g., 200x100mm or 200x200mm), use the VESA extender bracket.
- Attach the two extender brackets to the VESA extender plate using the provided screws. Ensure the ridge on the extender plate aligns with the brackets for a secure fit.
- Securely fasten the extender assembly to your monitor's VESA mounting holes using the appropriate screws from the hardware kit.

Image: Step-by-step visual guide for assembling the VESA extender brackets onto the main plate using screws.

이미지: 자세한 view of the VESA extender plate, showing its design for adapting to various VESA patterns.

Image: A diagram illustrating the various VESA patterns (200x100mm, 150x150mm, 200x200mm, 100x200mm) supported by the extender.

Image: A visual comparison showing a monitor that previously could not be mounted (before) and how the VESA extender enables mounting for larger VESA patterns (after).
Step 3: Attach Monitor to Arm
- Slide the monitor (with or without the VESA extender attached) onto the VESA head of the monitor arm.
- Secure the monitor to the VESA head using the provided screws. Ensure all screws are tightened to prevent the monitor from detaching.
작동 지침
모니터 위치 조정
The MOUNTUP monitor arm allows for flexible adjustment of your monitor's position to achieve optimal ergonomics.
- 높이 조정: Gently push or pull the monitor up or down to the desired height. The gas spring mechanism will hold it in place.
- 기울기 조정: Tilt the monitor screen up or down to reduce glare and find a comfortable view잉 각도.
- 회전 조정: Rotate the monitor horizontally (left or right) to share your screen or change view잉 방향.
- 회전 조정: 모니터를 360도 회전하면 가로 모드와 세로 모드가 전환됩니다.
장력 조정
If the monitor arm is too stiff or too loose, you may need to adjust the gas spring tension.
- Locate the tension adjustment screw on the arm (usually near the pivot points).
- Use the provided Allen wrench to turn the screw:
- 회전하다 시계방향 (-) 에게 줄이다 tension (for lighter monitors or if the arm is too stiff).
- 회전하다 반시계 방향(+) 에게 증가하다 tension (for heavier monitors or if the arm sags).
- Adjust gradually and test the arm's movement after each adjustment until it holds your monitor securely at any position.
유지
- 청소: Wipe the monitor arm and VESA extender with a soft, damp 천으로 닦아주세요. 마감재를 손상시킬 수 있는 연마성 세제나 용제는 사용하지 마세요.
- 정기 점검: Regularly inspect all screws and connections (C-clamp, VESA plate, arm joints) to ensure they remain tight. Retighten any loose fasteners to maintain stability and safety.
- 매끄럽게 하기: The gas spring mechanism is maintenance-free and does not require lubrication.
문제 해결
Monitor Sags or Does Not Hold Position
- 해결책: The gas spring tension is likely too low for your monitor's weight. Increase the tension by turning the adjustment screw counter-clockwise (+) with the provided Allen wrench until the arm can hold the monitor in place.
- 중량 확인: Ensure your monitor's weight is within the 4.4 - 33 lbs capacity.
Arm is Too Stiff to Move
- 해결책: The gas spring tension is likely too high. Decrease the tension by turning the adjustment screw clockwise (-) with the provided Allen wrench.
Monitor Wobbles
- 해결책: Check if the C-clamp is securely tightened to the desk. Ensure all VESA mounting screws are tight. Verify that the monitor arm joints are properly secured.
- 책상 안정성: Ensure your desk itself is stable and not prone to wobbling.
보증 및 지원
MOUNTUP products are designed for durability and performance. For specific warranty information, please refer to the documentation included with your purchase or visit the official MOUNTUP web대지.
If you encounter any issues or have questions regarding the installation or operation of your MOUNTUP Heavy Duty Single Monitor Arm and VESA Extender, please contact MOUNTUP customer support for assistance.
연락처 정보: Please refer to your product packaging or the MOUNTUP official web최신 고객 지원 연락처 정보는 사이트에서 확인하세요.


