소개
Thank you for choosing the GMBACK Wireless Pro Controller. This manual provides detailed instructions for setting up, operating, and maintaining your controller to ensure optimal performance and an enhanced gaming experience. Please read this manual thoroughly before use.
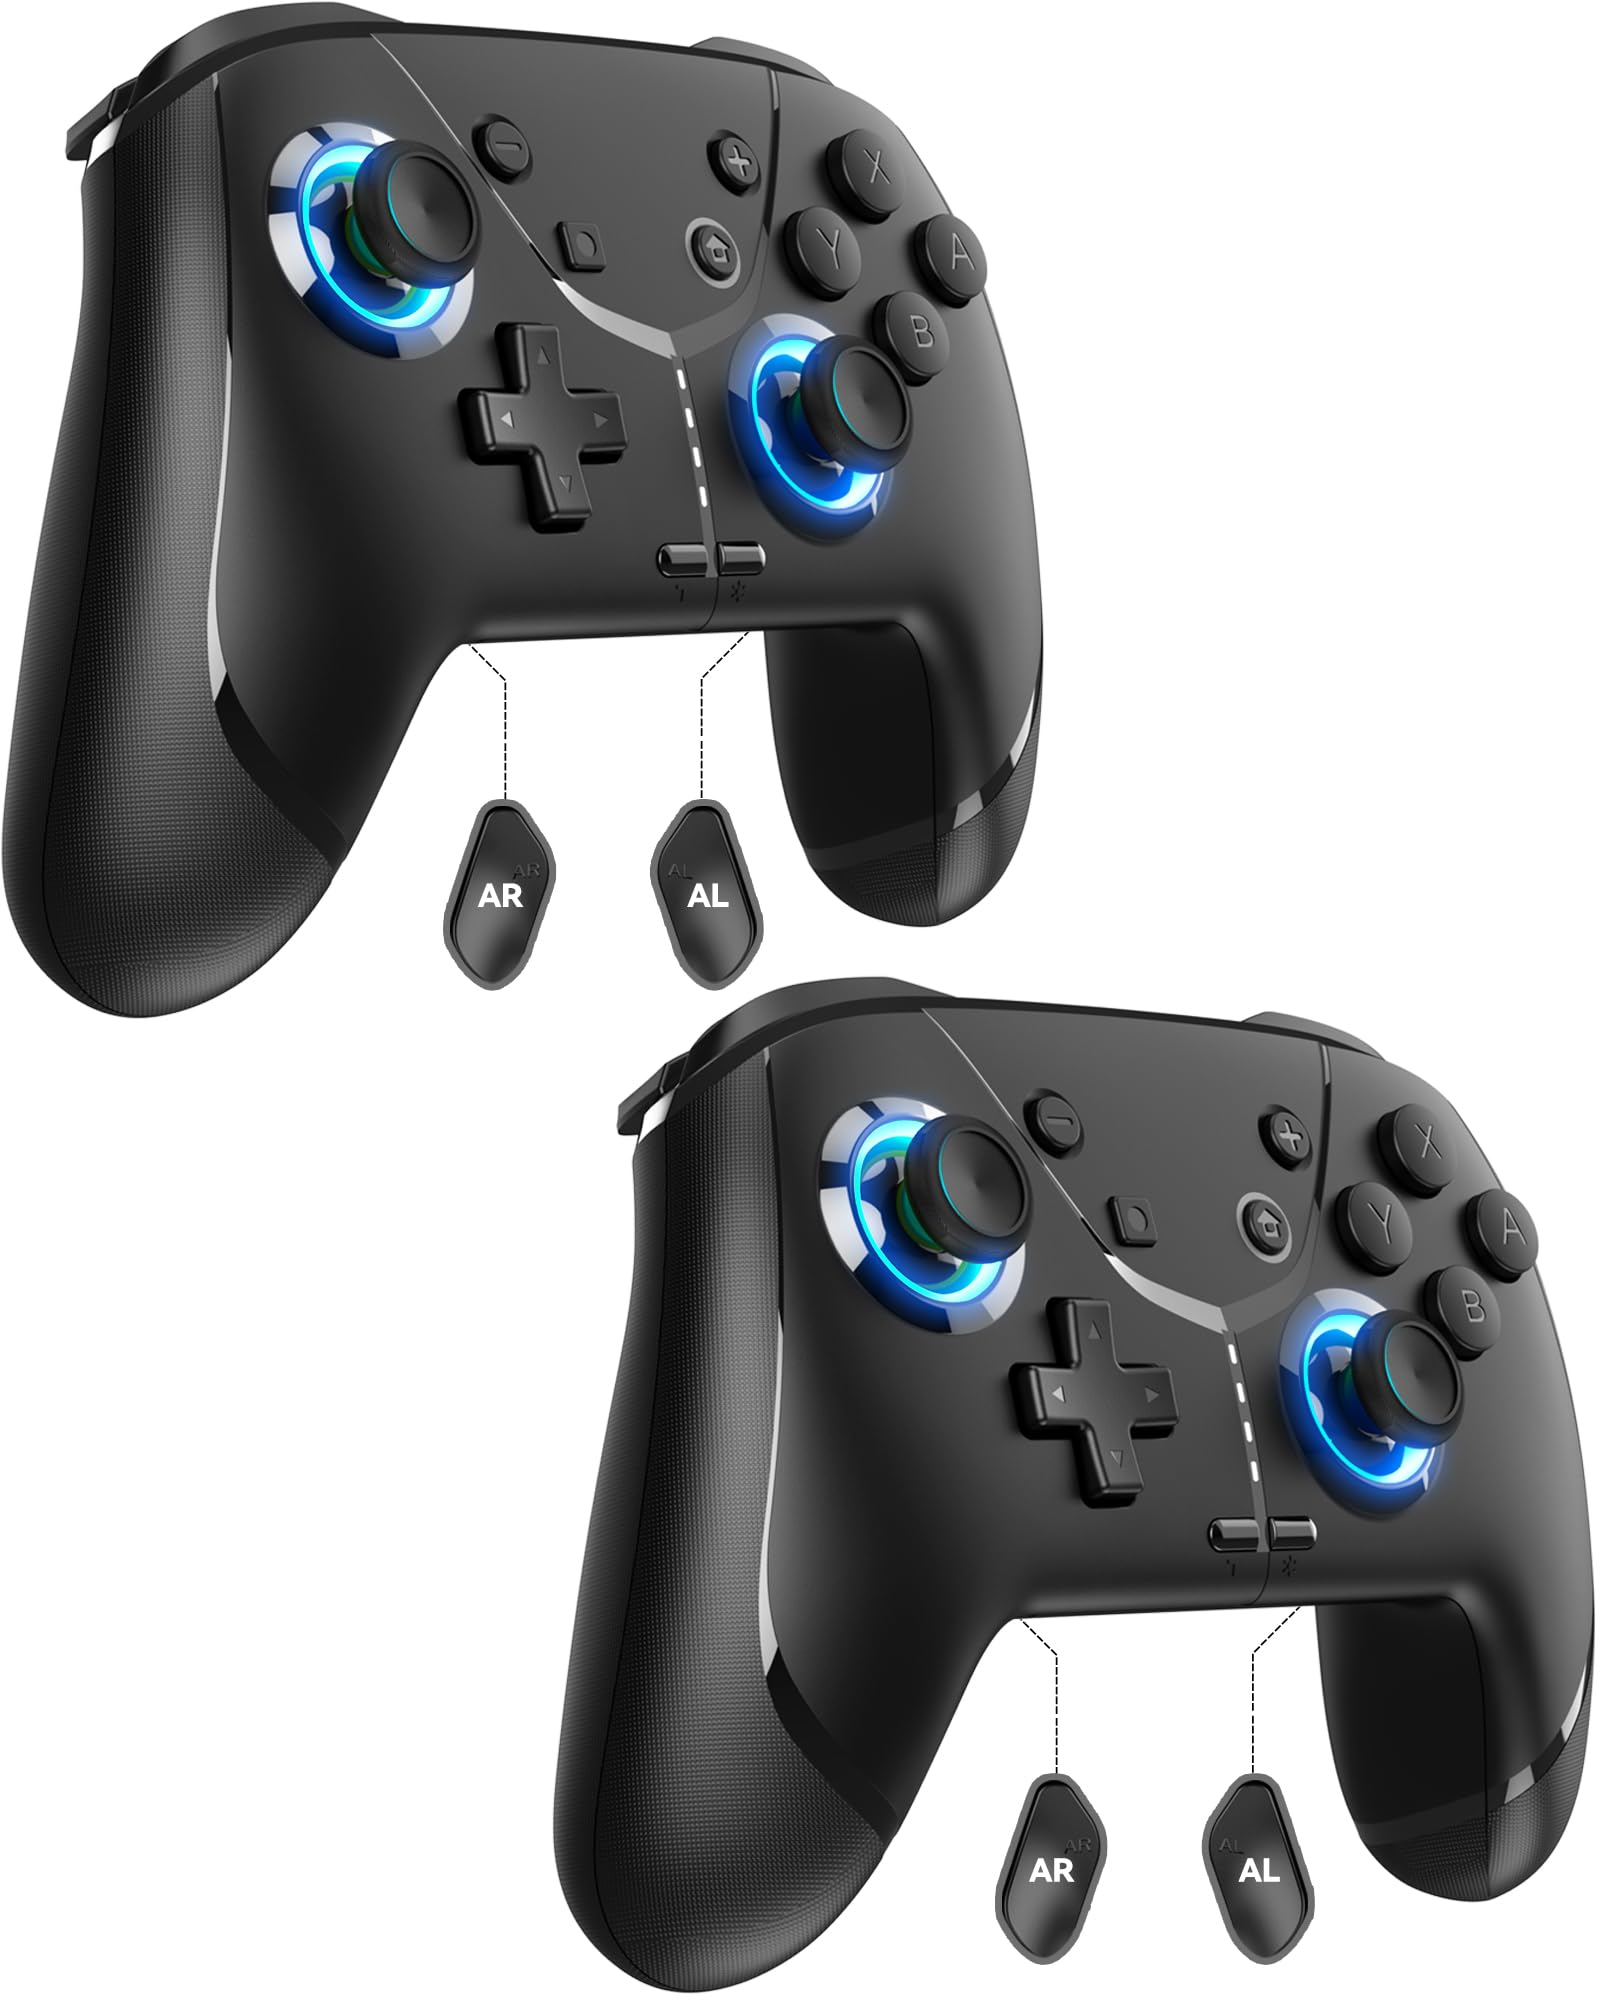
Image: GMBACK Wireless Pro Controller, front view.
패키지 내용
- 2 x GMBACK Wireless Pro Controllers
- 2 x USB-C 충전 케이블
- 1 x 사용자 설명서
시작하기
1. 닌텐도 스위치와의 페어링
- Nintendo Switch 콘솔의 전원이 켜져 있고 최신 시스템 소프트웨어로 업데이트되어 있는지 확인하세요.
- 홈 메뉴에서 '컨트롤러', 그 다음에 '그립/순서 변경'.
- On the GMBACK controller, press and hold the 동기화 버튼 (located on the top edge near the USB-C port) for 3-5 seconds until the LED indicators begin to flash rapidly.
- The controller will automatically pair with the Switch. Once paired, the player LED(s) on the bottom of the controller will light up solid.

Image: GMBACK Wireless Pro Controller connected to a Nintendo Switch console.
2. PC 연결 (유선)
- Connect the GMBACK controller to your PC using the provided USB-C cable.
- 컨트롤러는 표준 게임패드로 인식됩니다. 드라이버가 자동으로 설치될 수 있습니다.
- For optimal compatibility, ensure your PC's operating system is up to date.
3. 컨트롤러 충전
- 제공된 USB-C 케이블을 사용하여 컨트롤러를 USB 전원(예: 스위치 도크, PC, USB 벽면 어댑터)에 연결합니다.
- The LED indicators will show charging status. A full charge typically takes 2-3 hours.
- The controller features an 800mAh battery, providing approximately 15-20 hours of playtime on a full charge.

Image: Visual representation of the 800mAh battery, 15-20 hours playtime, and 2-3 hours charging time.
주요 특징 및 기능
1. Loop Macro Function
The controller supports a loop macro function, allowing you to record and replay a sequence of up to 30 seconds of button presses and joystick movements. This includes joysticks, triggers, D-pad, ABXY, and +/- buttons.
- 기록하다: Refer to the detailed instructions in the included user manual for specific recording steps.
- To Start/Stop Loop: 잡아라 터보 버튼 그리고 매크로 버튼 simultaneously. The controller will automatically replay your recorded actions in a continuous loop.

이미지: 후면 view of the controller highlighting the AR and AL programmable buttons and the text 'Loop Macro Function'.
2. 6축 자이로 센서
The integrated 6-axis gyro sensor provides precise motion detection, allowing for intuitive control in compatible games that utilize motion sensing. This enhances immersion and gameplay accuracy.

Image: Controller being used for a racing game, illustrating the 6-Axis Gyro Sensor feature.
3. Customizable Turbo Function
The controller offers three adjustable turbo speeds for rapid-fire actions. This feature can be set to either auto-fire or manual-fire mode.
- To Adjust Turbo Speed: Refer to the included user manual for specific button combinations to cycle through the three turbo speeds.
- To Activate/Deactivate Turbo: 를 누르세요 터보 버튼 along with the desired action button.

Image: Controller displaying the 'Auto & Manual Turbo' feature with a gaming background.
4. Dual Vibration Adjustment
Experience immersive feedback with four levels of dual vibration intensity: None, Weak, Medium, and Strong. Adjust the vibration to your preference for different games.
- To Adjust Vibration: Consult the user manual for the specific button combination to cycle through vibration levels.

Image: Controller illustrating the four levels of dual vibration: None, Weak, Medium, Strong.
5. RGB 조명
The controller features dynamic RGB lighting around the joysticks, enhancing the visual appeal during gameplay. The lighting can be adjusted or turned off.
- To Adjust RGB Lighting: Refer to the user manual for instructions on changing lighting modes or turning off the lights.

이미지: 컨트롤러 표시asing its RGB lighting feature around the joysticks.
6. Remappable ABXY Buttons
The ABXY buttons can be remapped to switch between Nintendo Switch and Xbox layouts, providing flexibility for different gaming preferences without needing to physically remove any buttons.
- To Remap ABXY: Follow the instructions in the user manual for the specific button sequence to switch layouts.

Image: Controller illustrating the ABXY button function switching between Nintendo Switch and Xbox layouts.
7. Screenshot and Home Wake-up
- The controller includes a dedicated 스크린 샷 버튼 for capturing in-game moments.
- 그만큼 홈 버튼 can be used to wake up your Nintendo Switch console from sleep mode.
유지
- 청소: 부드럽고 마른 천을 사용하여 컨트롤러를 청소하세요. 강한 화학 물질이나 연마재는 사용하지 마세요.
- 저장: 컨트롤러는 직사광선과 극한의 온도를 피해 서늘하고 건조한 곳에 보관하세요.
- 배터리 관리 : 배터리 수명을 연장하려면 컨트롤러를 자주 완전히 방전시키지 마십시오. 계속 사용하지 않더라도 정기적으로 충전하십시오.
문제 해결
- 컨트롤러가 연결되지 않음:
- 컨트롤러가 충전되어 있는지 확인하세요.
- Verify the Switch is in 'Change Grip/Order' mode.
- Try restarting both the Switch and the controller.
- 다른 무선 장치가 간섭을 일으키지 않는지 확인하세요.
- 버튼이 응답하지 않음:
- Check if the controller is properly paired.
- Test button functionality in Switch system settings.
- Ensure the controller's firmware is up to date (if applicable, check GMBACK support web대지).
- 충전 문제:
- Use the provided USB-C cable.
- 다른 USB 전원을 사용해 보세요.
- 컨트롤러의 충전 포트가 깨끗하고 이물질이 없는지 확인하십시오.
명세서
| 특징 | 세부 사항 |
|---|---|
| 모델 | HD6900 |
| 호환성 | Nintendo Switch 2, Switch, Switch Lite, Switch OLED, Windows PC (wired) |
| 배터리 용량 | 800mAh |
| 노는 시간 | 15-20시간 |
| 충전 시간 | 2-3시간 |
| 연결성 | 무선(블루투스), 유선(USB-C) |
| 특별 기능 | Loop Macro, 6-Axis Gyro Sensor, Dual Vibration (4 levels), Adjustable Turbo (3 speeds), RGB Lighting, Remappable ABXY, Screenshot, Home Wake-up |
| 품목 무게 | 8.5 온스 |
| 패키지 크기 | 6.54 x 5.31 x 5.28 인치 |
공식 제품 영상
비디오: 끝view of the GMBACK Wireless Switch Controller, demonstrating its features and compatibility with Nintendo Switch, Switch Lite, and Switch OLED consoles.
보증 및 지원
GMBACK products come with a standard manufacturer's warranty. For detailed warranty information, technical support, or any inquiries regarding your controller, please refer to the contact information provided on the product packaging or visit the official GMBACK web대지.

Image: Icon representing customer support.
