1. 중요한 안전 정보
조립 및 사용 전에 모든 지침을 읽고 이해하시기 바랍니다. 나중에 참고할 수 있도록 이 설명서를 보관하십시오.
- Always follow the assembly instructions carefully. Ensure all parts are securely fastened before use.
- Use caution when adjusting the leg pads to prevent injury or instability.
- Do not overload the table. The maximum load capacity for the top surface is 100 lbs (45 kg), and each internal shelf is 50 lbs (22.7 kg). Overloading may cause the table to tip over, resulting in injury or damage.
- 어린이와 애완동물이 조립 구역에 접근하지 못하도록 하세요. 작은 부품은 질식 위험을 초래할 수 있습니다.
- Ensure the charging station is connected to a properly grounded outlet. Do not expose the charging station to moisture.
2. 제품 오버view
The ONBRILL Oval End Table is designed for versatile use in various settings, offering both storage and convenient charging capabilities.
주요 특징:
- 통합 충전 스테이션: Equipped with 2 standard power outlets, 1 USB port, and 1 Type-C port for convenient device charging.
- Sliding Tambour Door: Provides easy access to the storage compartment while maintaining a clean aesthetic.
- Adjustable Internal Shelf: Allows customization of storage space to accommodate various item sizes.
- 조절 가능한 다리 패드: 고르지 않은 바닥 표면에서도 안정성을 보장합니다.
- 내구성 있는 구조: Made from wood and metal components for lasting use.
제품 크기:
16"D x 20"W x 23.5"H (40.6cm D x 50.8cm W x 59.7cm H)
Item Weight: 20 Pounds (9.07 kg)
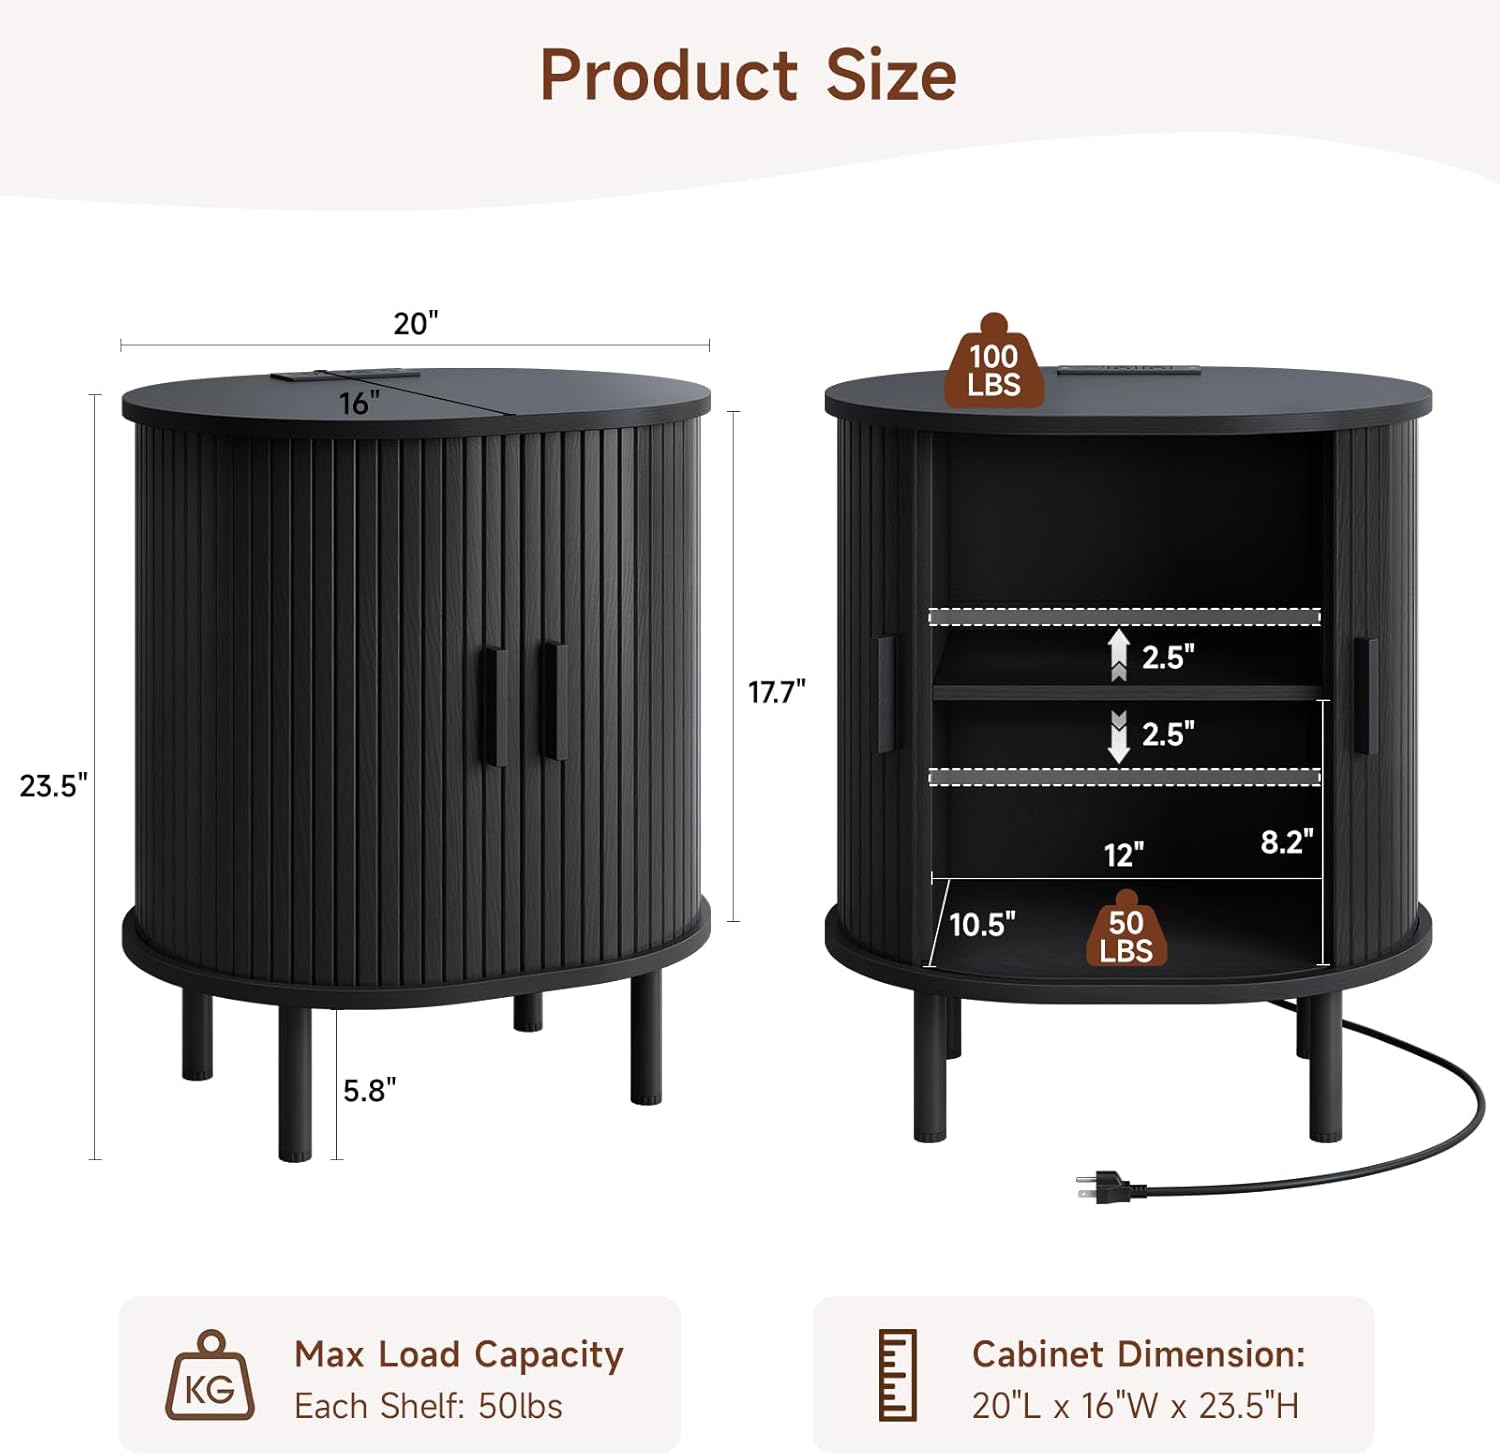
그림 2.1: 제품 크기 및 하중 용량
3. 조립 설명서
All parts and accessories are numbered for easy identification. Follow the steps below carefully. Tools recommended for assembly include a hammer and screwdriver.
조립 비디오 가이드:
Video 3.1: ONBRILL End Table Installation Guide
This video provides a comprehensive visual guide for assembling your ONBRILL Oval End Table. It demonstrates each step from unboxing to final setup, including the installation of the charging station and adjustable shelf.
단계별 조립:
- 측면 패널을 준비하세요: Insert cam bolts (B) into the designated holes on the side panels (parts 3 and 4). Ensure they are screwed in firmly.
- 가로대를 부착하세요: Connect the crossbar (part 5) between the two side panels (3 and 4) using cam locks (A). Tighten the cam locks to secure the connection.
- 하단 패널을 삽입하세요: Slide the bottom panel (part 6) into the grooves of the assembled side structure.
- Attach Top Panel (Base): Secure the oval base panel (part 2) to the top of the assembled structure using cam bolts (C) and screws (D).
- 뒷면 패널을 삽입하십시오: Carefully slide the back panel (part 6, if applicable, or the second bottom panel) into the rear grooves of the structure.
- Prepare Top Surface: Insert cam bolts (B) into the underside of the main oval top surface (part 1).
- Attach Main Top Surface: Align the main oval top surface (part 1) with the assembled structure and secure it using cam locks (A) and screws (C).
- 다리 설치: Attach the four legs (L) to the bottom of the table using the provided screws (F). Ensure they are tightly fastened.
- 선반 고정핀 설치: Insert the shelf pins (K) into the desired height adjustment holes on the inner side panels.
- 문 손잡이를 부착하세요: Secure the handles (part 9) to the tambour doors (parts 7 and 8) using screws (E). Ensure the process hole at the end of the handle faces downwards.
- Insert Tambour Doors: Carefully slide the tambour doors (parts 7 and 8) into the top and bottom grooves of the table structure.
- Adjust Shelf: Place the adjustable shelf (part 10) onto the installed shelf pins (G) at your preferred height.
- 충전소 설치: Feed the power cord (H) through the designated hole on the top surface. Insert the charging station into its recess and secure it with screws (I).
4. 사용 설명서
충전소 사용:
통합 충전 스테이션은 기기에 편리한 전원 공급을 제공합니다.
- Plug the table's power cord into a standard 125V/12A wall outlet.
- Use the 2 AC outlets for larger electronics.
- Connect your devices to the 5V/2A USB port or 5V/2A Type-C port for charging smartphones, tablets, and other compatible devices.

Figure 4.1: Charging Station in Use
Sliding Tambour Door:
The tambour door slides smoothly along the curved track to reveal or conceal the storage compartment. Gently push or pull the handles to open and close the door.
Adjusting the Internal Shelf:
The internal shelf can be adjusted to different heights to suit your storage needs.
- 선반에서 물건을 모두 꺼내세요.
- Carefully lift the shelf and remove the four shelf pins (G) from their current holes.
- 선반 핀을 새 높이의 원하는 구멍에 다시 삽입하세요. 네 개의 핀이 모두 같은 높이에 있는지 확인하세요.
- 선반을 다시 핀에 끼우세요.

그림 4.2: 조절 가능한 선반 메커니즘
Adjusting Leg Pads:
The adjustable leg pads help stabilize the table on uneven floors. Rotate the bottom of each leg pad clockwise to raise or counter-clockwise to lower until the table is stable and level.
5. 유지관리
- 청소: Wipe the table surface with a soft, dry cloth. For stubborn marks, use a slightly damp cloth with mild soap, then dry immediately. Avoid abrasive cleaners or harsh chemicals, as they may damage the finish.
- 유출: 얼룩이나 목재 손상을 방지하기 위해 유출된 물질을 즉시 청소하세요.
- 점검: 모든 나사와 연결부가 단단히 조여져 있는지 정기적으로 점검하세요. 필요하면 다시 조이세요.
- 놓기: Avoid placing the table in direct sunlight or near heat sources, as this can cause fading or warping.
6. 문제 해결
| 문제 | 가능한 원인 | 해결책 |
|---|---|---|
| 테이블이 흔들거립니다/불안정합니다. | Uneven floor or loose leg pads. | Adjust the leg pads by rotating them until the table is stable. Ensure all assembly screws are tightened. |
| 충전소가 작동하지 않습니다. | Power cord not plugged in, outlet issue, or device incompatibility. | Ensure the table's power cord is securely plugged into a working wall outlet. Test the outlet with another device. Verify your device is compatible with the USB/Type-C ports. |
| Sliding door is stiff or stuck. | Debris in the track or misalignment. | Inspect the top and bottom tracks for any obstructions and remove them. Ensure the door is properly seated in the grooves. |
| Shelf does not fit or is uneven. | Shelf pins incorrectly installed. | Ensure all four shelf pins are inserted into corresponding holes at the same height. |
7. 사양
- 상표: 온브릴
- 모델 번호: COT-123에
- 제품 크기: 16인치 깊이 x 20인치 너비 x 23.5인치 높이
- 품목 무게: 20 파운드
- 프레임 소재: 목재
- 재료 유형: 금속, 목재
- 색상: 검정색 (이 변형 모델의 경우)
- 모양: 타원형
- 테이블 디자인: 엔드 테이블
- 가구 마감: 얼룩진
- 포함된 구성 요소: Adjustable Leg Pads, Adjustable Shelf, Charging Station, Sliding Door
- 필요한 조립: 예
- 조립에 권장되는 도구: 망치, 드라이버
- 실내/실외 사용: 실내
- 충전소 출력: 125V/12A AC 콘센트 2개, 5V/2A USB 포트 1개, 5V/2A Type-C 포트 1개
- 전원 코드 길이: 6.56 피트 (2 미터)
8. 보증 및 지원
For warranty information, product support, or to report missing/damaged parts, please contact ONBRILL customer service. Refer to your purchase documentation for specific contact details or visit the official ONBRILL web대지.
고객 서비스: Please refer to the contact information provided with your purchase or on the ONBRILL official web대지.


