1. 서론
Thank you for choosing the DDPAI MINI PRO Dash Cam. This manual provides detailed instructions for the installation, operation, and maintenance of your device. The DDPAI MINI PRO is designed to capture high-quality footage of your journeys, offering features such as 2K resolution, advanced night vision, G-sensor for emergency recording, and seamless app control for convenient management of your recordings.
2. 제품 특징
- 1296p HD 녹화: Captures clear front-road footage at 2304×1296p @ 25fps, ensuring details like number plates and road signs are visible.
- 슈퍼 나이트 비전: Equipped with 5 sets of HD optical lenses and an F2.0 large aperture, enhancing low-light performance for clear and detailed footage in dimly lit environments.
- 330도 회전 가능한 렌즈: Offers flexible installation options, allowing the camera to record either inside or outside the vehicle, providing a wider range of footage.
- 앱 제어: Seamlessly operate the dash cam using the "DDPAI" app (Android/iOS) to view 라이브 푸tage, playback recordings, adjust settings, and download/share videos.
- 24/7 Parking Monitor with G-Sensor: Functions as a security guard for your parked car. The built-in G-sensor triggers recording during collisions or movement, using low-power mode to protect the car battery.
- 내장형 슈퍼 커패시터: Provides high tolerance for extreme temperatures and a prolonged lifespan, offering reliable performance in various climates.
- 원활한 루프 녹음: Continuously records video footage in a loop, overwriting the oldest footage once the memory card or storage space becomes full.
- 비상 사고 잠금 장치: Automatically saves and locks video footage in the event of an accident or other emergency situation, preventing it from being overwritten.
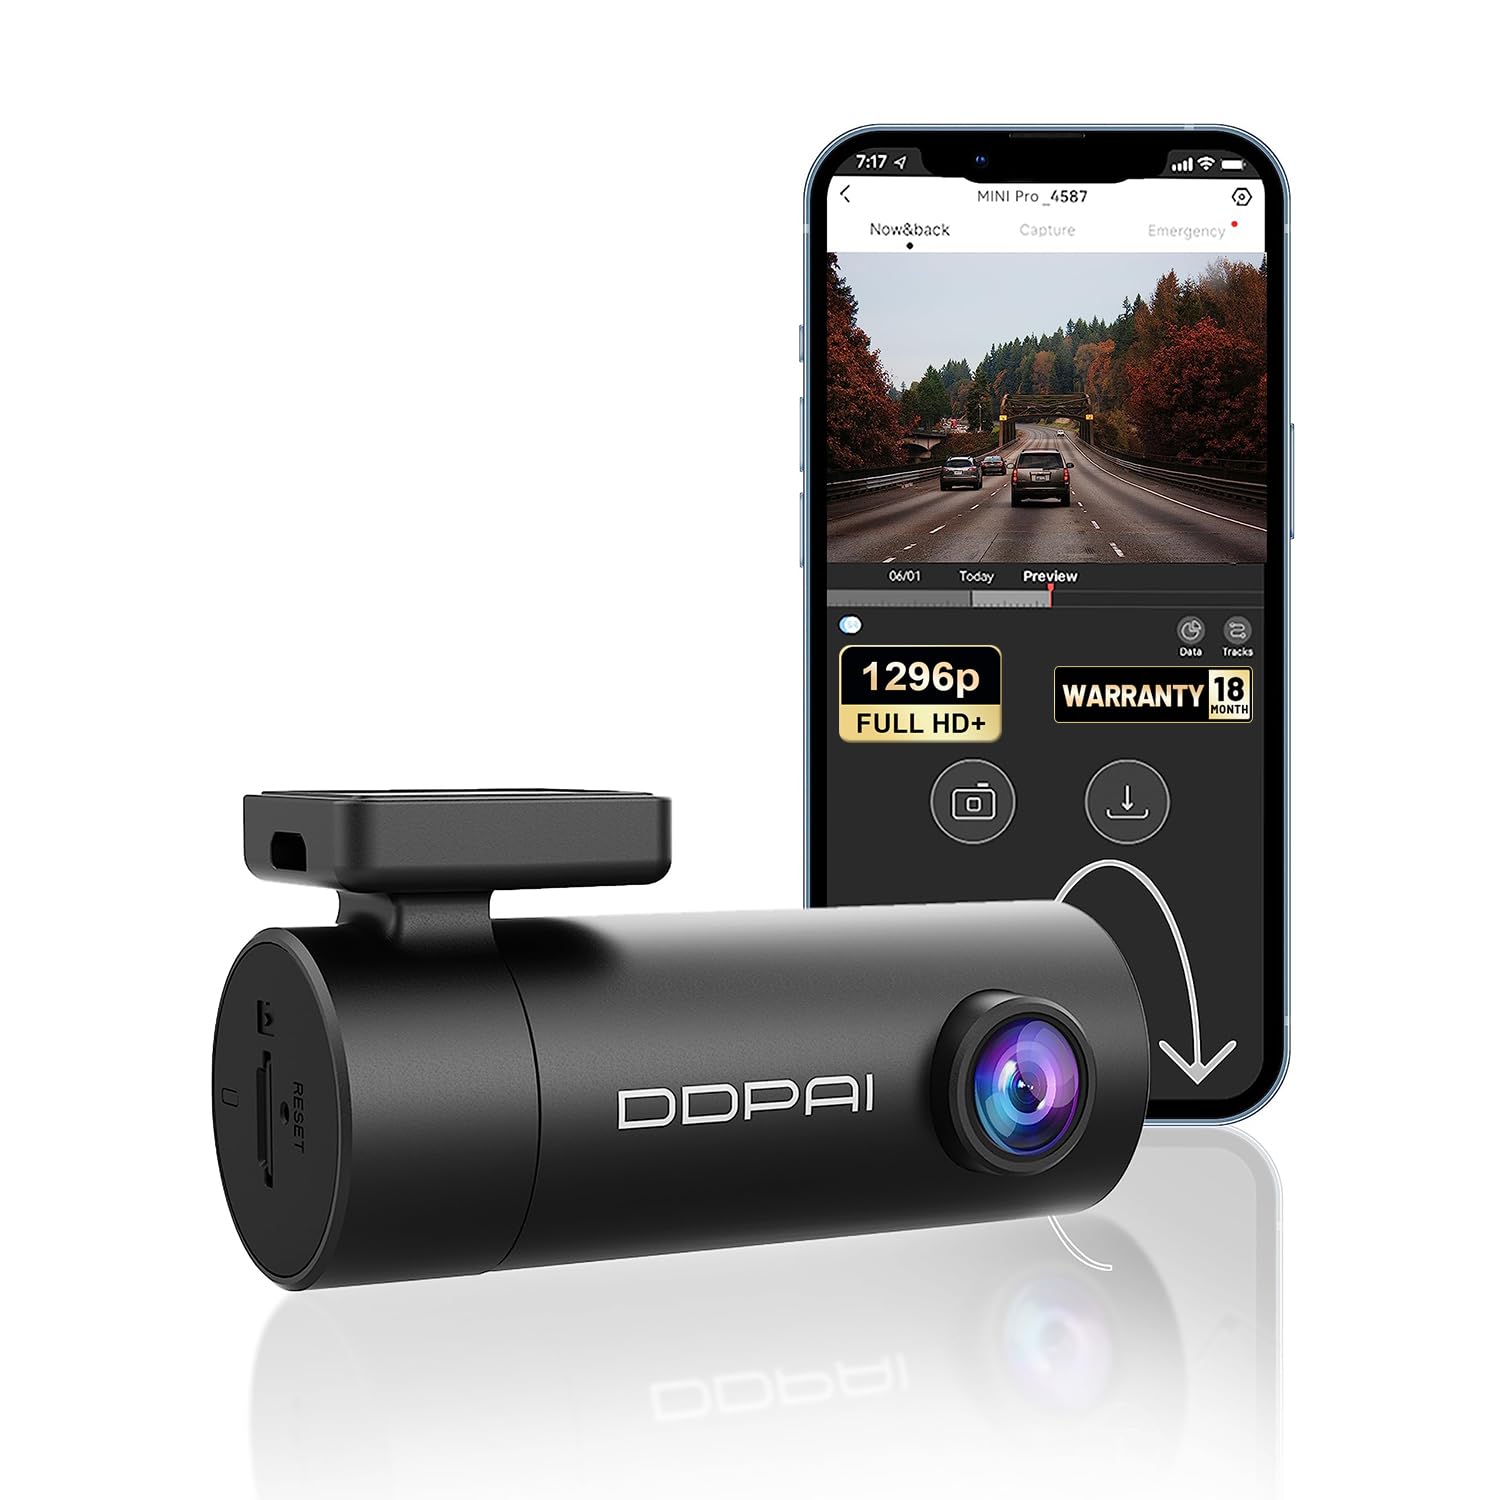
Image: Comparison showing the superior clarity of 1296P UHD resolution over 1080P, highlighting details like license plates.

이미지: 상세 view of the dash cam's lens system, emphasizing its Super Night Vision capabilities with 5 HD optical lenses and F2.0 aperture for enhanced low-light recording.

Image: The DDPAI MINI PRO Dash Cam showcasing its 330° rotatable lens, allowing for versatile recording angles inside or outside the car.

Image: A smartphone displaying the DDPAI app interface, connected to the dash cam via Wi-Fi, illustrating options to preview, share, and download footage.

Image: An illustration depicting two cars, with one highlighted to show the G-Sensor activating recording during an emergency event, ensuring critical footage가 저장되었습니다.

Image: A visual representation of the Super Capacitor, emphasizing its benefits for better long-term storage, longer service life, and resilience in more extreme weather conditions.
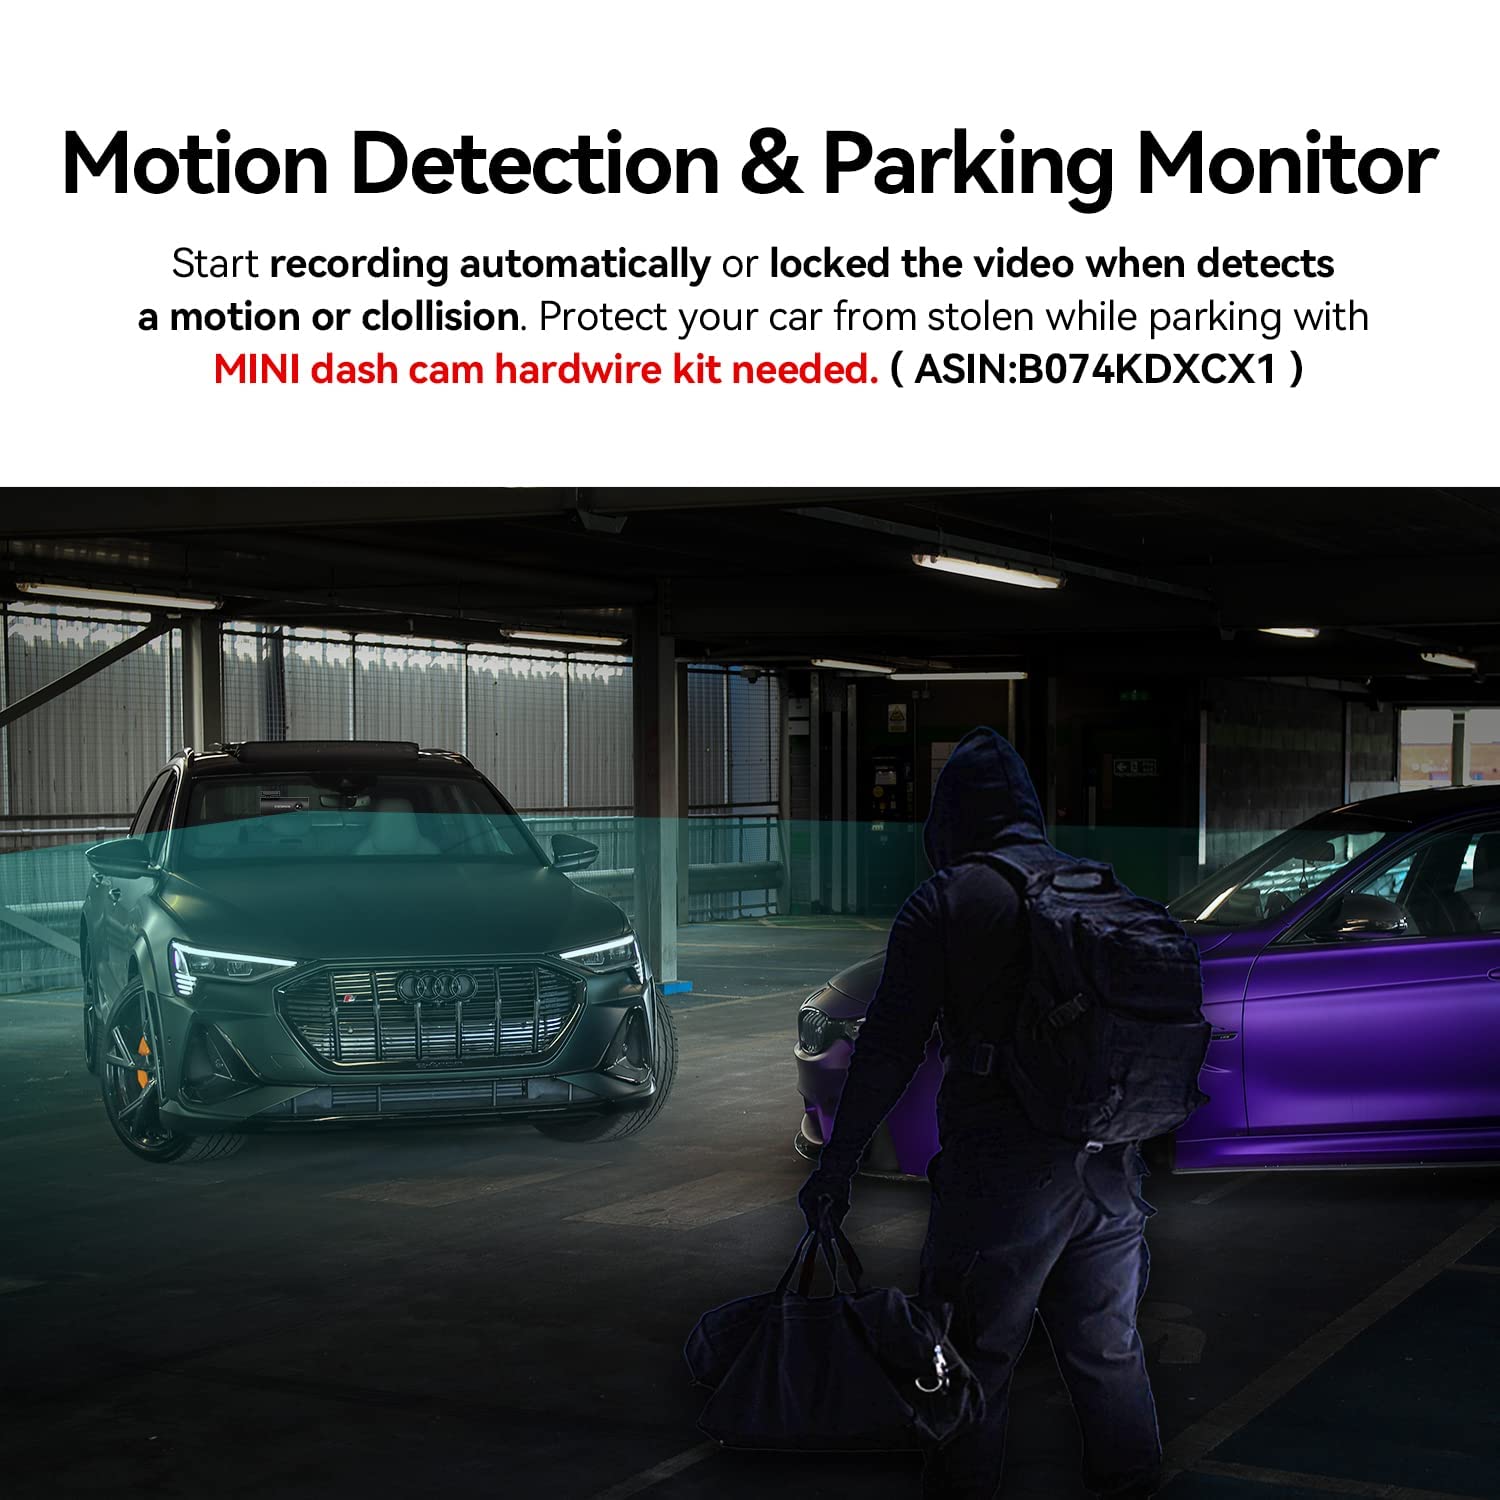
Image: A circular diagram showing the seamless loop recording process, where new footage overwrites the oldest files when the SD card is full, ensuring continuous recording.
3. 패키지 내용
설치를 진행하기 전에 패키지에 모든 구성품이 있는지 확인하십시오.
- DDPAI MINI Pro Dash Cam
- 정전기 스티커
- Power Supply Cable (9.84ft) with Car Charger
- 3M 스티커(x2)
- 설치 도구
- User Manual Package Box

Image: A visual representation of the DDPAI MINI Pro Dash Cam and all its included accessories, such as the electrostatic sticker, power cable, 3M stickers, installation tool, and user manual.
4. 설정 및 설치
Follow these steps to properly install your DDPAI MINI PRO Dash Cam in your vehicle:
- 대시캠 부착: Securely attach the dash cam to the windshield using the provided 3M adhesive. Ensure it is placed in an optimal installation area, typically near the rearview mirror, to avoid obstructing your view.
- 전원 케이블 연결: Connect the power cable to the dash cam.
- Hide the Wire: Carefully route and hide the power cable along the edges of the windshield and dashboard to maintain a tidy interior and prevent interference with driving.
- Plug into Power Socket: Plug the car charger into your vehicle's cigarette power socket.
Video: This tutorial demonstrates the step-by-step installation process for the DDPAI MINI PRO Dash Cam, including attaching the camera, connecting the power cable, hiding the wires, and plugging it into the car's power socket.
5. App Control & Operation
The DDPAI app provides full control over your dash cam. Follow these steps to connect and use the app:
- Download DDPAI App: Scan the QR code provided in the product packaging or search for "DDPAI" in the Google Play Store (Android) or Apple App Store (iOS) to download the app.
- 블랙박스 전원 켜기: Ensure your dash cam is powered on.
- 블루투스 활성화: 휴대폰의 블루투스를 켜세요.
- Launch App & Add Device: Open the DDPAI App and tap "+ Add a device". Select your dash cam's device name (e.g., DDPAI_N5Dual_XXXX) from the detected Bluetooth device list.
- 연결 승인: Press the function button on the dash cam to authorize the connection.
- Wi-Fi 연결: Follow the on-screen instructions to perform the Wi-Fi connection. Tap "Go to connection", navigate to WLAN settings, select your dash cam's Wi-Fi network, and paste the password directly into the edit box, then tap "Join".
- 장치 인터페이스: Once connected, you can enter the "Device" interface to view the device album, set up device settings, or enter the preview 인터페이스.
- View 다운로드됨 Files: Tap "Local album" to view downloaded videos, photos, and emergency files.
- 사전view 인터페이스: Tap on the area outlined by the dotted line on the device interface to enter the preview interface directly. Here you can preview 라이브 푸tage from the front or rear camera, take pictures, playback videos, download video files, 그리고 view data and tracks.
- 기기 설정: Access device settings to adjust speaker volume, local voice control, ADAS intelligent assistant reminders, preview display, rear lens image flip, recording resolution, microphone recording, timestamp, display speed, and capture sensitivity.
Video: This tutorial guides you through connecting your DDPAI Dash Cam to the app via Bluetooth and Wi-Fi, and demonstrates various app functions including live preview, accessing recorded files, and adjusting device settings.
6. 유지관리
To ensure optimal performance and longevity of your DDPAI MINI PRO Dash Cam, consider the following maintenance tips:
- 렌즈 청소: 깨끗하고 선명한 영상 녹화를 위해 부드럽고 보풀이 없는 천으로 카메라 렌즈를 정기적으로 닦아주세요. 렌즈에 흠집을 낼 수 있는 연마재는 사용하지 마세요.
- SD 카드 확인: Periodically check the status of your SD card. Format the card monthly to prevent data corruption and ensure smooth loop recording. Replace the SD card if it shows signs of wear or error.
- 펌웨어 업데이트: Keep the dash cam's firmware updated through the DDPAI app to benefit from new features and performance improvements.
- 안전한 장착: Ensure the dash cam remains securely mounted to the windshield. Re-apply the 3M adhesive if necessary to prevent vibrations that could affect video quality.
7. 문제 해결
If you encounter any issues with your DDPAI MINI PRO Dash Cam, refer to the following common troubleshooting steps:
- 대시캠 전원이 켜지지 않음:
- Check if the power cable is securely connected to both the dash cam and the car charger.
- Ensure the car charger is properly inserted into the cigarette power socket and the vehicle's ignition is on.
- Test the power socket with another device to confirm it is functional.
- 앱 연결 문제:
- Verify that Bluetooth is enabled on your phone and the dash cam is powered on.
- Ensure you have selected the correct dash cam device in the DDPAI app.
- If Wi-Fi connection fails, double-check the Wi-Fi password.
- Restart both your phone and the dash cam, then try connecting again.
- 낮은 비디오 품질:
- 카메라 렌즈에 묻은 먼지나 얼룩을 닦아내세요.
- 렌즈에서 보호 필름을 제거했는지 확인하세요.
- Check the recording resolution settings in the DDPAI app; ensure it is set to 1296P for optimal quality.
- SD 카드 오류:
- Format the SD card using the DDPAI app.
- Ensure you are using a high-speed (Class 10 or U3 recommended) and genuine SD card.
- If errors persist, try a different SD card.
8. 사양
| 특징 | 사양 |
|---|---|
| 상표 | DDPAI |
| 모델명 | Mini PRO |
| 제품 치수 | 10 x 12 x 3cm |
| 품목 무게 | 300g |
| 비디오 캡처 해상도 | 1296p |
| 실제 View잉 각도 | 140도 |
| 연결 기술 | 와이파이 |
| 특징 | 앱 제어 |
| 호환 장치 | 자동차, 트럭, 오토바이 |
| 디스플레이 유형 | 액정표시장치 |
| 배터리 포함 | 아니요 |
| 필요한 배터리 | 아니요 |
| 제어 방법 | 앱 |
| 색상 | 검은색 |
9. 보증 및 지원
DDPAI is committed to providing high-quality products and excellent customer service.
- 보증: Your DDPAI MINI PRO Dash Cam comes with an 18-month warranty from the date of purchase. Please retain your proof of purchase for warranty claims.
- 반품 정책: A 7-day return policy is applicable for defects.
- 고객 지원: For any questions, technical assistance, or warranty inquiries, please contact our customer support team.
이메일: 서비스센터@ddpai.com

Image: Details of DDPAI's after-sale service, including an 18-month warranty, 7-day return policy, and contact information for customer support.


