소개
This manual provides detailed instructions for the installation, operation, and maintenance of your Vetroo M06 Micro-ATX/Mini-ITX Gaming PC Case. Please read this manual thoroughly before beginning assembly to ensure proper setup and optimal performance.

Image: The Vetroo M06 Micro-ATX/Mini-ITX Gaming PC Case in black, showcasing its mesh front panel and side window, view각도에서 본 모습.
주요 특징
- 컴팩트한 디자인: Micro-ATX / Mini-ITX form factor with a high-airflow mesh front panel, designed for space-efficient builds.
- 최적화된 냉각: Supports up to five 120mm fans and a 240mm top-mounted liquid radiator for efficient thermal management.
- GPU 호환성: 최대 길이 355mm의 그래픽 카드를 지원합니다.
- Flexible PSU Mounting: Features an adjustable power supply installation area with a maximum length of 160mm.
- 최신 연결성: Front panel includes USB Type-C and USB 3.0 ports for convenient peripheral access.
패키지 내용
설치를 진행하기 전에 모든 구성 요소가 있는지 확인하세요.
- Vetroo M06 PC Case
- 부속품 상자 (나사, 스탠드오프, 케이블 타이)
- SFX PSU Bracket (1x)
- 사용 설명서 (본 문서)
명세서
| 특징 | 세부 사항 |
|---|---|
| 모델명 | M06 |
| 케이스 유형 | 미니타워 |
| 마더보드 호환성 | 마이크로 ATX, 미니 ITX |
| 제품 크기(L x W x H) | 15.55" x 7.87" x 13.07"(395mm x 200mm x 332mm) |
| 품목 무게 | 13.37파운드(6.06kg) |
| 재료 | Acrylonitrile Butadiene Styrene (ABS), SPCC (0.8mm metal plate) |
| 최대 GPU 길이 | 355mm |
| 최대 CPU 쿨러 높이 | 165mm |
| 최대 PSU 길이 | 160mm (Adjustable mounting) |
| 팬 지원 | 최대 5 x 120mm 팬 |
| 라디에이터 지원 | 1 x 240mm (Top) |
| 전면 I / O 포트 | 1 x USB Type-C, 1 x USB 3.0, HD Audio, Power Button, Reset Button |

Image: Diagram illustrating the compact dimensions of the Vetroo M06 PC case, measuring 15.5 inches in depth, 7.8 inches in width, and 13.0 inches in height.

Image: A detailed diagram outlining the compatibility specifications for the Vetroo M06 PC case, including maximum CPU cooler height (165mm), GPU length (355mm), PSU length (160mm), and supported motherboard form factors (M-ATX/ITX).
설정 및 설치
Before starting, ensure you have a clean, static-free workspace. Refer to your component manuals for specific installation details.
1. 마더보드 설치
- Remove the side panel(s) of the case.
- Install the necessary motherboard standoffs into the case tray according to your motherboard's form factor (Micro-ATX or Mini-ITX).
- 나사 구멍을 맞춰서 마더보드를 스탠드오프에 조심스럽게 올려놓습니다.
- 나사로 마더보드를 고정합니다.
2. GPU 설치
- Remove the appropriate PCIe slot covers from the rear of the case.
- Insert your graphics card into the primary PCIe slot on your motherboard.
- 그래픽 카드를 나사를 사용하여 케이스에 고정하십시오.
- Connect any required PCIe power cables from your power supply to the GPU.
3. 파워서플라이 설치
- Determine the desired mounting position for your power supply. The Vetroo M06 supports adjustable PSU mounting.
- If using an SFX power supply, attach the included SFX bracket to the PSU.
- Slide the power supply into its designated bay and secure it with screws from the rear of the case.
- Route the necessary power cables to your components.

이미지: 내부 view of the Vetroo M06 PC case highlighting the three adjustable mounting positions for ATX/SFX power supplies, along with an illustration of the included SFX bracket.
4. Storage Installation (HDD/SSD)
- Locate the designated mounting points for 3.5" HDDs and 2.5" SSDs.
- Secure your storage drives using the provided screws.
- Connect SATA data and power cables to each drive.
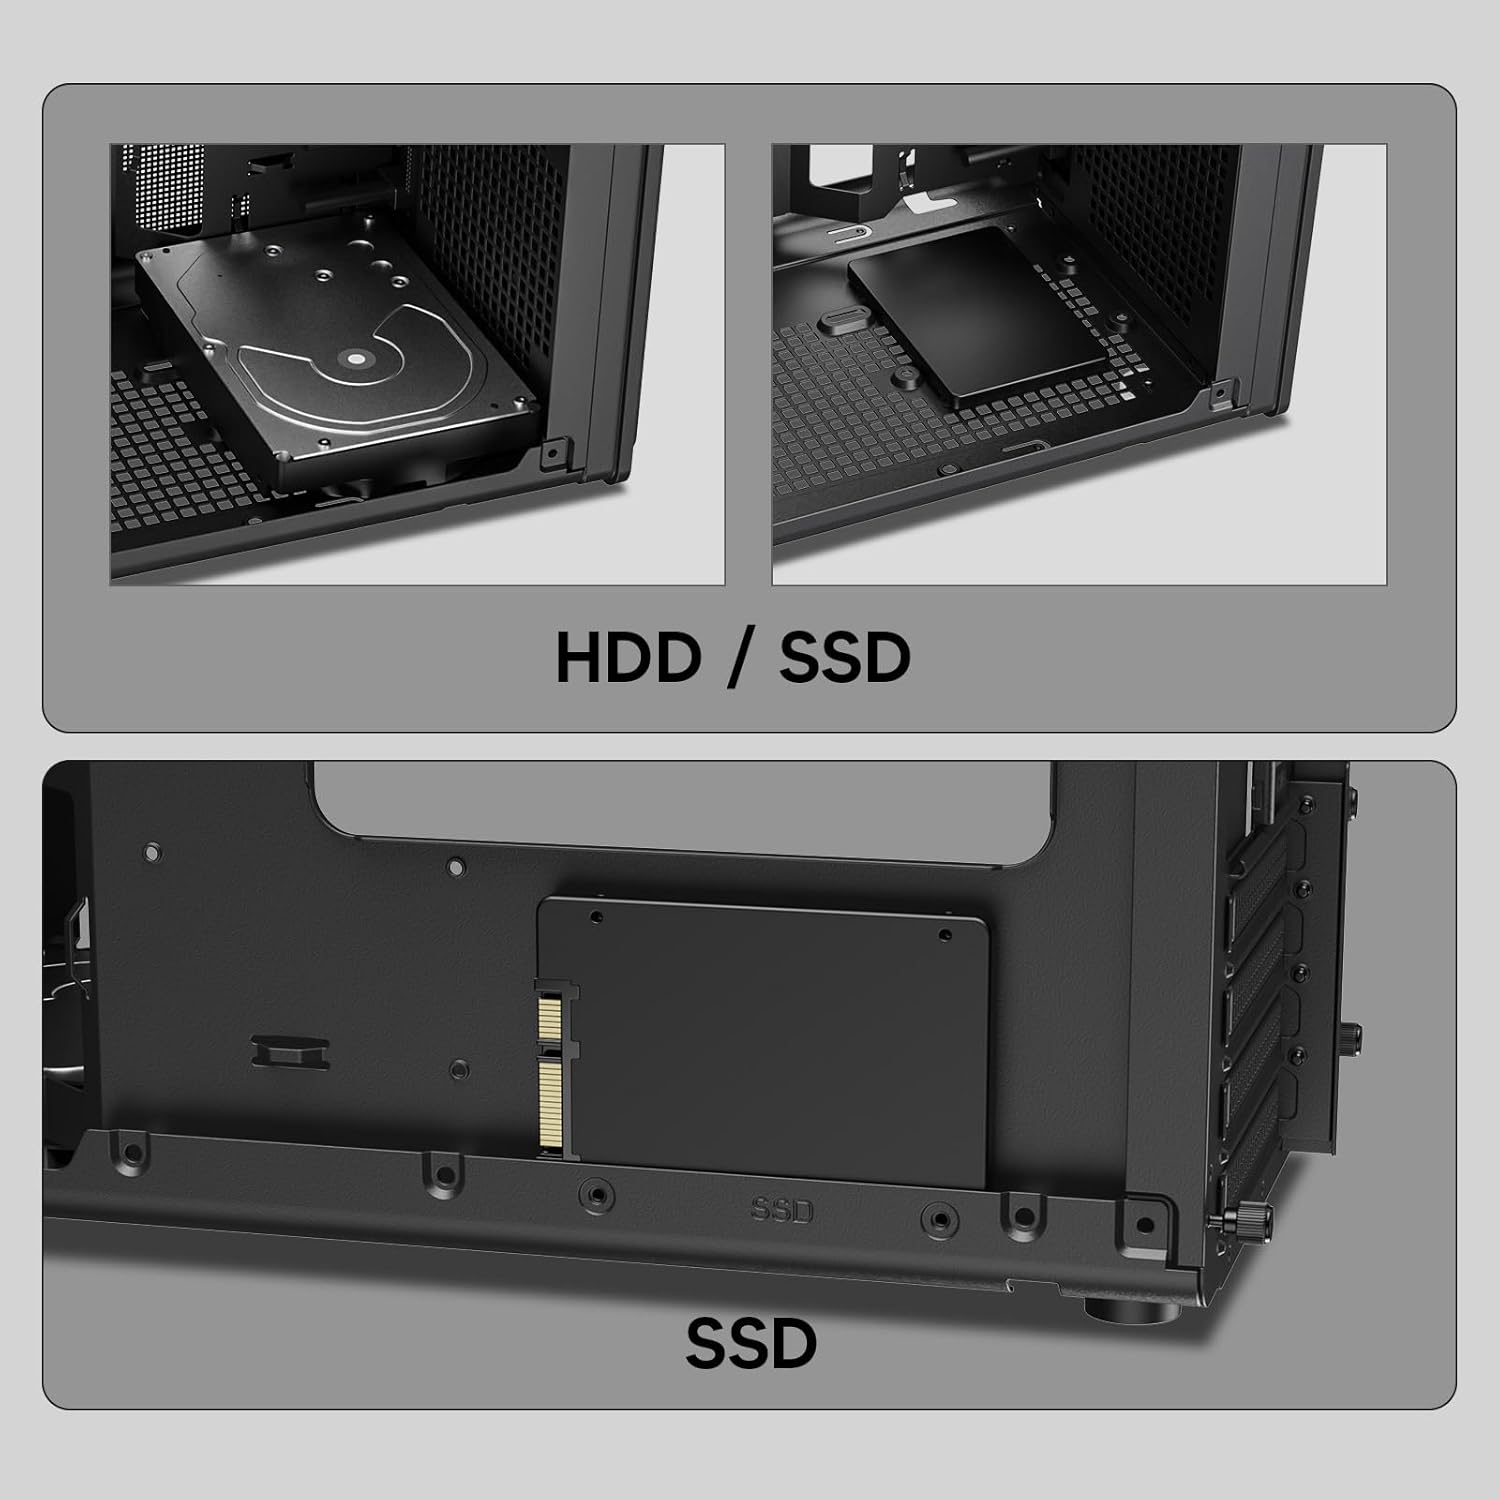
이미지: 클로즈업 views of the Vetroo M06 PC case interior, demonstrating the mounting options for both 3.5-inch Hard Disk Drives (HDDs) and 2.5-inch Solid State Drives (SSDs).
5. Cooling System Installation (Fans/Radiator)
- Identify the fan mounting locations (up to five 120mm fans).
- Mount fans using appropriate screws, ensuring correct airflow direction.
- For liquid cooling, install a 240mm radiator at the top mounting position, securing it with screws.
- Connect fan and pump cables to your motherboard or fan controller.
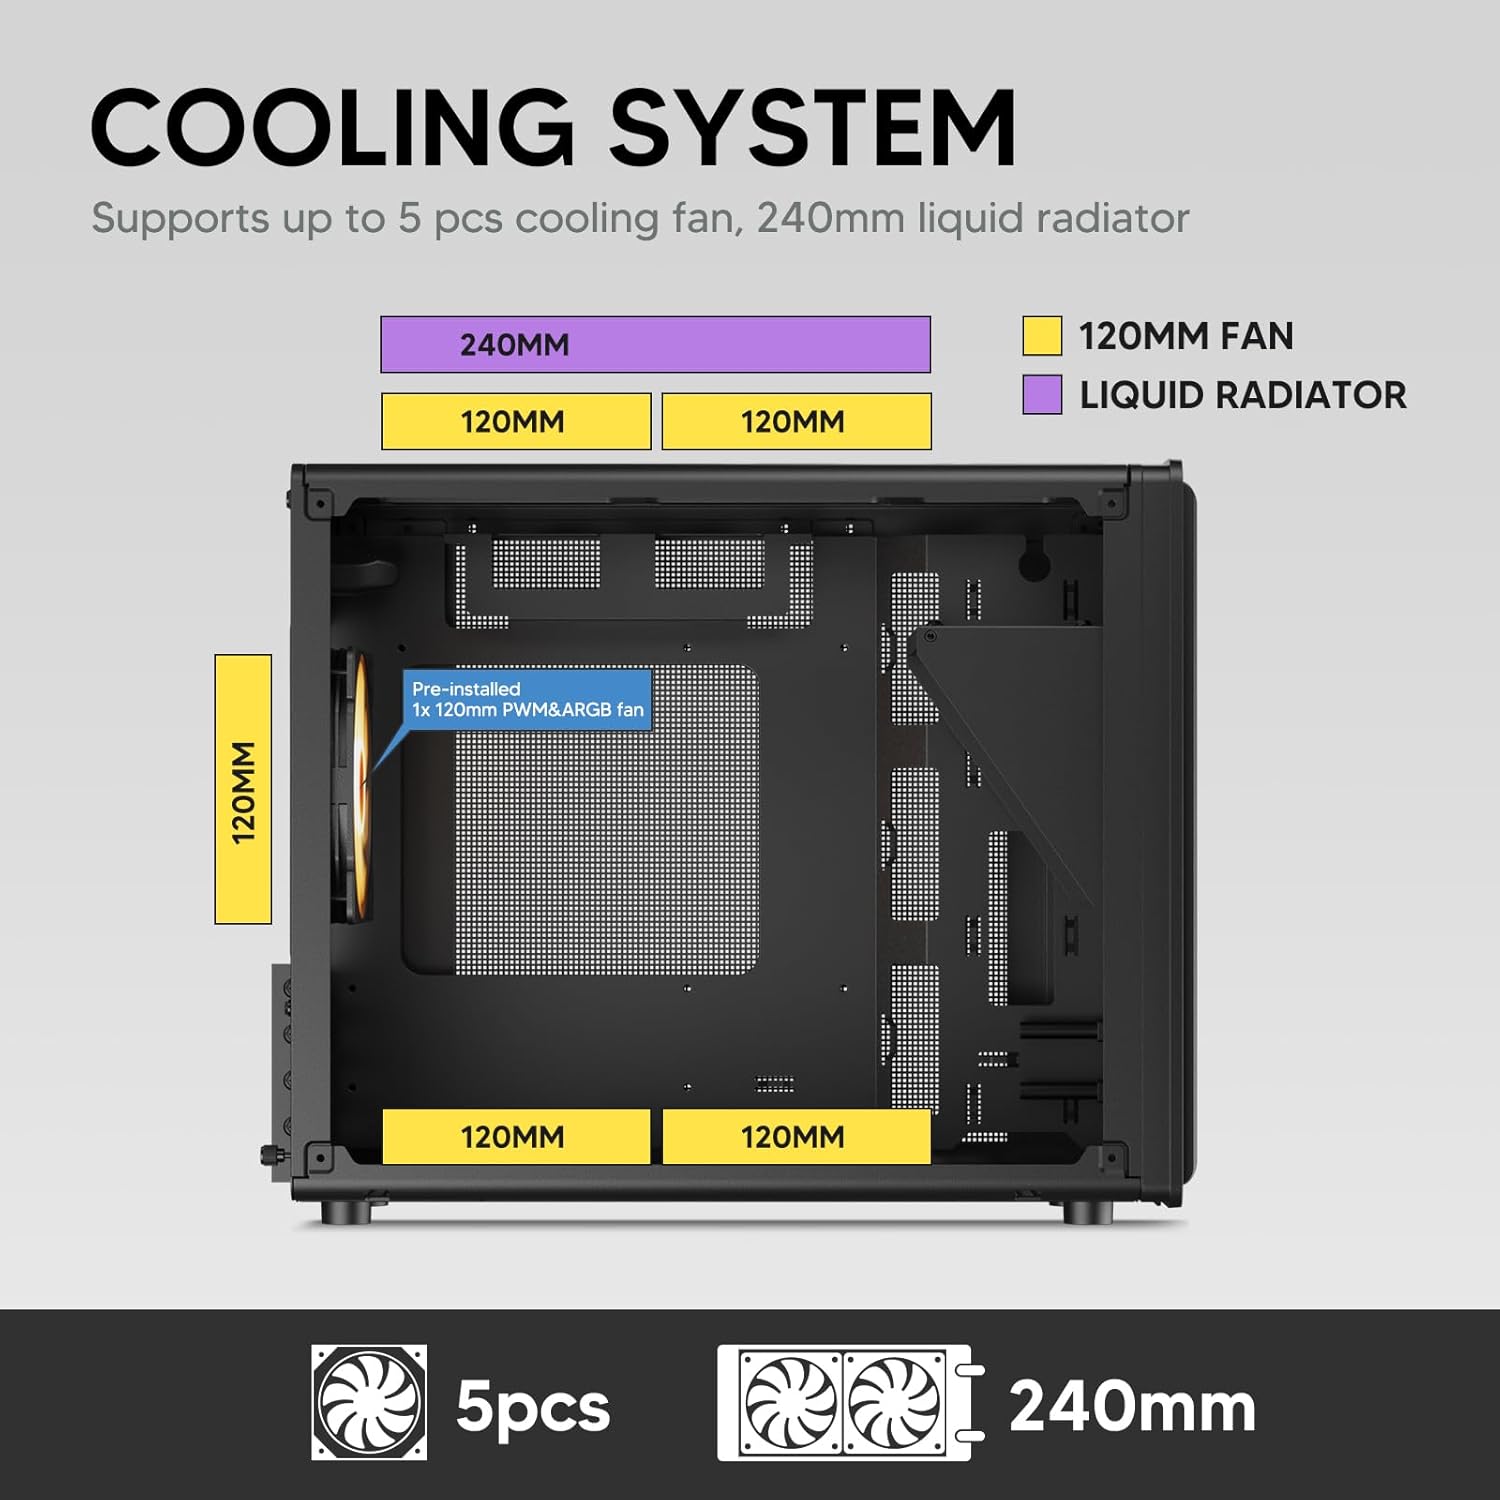
Image: A diagram illustrating the cooling system layout within the Vetroo M06 PC case, detailing the positions for up to five 120mm fans and a 240mm liquid radiator at the top.
6. I/O 패널 연결
- Connect the front panel cables (Power, Reset, USB 3.0, USB Type-C, HD Audio) to the corresponding headers on your motherboard. Refer to your motherboard manual for header locations.

Image: A close-up of the Vetroo M06 PC case's front I/O panel, clearly labeling the Power button, Reset button, USB 3.0 port, HD Audio jack, and USB Type-C port.
작동 지침
Once all components are installed and cables are connected, replace the side panels. Connect your peripherals (monitor, keyboard, mouse) and power cable to the PSU. Press the power button on the front panel to start your system.
공기 흐름 관리
The Vetroo M06 case features an excellent airflow design with mesh panels to facilitate optimal cooling. Ensure fans are installed to create a balanced airflow, typically with intake fans at the front/bottom and exhaust fans at the rear/top.

Image: An exploded diagram of the Vetroo M06 PC case, illustrating the intended airflow patterns with blue arrows indicating cool air intake and red arrows showing warm air exhaust through its mesh panels.
유지
정기적인 유지 관리는 PC 부품의 수명을 연장하고 최적의 성능을 보장하는 데 도움이 됩니다.
- 먼지 청소: 압축 공기를 사용하여 주기적으로 먼지 필터와 내부 부품을 청소하십시오. 청소하기 전에 시스템의 전원을 끄고 플러그를 뽑으십시오.
- 케이블 관리 : Verify that internal cables are neatly routed and do not obstruct airflow.
- 구성 요소 검사: Ensure all screws are tight and components are securely seated.

Image: A close-up shot of the Vetroo M06 PC case, featuring a digital caliper measuring the thickness of the metal plate, which is specified as 0.8mm, highlighting the case's robust construction.
문제 해결
문제가 발생하면 다음의 일반적인 문제 해결 단계를 참조하세요.
- 시스템 전원이 켜지지 않음:
- Check all power connections, including the PSU to wall outlet, PSU to motherboard (24-pin and CPU 8-pin), and front panel power switch cable to motherboard.
- PSU 스위치가 'ON' 위치에 있는지 확인하세요.
- 디스플레이 출력 없음:
- Verify that your monitor is connected to the graphics card (not the motherboard's integrated graphics ports, unless you are using integrated graphics).
- 그래픽 카드와 RAM 모듈을 다시 장착하세요.
- 과열 문제:
- 케이스 팬이 모두 제대로 회전하고 최적의 공기 흐름을 위해 올바른 방향으로 설치되어 있는지 확인하십시오.
- Check CPU cooler installation and thermal paste application.
- Clean any dust buildup from fans and filters.
- USB 포트가 작동하지 않음:
- Verify that the front panel USB 3.0 and USB Type-C cables are correctly connected to the motherboard headers.
보증 및 지원
Vetroo products are designed for quality and reliability. For warranty information and technical support, please visit the official Vetroo web해당 사이트를 방문하거나 고객 서비스에 문의하세요. 보증 청구를 위해 구매 증빙 자료를 보관하세요.
Vetroo Official Web대지: Vetroo Store on Amazon
For further assistance, please refer to the contact information provided with your product packaging or on the official Vetroo support channels.


