1. 서론
This manual provides detailed instructions for setting up, operating, maintaining, and troubleshooting your GMKtec G10 Mini PC. Please read this manual thoroughly before using your device to ensure optimal performance and longevity.
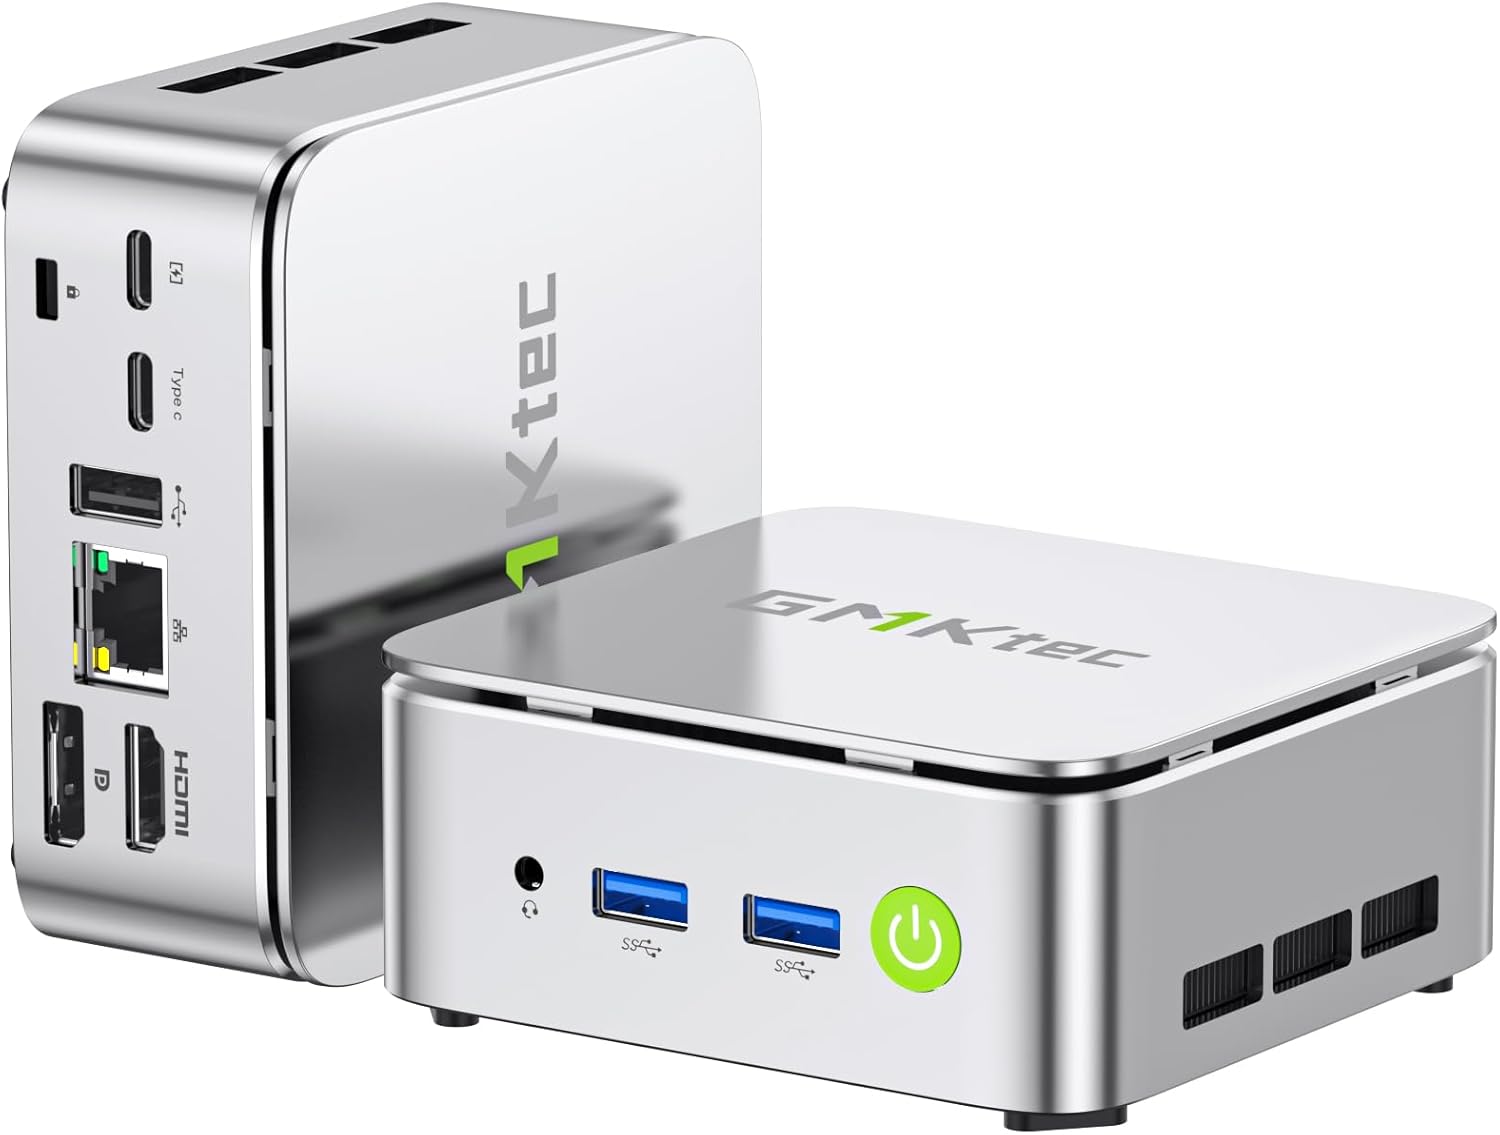
이미지: 앞면과 뒷면 view of the GMKtec G10 Mini PC, highlighting its compact design and various ports.
2. 제품 오버view
The GMKtec G10 Mini PC is a compact and powerful computing solution designed for various tasks, from everyday office work to multimedia entertainment. It features an AMD Ryzen 5 3500U processor, ample memory, and flexible storage options.
2.1 주요 특징
- High-Performance AMD Ryzen 5 3500U: Equipped with a 4-core, 8-thread processor with a max boost clock of 3.7GHz, offering robust performance for multitasking and light editing.
- 트리플 디스플레이 출력: Supports up to three simultaneous 4K displays via HDMI 2.1, DisplayPort 1.4, and USB-C (DP Alt Mode).
- 확장 가능한 스토리지: Includes a 256GB NVMe SSD and supports expansion up to 16TB (8TB x 2) via additional M.2 slots.
- Amp르 메모리: Comes with 16GB DDR4 RAM (8GB x 2) and is expandable up to 64GB across two SO-DIMM slots.
- 고속 연결: Features 2.5G wired LAN, Wi-Fi 5, and Bluetooth 5.0 for stable and fast network connections.
- Compact & Quiet Design: Palm-sized form factor with an efficient, silent cooling fan, ideal for space-constrained or quiet environments.
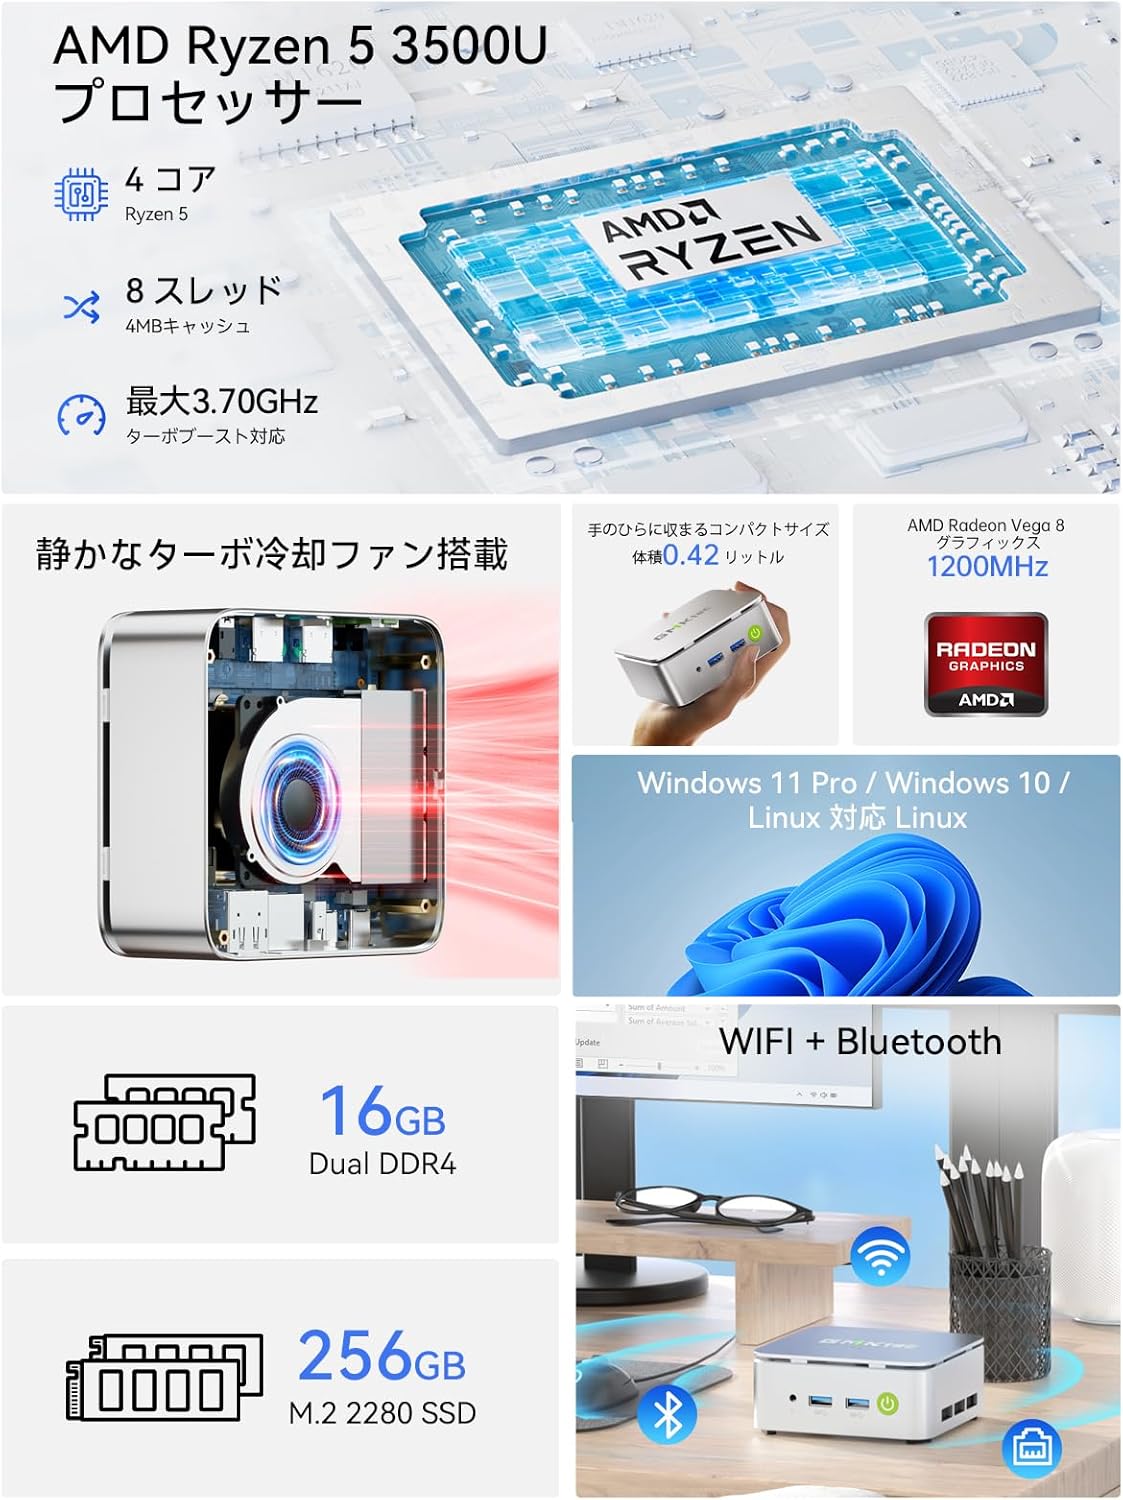
이미지: 오버view of the GMKtec G10 Mini PC's main features, including its AMD Ryzen 5 3500U processor, 16GB DDR4 RAM, 256GB SSD, compact size, quiet turbo cooling fan, and support for Windows 11 Pro/Windows 10/Linux.
2.2 프로세서 및 그래픽
The GMKtec G10 is powered by an AMD Ryzen 5 3500U processor, featuring 4 cores and 8 threads, with a maximum boost clock of 3.7GHz. It integrates Radeon Vega 8 Graphics, providing capable performance for daily tasks and multimedia.

Image: A close-up of the AMD Ryzen 5 3500U processor, detailing its core count, thread count, cache size, and maximum clock speed.
2.3 포트 및 연결
The Mini PC offers a comprehensive set of ports for connecting various peripherals and displays:
- 전면 포트: 3.5mm Audio Jack, USB 3.2 Gen1 x 2, Power Button.
- 후면 포트: Kensington Lock, Type-C (PD dedicated), USB 2.0 x 1, Type-C (DP / Data / PD compatible), 2.5G Gigabit LAN (RJ45) x 1, HDMI 2.1 (4K@60Hz), DisplayPort 1.4 (4K@60Hz).
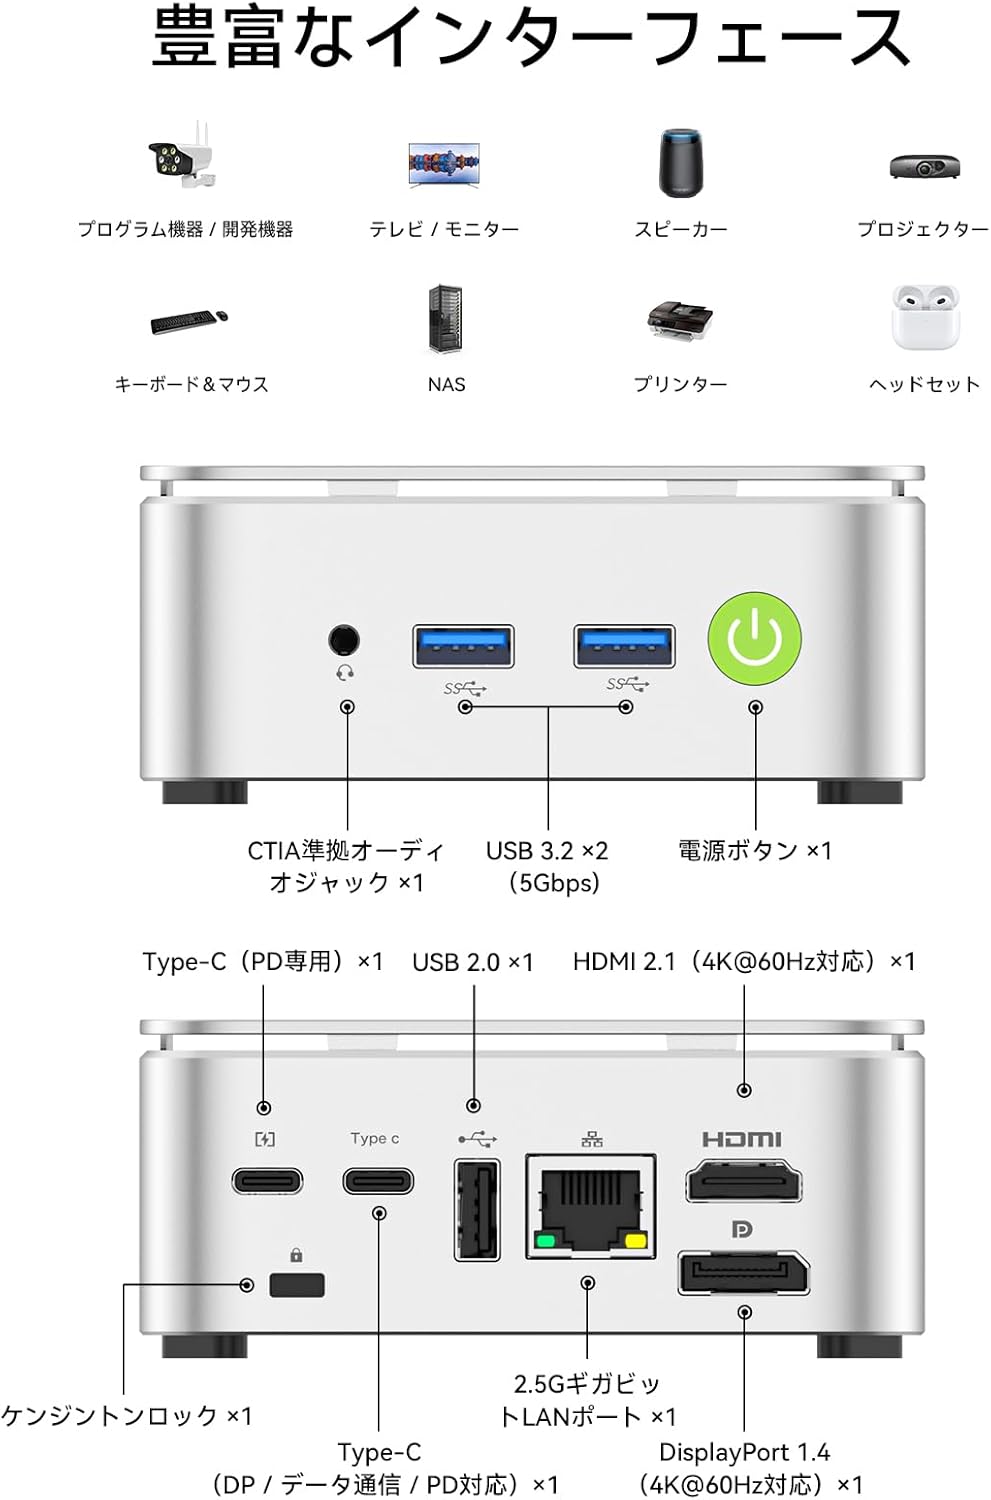
Image: A visual guide to the front and rear ports of the GMKtec G10 Mini PC, including USB, audio, power, HDMI, DisplayPort, Type-C, and LAN connections.
2.4 메모리 및 저장
The GMKtec G10 comes with 16GB of DDR4 RAM (8GB x 2) and a 256GB NVMe SSD. Both memory and storage are expandable to meet future needs.
- 메모리: Two SO-DIMM slots support up to 64GB DDR4 RAM.
- 저장: Two M.2 2280 slots support up to 16TB (8TB x 2) of storage.

이미지: 폭발된 view illustrating the dual-channel DDR4 memory and M.2 2280 SSD slots, highlighting the upgrade potential for RAM up to 64GB and storage up to 16TB.
3. 설정 가이드
3.1 언박싱 및 패키지 구성품
Carefully unbox your GMKtec G10 Mini PC. The package should contain the following items:
- Nucbox G10 Mini PC
- 전원 어댑터 및 케이블
- HDMI 케이블
- VESA Mount & Screws
- 사용 설명서 (본 문서)

Image: The complete package contents of the GMKtec G10 Mini PC, laid out for easy identification.
3.2 초기 전원 켜기 및 연결
To set up your Mini PC for the first time:
- 전원 어댑터를 미니 PC의 DC 입력 포트에 연결하고 전원 콘센트에 꽂으세요.
- 모니터를 HDMI, DisplayPort 또는 Type-C 비디오 출력 포트에 연결하십시오.
- 키보드와 마우스를 사용 가능한 USB 포트에 연결하세요.
- 미니 PC 앞면에 있는 전원 버튼을 눌러 전원을 켜세요.
Watch this video for a visual guide on initial setup and connections:
비디오: 오버view of the GMKtec G10 Mini PC, demonstrating its compact size, various ports, and ease of connection to a display for initial use.
3.3 VESA 마운트 설치
The GMKtec G10 supports VESA mounting, allowing you to attach it to the back of a compatible monitor for a clutter-free workspace.
- 제공된 나사를 사용하여 VESA 마운트 브래킷을 모니터 뒷면에 부착하십시오.
- Secure the Mini PC to the VESA mount.
For a visual demonstration of VESA mount installation, refer to this video (note: this video features a similar model, but the VESA mounting process is generally the same):
Video: Demonstration of VESA mount installation for a mini PC. The process shown is applicable to the GMKtec G10 for mounting behind a monitor.
4. 사용 설명서
4.1 전원 켜기/끄기
- 전원 켜기: 장치 전면의 전원 버튼을 누릅니다.
- 전원 끄기 : 운영 체제의 종료 기능을 사용하십시오. 또는 전원 버튼을 5초 동안 길게 눌러 강제로 종료할 수 있습니다(필요한 경우에만 사용하십시오).
4.2 다중 디스플레이 설정
The GMKtec G10 supports connecting up to three displays simultaneously, enhancing productivity for work and entertainment.

Image: A workstation setup showcasing the GMKtec G10 Mini PC driving two large monitors and a tablet, illustrating its triple HD output capability for enhanced productivity.
4.3 네트워크 연결
- 유선 LAN : Connect an Ethernet cable to the 2.5G Gigabit LAN port for high-speed internet access.
- 와이파이: The device supports Wi-Fi 5. Configure your wireless network settings through the operating system.
- 블루투스: Bluetooth 5.0 is supported for connecting wireless peripherals like keyboards, mice, and headphones.
5. 유지관리
5.1 청소
Regularly clean the exterior of the Mini PC with a soft, dry cloth. Ensure ventilation grilles are free from dust to maintain optimal cooling performance.
5.2 Component Upgrades (RAM & SSD)
The GMKtec G10 allows for upgrades to its RAM and M.2 SSD. Always ensure the device is powered off and unplugged before performing any internal modifications.
For a visual guide on upgrading RAM and SSD, please refer to this video (note: this video features a similar model, but the general procedure for installing RAM and M.2 SSDs is comparable):
Video: A tutorial demonstrating the process of expanding DDR memory and replacing an SSD in a mini PC. This guide can be used as a reference for upgrading the GMKtec G10.
5.3 냉각 시스템
The Mini PC features a silent cooling fan designed to maintain optimal operating temperatures while minimizing noise.

Image: A graph comparing the noise level of the G10 Mini PC (35dB) to other environments, highlighting its quiet operation, alongside a user working in a quiet room.

Image: An internal diagram of the GMKtec G10's high-efficiency cooling system, showing the airflow and heat sink design.
6. 문제 해결
6.1 디스플레이 출력 없음
- Ensure all display cables (HDMI, DP, Type-C) are securely connected to both the Mini PC and the monitor.
- 모니터의 전원이 켜져 있고 올바른 입력 소스로 설정되어 있는지 확인하세요.
- 다른 디스플레이 포트에 연결하거나 다른 케이블을 사용해 보세요.
6.2 Wi-Fi 연결 문제
- Check if Wi-Fi is enabled in the operating system settings.
- Ensure the Mini PC is within range of your wireless router.
- Restart your wireless router and the Mini PC.
- Update Wi-Fi drivers if available.
6.3 시스템 응답 없음
- If the system becomes unresponsive, press and hold the power button for 5 seconds to force a shutdown. Wait a few moments, then power it back on.
- 과열을 방지하기 위해 적절한 환기를 보장하십시오.
6.4 External Graphics Card Connection
If you are connecting an external graphics card via Oculink, ensure the Mini PC is powered off before connecting or disconnecting the external GPU. Hot-plugging Oculink is not supported and may damage the motherboard.
For a demonstration of connecting an external graphics card, refer to this video (note: this video features a similar model, but the connection method is relevant):
Video: A guide on how to connect an AD-GP1 external graphics board to a GMKtec M7 Mini PC. This demonstrates the Oculink connection process, which is similar for the G10.
7. 사양
| 특징 | 사양 |
|---|---|
| 상표 | GMK텍 |
| 모델 시리즈 | JP Nucbox G10 |
| 제품 치수 | 9.8 x 10.3 x 4.2 cm; 284g |
| 색상 | 하얀색 |
| CPU 브랜드 | (주)에스디에이치디(주) |
| CPU 유형 | 라이젠 5 3500U |
| CPU 속도 | 3.7GHz |
| 프로세서 수 | 4 |
| RAM 메모리 유형 | DDR4, SO-DIMM x 2 |
| 최대 메모리 용량 | 64GB (XNUMX기가바이트) |
| 메모리 클럭 속도 | 2400MHz |
| 하드 드라이브 용량 | 256GB (XNUMX기가바이트) |
| 하드 드라이브 유형 | SSD |
| 하드 드라이브 인터페이스 | PCIe x4 |
| 그래픽 가속기 | Radeon Vega 8 Graphic |
| GPU 브랜드 | (주)에스디에이치디(주) |
| 그래픽 카드 유형 | 통합 |
| VRAM 유형 | 소듐디엠 |
| VRAM 용량 | 16GB (XNUMX기가바이트) |
| 연결성 | Bluetooth, Wi-Fi 5, 2.5G LAN |
| USB 2.0 포트 | 1 |
| USB 3.0 포트 | 2 |
| HDMI 포트 | 1 |
| 광학 드라이브 유형 | 없음 |
| 운영 체제 | Windows 11 Pro / Linux |
| 포함된 배터리 | 예 |
| 리튬 배터리 에너지 함량 | 5W 시간 |
| 리튬 배터리 포장 | Battery contained in equipment |
| 리튬 배터리 무게 | 0.7그램 |
| Lithium Ion Battery Count | 1 |
| 제품 사용 | 게임, 비즈니스, 멀티미디어 |
| 개인용 컴퓨터 디자인 유형 | 미니 PC |
| 설치된 RAM 메모리 크기 | 16GB (XNUMX기가바이트) |
8. 보증 및 지원
보증 정보 및 기술 지원에 대해서는 GMKtec 공식 웹사이트를 참조하십시오. web사이트를 방문하거나 고객 서비스에 직접 문의하세요. 보증 청구를 위해 구매 증빙 자료로 구매 영수증을 보관하세요.


