1. 서론
구매해주셔서 감사합니다asing the GTRACING DL004 L-Shaped Gaming Desk. This manual provides detailed instructions for assembly, operation, maintenance, and troubleshooting to ensure optimal use and longevity of your desk. Please read this manual thoroughly before assembly and retain it for future reference.
2. 안전 정보
- 책상을 조립할 때는 항상 부드럽고 깨끗한 표면 위에서 조립하여 흠집이 생기는 것을 방지하십시오.
- 사용 전에 모든 나사와 패스너가 단단히 조여졌는지 확인하십시오. 정기적으로 점검하고 필요하면 다시 조여 주십시오.
- Do not overload the desk or shelves beyond the specified weight capacity (80 kg).
- 질식 위험을 방지하기 위해 작은 부품과 포장재를 어린이의 손이 닿지 않는 곳에 보관하세요.
- Avoid using power tools for assembly unless explicitly instructed, as they may overtighten screws and damage components. A manual wrench is recommended.
- The desk features rounded corners (fillet design) for safety, but exercise caution to prevent injury.
3. 패키지 내용
조립을 시작하기 전에 모든 구성 요소가 있는지 확인하세요.
- L-shaped Desktop Panels (A, B)
- Metal Frame Components (D, E, F, G, H)
- 보관 선반
- 서랍
- 조정 가능한 모니터 스탠드
- Cable Management Grommet
- 헤드폰 후크
- Stabilizer Rods (J)
- 조립용 하드웨어(나사, 육각렌치)
- Power Outlet Strip (if included with your model)
4. 설정 지침
4.1 사전 조립 노트
For a smooth assembly process, please watch the following video for helpful tips. It is recommended to use a manual wrench instead of a power drill to avoid damaging the desk components.
Video: Assembly Tips. This video provides general advice for assembling furniture, including the recommendation to use a manual wrench instead of a power drill to prevent damage.
4.2 조립 단계
- Attach Feet to Frame Components: Secure the feet to frame parts D, E, and F. Ensure they are firmly attached.
- Connect Desktop Panels: Join desktop panel A and side desktop panel B. Use the provided wooden dowels and ensure a tight fit to minimize gaps.
- Attach Frame G: Secure frame G to the underside of the connected desktop panels. Tighten screws to approximately 70% to allow for adjustments. Do not use a power drill.
- Attach Frame H: Secure frame H to the underside of the desktop panels. Ensure the four vertical screws and two horizontal screws are tightened to about 70%. The two outermost horizontal holes are not used.
- 측면 선반 조립하기: Attach the side shelves to the frame. Ensure the holes on the surface of the shelf board are facing downwards. Tighten screws to approximately 70%.
- Install Stabilizer Rods (J): Attach the stabilizer rods (J) to the designated points on the frame to enhance stability.
- 모니터 스탠드 설치: Attach the monitor stand to the desktop. Ensure the cylindrical posts are installed vertically and do not overtighten the screws (95% tightness is sufficient). If you prefer more desktop space, the monitor stand can be left unattached for easy movement.
- Install Cable Management Grommet: Insert the cable management grommet into the designated hole on the desktop.
- Install Power Outlet Strip: If your model includes a power outlet strip, attach it to the side of the monitor stand or desktop using the provided screws.
- 헤드폰 후크 부착: 헤드폰 걸이를 책상 옆면에 고정하세요.
Video: L-shaped Desk Detailed Introduction. This video provides a detailed overview of the desk's features and assembly process.
Video: Assembly Skills. This video demonstrates various assembly techniques applicable to the desk.
5. 사용 설명서
5.1 조절식 모니터 스탠드
The monitor stand is designed for ergonomic comfort. Its height can be adjusted to suit your preference, promoting a comfortable posture during use. For maximum desktop space, the monitor stand can be removed or repositioned as needed.
5.2 Storage Shelves and Drawers
The desk features a removable storage shelf on the right side, providing convenient access to essential items. Two fabric drawers offer additional storage for accessories, helping to keep your workspace tidy. The side panels of the desk include anti-drop panels and rounded corners for safety, preventing items from falling and reducing the risk of injury.
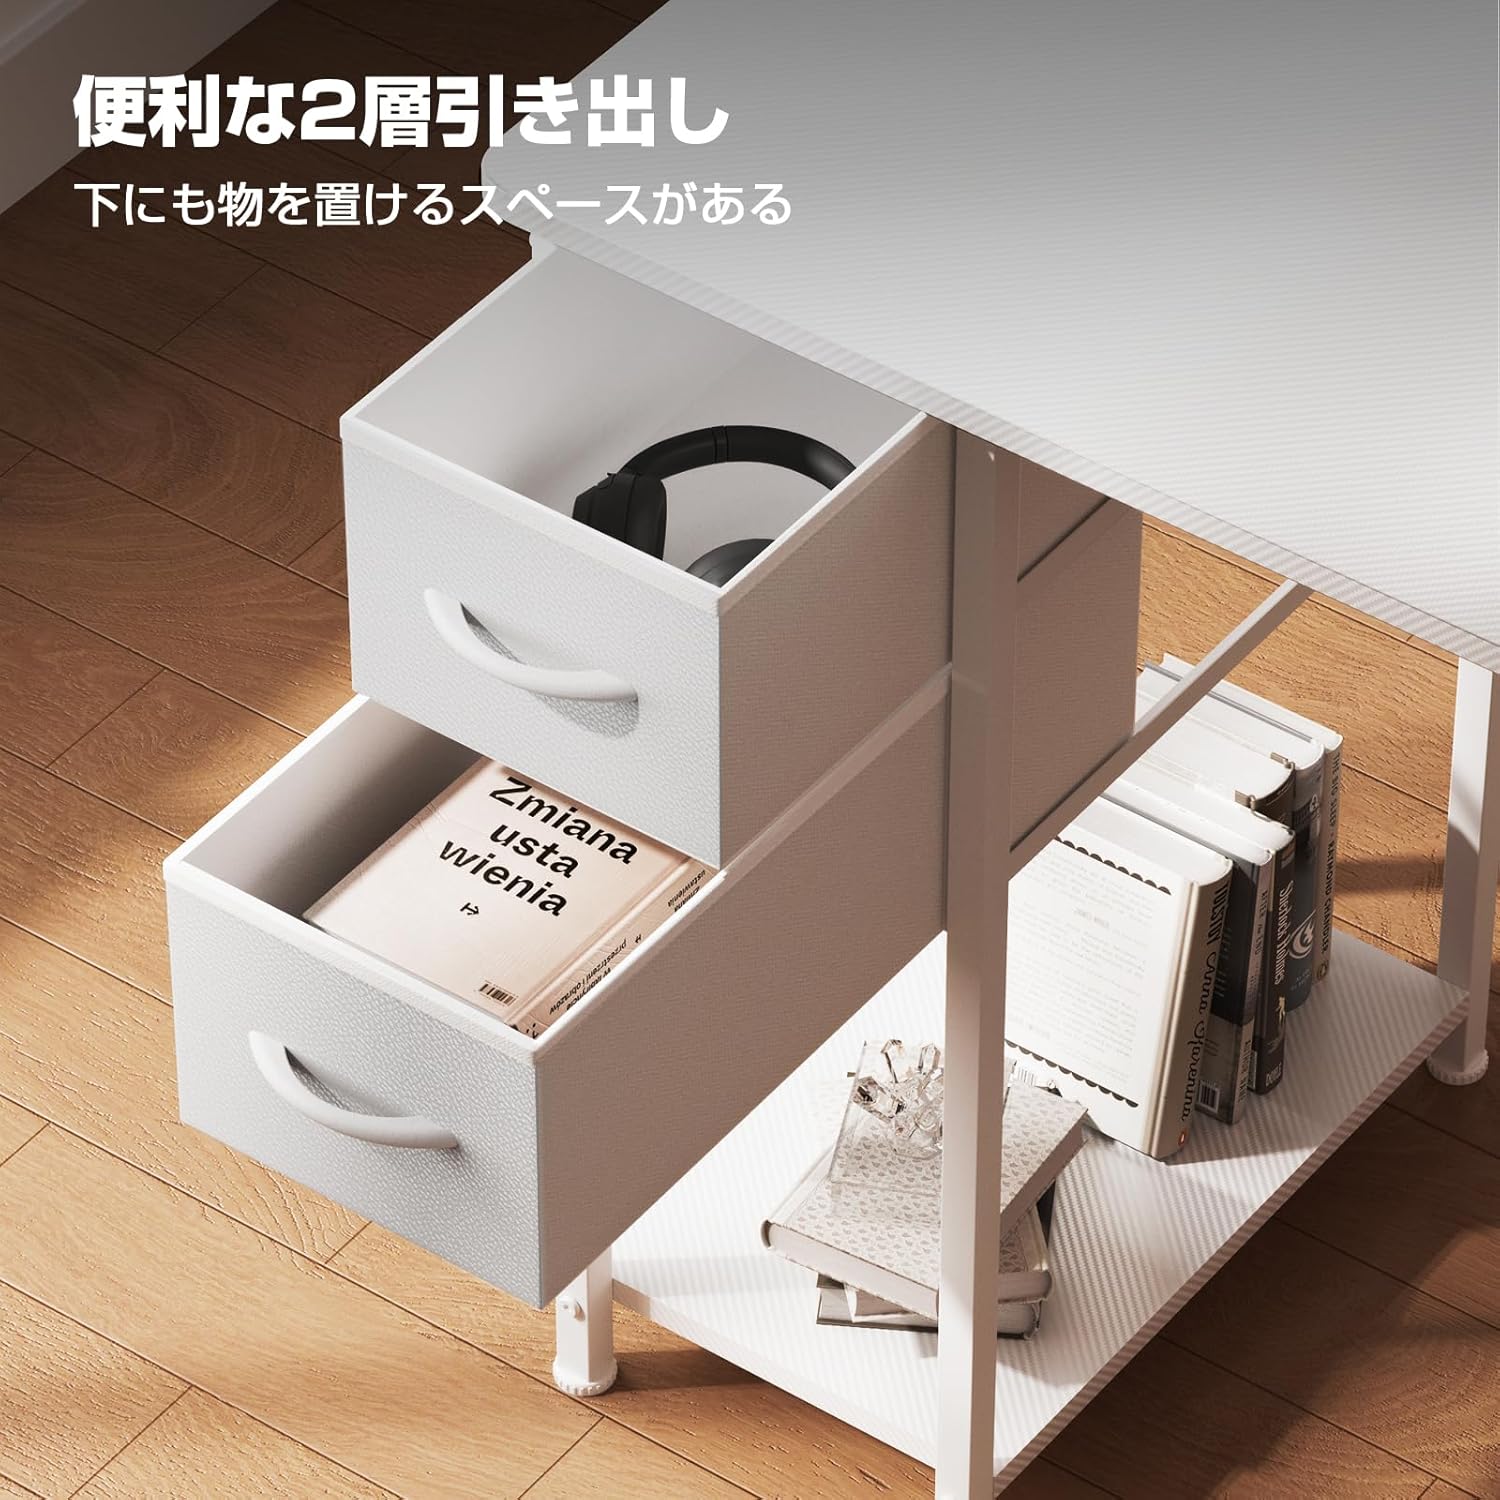
Image: Two convenient fabric drawers for storage, located on the left side of the desk.
5.3 케이블 관리
The integrated cable management grommet helps organize your wires, keeping your desktop neat and free from clutter. Utilize the included power outlet strip for easy access to charging ports for your devices.
Video: L-shaped Gaming Desk Detailed Video. This video highlights the various features and functionalities of the desk, including storage and cable management.
6. 유지관리
- 청소: 부드러운 천으로 책상 표면을 닦으세요.amp cloth. Avoid abrasive cleaners or harsh chemicals that may damage the carbon fiber finish.
- 점검: 모든 나사와 연결부가 단단히 조여져 있는지 주기적으로 점검하십시오. 헐거워진 부분이 발견되면 다시 조여주십시오.
- 보호: Avoid placing extremely hot or cold items directly on the desk surface. Use coasters or protective pads as needed.
- 무게 분포 : 책상과 선반 전체에 무게를 고르게 분산시켜 특정 지점에 부담이 집중되지 않도록 하십시오.
7. 문제 해결
| 문제 | 가능한 원인 | 해결책 |
|---|---|---|
| 책상이 흔들린다 | 느슨한 나사나 고르지 않은 바닥. | Check and tighten all assembly screws. Adjust the leveling feet on the bottom of the desk to stabilize it on uneven surfaces. |
| 조립 과정에서 부품들이 제대로 정렬되지 않습니다. | 부품의 방향이 잘못되었거나 나사가 완전히 풀리지 않았습니다. | Review the assembly instructions carefully. Ensure all parts are oriented correctly. Loosen screws slightly to allow for adjustment, then re-tighten. |
| 서랍이 부드럽게 열리지 않습니다. | Obstruction or improper installation. | Check for any items obstructing the drawer's path. Ensure the drawers are inserted correctly into their slots. |
8. 사양
| 특징 | 세부 사항 |
|---|---|
| 상표 | 지트레이싱 |
| 모델 | DL004 |
| 색상 | 하얀색 |
| 치수(길이 x 너비 x 높이) | 130 x 48 x 74cm |
| 제품 무게 | 10kg |
| 하중 용량 | 80kg |
| 재료 | Metal (Base), Carbon Fiber Finish (Desktop) |
| 특징 | Adjustable height monitor stand, Removable storage shelf, Cable management, Rounded corners |
| 조립이 필요합니다 | 예 |
9. 보증 및 지원
The GTRACING DL004 L-Shaped Gaming Desk comes with a 12-month manufacturer's quality guarantee from the date of purchase. This warranty covers initial defects and any subsequent issues that may arise under normal use. Spare parts are stocked in warehouses in Tokyo and Osaka, Japan, and can be delivered as early as the next day for replacement.
For any questions, concerns, or warranty claims, please contact GTRACING customer support through the retailer where you purchased the product. Please have your purchase receipt and product model number ready when contacting support.


