1. 서론
This manual provides detailed instructions for the GLEDOPTO ZigBee 3.0 RGBCCT LED Strip Controller Pro, Model GL-C-008P(MIX). This device allows for smart control of RGB, warm white, and cold white LED strips, offering extensive color and brightness adjustments through a compatible ZigBee hub.
중요 참고 사항: Tuya Zigbee hubs currently block third-party devices. GLEDOPTO ZigBee products are not compatible with Tuya hubs at this time. Please consider this before purchase if you intend to use a Tuya hub.
2. 제품 특징
- ZigBee 3.0 프로토콜: Utilizes advanced ZigBee 3.0 for fast, stable, and energy-efficient wireless communication.
- RGBCCT Mixing: Combines RGB color and tunable white light (2700K-6500K) for a wide range of lighting possibilities.
- 폭넓은 호환성: Works with Hub Bridge, Homey, Alexa, SmartThings, and other standard ZigBee hubs.
- 음성 및 앱 제어: Supports voice commands (e.g., Amazon Alexa) and smartphone app control for convenient adjustments.
- 내구성 있는 디자인: 난연성 PC 소재로 제작되었습니다.
- 브로드볼tag전자 지원: Compatible with 12V, 24V, 36V, 48V, and 54V analog LED strips.
3. 제품 오버view 및 사양

이미지 3.1: 앞쪽 view of the GLEDOPTO ZigBee 3.0 RGBCCT LED Strip Controller Pro. This image displays the input and output terminals, model number (GL-C-008P(MIX)), input voltage range (DC12-24-36-48-54V), output current per channel (5A Max), total output current (10A Max), operating temperature (-20 to +60°C), and common anode/constant voltage type. It also shows the wire preparation guide and reset button location.
3.1. 기술 사양
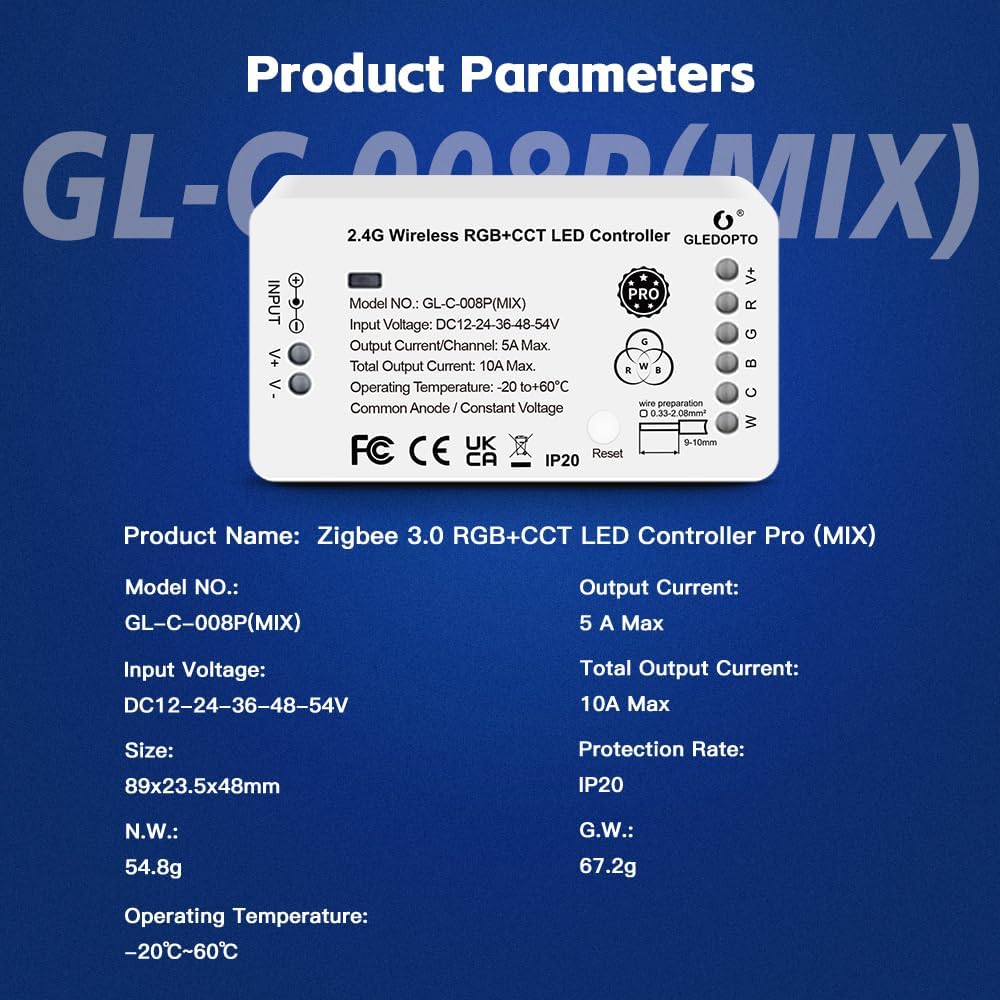
이미지 3.2: Detailed product parameters for the GLEDOPTO ZigBee 3.0 RGBCCT LED Controller Pro. This image lists the product name, model number (GL-C-008P(MIX)), input voltage (DC12-24-36-48-54V), size (89x23.5x48mm), net weight (54.8g), operating temperature (-20°C to 60°C), output current (5A Max), total output current (10A Max), protection rate (IP20), and gross weight (67.2g).
| 매개변수 | 값 |
|---|---|
| 모델 번호 | GL-C-008P(MIX) |
| 입력 Voltage | DC 12V-24V-36V-48V-54V |
| 출력 전류/채널 | 최대 5A |
| 총 출력 전류 | 최대 10A |
| 작동 온도 | -20°C ~ +60°C |
| 보호율 | IP20 |
| 치수 | 89mm x 23.5mm x 48mm |
| 연결 유형 | 공통 양극 / 일정 전압tage |
| 무선 프로토콜 | 지그비 3.0 |
4. 설정 및 설치
4.1. Wiring the LED Strip Controller
Ensure all power is disconnected before proceeding with wiring. The controller uses a press-type design for secure wire connections.
이미지 4.1: Illustration of the press-type wiring design. To connect wires, press down on the orange tab with a small screwdriver or similar tool, insert the stripped wire (9-10mm length, 0.33-2.08mm² cross-section), and release the tab to secure the connection.
- 전선 준비: Strip approximately 9-10mm of insulation from the ends of your LED strip wires and power supply wires. The recommended wire cross-section is 0.33-2.08mm².
- LED 스트립 연결하기: Connect the R, G, B, C, W, and V+ wires from your RGBCCT LED strip to the corresponding output terminals on the controller. Ensure correct polarity for V+.
- 전원 공급 장치 연결: Connect the positive (V+) and negative (V-) wires from your DC power supply to the INPUT terminals on the controller. Observe correct polarity.
4.2. 전원 공급 장치 선택
The controller supports a wide range of input voltages. Select an appropriate power supply that matches the voltagLED 스트립의 요구 사항.

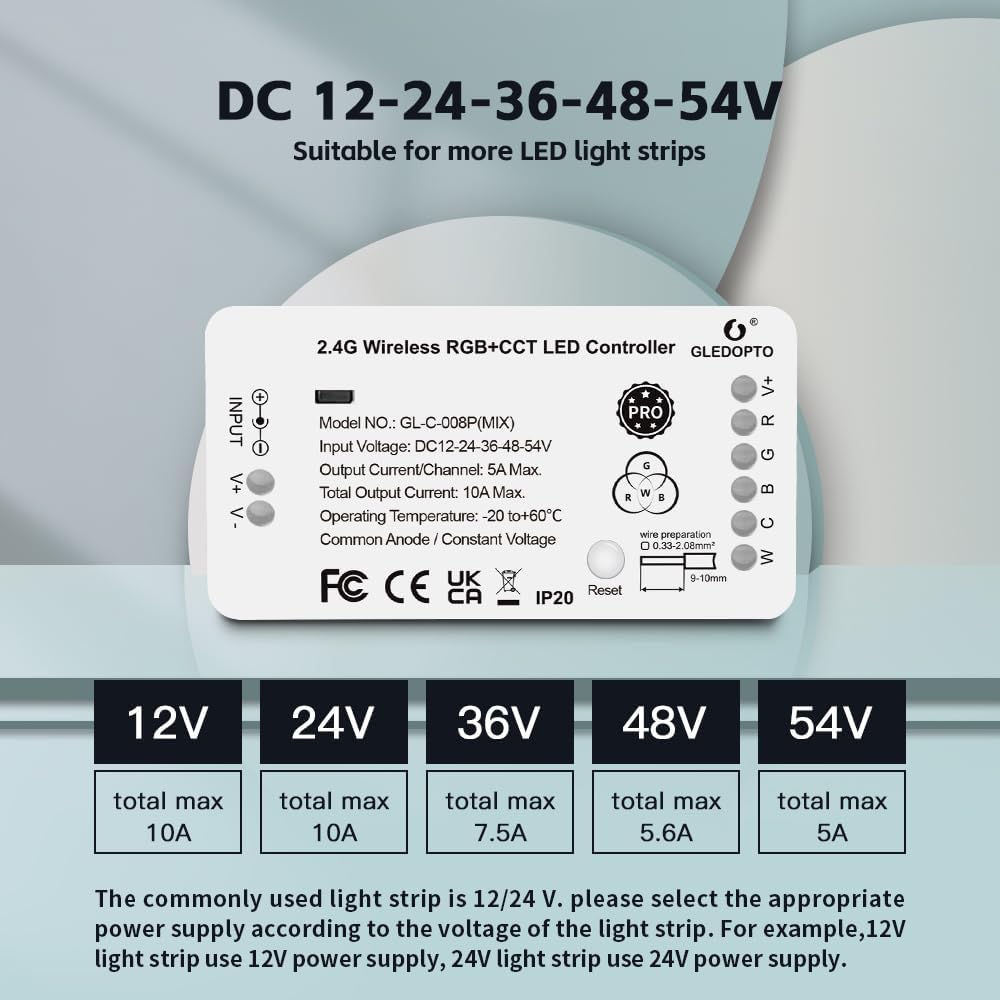
이미지 4.2: 권tage compatibility chart for the GLEDOPTO LED controller. It shows that for 12V and 24V LED strips, the total maximum current is 10A. For 36V, it's 7.5A; for 48V, 5.6A; and for 54V, 5A. Always match the power supply voltage to the LED strip voltage.
- For a 12V LED strip, use a 12V power supply.
- For a 24V LED strip, use a 24V power supply.
- Ensure the power supply's total current output meets or exceeds the total current draw of your LED strip, considering the controller's 10A maximum total output.
4.3. ZigBee 허브와 페어링
After wiring and powering on the controller, it needs to be paired with a compatible ZigBee hub.
- 전원 켜기: Connect the power supply to the controller and LED strip. The LED strip should briefly light up.
- 허브에서 페어링 시작: Open your ZigBee hub's application (e.g., SmartThings, Homey, Philips Hue) and initiate the device discovery or pairing mode.
- 컨트롤러 재설정(필요한 경우): If the controller does not automatically appear, press and hold the "Reset" button on the controller for approximately 5 seconds until the connected LED strip flashes, indicating it has entered pairing mode.
- 페어링 확인: Once discovered by your hub, follow the on-screen instructions in the hub's app to complete the pairing process.
5. 사용 설명서
5.1. App Control (Color and White Light Mixing)
Once paired with your ZigBee hub, you can control the LED strip using the hub's smartphone application.

이미지 5.1: Demonstration of RGB+White Light Mix control via a smartphone app. When the color selector is moved towards the edge of the color wheel, only the RGB light turns on. When moved towards the center, both RGB and white light turn on together, allowing for richer, mixed colors.
- 색상 선택: Use the color wheel in your app to select from millions of colors.
- 백색광 조절: Adjust the color temperature of the white light from warm white (2700K) to cold white (6500K).
- 밝기 조절: Dim or brighten the LED strip to your desired level.
- RGB + CCT Mixing: The controller allows for seamless mixing of RGB colors with tunable white light. Moving the color selector towards the center of the color wheel typically activates both RGB and white LEDs for a broader spectrum of hues and improved color rendering.
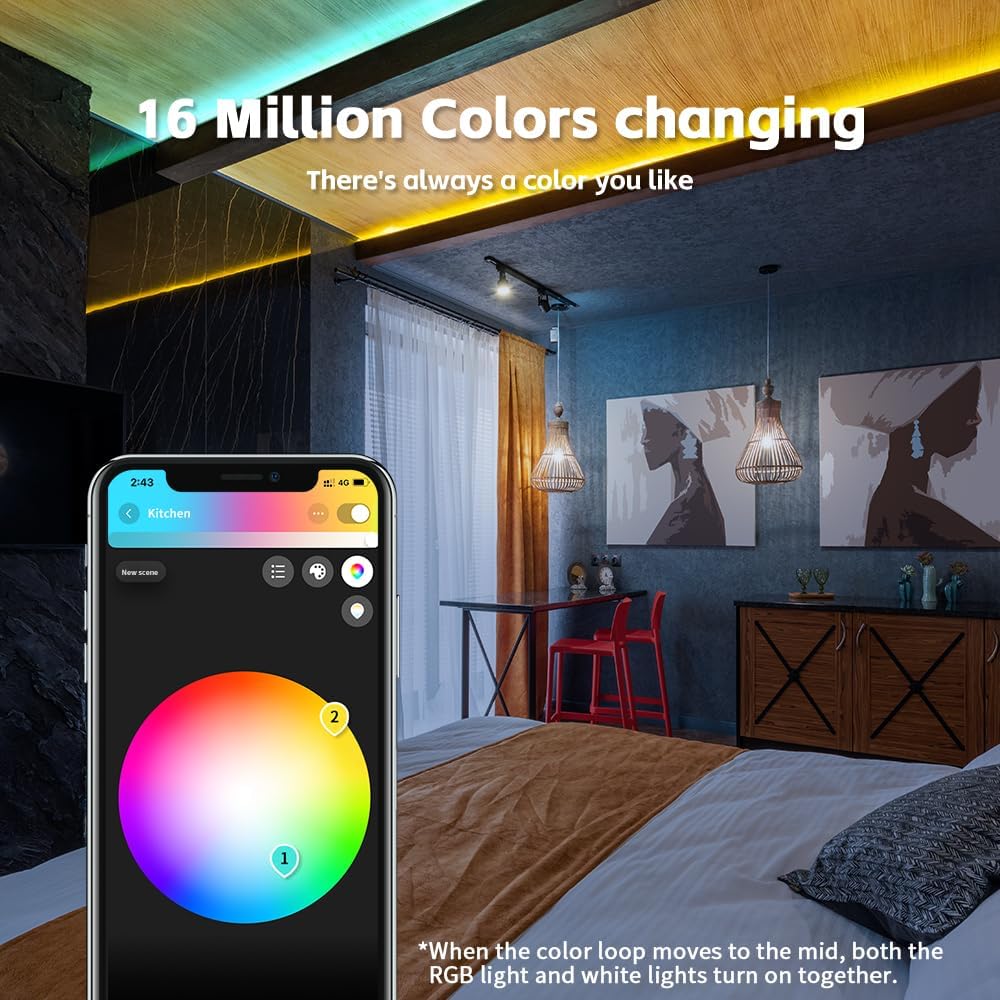
이미지 5.2: 전ample of a room illuminated with 16 million colors controlled by the smartphone app. The image highlights the extensive color customization available, allowing users to create various ambiances.
5.2. Voice Control (e.g., Amazon Alexa)
If your ZigBee hub is integrated with a voice assistant like Amazon Alexa, you can control your LED strip using voice commands.

이미지 5.3: Illustration of voice control functionality with Amazon Echo Plus. Examples of commands include "Alexa, turn on the bedroom light," "Alexa, set to warm white," and "Alexa, increase to 70%."
- Ensure your ZigBee hub is linked to your Amazon Alexa account.
- 다음과 같은 명령을 사용하세요.
- "알렉사, [조명 이름] 켜줘."
- "알렉사, [조명 이름]을 꺼줘."
- "Alexa, set [Light Name] to [Color]."
- "Alexa, set [Light Name] to warm white."
- "알렉사, [조명 이름]의 밝기를 50%로 낮춰줘."
- "Alexa, brighten [Light Name]."
6. 호환성
The GLEDOPTO ZigBee 3.0 RGBCCT LED Strip Controller Pro is designed for broad compatibility with various ZigBee 3.0 gateways.

이미지 6.1: Compatibility chart for ZigBee 3.0 gateways. It indicates compatibility with Homey, Conbee, SmartThings, Philips Hue, and Amazon Echo Plus for RGB, CCT, Brightness, and Mix functionalities. Note the specific warning regarding Tuya hubs.
Compatible Gateways:
- 가정 다운
- 콘비
- 스마트씽스
- 필립스 휴
- Amazon Echo Plus / Studio
- Other standard ZigBee 3.0 hubs
Important Compatibility Alert: As of the latest information, Tuya Zigbee hubs have implemented restrictions that prevent third-party devices, including GLEDOPTO products, from connecting. If you use a Tuya hub, this controller will not be compatible.
7. 유지관리
The GLEDOPTO LED Strip Controller Pro requires minimal maintenance.
- 청소: 컨트롤러를 마른 부드러운 천으로 살살 닦아주세요. 액체 세척제나 용제를 사용하지 마세요.
- 환경: Ensure the controller is installed in a dry environment, away from direct sunlight, extreme temperatures, and high humidity. The IP20 rating indicates it is not protected against water.
- 펌웨어 업데이트: Periodically check your ZigBee hub's application for any available firmware updates for connected devices, including the GLEDOPTO controller.
8. 문제 해결
| 문제 | 가능한 원인 / 해결책 |
|---|---|
| LED 스트립에 불이 들어오지 않습니다. |
|
| Controller cannot be paired with ZigBee hub. |
|
| Colors are incorrect or white light is not working. |
|
| 음성 제어가 응답하지 않습니다. |
|
9. 안전 정보
- 설치 또는 유지 관리 전에 항상 전원을 차단하십시오.
- This device is for indoor use only (IP20 rating). Do not expose to water or high humidity.
- 전원 공급 장치 볼륨을 확인하십시오.tage matches the LED strip voltage and is within the controller's specified input range.
- 최대 총 출력 전류 10A를 초과하지 마십시오.
- 어린이의 손이 닿지 않는 곳에 보관하세요.
- 컨트롤러를 분해하거나 개조하지 마십시오. 그렇게 할 경우 모든 보증이 무효화됩니다.
10. 보증 및 지원
GLEDOPTO products typically come with a standard manufacturer's warranty. Please refer to the product packaging or the official GLEDOPTO web구체적인 보증 약관은 해당 사이트에서 확인하세요.
For technical support, troubleshooting assistance, or warranty claims, please contact GLEDOPTO customer service through their official channels or the retailer from whom you purchased the product.
온라인 리소스: For additional information, FAQs, and community support, visit the official GLEDOPTO website or relevant smart home forums.


