1. 서론
This manual provides detailed instructions for the setup, operation, and maintenance of your CYCPLUS M3 GPS Cycle Computer. Please read this manual thoroughly before using the device to ensure proper functionality and to maximize your cycling experience.
2. 패키지 내용
패키지에 모든 품목이 들어 있는지 확인하세요.
- CYCPLUS M3 GPS Cycle Computer
- USB-C 충전 케이블
- Bike Mount and Rubber Bands
- 사용 설명서 (본 문서)
3. 제품 오버view
The CYCPLUS M3 features a 2.8-inch FSTN reflective LCD display, designed for clear visibility in various lighting conditions, including direct sunlight. It includes physical buttons for navigation and control.

이미지: 앞면 view of the CYCPLUS M3 GPS Cycle Computer, displaying current speed, time, altitude, distance, and other metrics.

Image: The CYCPLUS M3 mounted on a bicycle handlebar, showcasing its compact and slim profile.
버튼 및 기능:
- Left Button (L1): Long press for Power ON/OFF. Short press to Start/Pause recording.
- Right Button (R1): Navigate display screens. Confirm selection in settings.
- Right Button (R2): Long press to save current ride data.
4. 설정
4.1 장치 장착
- Attach the bike mount to your handlebar or stem using the provided rubber bands.
- Align the back of the M3 device with the mount and twist it clockwise until it locks securely into place.
4.2 초기 전원 켜기 및 기본 설정
- Long press the Left Button (L1) to power on the device.
- Upon first use, the device may prompt you to set basic parameters such as language, time zone, and unit system (metric/imperial). Use the Right Button (R1) to navigate and confirm.
- The device will automatically search for GPS signals. For optimal performance, ensure you are in an open outdoor area. The M3 supports 5 satellite systems (GPS / GLONASS / Galileo / BeiDou / QZSS) for fast and stable positioning.

Image: Visual representation of the M3's multi-satellite system (GPS, GLONASS, Galileo, BeiDou, QZSS) for enhanced positioning accuracy.
4.3 App Pairing (CYCPLUS FIT)
To unlock full customization and data synchronization features, pair your M3 with the CYCPLUS FIT app.
- Download the "CYCPLUS FIT" app from Google Play Store (Android) or Apple App Store (iOS).
- 계정을 만들거나 로그인하세요.
- In the app, navigate to the device pairing section and select the M3.
- Follow the on-screen instructions in the app to complete the pairing process via Bluetooth.

Image: The CYCPLUS FIT app interface, demonstrating features like data synchronization and analysis.
4.4 Sensor Pairing (ANT+)
The M3 supports ANT+ sensors for additional data such as heart rate, speed, cadence, and power. These sensors are sold separately.
- ANT+ 센서가 활성화되어 있고 M3의 범위 내에 있는지 확인하십시오.
- On the M3, navigate to the sensor pairing menu (refer to the device's on-screen menu for exact steps, usually found under 'Settings' or 'Sensors').
- '센서 추가'를 선택하고 페어링하려는 센서 유형을 선택하세요.
- M3이 사용 가능한 센서를 검색합니다. 목록에서 센서를 선택하여 페어링하세요.

Image: An illustration of the various data metrics the M3 can display, including those requiring optional ANT+ sensors such as heart rate, cadence, and power.
5. 사용 설명서
5.1 Basic Ride Recording
- Power on the device (long press L1).
- Wait for GPS signal acquisition (indicated by a stable GPS icon).
- Short press L1 to start recording your ride.
- During the ride, short press L1 to pause recording. Short press again to resume.
- To end and save the ride, long press R2.
5.2 데이터 표시 사용자 지정
The M3 allows you to customize the data fields displayed on its screen via the CYCPLUS FIT app. You can configure up to 8 data items per page.
- Open the CYCPLUS FIT app on your smartphone and ensure it's connected to your M3.
- Navigate to the 'Device Settings' or 'Display Settings' section within the app.
- Select the data fields you wish to display on each screen page.
- Sync the settings to your M3 device.
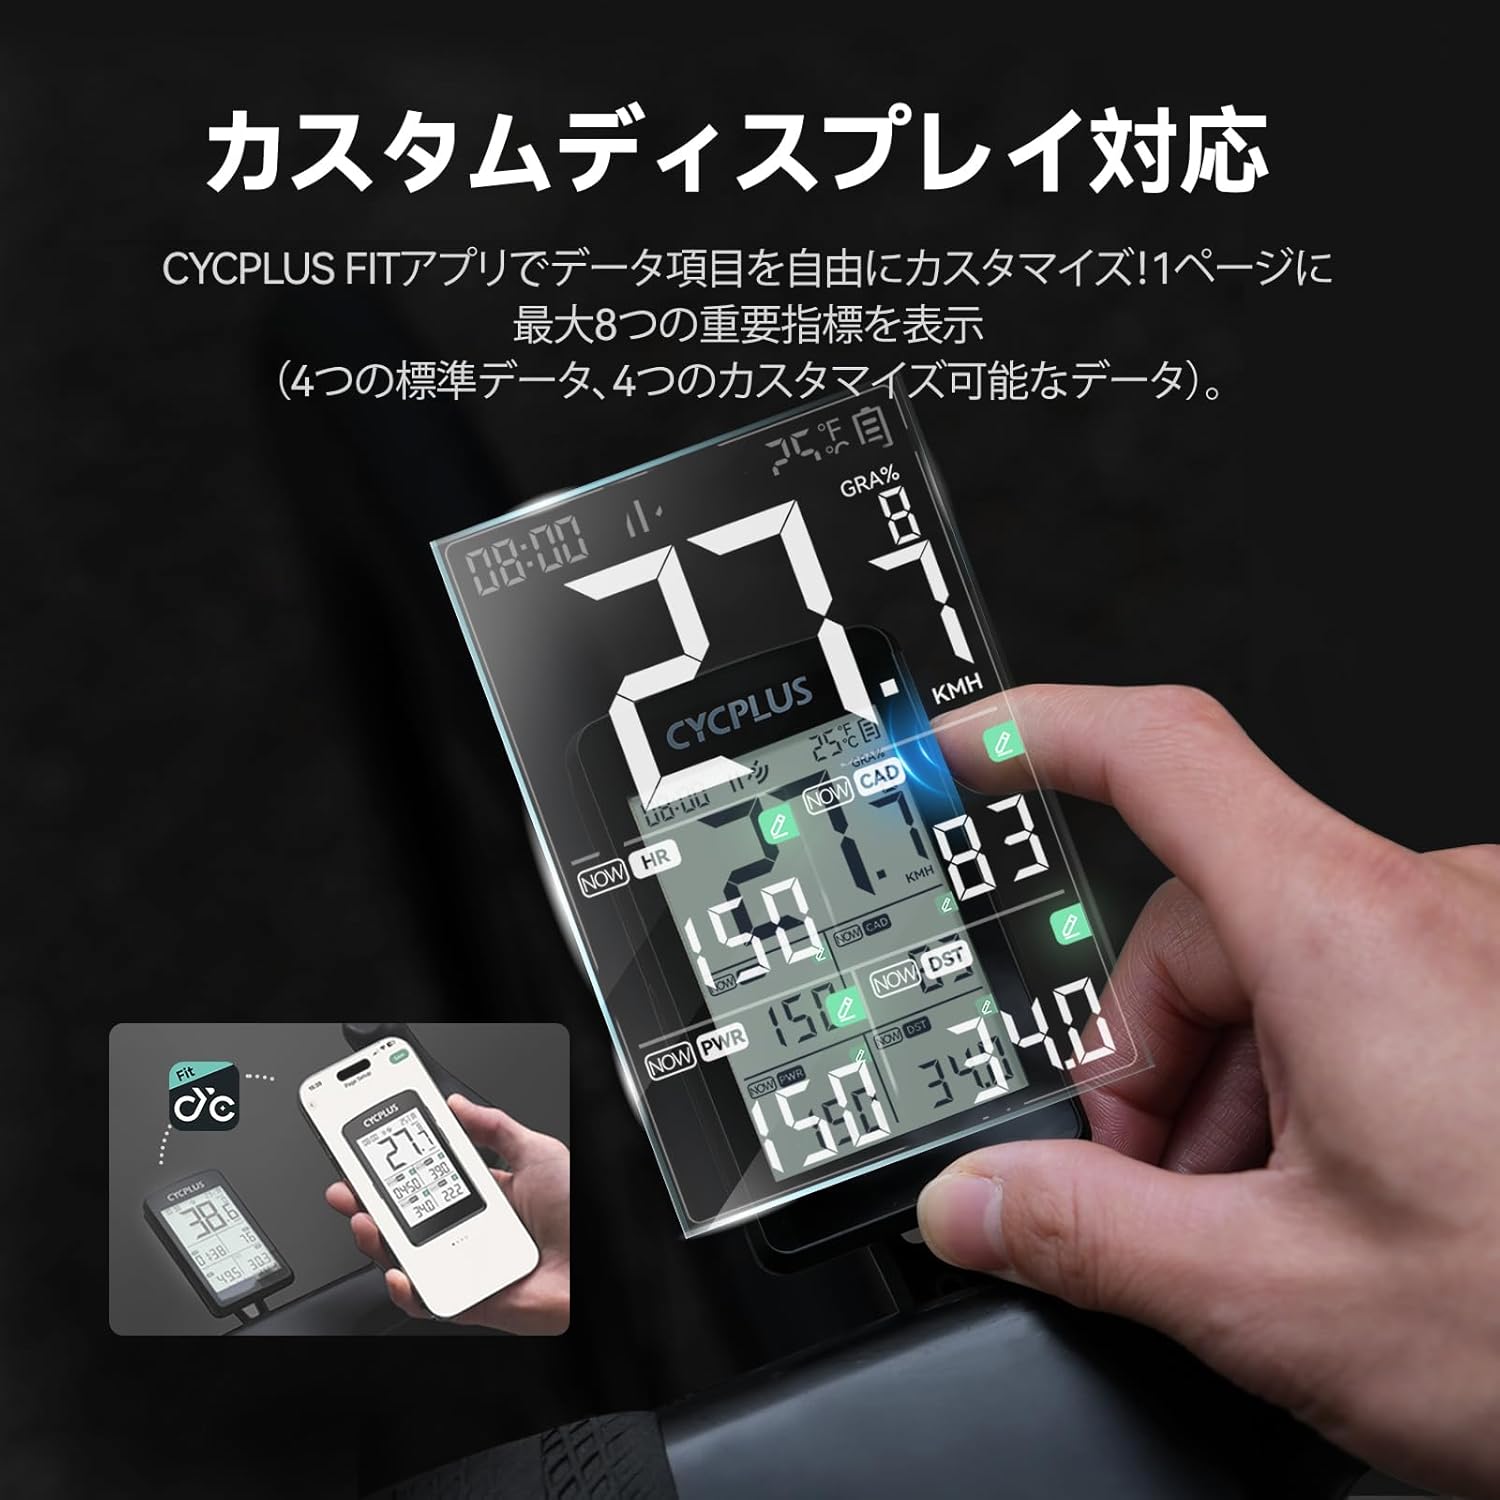
Image: Customizing the M3's display layout and data fields using the CYCPLUS FIT smartphone application.
5.3 Automatic Backlight and Auto-Wake Function
The M3 features an automatic backlight that activates in low-light conditions (e.g., 6 PM to 9 AM) for improved visibility. The device also has an auto-wake function: if it detects no movement for 10 minutes, it enters a sleep state. Vibration or movement will automatically restart it.
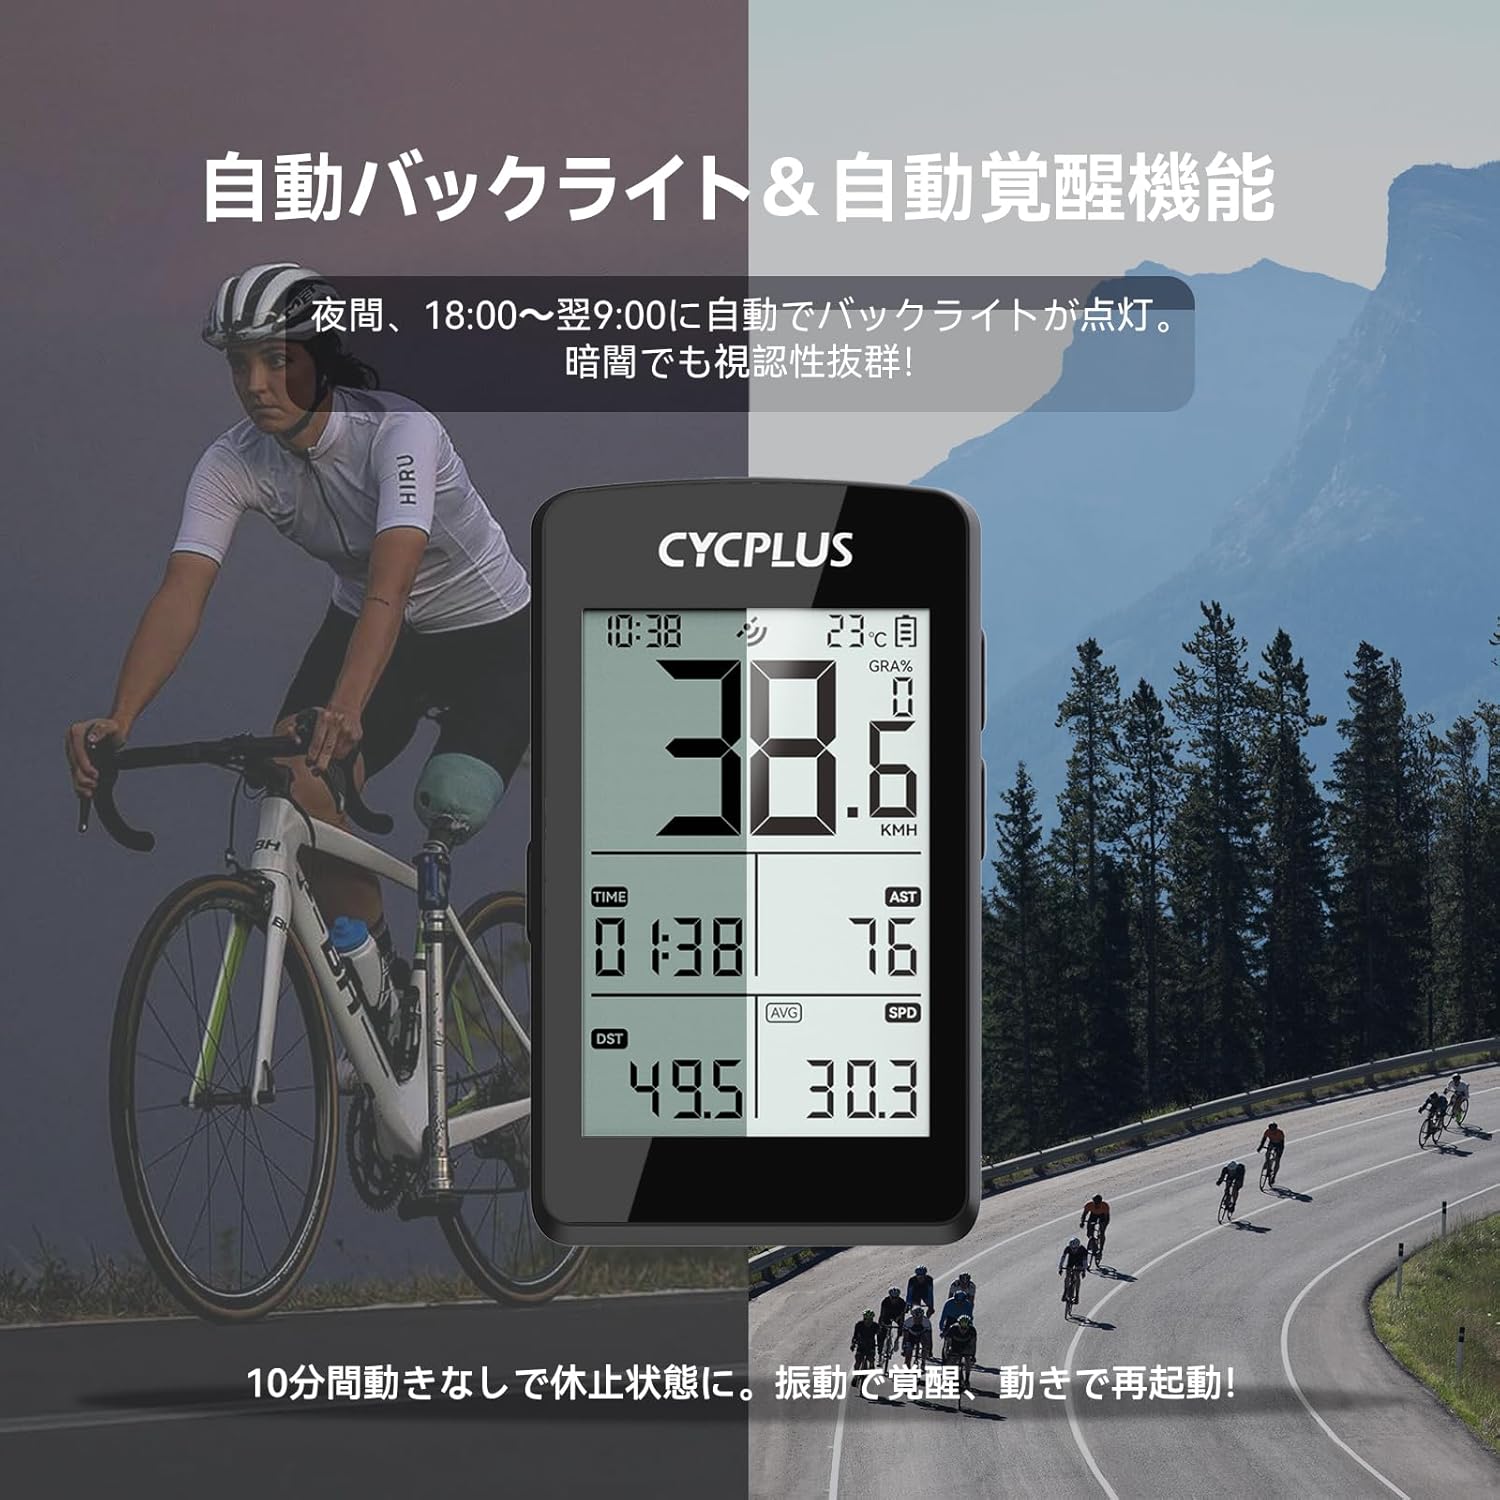
Image: The M3's automatic backlight feature shown during a night ride, ensuring data visibility in dark conditions, alongside a daytime usage scenario.
6. 충전
The M3 is equipped with a 1500mAh lithium battery, providing up to 100 hours of continuous operation. It supports USB-C fast charging.
- Connect the provided USB-C cable to the charging port on the M3.
- 케이블의 다른 쪽 끝을 표준 USB 전원 어댑터(별도 구매) 또는 컴퓨터 USB 포트에 연결하십시오.
- A full charge takes approximately 2.5 hours. The battery indicator on the screen will show charging status.

Image: The USB-C charging port of the M3, emphasizing its long battery life of up to 100 hours.
7. 데이터 동기화
After your ride, you can synchronize your data to the CYCPLUS FIT app and other platforms like Strava.
- Ensure your M3 is connected to the CYCPLUS FIT app via Bluetooth.
- The app will automatically detect and download new ride data from the M3.
- Within the CYCPLUS FIT app, you can configure automatic synchronization with third-party platforms such as Strava for further analysis and sharing.
8. 유지관리
8.1 청소
부드러운 천으로 장치를 닦으십시오. damp cloth. Do not use abrasive cleaners or solvents, as they may damage the device's surface or screen.
8.2 방수성
The CYCPLUS M3 has an IPX67 water resistance rating, meaning it is protected against dust and can withstand immersion in water up to 1 meter for 30 minutes. It is suitable for use in rain, but avoid prolonged submersion or high-pressure water jets.

Image: The M3 demonstrating its IPX67 waterproof capability during a rainy cycling session.
9. 문제 해결
- 장치가 켜지지 않음: Ensure the battery is charged. Connect to a USB-C charger for at least 30 minutes. If still unresponsive, perform a soft reset by holding down all buttons for 10 seconds.
- GPS 신호 없음: Ensure you are in an open outdoor area. Avoid tall buildings or dense tree cover. Allow a few minutes for the device to acquire satellites.
- 속도/거리 부정확: Ensure GPS signal is strong. If using a speed sensor, verify it is correctly paired and calibrated.
- 센서가 연결되지 않음: Ensure sensors are active and have fresh batteries. Re-pair the sensors through the M3's settings menu.
- 앱이 데이터를 동기화하지 않음: Ensure Bluetooth is enabled on your smartphone and the M3 is connected to the CYCPLUS FIT app. Check for app updates.
- Display issues (e.g., blank screen in extreme heat): The device may temporarily shut down or experience display issues in extreme temperatures. Allow it to return to a normal operating temperature.
10. 사양
| 특징 | 사양 |
|---|---|
| 모델 | M3 |
| 표시하다 | 2.8-inch FSTN LCD |
| GPS 시스템 | GPS / GLONASS / Galileo / BeiDou / QZSS |
| 배터리 수명 | 최대 100시간 |
| 충전 포트 | USB-C |
| 연결성 | ANT+, 블루투스 |
| 방수성 | IPX67 |
| 재료 | 플라스틱 |
| 치수(패키지) | 15.4 x 9.2 x 3.4cm |
| 무게(패키지) | 130g |
11. 보증 및 지원
The CYCPLUS M3 GPS Cycle Computer comes with a 2-year product warranty. For technical support, warranty claims, or any inquiries regarding your device, please contact CYCPLUS customer service. Support is available 24 hours a day, 365 days a year.
For further assistance, please visit the official CYCPLUS web해당 사이트를 참조하거나 구매 시 제공된 연락처 정보를 참조하세요.


