1. 서론
Thank you for choosing the GAMEMAX Starlight 2 AB Mid Tower ATX PC Case. This manual provides essential information for the proper installation, operation, and maintenance of your new PC case. Please read this manual thoroughly before beginning the assembly process to ensure optimal performance and longevity of your system components.
2. 안전 정보
- 구성 요소를 설치하거나 제거하기 전에 항상 벽면 콘센트에서 전원 공급 장치를 분리하세요.
- 손상을 방지하기 위해 모든 구성품을 조심스럽게 다루십시오.
- 정전기 방전(ESD)으로 인한 민감한 부품 손상을 방지하기 위해 정전기 방지 손목 스트랩을 착용하십시오.
- Keep the case away from direct sunlight, high temperatures, and moisture.
- 과열을 방지하려면 케이스 주변의 적절한 환기를 확보하세요.
- 케이스 또는 구성품을 개조하지 마십시오. 개조 시 보증이 무효화될 수 있으며 안전상의 위험이 발생할 수 있습니다.
3. 패키지 내용
패키지에 모든 품목이 들어 있는지 확인하세요.
- GAMEMAX Starlight 2 AB Mid Tower ATX PC Case
- 액세서리 상자(나사, 스탠드오프, 케이블 타이 등이 들어 있음)
- 사용 설명서 (본 문서)
4. 제품 오버view
The GAMEMAX Starlight 2 AB is a Mid Tower ATX PC case designed for efficient cooling and versatile configurations. It features a tempered glass side panel, pre-installed ARGB fans, and comprehensive hardware compatibility.
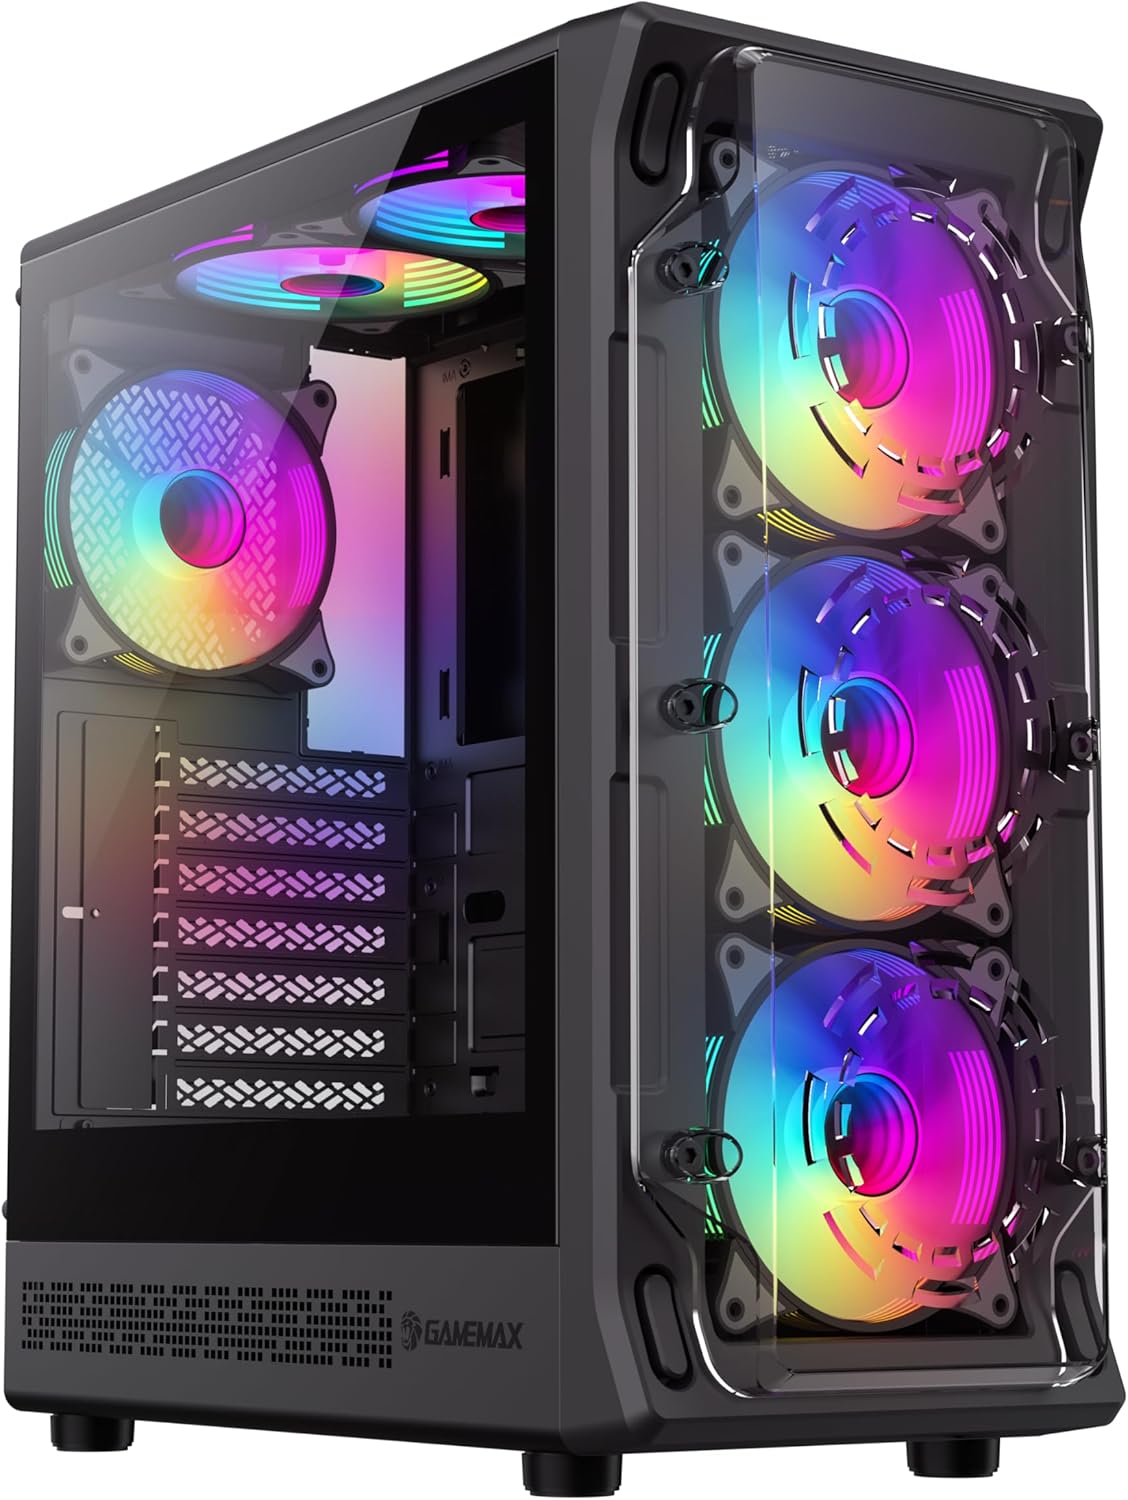
그림 4.1: 앞-왼쪽 view of the GAMEMAX Starlight 2 AB PC Case, showcasing the tempered glass side panel and the vibrant ARGB lighting of the pre-installed fans.

그림 4.2: 정면 view highlighting the three 120mm ARGB fans, visible through the clear front panel, designed for optimal airflow.
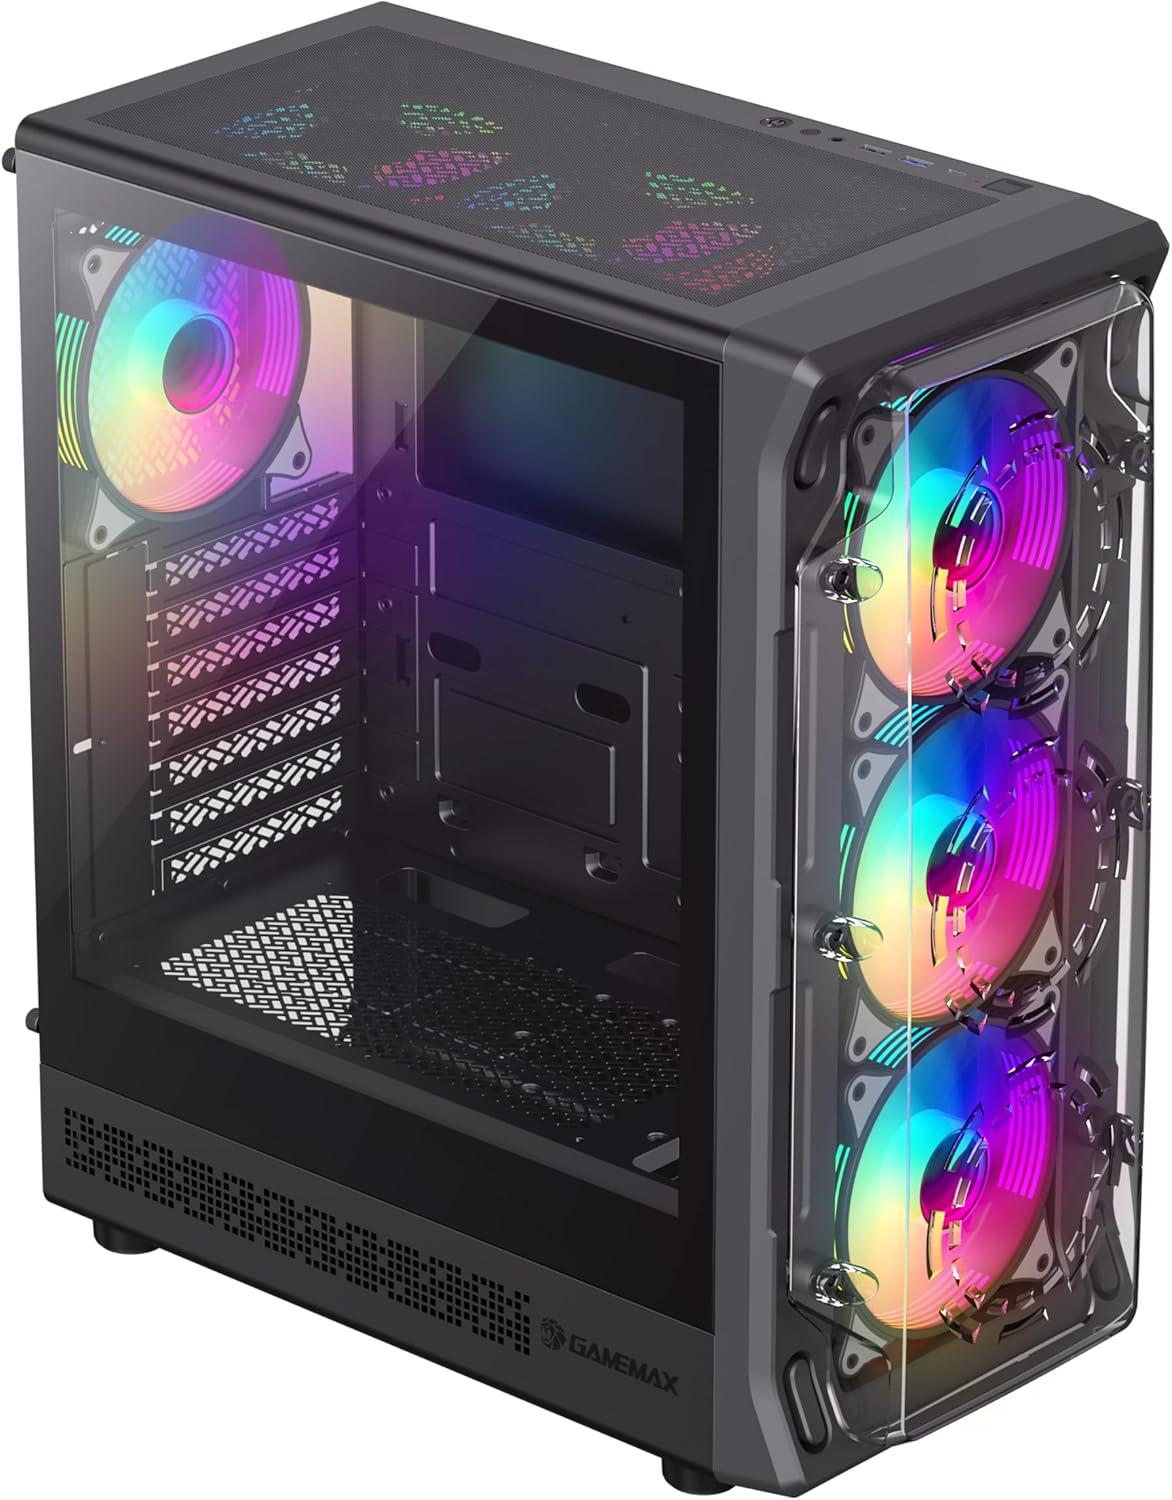
그림 4.3: Top-front perspective showing the top-mounted I/O panel, including USB ports and audio jacks, along with the mesh top panel for additional cooling.

그림 4.4: 뒤쪽 view of the PC case, illustrating the rear exhaust fan, expansion slots, and the power supply mounting area at the bottom.

그림 4.5: 내부 view of the main chamber, showing the motherboard tray, fan mounts, and amp부품 설치를 위한 공간.
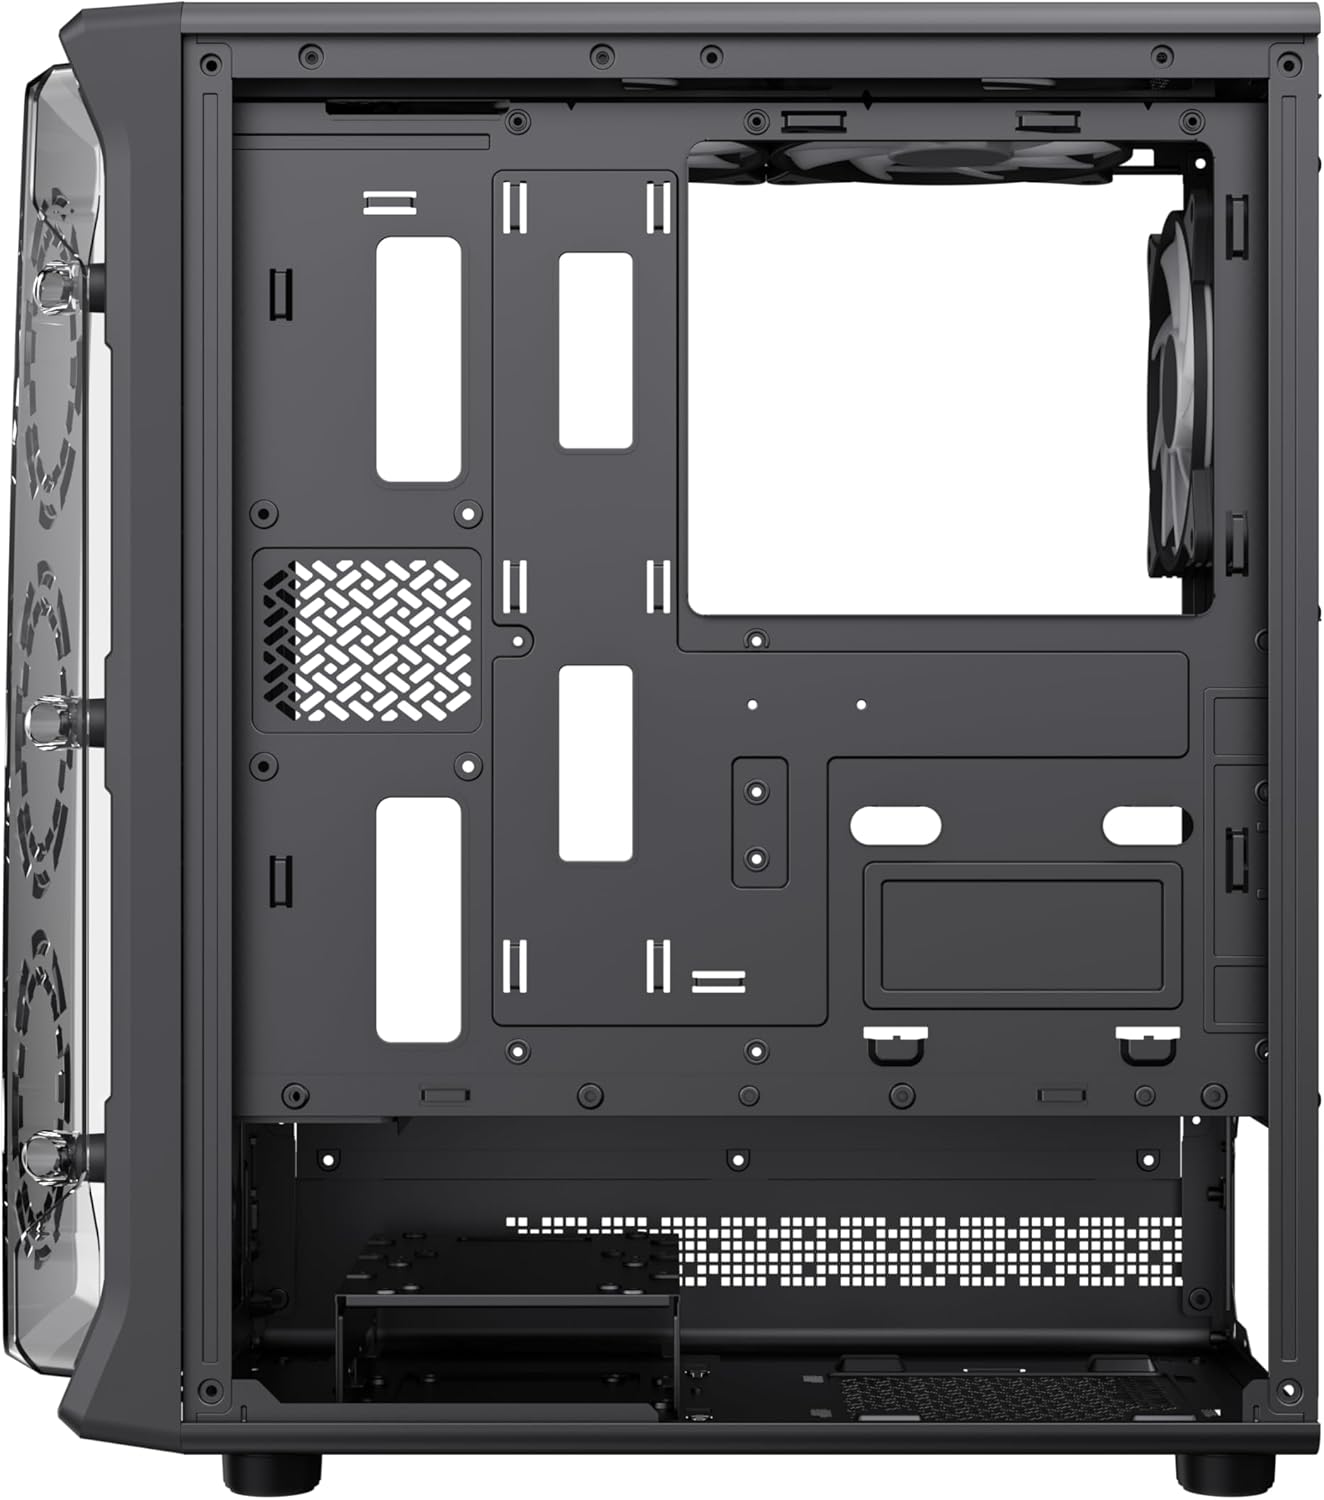
그림 4.6: View behind the motherboard tray, revealing cable routing cutouts and mounting points for storage drives, facilitating clean cable management.
5. 사양
| 특징 | 설명 |
|---|---|
| 모델 | Starlight 2 AB |
| 케이스 유형 | 미드 타워 |
| 마더보드 호환성 | ATX, 마이크로 ATX, 미니 ITX |
| 치수(길이 x 너비 x 높이) | 34 x 20 x 43.6cm |
| 무게 | 4.55kg |
| 재료 | 금속, 강화 유리 |
| 사전 설치된 팬 | 6 x 120mm ARGB Fans (3 front, 2 top, 1 rear) |
| 라디에이터 지원 | 120mm, 240mm, 360mm |
| GPU 여유 공간 | 최대 330mm |
| CPU 쿨러 높이 | 최대 155mm |
| I/O 포트 | USB 3.0, USB 2.0, Type-C, Audio |
| 특별 기능 | Built-In Fan, Dust Filter, RGB Lighting |
6. 설정 및 설치
6.1 사건 준비
- 케이스를 평평하고 안정적인 표면에 놓으십시오.
- Carefully remove the tempered glass side panel by unscrewing the thumb screws and sliding it open. Set it aside in a safe place.
- Remove the solid right side panel to access the cable management area.
6.2 마더 보드 설치
- 케이스 후면 개구부에 I/O 실드를 설치합니다.
- Align your motherboard with the standoffs inside the case. Ensure the standoffs match your motherboard's form factor (ATX, Micro ATX, Mini ITX).
- 제공된 나사로 마더보드를 고정합니다.
6.3 전원 공급 장치(PSU) 설치
- 파워서플라이를 케이스 후면 하단에 있는 전용 수납공간에 장착하십시오.
- 케이스 뒷면에서 나사로 PSU를 고정합니다.
6.4 Storage Device Installation (HDD/SSD)
- Locate the drive bays or mounting points for 3.5" HDDs and 2.5" SSDs.
- Install your storage devices using the appropriate screws.
6.5 그래픽 카드(GPU) 및 확장 카드 설치
- 케이스 후면에서 필요한 확장 슬롯 덮개를 제거하십시오.
- 그래픽 카드 또는 기타 확장 카드를 마더보드의 PCIe 슬롯에 장착하십시오.
- 카드를 나사로 고정합니다.
6.6 Connecting Front I/O Cables
Connect the following cables from the case's front I/O panel to the corresponding headers on your motherboard:
- USB 3.0 헤더
- USB 2.0 헤더
- Type-C Header (if applicable)
- HD 오디오 헤더
- Power Switch, Reset Switch, Power LED, HDD LED headers
6.7 케이블 관리
메인보드 트레이 뒤쪽의 케이블 정리용 홈과 고정 지점을 활용하여 케이블을 정리하고 고정하세요. 이렇게 하면 공기 흐름이 개선되고 미관도 향상됩니다.
7. 사용 설명서
7.1 전원 켜기
After all components are installed and cables are connected, replace both side panels. Connect your power cable to the PSU and a wall outlet, then press the power button on the case's front I/O panel to start your system.
7.2 ARGB 팬 컨트롤
The pre-installed ARGB fans can be controlled via your motherboard's ARGB software (e.g., ASUS Aura Sync, MSI Mystic Light Sync, Gigabyte RGB Fusion, ASRock Polychrome Sync) if your motherboard supports a 3-pin 5V ARGB header. Connect the ARGB cable from the case's fan hub to the motherboard's ARGB header. Refer to your motherboard manual for specific instructions on ARGB software usage.
8. 유지관리
8.1 먼지 필터 청소
The case includes integrated removable dust filters. Regularly clean these filters to maintain optimal airflow and prevent dust buildup inside your system. Gently slide out the filters, clean them with a soft brush or rinse with water (ensure they are completely dry before reinstallation), and then reinsert them.
8.2 General Case Cleaning
부드러운 d를 사용하세요amp cloth to wipe down the exterior surfaces of the case. For the tempered glass panel, use a glass cleaner and a microfiber cloth to avoid streaks. Avoid using harsh chemicals or abrasive materials.
9. 문제 해결
- 시스템 전원이 켜지지 않습니다. Ensure all power cables (24-pin ATX, 8-pin CPU, GPU power) are securely connected. Verify the PSU switch is in the 'ON' position. Check front panel power switch connection to the motherboard.
- Fans are not spinning or ARGB not working: Check fan power connections to the motherboard or fan hub. Ensure ARGB cables are correctly connected to a 3-pin 5V ARGB header on the motherboard. Verify ARGB software settings.
- 화면에 아무것도 표시되지 않습니다. Confirm the graphics card is properly seated in its PCIe slot and power cables are connected. Ensure the monitor cable is connected to the graphics card, not the motherboard's integrated graphics port (unless using integrated graphics).
- 과열: Ensure all fans are spinning correctly and are oriented for proper airflow (intake/exhaust). Clean dust filters regularly. Verify CPU cooler installation.
10. 보증 및 지원
For warranty information or technical support, please refer to the GAMEMAX official web사이트를 방문하거나 가까운 판매점에 문의하세요. 보증 청구를 위해 구매 증빙 자료를 보관하세요.
11. 폐기정보
Please dispose of this product in accordance with local environmental regulations. Do not dispose of electronic waste with general household waste.


