1. 서론
The Raddy VP7 Wireless Weather Station provides comprehensive weather monitoring for your home and surroundings. This manual details the setup, operation, and maintenance of your device, ensuring accurate and reliable weather data.
2. 상자 안에 무엇이 들어있나요?
모든 구성품을 조심스럽게 풀어서 다음 품목이 있는지 확인하세요.
- 사용 설명서
- 실외 센서
- 바람개비
- 태양광 패널
- 실내 디스플레이 콘솔
3. 제품 특징
- 7.4인치 컬러 디스플레이: Provides detailed weather information including indoor/outdoor temperature and humidity, precipitation, 12-hour weather forecasts, atomic clock, RCC calendar, wind direction and speed, dew point, felt temperature, atmospheric pressure, and daily maximum/minimum temperatures.
- High-Precision Outdoor Sensors: Includes a rain funnel, wind vane, speed sensor, thermo-hygrometer with anti-radiation shield, and a solar panel. Designed for accurate data with a communication range of up to 100 meters and resistance to harsh weather.
- 사용자 정의 알림: Configure alerts for maximum/minimum temperature and humidity, wind speed, and precipitation. Features two alarms for weekdays and weekends.
- Scalable Monitoring: Connect up to three additional Raddy R5 remote sensors to monitor up to five different areas (e.g., baby's room, garden, living room, kitchen).
4. 설정
4.1 실외 센서 설치
Proper placement of the outdoor sensor is crucial for accurate readings. Choose an open location, free from obstructions, that allows for accurate wind, rain, and temperature measurements.
- Assemble the wind cups and wind vane onto the sensor unit.
- Mount the sensor using the provided hardware. Ensure it is level using a spirit level for accurate rain and wind measurements.
- Insert 3 AA batteries (not included) into the outdoor sensor's battery compartment.

Image: The Raddy VP7 outdoor sensor showing its main components: Wind Cups, Rain Funnel, Thermo-Hygrometer Radiation Shield, Solar Panel, and Wind Vane.

Image: Various mounting options for the outdoor sensor, including top, side, and pole mounting, along with a detailed view of the sensor's battery compartment and reset button.
4.2 Indoor Display Console Setup
- Place the indoor display console in a central location within range of the outdoor sensor (up to 100 meters).
- Connect the power adapter to the console and a power outlet. Alternatively, insert 3 AA batteries (not included) for backup power. Note that continuous backlight requires AC power.
- The console will automatically search for the outdoor sensor and synchronize data. This may take a few minutes.

Image: Illustration showing the wireless data transmission between the indoor display console and the outdoor sensor, highlighting the 330ft (100m) range.
5. 사용 설명서
5.1 디스플레이 오버view
The 7.4-inch color display presents various weather parameters. Familiarize yourself with the layout:
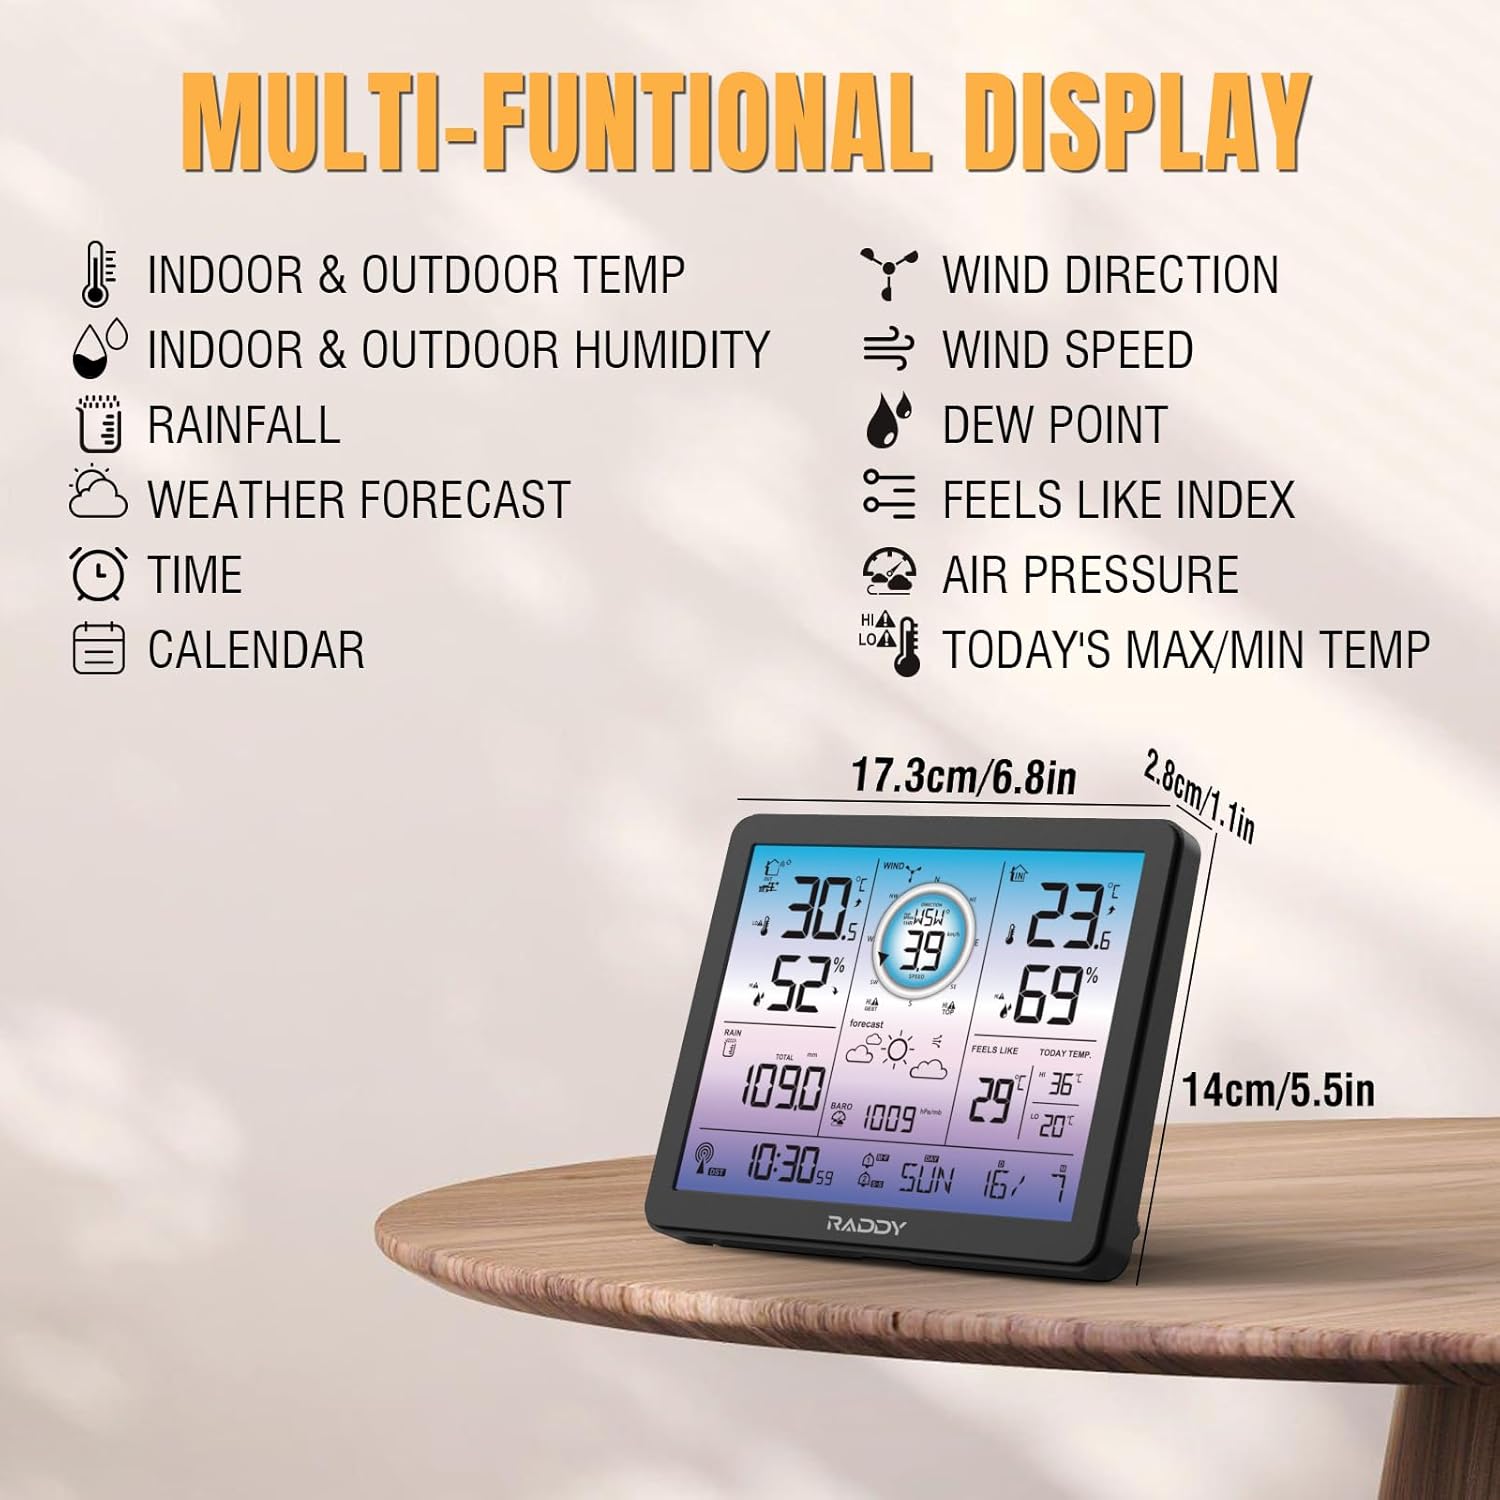
Image: The Raddy VP7 indoor display console showing its multi-functional display with various weather data points and dimensions.
- 왼쪽 상단: Indoor & Outdoor Temperature, Indoor & Outdoor Humidity
- 맨 위 오른쪽: Wind Direction, Wind Speed, Dew Point, Feels Like Index
- 가운데: Rainfall, Weather Forecast, Air Pressure
- 맨 아래: Time, Calendar, Today's Max/Min Temperature
5.2 시간 및 날짜 설정
The Raddy VP7 features an atomic clock with DCF functionality for automatic time synchronization. If manual adjustment is needed:
- 'SET' 버튼을 눌러 시간 설정 모드로 들어가세요.
- Use the '+' and '-' buttons to adjust values.
- Press 'SET' again to confirm and move to the next setting (e.g., year, month, day).

Image: The Raddy VP7 display console highlighting the atomic clock with DCF feature for precise timekeeping.
5.3 날씨 데이터 이해하기
The display provides real-time and forecasted weather information:
- 온도/습도: Displays current indoor and outdoor readings.
- 풍향 데이터: 현재 풍속과 풍향을 보여줍니다.
- 강우: Tracks daily, weekly, and monthly precipitation.
- 일기 예보: Provides a 12-hour forecast based on barometric pressure changes.
- 기압: 현재 대기압을 표시합니다.
5.4 알림
Set custom alerts for various weather conditions:
- Press the 'ALERT' button to cycle through alert settings (temperature, humidity, wind, rain).
- Use '+' and '-' to set desired high/low thresholds.
- Press 'ALERT' again to activate or deactivate the alert.
5.5 백라이트 조정
The display features 4 adjustable backlight levels (LV0 to LV3) for optimal visibility in different lighting conditions.

이미지: 네 가지 예시amples of the Raddy VP7 display showing different backlight levels from LV0 (off) to LV3 (brightest).
6. 유지관리
- 청소: Wipe the display console and outdoor sensor with a soft, damp 천. 연마성 세척제나 용매를 사용하지 마십시오.
- 배터리 교체: Replace batteries in both the outdoor sensor and indoor console when the low battery indicator appears on the display.
- 실외 센서 점검: Periodically check the outdoor sensor for debris (leaves, dirt) that might obstruct the rain funnel or wind sensors.
7. 문제 해결
| 문제 | 가능한 원인 | 해결책 |
|---|---|---|
| 야외 데이터가 표시되지 않습니다. | Outdoor sensor out of range or low battery. | Relocate sensor closer to console. Replace sensor batteries. |
| 부정확한 온도/습도 | 센서가 직사광선이나 열원에 노출되었습니다. | Ensure sensor is in a shaded, well-ventilated area. |
| 시간/날짜가 잘못되었습니다 | DCF signal interference or manual setting error. | Ensure console is away from electronic interference. Manually set time/date if automatic sync fails. |
| Rainfall not registering | Rain funnel blocked by debris. | Clear any obstructions from the rain funnel. |
8. 사양
| 특징 | 세부 사항 |
|---|---|
| 모델 | VP7 |
| 제조업체 | 래디 |
| 디스플레이 스타일 | 디지털 컬러 디스플레이 |
| 화면 크기 | 7.4인치 |
| 전원 공급 장치(콘솔) | AC 어댑터(포함), AA 배터리 3개(포함되지 않음) |
| 전원(센서) | 3x AA Batteries (not included), Solar Panel |
| 연결 기술 | 무선 전화 |
| 무선 범위 | 최대 100미터(330피트) |
| 온도 정확도 | ±1 °C |
| 포함된 구성 요소 | Instruction Manual, Outdoor Sensor, Wind Vane, Solar Panel, Indoor Display Console |
| 치수(패키지) | 38.1 x 29.7 x 14.8cm |
| 무게(패키지) | 1.7킬로그램 |
9. 보증 및 지원
Raddy provides lifetime technical support for the VP7 Wireless Weather Station. For any questions, issues, or assistance with installation and setup, please contact Raddy customer service. Refer to the product packaging or Raddy's official web연락처 정보 사이트.


