1. 서론
This manual provides essential information for the safe operation, installation, maintenance, and troubleshooting of your Shinco 120 Pints Energy Star Dehumidifier. Please read this manual thoroughly before using the appliance and retain it for future reference. Proper use ensures optimal performance and extends the lifespan of your dehumidifier.
안전 정보
- Always operate the unit on a level surface to prevent water spillage.
- 전원 콘센트가 볼륨과 일치하는지 확인하십시오.tage 장치의 요구 사항.
- 공기 흡입구나 배출구를 막지 마십시오. 장치 주변에 최소 20cm(8인치)의 여유 공간을 유지하십시오.
- 청소나 유지관리를 하기 전에 제습기의 플러그를 뽑으세요.
- 작동 중에는 어린이와 애완동물이 기기에 접근하지 못하도록 하세요.
2. 제품 오버view
The Shinco 120 Pints Energy Star Dehumidifier is designed to efficiently remove excess moisture from large spaces up to 6,000 Sq.Ft, helping to create a healthier and more comfortable environment. It features Wi-Fi connectivity for remote control, auto defrost, and continuous drainage options.

Figure 2.1: Shinco Dehumidifier with Wi-Fi connectivity and smartphone app interface.
주요 특징
- 대용량: Removes up to 120 pints of moisture per day (under 95°F, 90%RH conditions).
- 넓은 커버리지 영역: Suitable for spaces up to 6,000 Sq.Ft.
- Wi-Fi 스마트 제어: Remote operation via smartphone app.
- 조절 가능한 습도: Settings from 30% to 80% in 5% increments.
- 다양한 배수 옵션: Manual water tank (5L/1.32Gal) or continuous drainage with included hose.
- 24시간 타이머: Programmable operation for energy efficiency.
- 자동 제상: Prevents coil freezing in low temperatures.
- 아동 잠금: Disables control panel buttons to prevent accidental changes.
- 빨 필터: 청소 및 유지관리가 쉽습니다.
3. 설정
포장 풀기 및 배치
- 제습기를 포장에서 조심스럽게 꺼내세요.
- 단단하고 평평한 표면에 장치를 똑바로 세우십시오.
- 원활한 공기 흐름을 위해 제품 주변에 최소 20cm(8인치)의 공간을 확보하십시오. 공기 흡입구 또는 배출구를 막을 수 있는 벽이나 가구에 제품을 붙여 놓지 마십시오.
- 장치를 열원 근처나 직사광선에 노출시키지 마십시오.
전원 연결
Plug the power cord into a grounded electrical outlet. The unit will beep once, and the display will illuminate briefly.
배수 옵션
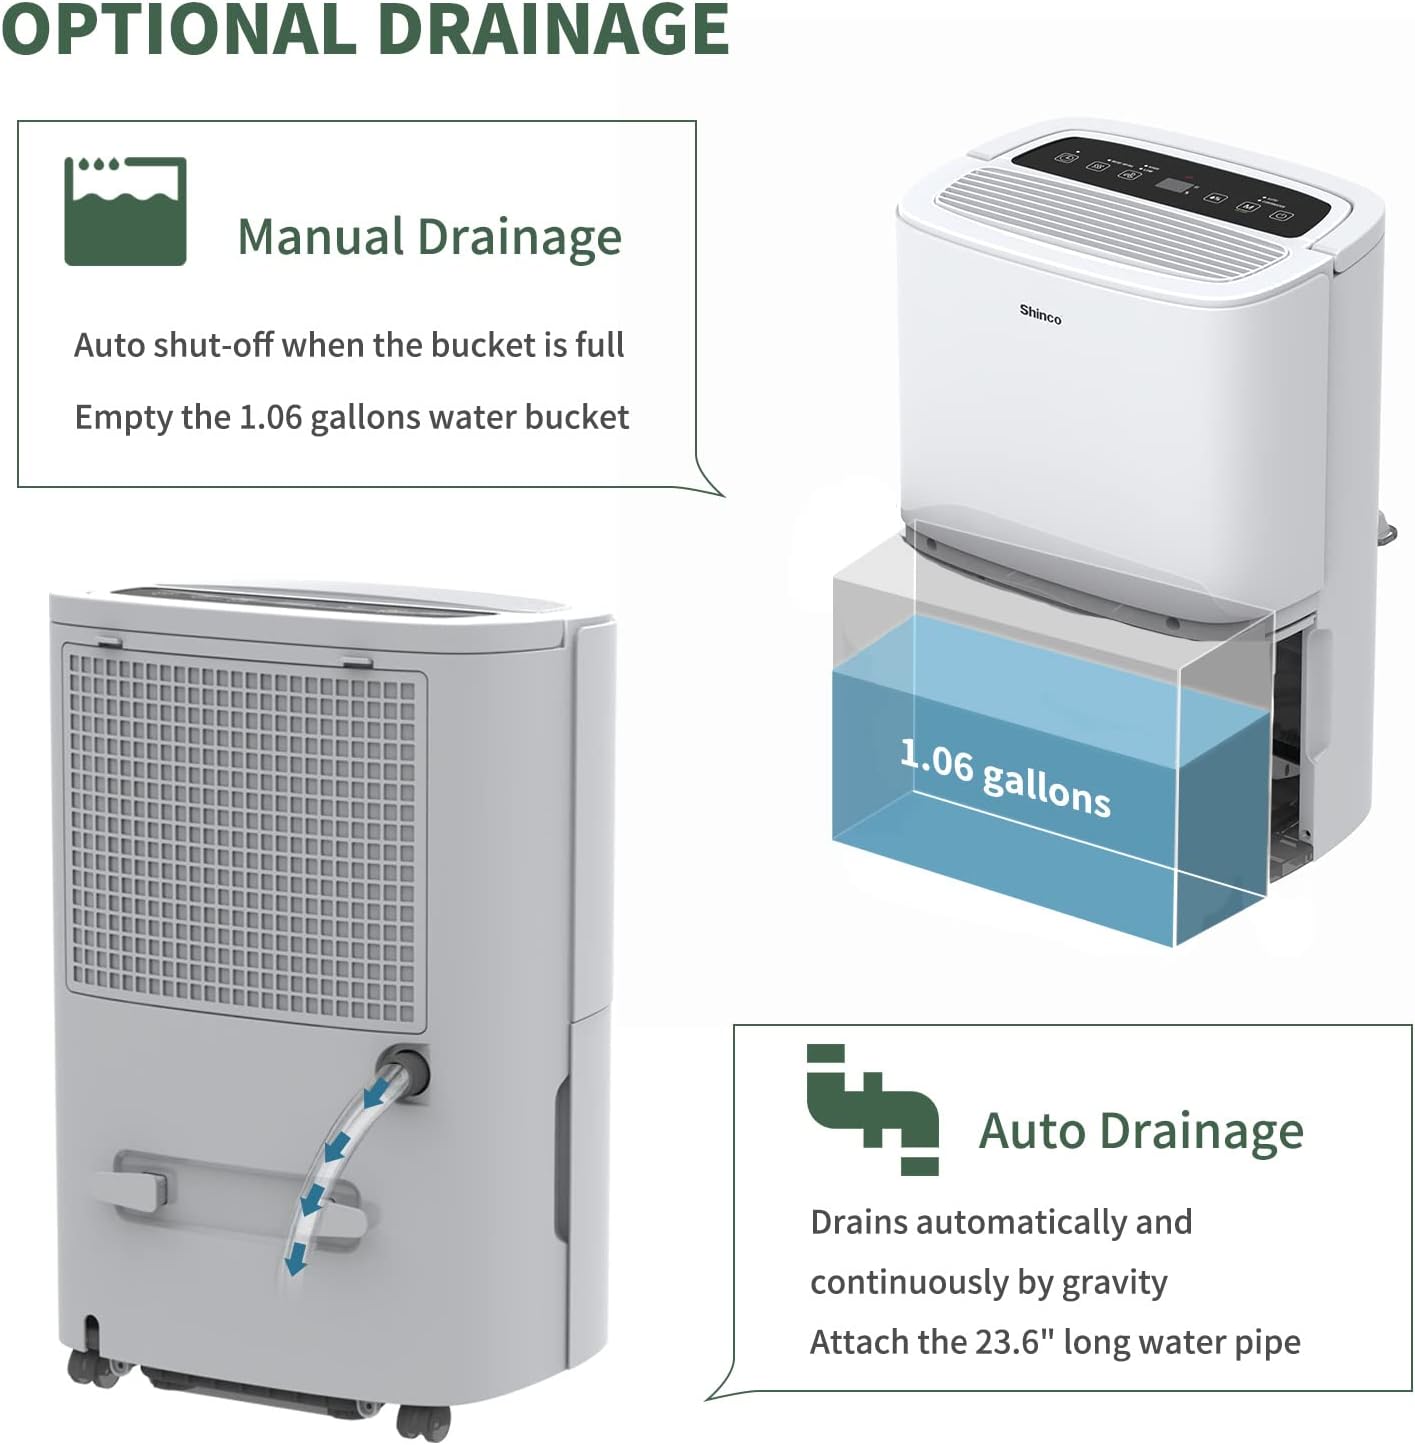
Figure 3.1: Manual and continuous drainage methods.
제습기는 두 가지 방법으로 물을 제거합니다.
- 수동 배수(물 탱크): The unit collects water in its internal 5-liter (1.32-gallon) water tank. When the tank is full, the unit will automatically shut off, display "FL" (Full) on the screen, and an alarm will sound. The tank must be manually emptied.
- 연속 배수(배수 호스): For extended operation without manual emptying, attach the included 23.6-inch drain hose to the continuous drain port on the back of the unit. Ensure the hose is sloped downwards to a suitable floor drain or larger container to allow gravity drainage. Do not elevate the hose above the drain port.
4. 사용 설명서
제어판 이상view

Figure 4.1: Digital control panel layout.
- 전원 버튼: 장치를 켜거나 끕니다.
- 모드 버튼: Cycles through operating modes (Auto, Continuous). Press and hold for 3 seconds to activate/deactivate Child Lock.
- Humidity Setting Buttons (%): 원하는 습도 수준(30%~80%)을 조절합니다.
- 팬 속도 버튼: Selects fan speed (High, Low).
- 타이머 버튼: 자동 켜짐 또는 자동 꺼짐 타이머(1~24시간)를 설정합니다.
- Inside Drying Button: Activates the internal drying function, useful before storage.
원하는 습도 설정
- 전원 버튼을 눌러 장치를 켭니다.
- Use the Humidity Setting buttons (%) to select your desired humidity level. The display will show the target humidity. The unit will operate until the room humidity reaches this level, then cycle on and off to maintain it.
팬 속도 조정
Press the Fan Speed button to toggle between High and Low fan speeds. Higher fan speed results in faster dehumidification.
타이머 기능

Figure 4.2: 24-hour programmable timer function.
The timer allows you to set a specific duration (1-24 hours) for the unit to either turn on or turn off automatically.
- 자동 꺼짐 타이머: While the unit is running, press the Timer button and use the Humidity Setting buttons to set the desired number of hours until the unit turns off.
- 자동 켜짐 타이머: While the unit is off, press the Timer button and use the Humidity Setting buttons to set the desired number of hours until the unit turns on.
작동 모드

Figure 4.3: Available operating modes and child lock feature.
- Auto Dehumidify Mode: The unit automatically senses the room's humidity and adjusts its operation to maintain the preset humidity level. If the humidity drops more than 5% below the target, the compressor and fan will stop. If it rises more than 5% above, they will resume.
- 연속 건조 모드: The unit runs continuously regardless of the humidity level, providing maximum dehumidification. This mode is suitable for drying clothes or in very damp 정황.
아동 잠금
To prevent accidental changes to settings, press and hold the Mode button for 3 seconds to activate or deactivate the Child Lock function. When active, all other buttons on the control panel will be unresponsive.
Wi-Fi 스마트 컨트롤

Figure 4.4: Wi-Fi connectivity for remote control.
The dehumidifier can be controlled remotely using a smartphone app. Refer to the separate Wi-Fi setup guide for detailed instructions on connecting your device to your home Wi-Fi network and using the app to adjust settings, monitor humidity, and schedule operations.
5. 유지관리
정기적인 유지관리를 통해 제습기의 효율적이고 오래 지속되는 작동을 보장할 수 있습니다.
에어 필터 청소

Figure 5.1: Washable air filter location and other design elements.
공기 필터는 사용량과 공기 질에 따라 2주에 한 번 또는 그 이상 자주 청소해야 합니다.
- 제습기의 플러그를 전원 콘센트에서 뽑으세요.
- 기기 뒷면에서 필터를 제거합니다.
- 필터를 따뜻한 비눗물로 씻으세요. 깨끗이 헹구세요.
- 필터를 다시 설치하기 전에 완전히 자연 건조하세요. 건조기나 직접 열을 사용하지 마세요.
물탱크 비우기
When the water tank is full, the unit will stop operating and display "FL".
- 제품 앞쪽에서 물탱크를 조심스럽게 당겨 빼내세요.
- 모아둔 물을 조심스럽게 비우세요.
- Slide the empty water tank back into the unit until it clicks into place. The unit will resume operation if not in continuous drainage mode.
장치 외부 청소
부드러운 천으로 제습기의 외부를 닦고 damp 천. 강한 화학 물질, 연마제 또는 용제는 표면을 손상시킬 수 있으므로 사용하지 마십시오.
저장
장기간 장치를 사용하지 않을 경우:
- 물탱크를 비우고 깨끗하고 건조한 상태인지 확인하십시오.
- Press the "Inside Drying" button to run the internal drying function, which helps prevent mold and mildew growth inside the unit.
- 공기 필터를 청소한 후 다시 설치하세요.
- 전원 코드를 뽑아서 깔끔하게 감아주세요.
- 먼지로부터 제품을 보호하기 위해 비닐봉투나 원래 포장재로 덮어주세요.
- 제습기는 서늘하고 건조한 곳에 똑바로 세워서 보관하십시오.
6. 문제 해결
고객 지원팀에 문의하기 전에 일반적인 문제에 대한 다음 문제 해결 가이드를 참조하세요.
| 문제 | 가능한 원인 | 해결책 |
|---|---|---|
| 제습기가 켜지지 않습니다. | No power; Power cord not plugged in; Child Lock active. | Ensure unit is plugged into a working outlet; Check circuit breaker; Deactivate Child Lock by pressing and holding Mode button for 3 seconds. |
| 물이 수집되지 않았거나 제습이 충분하지 않습니다. | Humidity level already low; Air filter clogged; Room temperature too low; Air inlets/outlets blocked; Unit too small for space. | Adjust desired humidity lower; Clean air filter; Ensure room temperature is above 41°F (5°C); Clear obstructions; Consider a larger capacity unit if space exceeds 6,000 Sq.Ft. |
| "FL" code displayed and unit stops. | 물탱크가 가득 찼거나 잘못 설치되었습니다. | 물탱크를 비우고, 딸깍 소리가 나면서 제자리에 고정될 때까지 올바르게 다시 설치하십시오. |
| Unit freezing up (ice on coils). | Low room temperature; Air filter clogged. | The unit has an Auto Defrost function. If freezing persists, ensure room temperature is not too low (below 41°F/5°C) and clean the air filter. You can also manually activate the "Inside Drying" function to help defrost. |
| 이 장치는 시끄럽습니다. | Unit not on a level surface; Air filter clogged; Loose parts. | Ensure unit is on a stable, level surface; Clean air filter; Check for any loose components. |
| Wi-Fi 연결 문제. | 와이파이 비밀번호가 잘못되었습니다. 공유기가 너무 멀리 떨어져 있습니다. 앱이 업데이트되지 않았습니다. | Verify Wi-Fi password; Move unit closer to router; Update smartphone app; Refer to Wi-Fi setup guide. |
7. 사양
Technical specifications for the Shinco 120 Pints Energy Star Dehumidifier (Model B0DZX4B1MK).
| 특징 | 세부 사항 |
|---|---|
| 상표 | 신코 |
| 모델명 | B0DZX4B1MK |
| 제습 능력 | 120 Pints/Day (under 95°F, 90%RH) / 50 Pints per Day (DOE Standard) |
| 바닥 면적 적용 | 최대 6,000평방피트 |
| 탱크 용량 | 5리터(1.32갤런) |
| 제품 치수 | 9.45인치 깊이 x 13.5인치 너비 x 20.1인치 높이 |
| 품목 무게 | 30.8파운드 |
| 색상 | 하얀색 |
| 재료 | 플라스틱 |
| 속도의 수 | 2(높음, 낮음) |
| 작동 모드 | 연속, 자동 |
| 특별 기능 | Adjustable Humidity Control, Anti-Spill, Automatic Defrost, Automatic Moisture Removal, Automatic Restart, Automatic Shutoff, Bucket Storage, Child Lock, Continuous Draining, Detachable, Digital Display, Ergonomic Handle, Portable, Quiet Operation, Removable Tank, Timer, Washable Filter, Wi-Fi |
| 포함된 구성 요소 | Dehumidifier, Drain hose |
8. 보증 및 지원
For warranty information and customer support, please refer to the documentation included with your product or contact Shinco customer service directly. Keep your purchase receipt as proof of purchase for warranty claims.


