1. 서론
This manual provides detailed instructions for the AODELAN BR-3 Wireless Camera Remote Control, designed for use with compatible Canon cameras. This device allows for remote control of various camera functions, enhancing your photography and videography experience.

Image: The AODELAN BR-3 Wireless Camera Remote Control.
2. 제품 오버view
The AODELAN BR-3 features an OLED screen for clear status visualization and a USB-C rechargeable design for convenience. It supports various shooting modes and offers zoom and focus control with compatible lenses/adapters.

이미지: 이상view of the remote's main features including shooting modes, AF, zoom, and operating distance.

Image: Detailed diagram of the AODELAN BR-3 remote control buttons and their functions.
주요 특징:
- OLED 스크린: Displays status indicators and settings.
- USB-C 충전식: Built-in battery with up to 10 hours of endurance. Supports firmware updates.
- 사진 촬영: Immediate Release and 2-sec Delay Release.
- 비디오 녹화: 비디오 녹화를 시작하고 중지합니다.
- BULB Mode: For long exposure photography.
- AF 버튼: Auto focus start button.
- 줌 컨트롤: Works with power zoom lenses or power zoom adapters (e.g., Canon PZ-E1).
- 작동 범위: Up to 10m/32.8ft, no line of sight required.
- 360° Control: No need to face the camera directly.
3. 호환성
The AODELAN BR-3 Wireless Remote Control is compatible with a wide range of Canon cameras. Please ensure your camera model is listed below for full functionality.
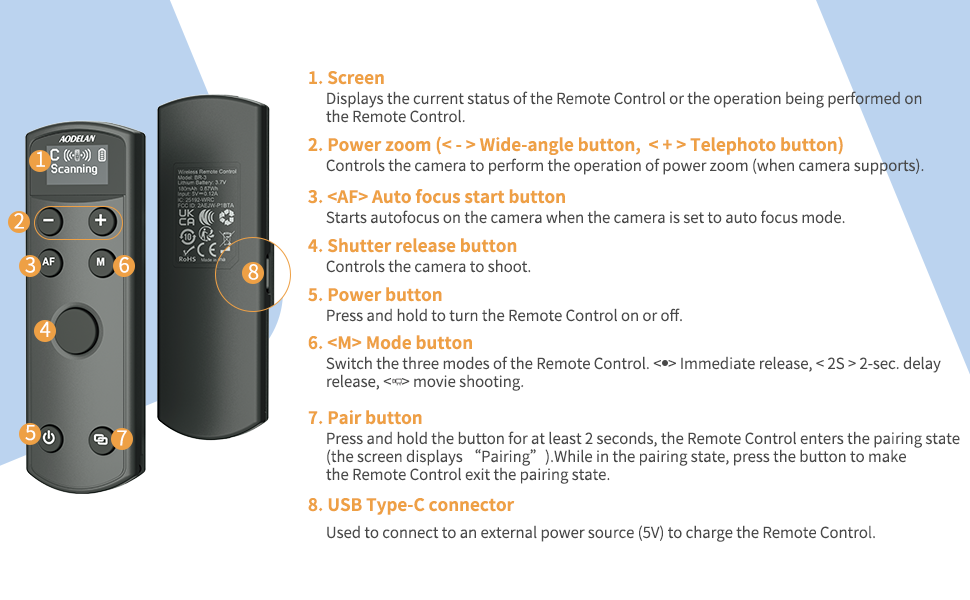
Image: List of compatible Canon camera models.
Compatible Canon Models:
- EOS R1, R3, R5, R5II, R5C* (does not support remote video shooting), R6, R6 II, R7, R8, R10, R50, R100, R, Ra, RP
- M6II, M50, M50II, M200
- 6DII, 77D (9000D), 90D
- Rebel T7i (800D), T8i (850D), SL2 (200D), SL3 (250D, 200D II)
- PowerShot G7X III, G5X II, SX70 HS, V10
Note on Zoom Functionality: Only G7X III, G5X II, and SX70 HS support remote power zoom directly. Other cameras require compatibility with an EF-S 18-135 IS NANO USM lens and the PZ-E1 power zoom adapter for remote zoom. On EOS R50, R6II, R8, set the Model dial to '<P>', select MENU → [📷]: Digital zoom → [On] for remote digital zoom.
4. 설정
4.1 리모컨 충전하기
The BR-3 remote control features a built-in rechargeable battery. Use the provided USB-C cable to charge the device. A full charge provides up to 10 hours of use.

Image: The BR-3 remote control connected to a laptop via USB-C for charging.
4.2 카메라와 페어링하기
The pairing process varies slightly depending on your Canon camera model. Follow the instructions below that correspond to your camera series.
Pairing 1: For Canon EOS R, RP; 6D II, 77D (9000D), M50; Rebel T7i (800D), SL2 (200D); PowerShot G5X Mark II, SX70 HS
After successful pairing, enable the drive mode [📷]. Otherwise, all buttons will be disabled.
- 1단계: Select [Wireless communication settings] on your camera.
- 2단계: Select [Bluetooth Function] - [Enable].
- 3단계: Select [Remote].
- 4단계: Select [Pairing]. When the [Pairing] screen appears, press and hold the <-> buttons on the BR-3 for at least 3 seconds. Pairing begins. When pairing is complete, BR-3 is registered on the camera.
- 5단계: For still photo shooting, set the camera to 'Self-timer:10sec/remote' drive mode. On the Remote Control, press "M" to set the mode to <P> or <2s> (2-sec delay release).
- 6단계: For movie shooting, set the camera to 'Movie shooting' mode and enable remote control from the camera menu.
Image: Visual guide for Pairing Method 1.
Pairing 2: For Canon EOS R5, R6, R7, R10, R100, M6 II, M50 II, M200; 90D; Rebel T8i (850D), SL3 (250D, 200D II); PowerShot G7X Mark III
After successful pairing, enable the drive mode [📷]. Otherwise, all buttons will be disabled.
- 1단계: Set Wi-Fi settings to [Enable]. Select [Wi-Fi/Bluetooth connection].
- 2단계: [무선 리모컨에 연결]을 선택하세요.
- 3단계: Select [Add a device to connect to].
- 4단계: Press <SET>.
- 5단계: Pair the devices. When the [Pairing] screen appears, press and hold the <-> buttons on the BR-3 for at least 3 seconds. After a message confirms that the camera is paired with the Remote Control, press <SET> on the camera.
- 6단계: Set up the camera for remote shooting. For still photos, select [📷] or [📷] as the drive mode. For movie recording, set [📷]: Remote control to [Enable].
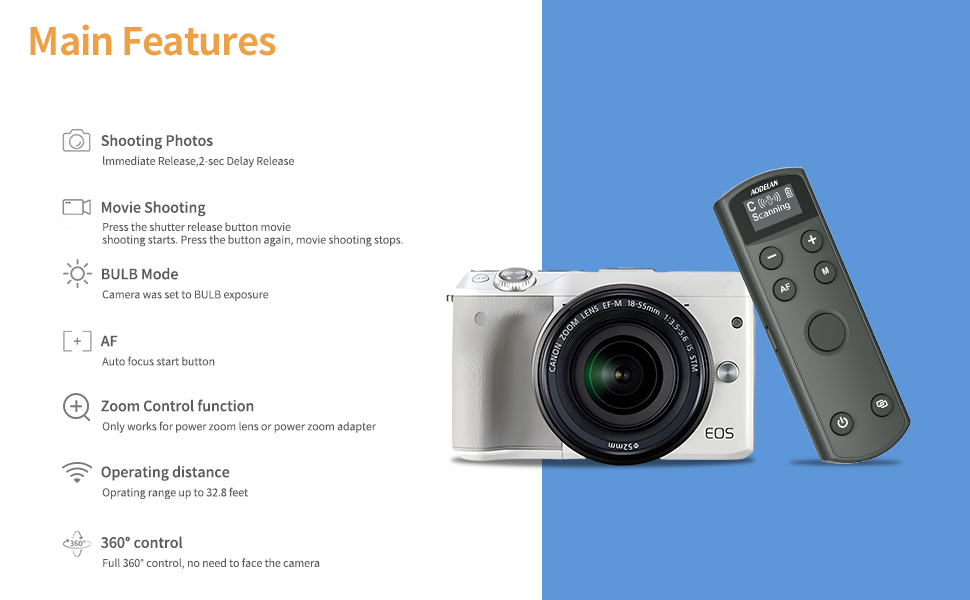
Image: Visual guide for Pairing Method 2.
Pairing 3: For Canon EOS R50, R6 II, R8; PowerShot V10
Follow the steps and settings below to pair with the camera.
- 1단계: [무선 리모컨에 연결]을 선택하세요.
- 2단계: Select [Add a device to connect to].
- 3단계: [OK]. This screen is not displayed if the Bluetooth setting is already set to [Enable].
- 4단계: Pair the devices. When the [Pairing] screen appears, press and hold the <-> buttons on the BR-3 for at least 3 seconds. After a message confirms that the camera is paired with the Remote Control, press <SET> on the camera.

Image: Visual guide for Pairing Method 3.
5. 사용 설명서
The BR-3 remote control offers intuitive operation for various camera functions.
5.1개 버튼 기능:
- 화면: Displays current status and operations.
- 전원 버튼: 리모컨을 켜거나 끄려면 버튼을 길게 누르세요.
- 페어링 버튼: Press and hold for at least 2 seconds to enter pairing state.
- 셔터 릴리스 버튼: Controls photo capture and video recording start/stop.
- AF (Auto Focus) Button: Starts autofocus when the camera is set to autofocus mode.
- M(모드) 버튼: Switches between Immediate Release, 2-sec Delay Release, and Movie Shooting modes.
- 확대/축소 버튼(+/-): Controls power zoom (wide-angle/telephoto) when the camera supports it or with a compatible power zoom adapter.
5.2 Shooting Photos and Movies:
The remote supports immediate release, 2-second delay release, and video recording. For long exposure (BULB mode), simply press the shutter button to start and press again to stop.

Image: Visual representation of different shooting modes available with the remote.
5.3 Adjusting Camera Focus and Zoom:
To adjust camera focus, ensure your camera is in manual focus mode. The zoom function is available for power zoom lenses or when using a power zoom adapter.

Image: Guide for adjusting camera focus and using zoom controls.
6. Status and Settings Visualization
The BR-3's OLED screen provides clear visibility of all status indicators and settings, including pairing status, battery level, and selected shooting mode.

이미지: 전amples of the OLED screen displaying various status and mode indicators.
7. 문제 해결
- 리모컨이 페어링되지 않음: Ensure Bluetooth is enabled on your camera and the remote is in pairing mode. Verify that the camera's remote control function is enabled in its settings. Refer to the specific pairing steps for your camera model in Section 4.2.
- 버튼이 응답하지 않음: After successful pairing, confirm that the correct drive mode (e.g., 'Self-timer:10sec/remote') is selected on your camera.
- 확대/축소 기능이 작동하지 않습니다. Confirm your camera or lens supports power zoom, or that a compatible power zoom adapter (like the Canon PZ-E1) is attached and correctly configured.
- 호환성 문제: The USB-C port supports firmware updates to maintain compatibility with newer camera models. Check the AODELAN support web최신 펌웨어 사이트.
- 짧은 작동 범위: 리모컨과 카메라 사이에 눈에 띄는 장애물이 없는지 확인하십시오.
8. 사양
| 상표 | 아오델란 |
| 모델 번호 | BR-3 (Replaces BR-E1) |
| 품목 무게 | 2.39 온스 |
| 패키지 크기 | 4.61 x 1.97 x 1.1 인치 |
| 특징 | Digital Display, Rechargeable |
| 색상 | 검은색 |
| 지원되는 최대 장치 수 | 1 |
| 호환 장치 | Camera (Specific Canon models listed in Section 3) |
9. 보증 및 지원
AODELAN products are designed for reliability and performance. For warranty information, technical support, or service inquiries, please refer to the official AODELAN web사이트를 방문하거나 고객 서비스에 직접 문의하세요. 보증 청구를 위해 구매 영수증을 보관하세요.


