1. 서론
This manual provides detailed instructions for the setup, operation, and maintenance of your Radiomaster TX16S MKII MAX Radio Control System. Please read this manual thoroughly before using the device to ensure safe and optimal performance.
2. 제품 오버view 및 기능
The Radiomaster TX16S MKII MAX is an advanced radio control system designed for precision and reliability. It features AG01 CNC Hall Gimbals and supports both ExpressLRS and Multi-Protocol 4in1 modules.
주요 특징:
- 내부 회로 개선 및 전원 공급 장치 최적화.
- 역극성 보호 기능이 통합된 새로운 충전 회로.
- Optimized charge IC allowing up to 2.2A internal USB-C charge current.
- Rear-mounted audio jack for headphone output.
- V4.0 짐벌은 중앙 정렬 및 온도 안정성이 향상되었습니다(AG01과 동일한 회로 사용).
- Optional high/low rear grips for improved ergonomics.
- 중앙 걸림쇠가 명확해진 개선된 S1/S2 노브.
- LS/RS 슬라이더가 개선되어 더욱 부드러운 작동감과 향상된 중앙 고정 기능을 제공합니다.
- 배터리 접근성을 개선하기 위해 배터리 커버를 재설계했습니다.
- 차체 디자인을 새롭게 개선하여 마감과 완성도를 높였습니다.
- 트레이너 소켓이 표준 TRS 3.5mm 소켓으로 변경되었습니다.
- 개인 맞춤형 개조를 위해 후면 DIY 소켓이 추가되었습니다.
- 내구성을 높이기 위해 내부 플라스틱 소재를 개선했습니다.
- ExpressLRS 백팩이 내장된 버전과 4-in-1 버전이 있습니다.
- Support for EdgeTX and OpenTX (EdgeTX installed by default, touch screen enabled).
- AG01 Gimbals: Fully CNC milled for ultimate precision with quad ball bearings, featuring front-accessible tension and travel adjustment.
- External Module Bay: Natively supports Team Black Sheep MicroTX modules in CRSFmode with LUA scripts. Internal 4-in-1 Multi-protocol module allows switching between internal RF and Crossfire via software.
The TX16S MKII MAX is available in 4in1 and ELRS versions.
제품 비디오 끝view:
비디오: 끝view of the TX15 Max V5.0 16CH 2.4G RC Transmitter, highlighting its advanced features and capabilities.
3. 구성 요소 및 제어
Familiarize yourself with the various components and controls of your Radiomaster TX16S MKII MAX radio controller.
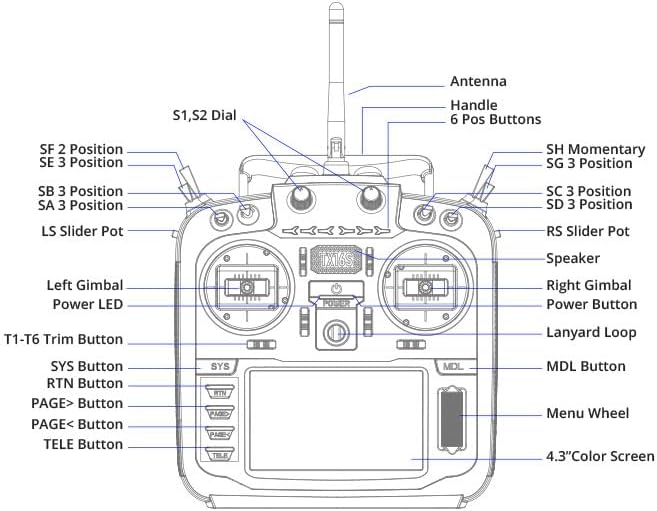
Image: Front panel diagram of the Radiomaster TX16S MKII MAX, illustrating the location and labels of its various switches, gimbals, buttons, and screen.
- 안테나: 신호 전송용.
- 핸들: 송신기를 휴대하기 위해.
- S1, S2 Dial: Rotary dials for various functions.
- 6 Pos Buttons: Six programmable position buttons.
- SF 2 Position, SE 3 Position, SB 3 Position, SA 3 Position, SH Momentary, SG 3 Position, SC 3 Position, SD 3 Position: Various 2- and 3-position switches for control.
- LS Slider Pot, RS Slider Pot: Left and Right slider potentiometers.
- Left Gimbal, Right Gimbal: Precision control sticks.
- 전원 LED: 전원 상태를 나타냅니다.
- 전원 버튼: 장치를 켜거나 끕니다.
- 목걸이줄 고리: 목걸이 스트랩을 부착할 수 있는 부분입니다.
- T1-T6 Trim Button: Trim buttons for fine-tuning controls.
- SYS Button, RTN Button, PAGE> Button, PAGE< Button, TELE Button, MDL Button: 탐색 및 기능 버튼.
- Menu Wheel: Rotary wheel for menu navigation.
- 4.3인치 컬러 화면: TFT full-color touch display for interface and settings.
- 스피커: 음성 피드백을 위해.
4. 설정
4.1. 배터리 설치
The TX16S MKII MAX uses a 7.4V Li-Ion or Li-Po battery. Ensure the battery is fully charged before installation.
- 송신기 뒷면의 배터리 덮개를 엽니다.
- Connect the battery's balance lead (JST-XH) and power lead (XT30) to the corresponding ports inside the compartment.
- Carefully place the battery into the compartment, ensuring wires are not pinched.
- 배터리 덮개를 단단히 닫으세요.
Video: Demonstration of installing a 6200mAh battery into a Radiomaster TX16S transmitter, showing the connection of the battery leads and securing the compartment cover.
Video: A detailed look at the Radiomaster 5000mAh battery, its connectors (JST-XH and XT30), and its compatibility with TX12, TX16S, and TX15 MAX transmitters, including installation steps.
4.2. 초기 전원 켜기
After installing the battery, press and hold the power button until the screen illuminates and the system boots up. Follow any on-screen prompts for initial setup.
5. 사용 설명서
5.1. Gimbal Adjustments
The AG01 CNC Hall Gimbals offer precise control. Tension and travel adjustments are front-accessible for easy fine-tuning to your preference. Refer to the diagram for gimbal locations.
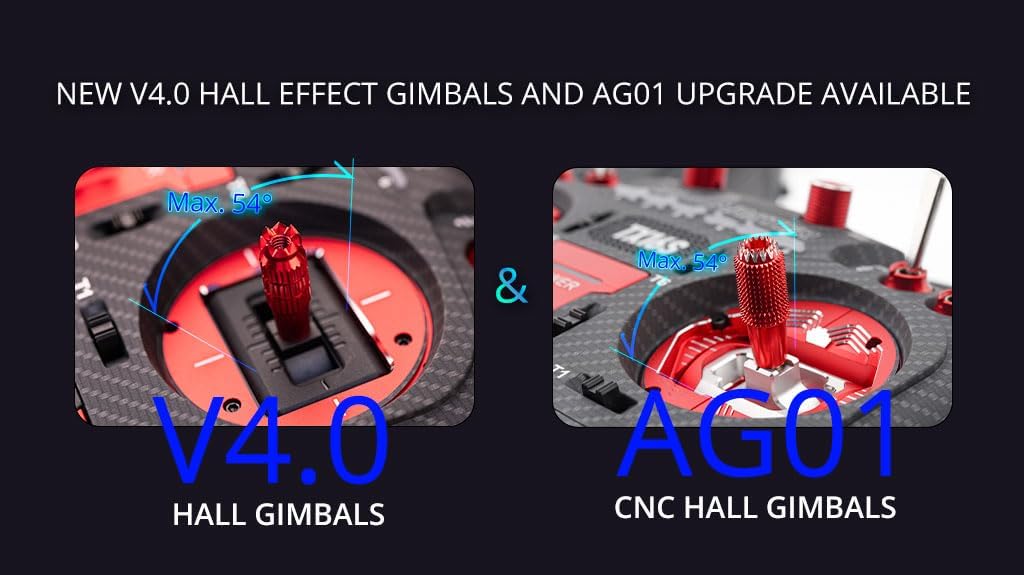
Image: A visual comparison highlighting the V4.0 Hall Gimbals and the upgraded AG01 CNC Hall Gimbals, emphasizing their precision and adjustable features.
5.2. 화면 탐색
The 4.3-inch TFT full-color touch display allows for intuitive navigation through menus and settings. Use the touch screen or the Menu Wheel and associated buttons (SYS, RTN, PAGE>, PAGE<, TELE, MDL) to access and modify parameters.
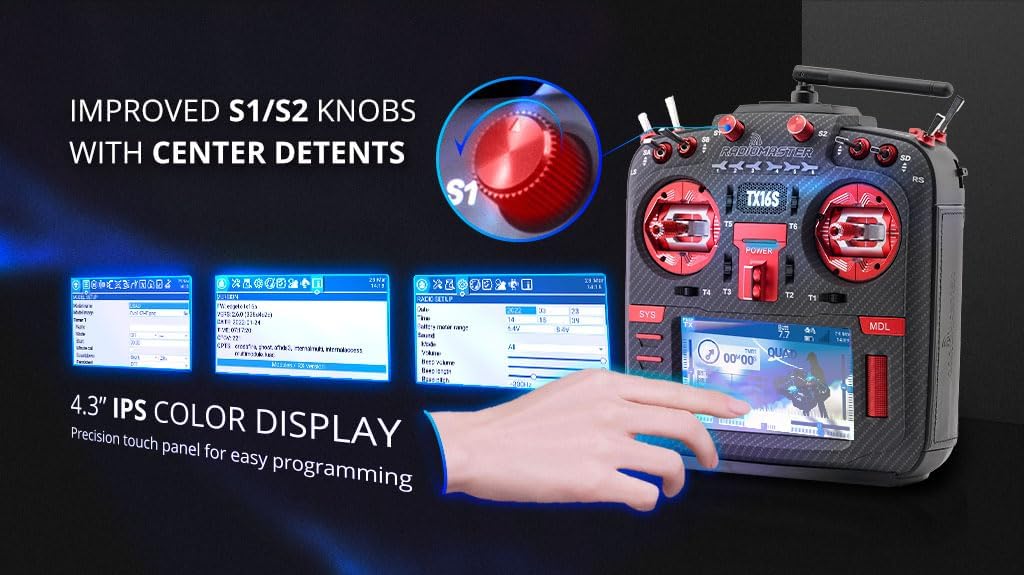
Image: Close-up of the Radiomaster TX16S MKII MAX's 4.3-inch IPS color display and the improved S1/S2 knobs with clear center detents, demonstrating ease of programming.
5.3. Module Bay Usage
The JR compatible module bay allows for external RF module expansion. The internal 4-in-1 Multi-protocol module enables seamless switching between internal RF and external modules like Crossfire via software settings.
5.4. 연결성
The TX16S MKII MAX features a USB-C port for charging, simulator connectivity, and firmware updates. An SD card slot is also available for storing models, scripts, sounds, and themes.

이미지: 측면 view of the Radiomaster TX16S MKII MAX, highlighting the UART Port, Charging Port, and SD Card Slot for various connectivity options.
5.5. 인체공학
The radio controller is designed for comfort and control. It includes optional high/low rear grips for improved ergonomics and features improved S1/S2 knobs and LS/RS Sliders for a smoother feel and better center detents.
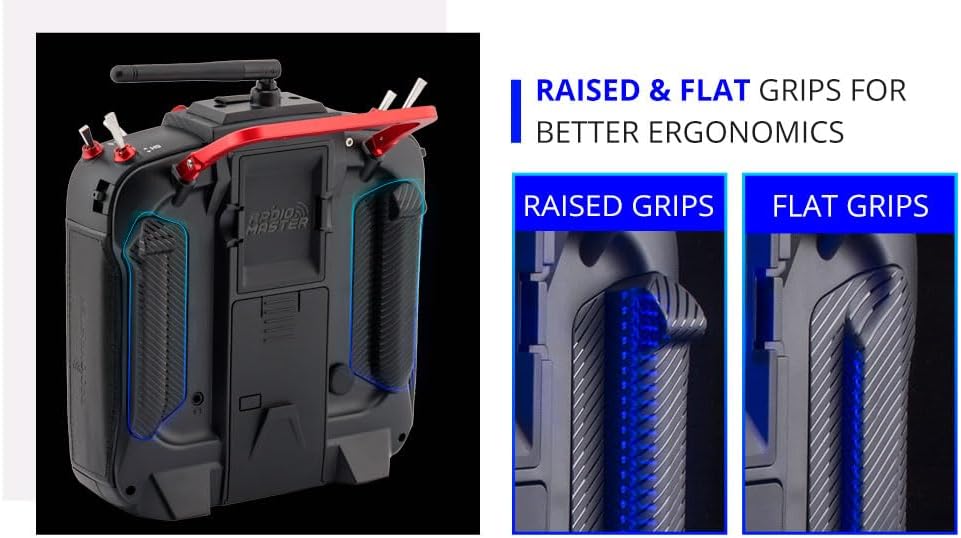
Image: A visual comparison of raised and flat grips for the Radiomaster TX16S MKII MAX, demonstrating options for improved ergonomic comfort during use.
6. 유지관리
- 송신기를 깨끗하게 유지하고 먼지나 이물질이 없도록 하세요. 청소 시에는 부드럽고 마른 천을 사용하세요.
- 송신기는 직사광선과 극한 온도 변화를 피해 서늘하고 건조한 곳에 보관하십시오.
- 모든 스위치, 짐벌 및 버튼이 제대로 작동하는지 정기적으로 점검하십시오.
- 안테나가 단단히 고정되어 있고 손상되지 않았는지 확인하십시오.
- Periodically check for and install firmware updates to ensure optimal performance and access to new features.
- Always charge the battery using appropriate charging devices and follow safety guidelines.
7. 문제 해결
- 송신기가 켜지지 않음: 배터리 연결 상태와 충전량을 확인하십시오. 전원 버튼이 제대로 눌렸는지 확인하십시오.
- 수신기에 신호가 없습니다. Verify that the transmitter and receiver are properly bound. Check the RF module settings (internal 4in1 or external). Ensure the antenna is correctly positioned.
- Gimbal or switch issues: Check physical connections and ensure no debris is obstructing movement. Calibrate gimbals if necessary through the system settings.
- 화면이 응답하지 않습니다: Perform a soft reset by powering off and on. If issues persist, check for firmware updates.
- 펌웨어 업데이트 문제: Ensure a stable USB connection and sufficient battery charge. Follow the specific firmware update instructions provided by Radiomaster.
8. 사양
| 목 | 사양 |
|---|---|
| 크기 | 287x129x184mm |
| 무게 | 750g (배터리 제외) |
| 전송 주파수 | 2.400GHz-2.480GHz |
| 송신기 모듈 | Internal 4-in-1 multi-protocol module (CC2500 CYRF6936 A7105 NRF2401) OR Internal ELRS (SX1280) |
| SD 카드 | 기본값은 256MB, 최대 용량은 8GB입니다. |
| 안테나 이득 | 2db(전송 전력 조절 가능) |
| 작업 전류 | 400mA |
| 작업 볼륨tage | 6.6-8.4V 직류 |
| 라디오 펌웨어 | 에지TX |
| 모듈 펌웨어 | Multiprotocol-Module (4IN1) -OR- ExpressLRS (ELRS) |
| 채널 | 최대 16개 채널(수신기에 따라 다름) |
| 표시하다 | 4.3 * 480 해상도의 272인치 TFT 풀컬러 터치 디스플레이 |
| 짐벌 | V4.0 Hall sensor with Aluminium fascia; Option 2: AG01 CNC Hall sensor |
| 모듈 베이 | JR 호환 모듈 베이 |
| 업그레이드 방법 | USB-C 온라인/SD 카드 오프라인 업그레이드 지원 |
9. 상자 안에 무엇이 들어있나요?
The Radiomaster TX16S Mark II Max package includes:
- 1 * TX16S Mark II Max 무선 컨트롤러
- 1 * 18650 트레이
- 1 * USB-C 케이블
- 1 * 화면 보호필름
- 플랫 그립 1쌍
- 1 * TX16S Key Chain
10. 보증 및 지원
보증 정보 및 기술 지원에 대해서는 공식 Radiomaster 웹사이트를 참조하십시오. web사이트를 방문하거나 판매점에 문의하세요. 보증 청구를 위해 구매 증빙 자료를 보관하세요.
방문하세요 RADIOMASTER Store 더 많은 제품과 정보를 확인하세요.