1. 서론
This manual provides detailed instructions for the installation, operation, and maintenance of your KERUI 8-Channel Wireless NVR Surveillance System. This system includes a 10.1-inch NVR monitor and two 6MP PTZ dual-lens Wi-Fi outdoor cameras, designed for comprehensive security monitoring.
Please read this manual thoroughly before operating the system to ensure proper usage and to maximize its functionality and lifespan.
2. 패키지 내용
아래 나열된 모든 구성품이 패키지에 포함되어 있는지 확인하세요.
- 1x 10.1-inch 8-Channel NVR Monitor (with integrated 500GB HDD)
- 2x Wired PTZ Wi-Fi Outdoor Cameras
- 2x 12V/1A Power Adapters for cameras
- NVR용 전원 어댑터 1개
- 장착 나사 및 앵커
- 사용 설명서 (본 문서)
3. 시스템 오버view 및 구성 요소
Familiarize yourself with the main components of your surveillance system.
영상: Detailed diagram of the PTZ camera showing its components: bracket, antenna, waterproof housing, bullet camera, LED light, two-light sensor, wide-angle lens, IR-LEDs, power connection, and speaker. Dimensions are also indicated.
The camera features a robust, waterproof housing suitable for outdoor installation. It includes both a fixed bullet camera and a PTZ (Pan-Tilt-Zoom) camera with dual lenses for comprehensive coverage. Integrated LED lights and IR-LEDs provide various night vision modes. The camera also has a built-in speaker for two-way audio communication.
4. 설정 및 설치
4.1 NVR Monitor Setup
- 전원 켜기: Connect the NVR monitor to a power outlet using its dedicated power adapter. The system will boot up automatically.
- 네트워크 연결 : Connect the NVR to your router via an Ethernet cable for initial setup and remote access. Alternatively, the NVR can connect wirelessly to your network.
- 초기 구성: 화면 안내에 따라 비밀번호 설정 및 네트워크 설정 등 초기 설정을 완료하십시오.

영상: The NVR monitor displaying multiple camera feeds, connected to a router via Ethernet for remote viewing and playback. A camera is shown mounted on a wall, connected to power.
4.2 카메라 설치
- 위치를 선택하십시오 : Select an outdoor location that provides optimal coverage and has access to a power source. Ensure the camera is within range of the NVR's wireless signal or your Wi-Fi network.
- 설치: Use the provided screws and anchors to securely mount the camera to a wall or ceiling. The camera's bracket allows for angle adjustment.
- 전원 연결: Connect the camera to the 12V/1A power adapter and plug it into a power outlet.
- 페어링(필요한 경우): The cameras are typically pre-paired with the NVR. If not, refer to the NVR's on-screen menu for instructions on adding new cameras.

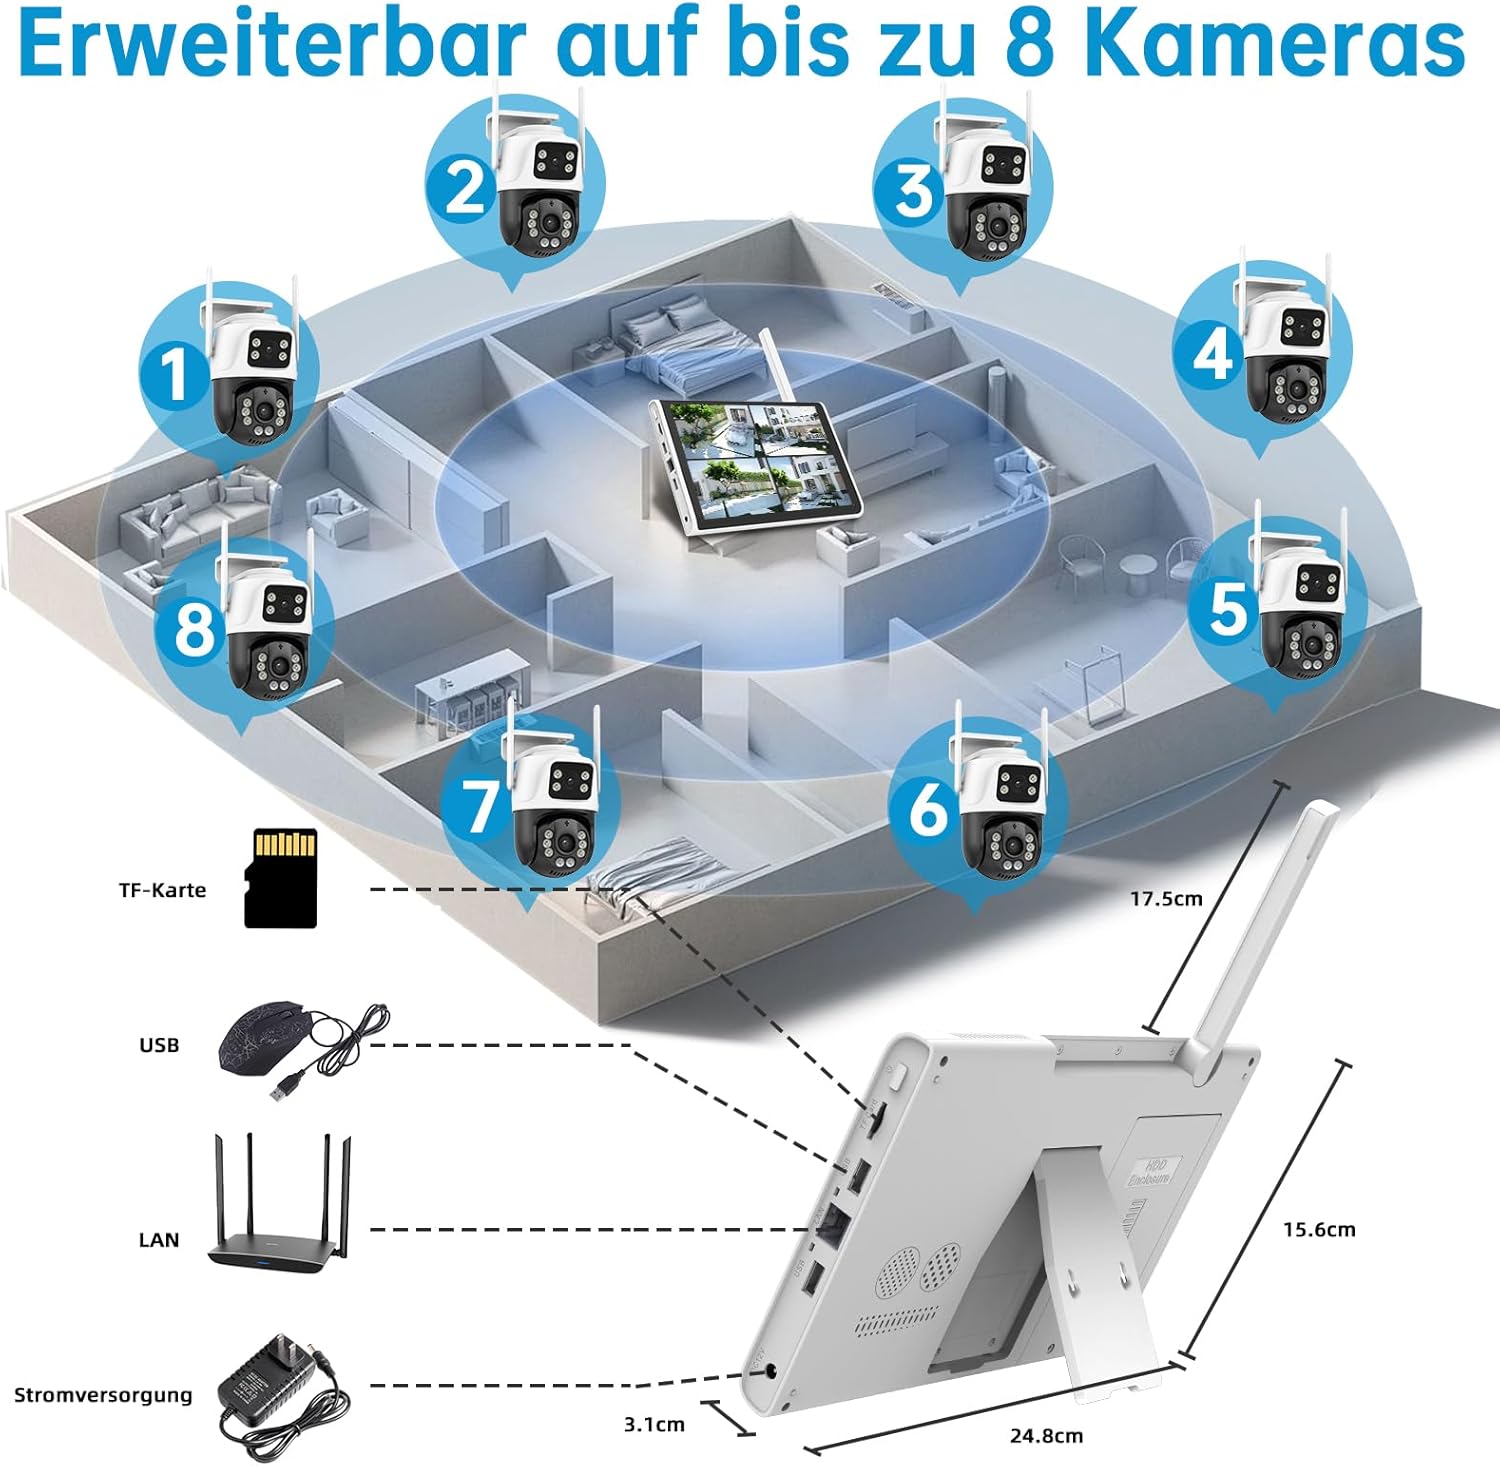
영상: 오버헤드 view of a house layout showing the NVR monitor in the center and eight cameras (two included, six expandable) strategically placed around the property. The NVR's ports for TF card, USB, LAN, and power are also depicted.
The system supports up to 8 cameras. You can expand your surveillance by adding up to 6 additional wired or wireless cameras.
5. 운영
5.1 라이브 View 및 재생
- NVR 모니터에서: The 10.1-inch NVR monitor displays live feeds from all connected cameras. Use the NVR's controls to switch views, access settings, and review 기록된 footage.
- Remote Access (XMEYE PRO App): Download the free XMEYE PRO app on your smartphone or tablet. Follow the app's instructions to add your NVR system for remote viewing, playback, and system control from anywhere.
5.2 Dual-Lens Camera Features

영상: A dual-lens PTZ camera illustrating its pan (355°) and tilt (90°) capabilities, providing 360° coverage without blind spots. The image shows the camera's wide field of view over a residential area.
Each camera features two lenses: one fixed and one PTZ. The PTZ lens offers 355° pan and 90° tilt rotation, allowing for comprehensive 360° coverage. This dual-lens design ensures no blind spots in your surveillance area.
5.3 Motion Detection and AI Humanoid Recognition

영상: An illustration of the AI Humanoid Detection and Auto-Tracking feature. The camera detects a person, activates a spotlight, sends app and email notifications, and tracks the individual. An alarm notification is shown at the bottom.
The system incorporates AI intelligent motion detection to accurately identify human figures, reducing false alarms. When suspicious movement is detected, the camera can activate spotlights, trigger a siren alarm, and send instant push notifications or email alerts to your device. The auto-tracking function allows the PTZ camera to follow detected individuals.
5.4 양방향 오디오

영상: A scenario demonstrating two-way audio. A delivery person is at the door, and a user is communicating with them via the camera and NVR monitor from indoors, instructing them to leave the package.
With the built-in microphone and speaker, the cameras support two-way audio communication. This allows you to listen to the environment and speak through the camera, which is useful for interacting with visitors or deterring intruders.
5.5 야간 투시 모드
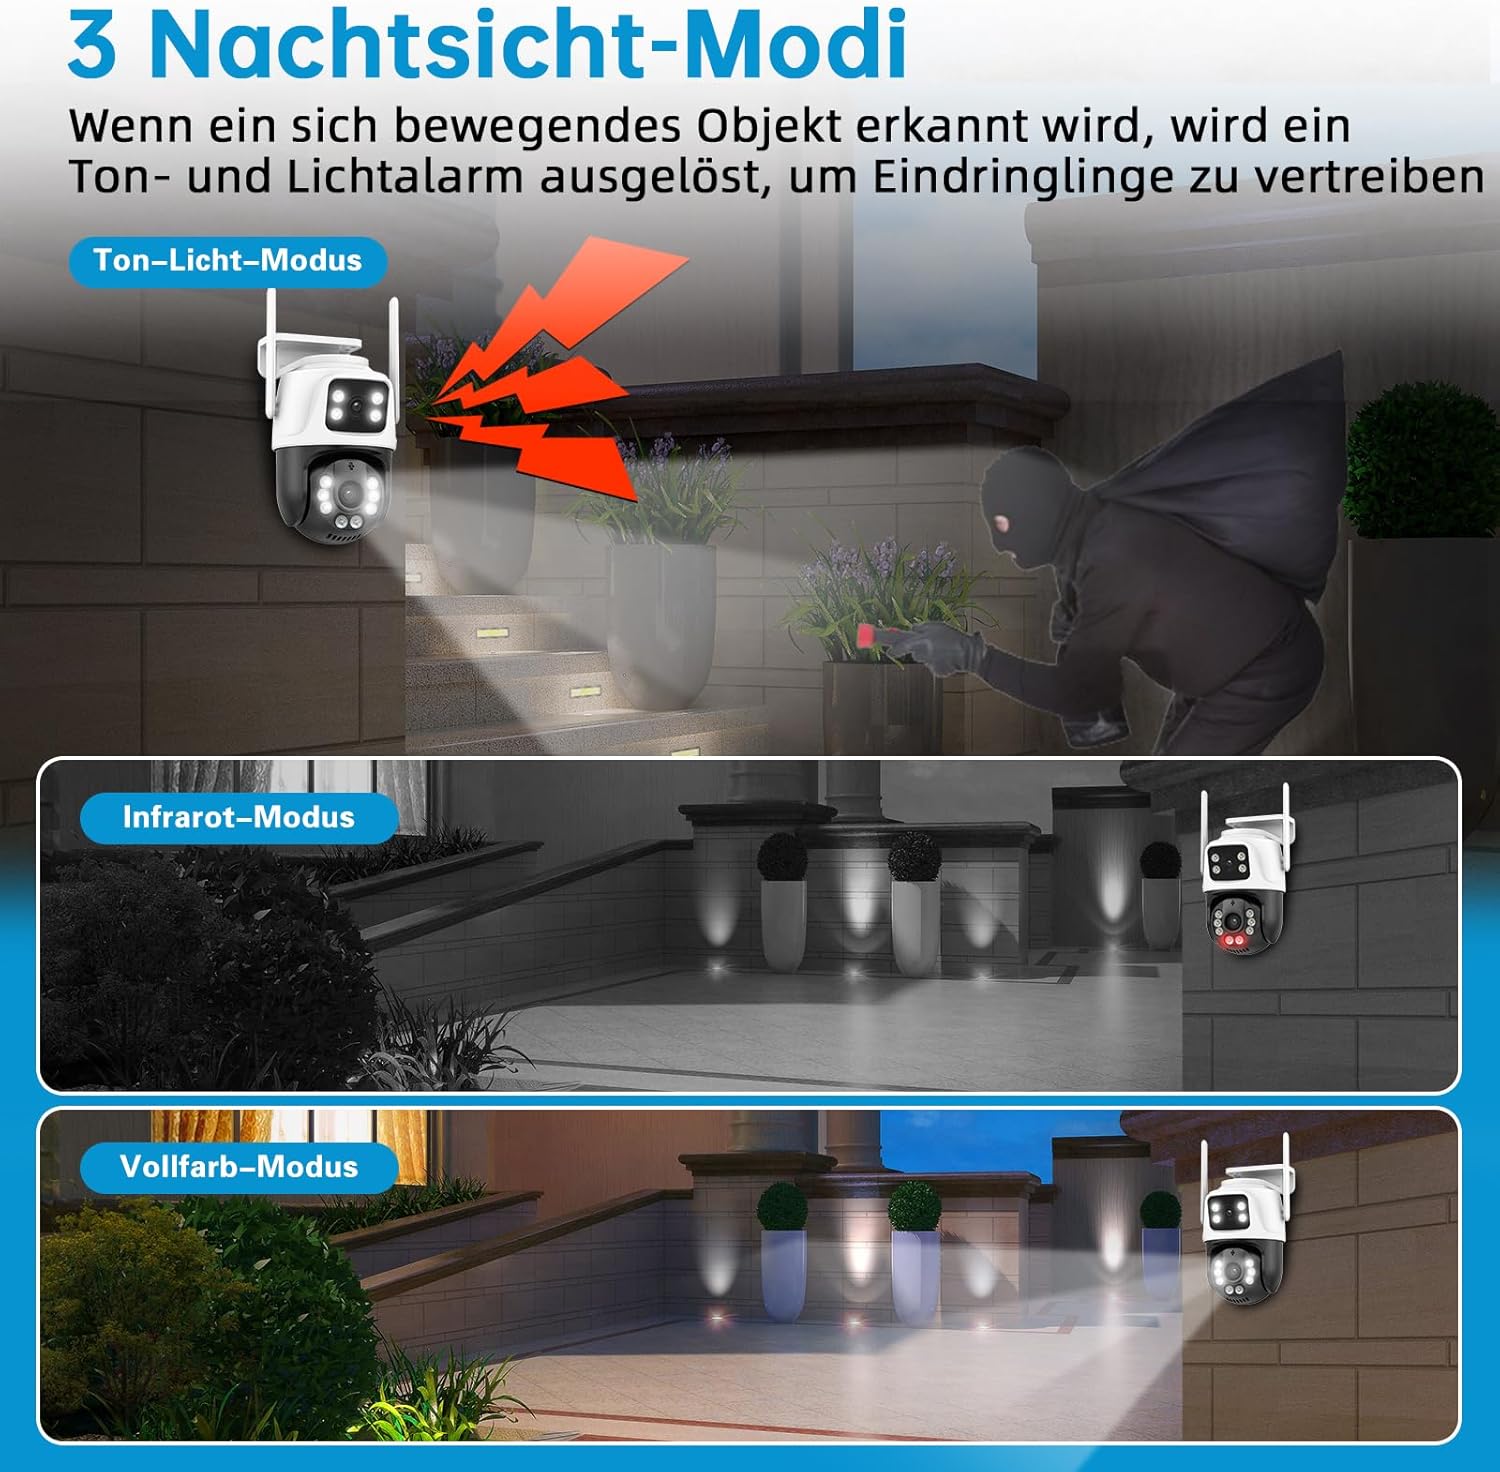
영상: An illustration showing three night vision modes: Sound-Light Mode (activates light and sound alarm upon detection), 적외선 모드 (standard black and white night vision), and Full-Color Mode (provides vivid color images at night using integrated lights).
The cameras offer three distinct night vision modes:
- 소리-조명 모드: When motion is detected, the camera activates its integrated lights and an audible alarm to deter intruders.
- 적외선 모드 : Provides clear black and white video footage in low-light or no-light conditions using infrared LEDs.
- 풀 컬러 모드: Utilizes the camera's integrated white lights to capture full-color video even in complete darkness, offering more detailed visual information.
5.6 24시간 연중무휴 녹화 및 저장

영상: Depicts continuous 24/7 video and audio recording. The NVR includes a pre-installed 500GB hard drive for local storage, which automatically overwrites older footag가득 찼을 때.
The NVR system supports continuous 24/7 video and audio recording. It comes with a pre-installed 500GB hard drive for local storage. When the storage is full, the system automatically overwrites the oldest footage 지속적인 녹화를 보장합니다.
6. 유지관리
- 깨끗한 렌즈: 카메라 렌즈는 부드러운 천으로 정기적으로 닦아주세요.amp 깨끗한 이미지 품질을 위해 천을 사용하십시오. 연마성 세척제는 사용하지 마십시오.
- 연결 확인: Periodically inspect all power and network connections for security and integrity.
- 펌웨어 업데이트: 제조사 확인해보세요 website or the XMEYE PRO app for available firmware updates to ensure optimal performance and security.
- 데이터 백업: 만약 중요한 정보라면tage needs to be preserved, back it up from the NVR's hard drive to an external storage device or cloud service (if supported).
7. 문제 해결
| 문제 | 가능한 원인 | 해결책 |
|---|---|---|
| NVR 모니터에 화면이 나오지 않습니다. | Power issue, loose cable, NVR not booted | Check power adapter connection. Ensure NVR is powered on. Restart NVR. |
| Cameras not connecting to NVR | Out of range, power issue, pairing lost | Ensure cameras are powered. Move cameras closer to NVR. Re-pair cameras via NVR settings. |
| 원격 접속이 작동하지 않습니다 | NVR not connected to internet, incorrect app settings | Verify NVR's internet connection (Ethernet or Wi-Fi). Check app settings and ensure NVR is added correctly. |
| 오작동 동작 경보 | Sensitivity too high, environmental factors (e.g., moving branches) | Adjust motion detection sensitivity in NVR settings. Define specific detection zones to exclude irrelevant areas. |
| 야간 시야 품질이 좋지 않음 | Dirty lens, IR obstruction, insufficient ambient light for color mode | Clean camera lens. Ensure no obstructions block IR LEDs. Switch to Infrared Mode if Full-Color Mode is too dark. |
8. 사양
| 특징 | 세부 사항 |
|---|---|
| 모델 번호 | CZSNVR050201 |
| NVR 모니터 크기 | 10.1인치 |
| NVR 채널 | 8채널 |
| NVR 스토리지 | 500GB HDD (integrated) |
| 카메라 해상도 | 6MP (1296p video capture) |
| 카메라 유형 | PTZ Dual-Lens Wi-Fi Outdoor Camera |
| 연결성 | Wireless (2.4G & 5G WiFi) |
| PTZ 회전 | 팬 355 °, 틸트 90 ° |
| 오디오 | 양방향 오디오 |
| 나이트 비전 | Color Night Vision, Infrared Mode, Sound-Light Mode |
| 내후성 | IP66 |
| 특별 기능 | AI Humanoid Detection, Auto-Tracking, Siren Alarm, App Control, Recording Audio, Smart Playback |
| 전원 공급 장치 | Wired electric (12V/1A adapters) |
| 차원(NVR) | 25.4 x 7.62 x 17.78cm |
| Weight (NVR) | 2kg |
9. 보증 및 지원
보증 정보 및 기술 지원에 대해서는 케루이 공식 웹사이트를 참조하십시오. website or contact their customer service directly. Contact details are typically provided on the product packaging or on the manufacturer's web대지.
Ensure you have your model number (CZSNVR050201) and purchase details available when contacting support.


