1. 서론
Thank you for choosing the ELISWEEN Wireless PC Gaming Controller. This controller is designed to provide a superior gaming experience across multiple platforms, including PC, Nintendo Switch, Android, and iOS devices. Featuring advanced Hall Effect joysticks, programmable back buttons, and customizable vibration, this manual will guide you through its setup, operation, and maintenance to ensure optimal performance.
2. 패키지 내용
- ELISWEEN Wireless PC Gaming Controller
- USB-C 충전 케이블(1.5m)
- 2.4GHz USB 동글
- 사용자 설명서
3. 제품 오버view
컨트롤러의 구성 요소를 숙지하십시오.
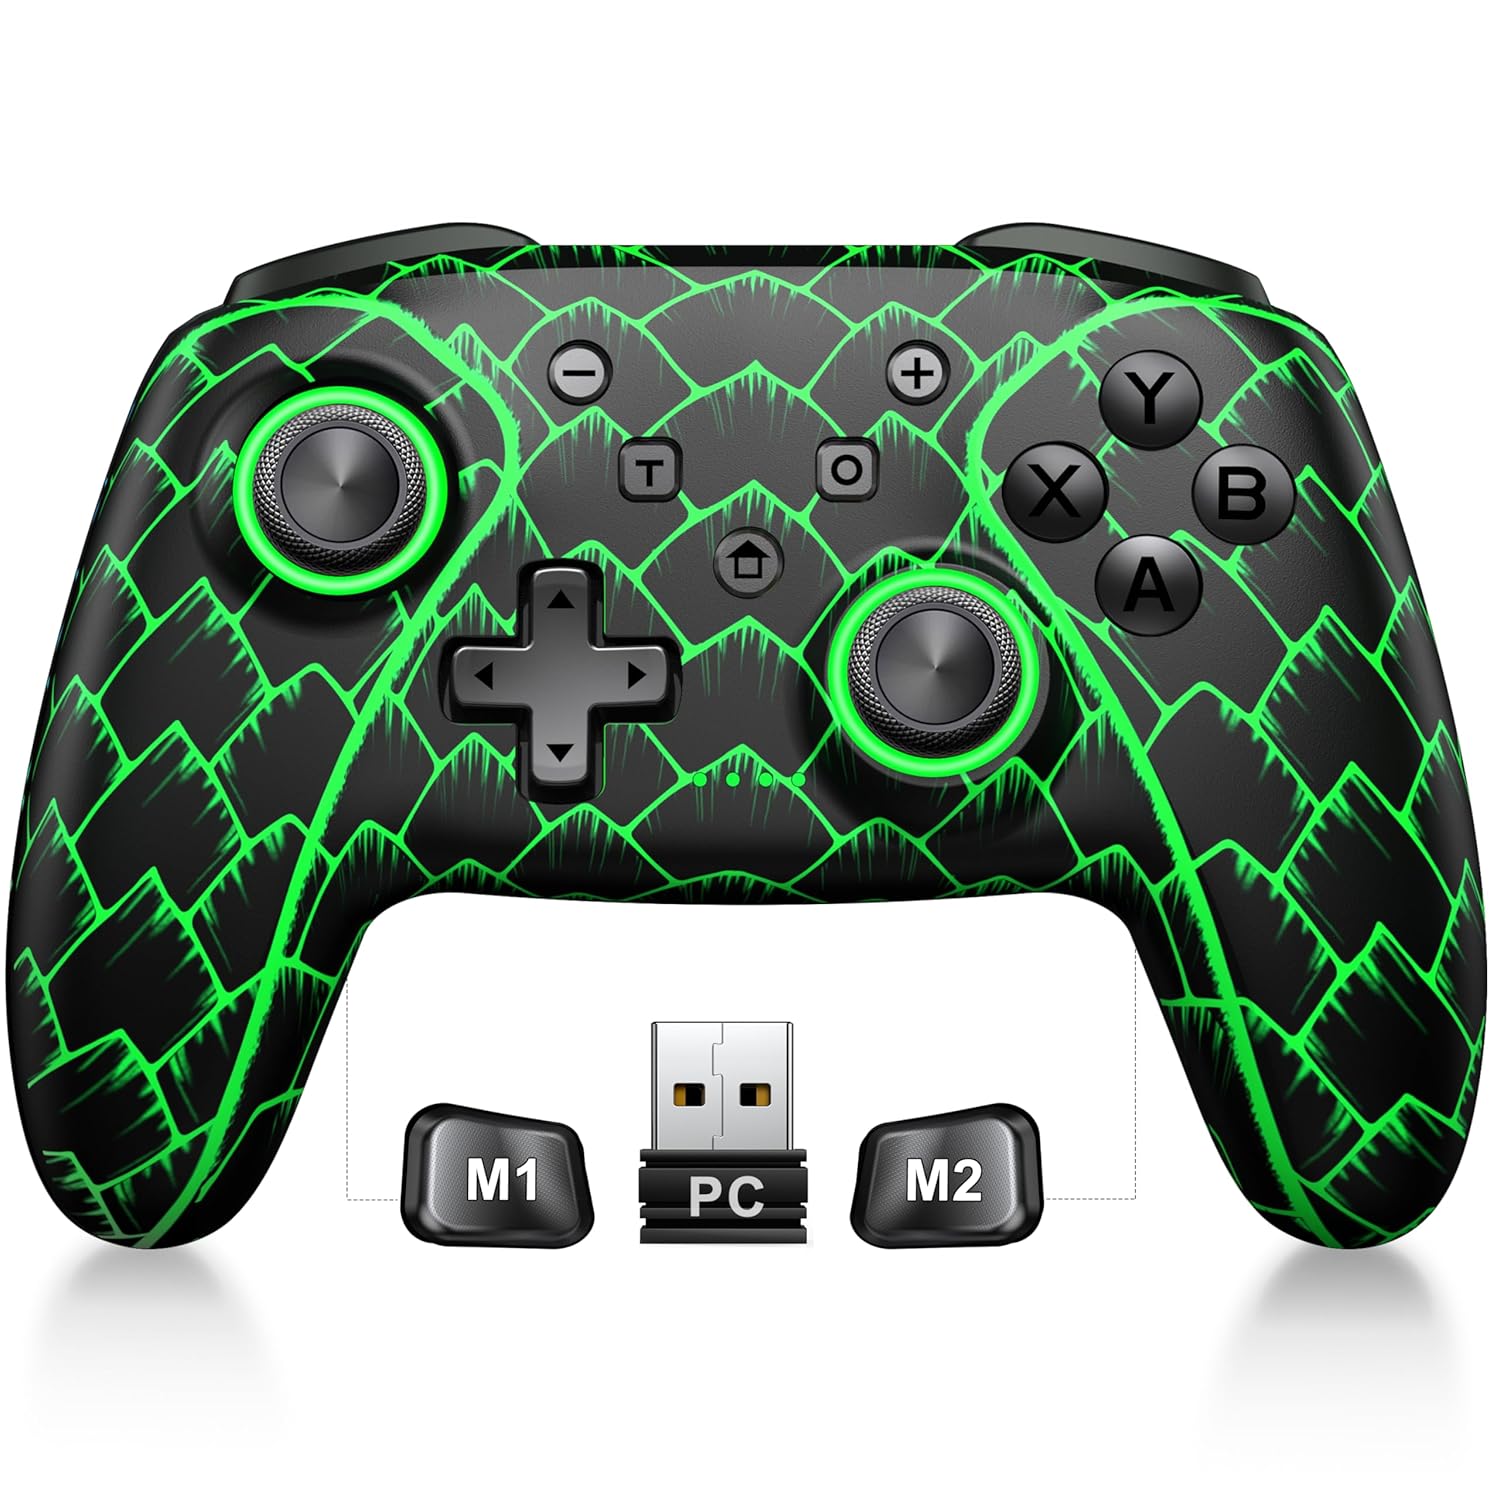
Figure 3.1: ELISWEEN Wireless PC Gaming Controller with its 2.4GHz USB dongle and highlighted M1/M2 programmable buttons.
- 왼쪽/오른쪽 아날로그 스틱: Hall Effect joysticks for precise movement.
- 방향 패드: 방향 입력.
- 액션 버튼(A/B/X/Y): 표준 게임 입력 버튼.
- 어깨 단추 (좌/우): 상단에 장착된 버튼.
- Trigger Buttons (ZL/ZR): 홀 효과 아날로그 트리거.
- M1/M2 버튼: 프로그래밍 가능한 뒤로 가기 버튼.
- 홈 버튼: Powers on/off and returns to system home screen.
- +/- 버튼: System navigation/menu buttons.
- 스크린샷 버튼: 스크린샷을 캡처합니다.
- 터보 버튼: 터보 기능을 활성화/비활성화합니다.
- USB-C 포트: 충전 및 유선 연결용입니다.
4. 설정 및 연결
4.1 컨트롤러 충전
Before first use, fully charge the controller. Connect the USB-C cable to the controller's USB-C port and the other end to a USB power source (e.g., PC, USB wall adapter). The charging indicator will show status and turn off when fully charged. A full charge takes approximately 3 hours.
4.2 PC 연결 (무선 2.4GHz)

Figure 4.1: Multi-platform compatibility of the ELISWEEN controller, including PC, Switch, Android, and iOS.
- 2.4GHz USB 동글을 PC의 사용 가능한 USB 포트에 삽입하십시오.
- 컨트롤러의 홈 버튼을 눌러 전원을 켜세요.
- The controller will automatically connect to the dongle. The indicator lights will stabilize once connected.
4.3 Connecting to PC (Wired USB-C)
- Connect the USB-C cable to the controller and the other end to your PC.
- The controller will be recognized as a plug-and-play device.
4.4 Nintendo Switch에 연결하기
- 닌텐도 스위치에서 시스템 설정 > 컨트롤러 및 센서 > 컨트롤러 연결 해제로 이동하세요.
- 다음으로, 컨트롤러 및 센서 > 그립/순서 변경으로 이동합니다.
- Press and hold the Home button on the ELISWEEN controller until the indicator lights begin to flash rapidly.
- Once paired, the indicator light(s) corresponding to the player number will remain solid.
4.5 Connecting to Android/iOS (Bluetooth)
- Android 또는 iOS 기기에서 Bluetooth가 활성화되어 있는지 확인하세요.
- On the controller, press and hold the X + Home buttons simultaneously until the indicator lights flash rapidly, indicating pairing mode.
- On your device, search for Bluetooth devices and select "STK-7040RG" (or similar) to pair.
- Once connected, the indicator light will stabilize. Supports iOS 13+ MFi titles.
5. 사용 설명서
5.1 홀 효과 조이스틱
The controller features precision Hall Effect joysticks and triggers, designed to prevent stick drift and provide accurate, responsive control. These magnetic, contactless sensors ensure long-term durability and precision.

그림 5.1: 내부 view of Hall Effect joystick technology, highlighting its magnetic, contactless design for enhanced accuracy and durability.
Zero Deadzone Mode: For competitive gaming, activate a temporary 0 deadzone mode by holding the T 버튼 + R3 (right stick click) or L3 (left stick click). A green light confirms activation. To revert to default calibration, press the same combo (blue light indicator). The controller automatically resets to factory default settings upon restart for consistent anti-drift performance.
5.2 프로그래밍 가능한 뒤로 가기 버튼(M1/M2)
The M1 and M2 back buttons can be programmed to map up to 21 different key combinations, allowing for quick execution of complex actions.

Figure 5.2: The M1 and M2 programmable back buttons, capable of mapping up to 21 different actions for enhanced control.
Refer to the Keylinker App (search "NC300") for detailed instructions on programming and customizing these buttons.
5.3 터보 기능
The controller supports Turbo fire functionality for 10 action buttons with adjustable speeds (5, 12, or 20 presses per second).
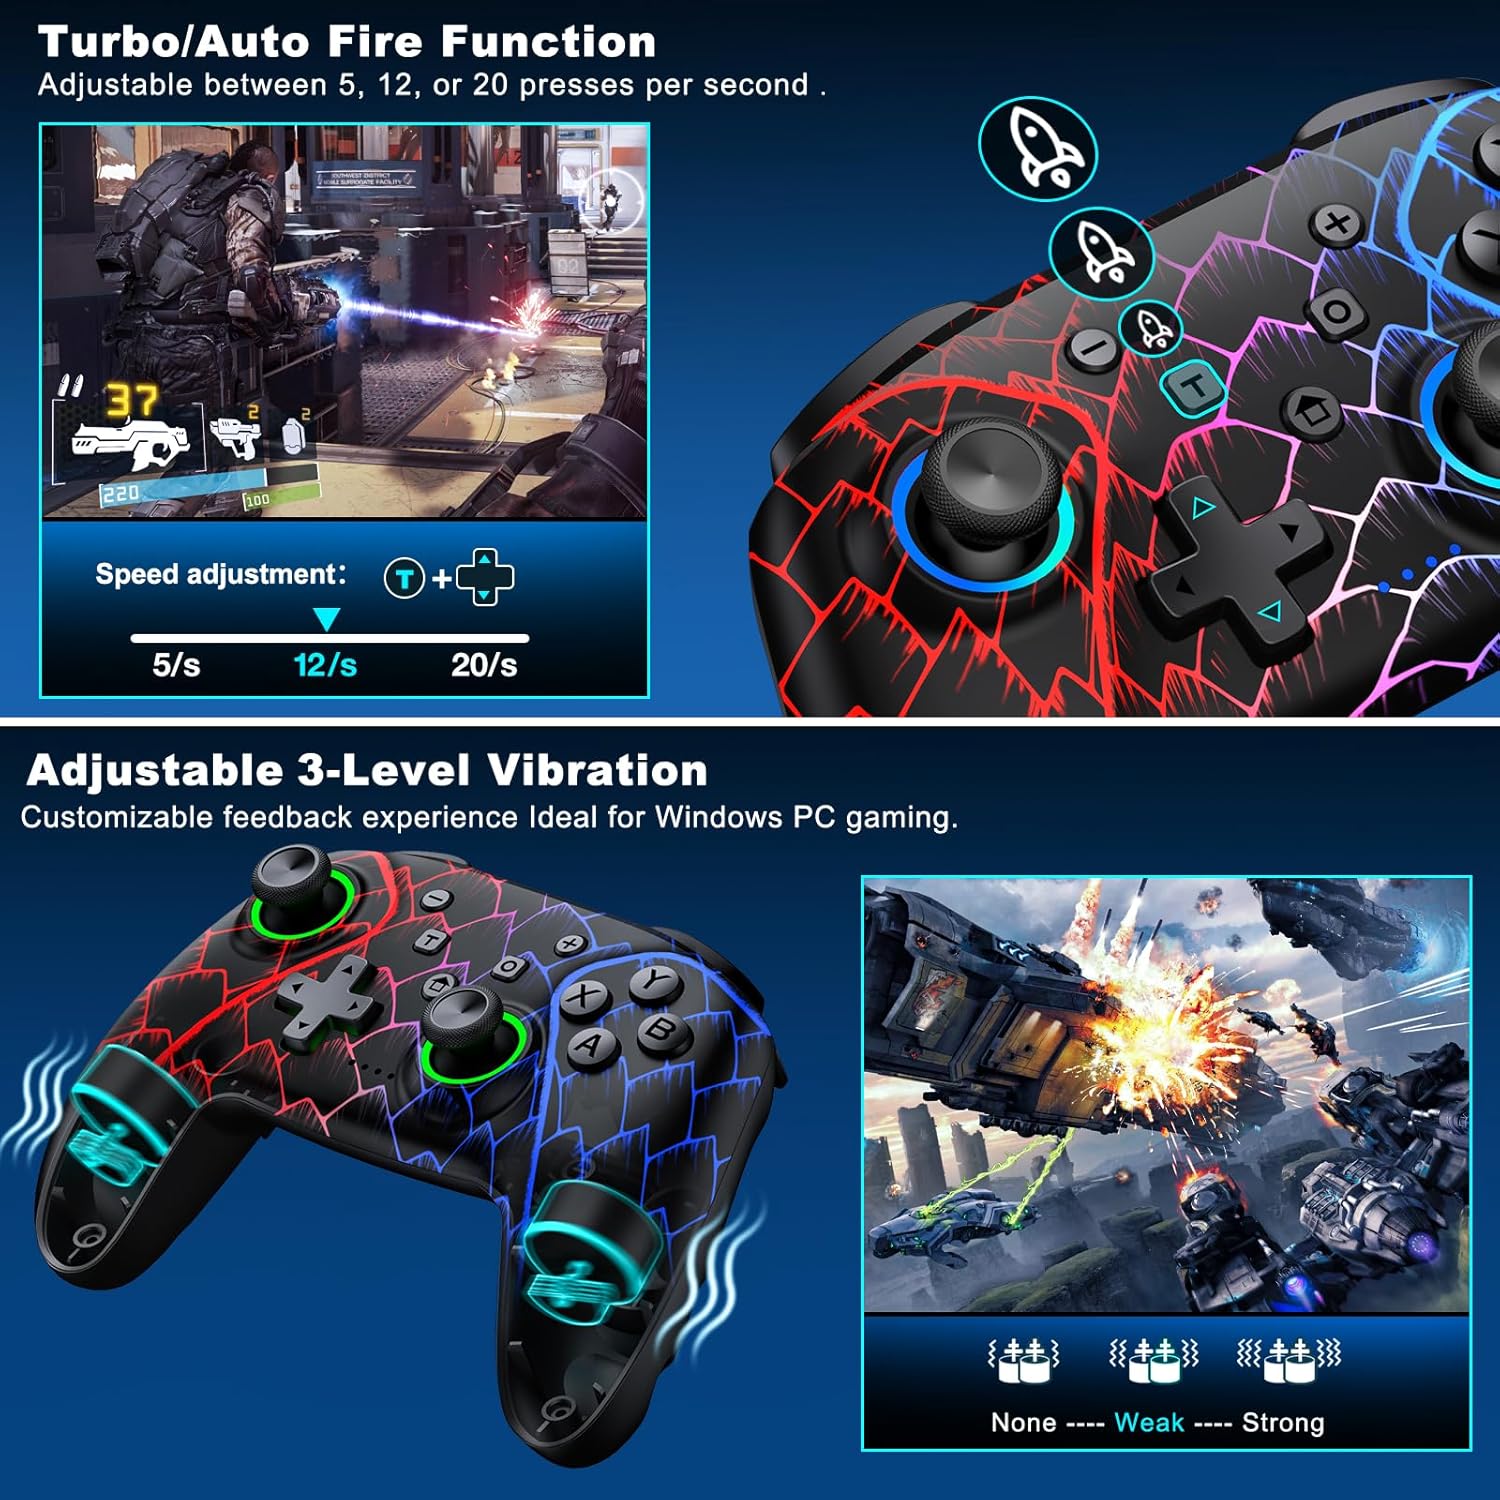
Figure 5.3: Visual representation of the Turbo/Auto Fire function and the adjustable 3-level vibration feature.
- 터보 활성화: 를 누르세요 터보 button + the desired action button.
- 속도 조정: 누르다 터보 + Up arrow (increase) or 아래에 arrow (decrease) on the D-pad.
- 클리어 터보: 잡아라 마이너스 버튼 + 아래에 arrow on the D-pad to instantly clear all Turbo binds.
5.4 진동 조정
Experience immersive feedback with dual vibration motors offering 3 intensity levels.
- Adjust intensity by pressing L + R + ZL + ZR simultaneously. Cycle through levels: None, Weak, Strong.
- Note: Vibration is disabled on mobile platforms. Gyro functionality works only with Nintendo systems.
5.5 헤어 트리거 잠금
Shorten trigger pulls for faster response times in games requiring quick inputs, such as first-person shooters.
5.6 배터리 수명 관리
The controller is equipped with a 1000mAh battery, providing over 20 hours of continuous gameplay on a single charge. Charging takes approximately 3 hours via USB-C.

Figure 5.4: The ELISWEEN controller's 1000mAh battery provides extended playtime with quick charging capabilities.
5.7 동적 조명 효과
Customize the controller's lighting effects via the Keylinker App (search "NC300").
5.8 자동 전원 끄기
To conserve battery, the controller will automatically power off after 20 minutes of inactivity.
6. 유지관리
- 청소: 부드럽고 마른 천을 사용하여 컨트롤러를 닦으세요. 연마성 세제나 용제는 사용하지 마세요.
- 저장: 컨트롤러는 직사광선과 극한의 온도를 피해 서늘하고 건조한 곳에 보관하세요.
- 배터리 관리 : Avoid fully discharging the battery frequently. Charge it regularly to prolong its lifespan.
7. 문제 해결
- 컨트롤러가 연결되지 않음:
- 컨트롤러가 충전되어 있는지 확인하세요.
- Verify the correct connection method for your device (2.4GHz dongle for PC, Bluetooth for mobile, pairing for Switch).
- 컨트롤러와 연결하려는 장치를 재시작해 보세요.
- For PC, try a different USB port for the dongle or wired connection.
- Stick drift or inaccurate input:
- Activate the 0 deadzone mode (T + R3/L3) to recalibrate.
- Ensure the controller firmware is up to date via the Keylinker App.
- 버튼이 응답하지 않음:
- 컨트롤러가 제대로 연결되어 있는지 확인하세요.
- 버튼 아래에 이물질이 끼지 않았는지 확인하세요.
- Perform a factory reset if issues persist (refer to Keylinker App or contact support).
- 충전 문제:
- 다른 USB-C 케이블과 전원을 사용해 보세요.
- Ensure the USB-C port on the controller is clean and free of obstructions.
8. 사양
| 연결성 | Bluetooth 5.2, 2.4GHz 무선, USB-C 유선 |
| 호환성 | PC, Nintendo Switch, Android, iOS (iOS 13+ MFi) |
| 배터리 용량 | 1000mAh |
| 노는 시간 | 20시간 이상 (대략) |
| 충전 시간 | 3시간(약) |
| 조이스틱 | Hall Effect (Drift-Proof) |
| 프로그래밍 가능한 버튼 | 4 Back Buttons (M1/M2) |
| 진동 | 듀얼 모터, 3단계 높이 조절 |
| 치수 | 6.38 x 4.72 x 2.64 인치 |
| 무게 | 11.99온스(약 340g) |
| 제조업체 | 치순테크 |
| 원산지 | 중국 |
9. 보증 및 지원
The ELISWEEN Wireless PC Gaming Controller comes with a standard manufacturer's warranty. For specific warranty terms and conditions, please refer to the product packaging or contact our customer support.
For any technical assistance, troubleshooting, or inquiries, our 24/7 Expert Support team is available to help. Please refer to the contact information provided on the product packaging or our official web대지.


