1. 서론
The EPOMAKER P65 is a QMK/VIA compatible wireless aluminum gaming keyboard designed for versatility and performance. Featuring a compact 65% layout, gasket-mount structure, and multiple connectivity options, it offers a premium typing and gaming experience. This manual provides essential information for setting up, operating, maintaining, and troubleshooting your keyboard.

2. 상자 안에 무엇이 들어있나요?
Your EPOMAKER P65 package includes the following items:
- EPOMAKER P65 QMK/VIA Wireless Aluminum Gaming Keyboard
- 3x 예비 스위치
- 1x 2-in-1 키캡 및 스위치 풀러
- 1x Detachable USB-A to USB-C cable
- 1x 2.4Ghz Wireless Receiver
- 1x 다국어 매뉴얼
3. 제품 특징
3.1. Mechanical Gaming Keyboard
The EPOMAKER P65 features a compact 65% layout with a silver glossy knob for quick multimedia access. Its durable CNC aluminum build ensures longevity, while customizable QMK/VIA programmability allows for tailored layouts and macros. Multiple connectivity options and vibrant RGB backlighting enhance productivity and provide an immersive experience.

3.2. 다양한 연결 옵션
Experience versatile connectivity with BT 5.0, 2.4GHz wireless, and Type-C wired connections. The keyboard includes a detachable USB-A to C cable for ultra-fast low latency. A built-in 4000mAh large-capacity rechargeable battery offers long-lasting wireless performance and compatibility across various devices.

3.3. QMK/VIA Programmable Keyboard
The P65 gasket keyboard is fully key programmable with QMK/VIA support, allowing users to customize key layouts and macros. It features NKRO for anti-ghosting and on-board memory to store layouts without requiring background software. VIA software enables real-time layout modifications without additional program downloads.

3.4. Durable Aluminum Build Quality
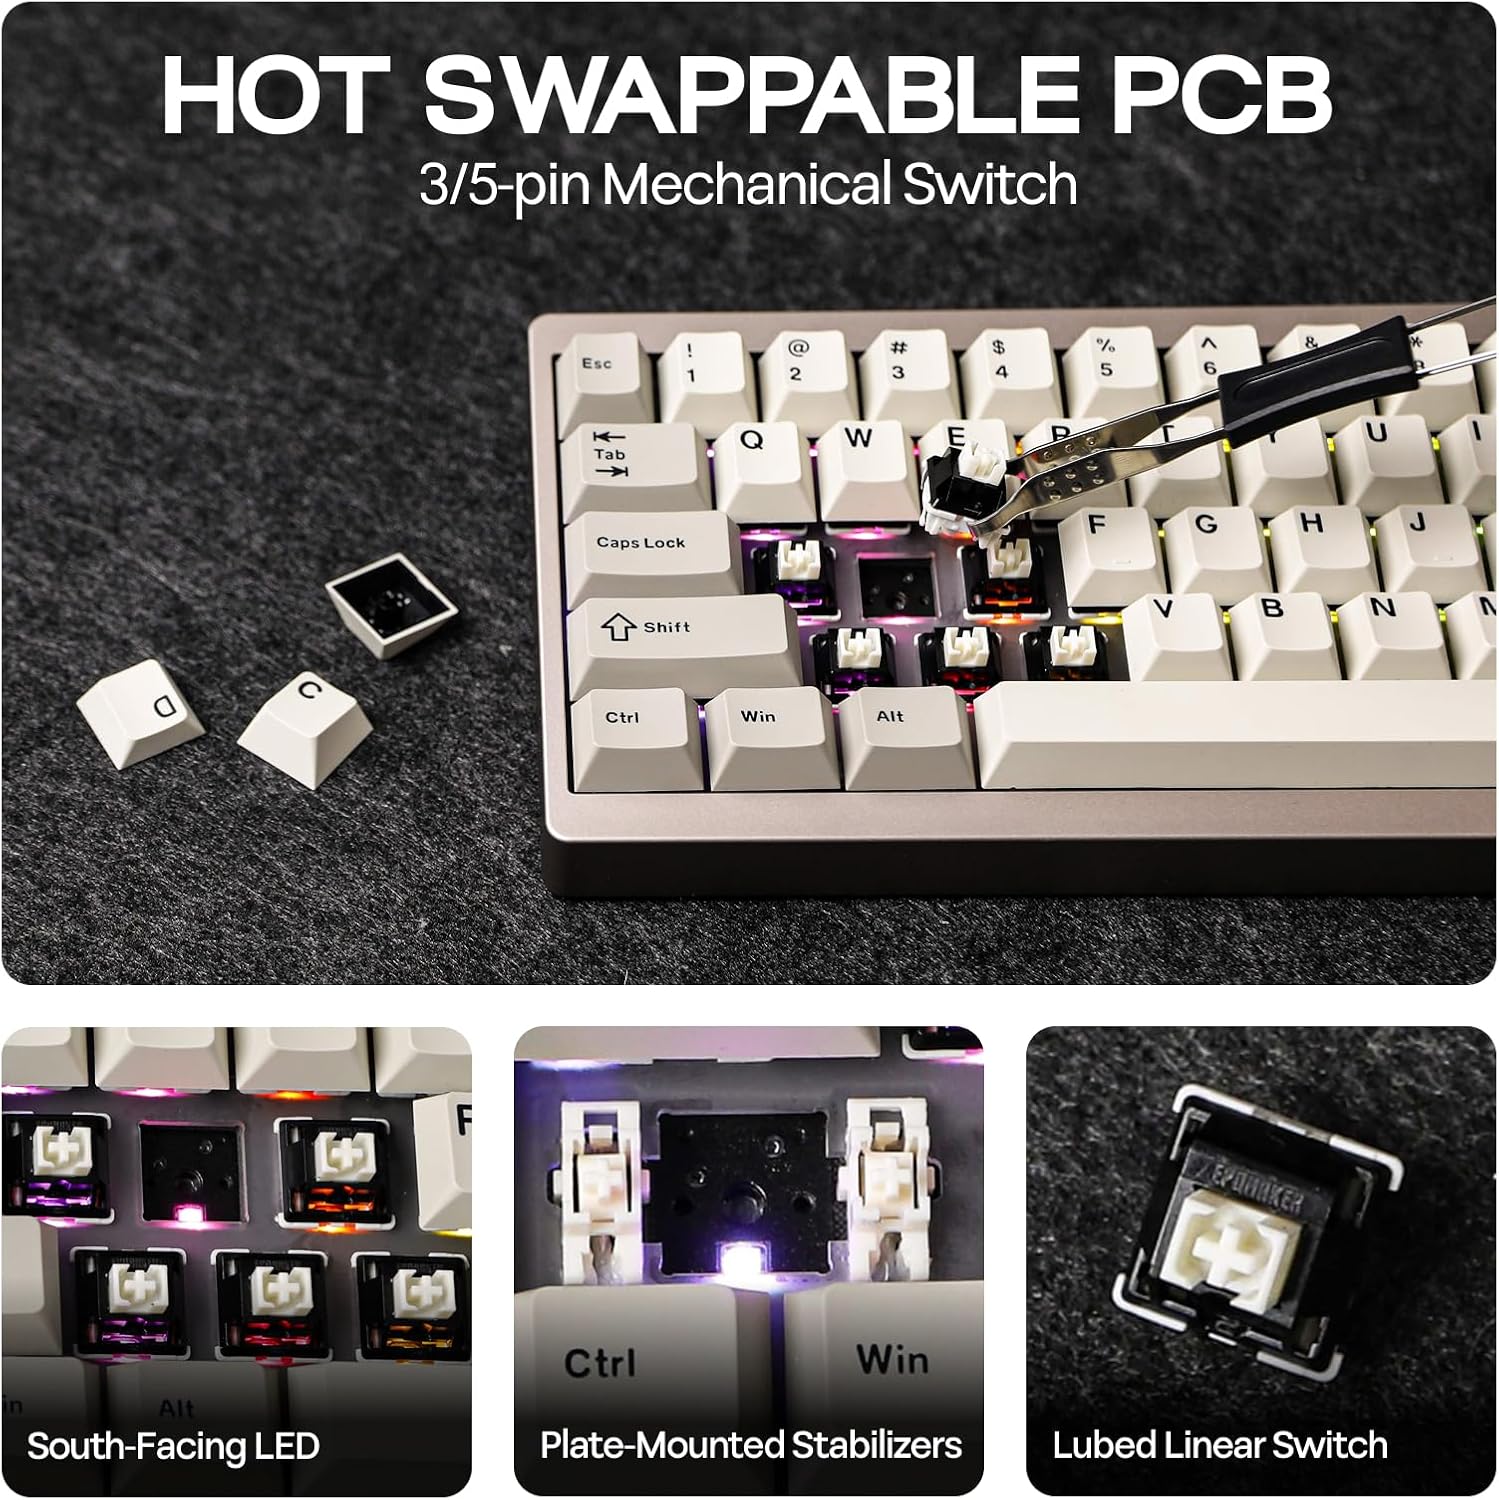
Constructed from durable aluminum with an anodized finish, the keyboard resists wear and corrosion. It features a hot-swappable PCB with plate-mounted stabilizers, allowing for easy switch replacement without soldering. This enables customization with preferred switch types (tactile, linear, or clicky).

3.5. Enhanced Typing Sound & Vibrant RGB Backlighting
고급 사운드-dampening materials, including sandwich foam, IXPE switch pad, PET sound pad, sound-absorbing foam, and EVA case foam, reduce noise and enhance the keyboard's sound profile. South-facing RGB backlighting creates a visually stunning setup with customizable per-key lighting.

3.6. 스위치
The EPOMAKER P65 is available with various switch options, including Wisteria Linear Switch and Zebra Switch. Both are pre-lubed linear mechanical switches with 5 pins, offering a smooth typing experience. The Zebra switches have an actuation force of 40±5gf, while Wisteria Linear V1 switches have an actuation force of 45±17gf.

4. 설정
4.1. 연결 모드
The EPOMAKER P65 supports three connectivity modes: Wired (USB-C), 2.4GHz Wireless, and Bluetooth 5.0.

4.1.1. 유선 연결(USB-C)
Connect the keyboard directly to your device using the provided USB-A to USB-C cable. The keyboard will automatically switch to wired mode.
4.1.2. 블루투스 연결 (BT 5.0)
- Flip the switch on the back of the keyboard to the 'BT' position.
- 누르고있어 Fn + Q, Fn + W, 또는 Fn + E until the corresponding key flashes, indicating pairing mode.
- On your device (PC, Mac, Smartphone, Tablet), search for Bluetooth devices and select 'EPOMAKER P65' to connect.
4.1.3. 2.4GHz 무선 연결
- Locate the 2.4GHz wireless receiver (dongle) stored in the slot on the back of the keyboard.
- Flip the switch on the back of the keyboard to the '2.4G' position.
- 2.4GHz 수신기를 장치의 사용 가능한 USB 포트에 꽂습니다.
- 누르고있어 Fn + R until the 'R' key flashes, indicating pairing mode. The indicator will stop flashing once connected.
4.2. 호환성
The EPOMAKER P65 is compatible with a wide range of devices and operating systems, including Windows, macOS, Linux, Android, PC, Laptops, Tablets, Smartphones, PlayStation, Xbox, and Nintendo Switch.

5. 사용 설명서
5.1. QMK/VIA 맞춤형
The EPOMAKER P65 supports QMK/VIA for advanced customization of key layouts, macros, and RGB lighting. Download the VIA software from the official website to access these features. VIA allows for real-time modifications without firmware flashing.
5.2. RGB 백라이트 제어
Adjust RGB effects and brightness directly from the keyboard:
- Fn + \|: Cycle through various RGB lighting effects.
- Fn +]}: Cycle through single color modes.
- Fn + ↑: 밝기를 높입니다.
- Fn + ↓밝기를 낮추세요.
- FN + →: Increase effect speed.
- Fn + ←: Decrease effect speed.
5.3. 멀티미디어 노브
The silver glossy knob on the top right corner provides quick access to multimedia controls, such as volume adjustment and play/pause functions.
5.4. 배터리 확인
배터리 수준을 확인하려면 다음을 누르세요. Fn + 백스페이스RGB 조명은 현재 배터리 상태를 나타냅니다.

6. 유지관리
6.1. 청소
Regularly clean your keyboard to ensure optimal performance and longevity. Use a soft brush or compressed air to remove dust and debris from between the keycaps. For keycap cleaning, remove them using the provided puller and wipe with a damp 옷감.
6.2. 스위치 및 키캡 교체
The EPOMAKER P65 features a hot-swappable PCB, allowing you to easily replace switches without soldering. Use the included 2-in-1 keycap-and-switch puller to remove existing keycaps and switches. Ensure new switches are 3-pin or 5-pin mechanical switches and align the pins correctly before inserting.
7. 문제 해결
7.1. 키보드가 연결되지 않음
- Ensure the mode switch (Wired, 2.4G, BT) on the back of the keyboard is in the correct position.
- For Bluetooth, ensure the keyboard is in pairing mode (Fn + Q/W/E flashing) and your device's Bluetooth is enabled.
- For 2.4GHz wireless, ensure the dongle is securely plugged in and the keyboard is in pairing mode (Fn + R flashing).
- 무선 연결 문제를 배제하려면 USB-C 케이블을 사용하여 연결해 보세요.
7.2. Keys Not Responding or Double Typing (Chattering)
- This can sometimes be caused by overly sensitive switches. If you experience chattering on specific keys, try replacing the affected switch with one of the spare switches provided or a different switch type.
- Ensure switches are fully seated in the hot-swappable PCB.
- Reset the keyboard to factory settings by holding Fn + 스페이스바 3초 동안.
7.3. VIA Software Not Recognizing Keyboard
- Ensure the keyboard is connected via USB-C cable when attempting to use VIA software.
- Verify you have the latest version of VIA software installed.
- Check the official EPOMAKER website or community forums for specific firmware or JSON files required for VIA compatibility with your P65 model.
8. 사양
| 특징 | 세부 사항 |
|---|---|
| 상표 | 에포메이커 |
| 모델 | 피65 |
| 제품 치수 | 12.6 x 4.57 x 1.71 인치 |
| 품목 무게 | 3.98파운드 |
| 재료 | 알류미늄 |
| 연결 기술 | 2.4GHz Wireless, BT 5.0, USB-A to C |
| 키보드 설명 | 기계적 |
| 특징 | Aluminum, Backlit, Gasket-Mount, Hot-Swappable, N-key Rollover |
| 키보드 백라이팅 | RGB(남향) |
| 배터리 | 4000mAh 리튬 이온(포함) |
9. 보증 및 지원
For warranty information, technical support, or any inquiries regarding your EPOMAKER P65 keyboard, please refer to the contact details provided in the included multilingual manual or visit the official EPOMAKER website. You may also reach out to EPOMAKER customer service directly for assistance.


