1. 서론
Thank you for choosing the RAINPOINT Irrigation Computer. This device is designed to simplify your garden watering tasks with its advanced features and user-friendly interface. It allows for precise control over watering schedules across multiple zones, ensuring optimal hydration for your plants while conserving water.
Please read this manual thoroughly before operating the device to ensure proper installation, programming, and maintenance. Keep this manual for future reference.
2. 제품 오버view
2.1개의 구성요소
The RAINPOINT Irrigation Computer features a robust design with a large LCD display and intuitive controls. Key components include:
- 메인 유닛: Houses the control panel, LCD display, and battery compartment.
- 황동 입구: Durable connection point for your water source, compatible with 3/4 and 1-inch hoses/taps.
- Three Independent Outlets: Allows for connection of up to three separate watering zones.
- 컨트롤 다이얼 : Used for navigating through settings and modes.
- 버튼: OK/Manual, Delay/+, Zone/-, used for specific functions and adjustments.

그림 2.1: 전면 view of the RAINPOINT Irrigation Computer, showing the large LCD display, control dial, and three outlets at the bottom.
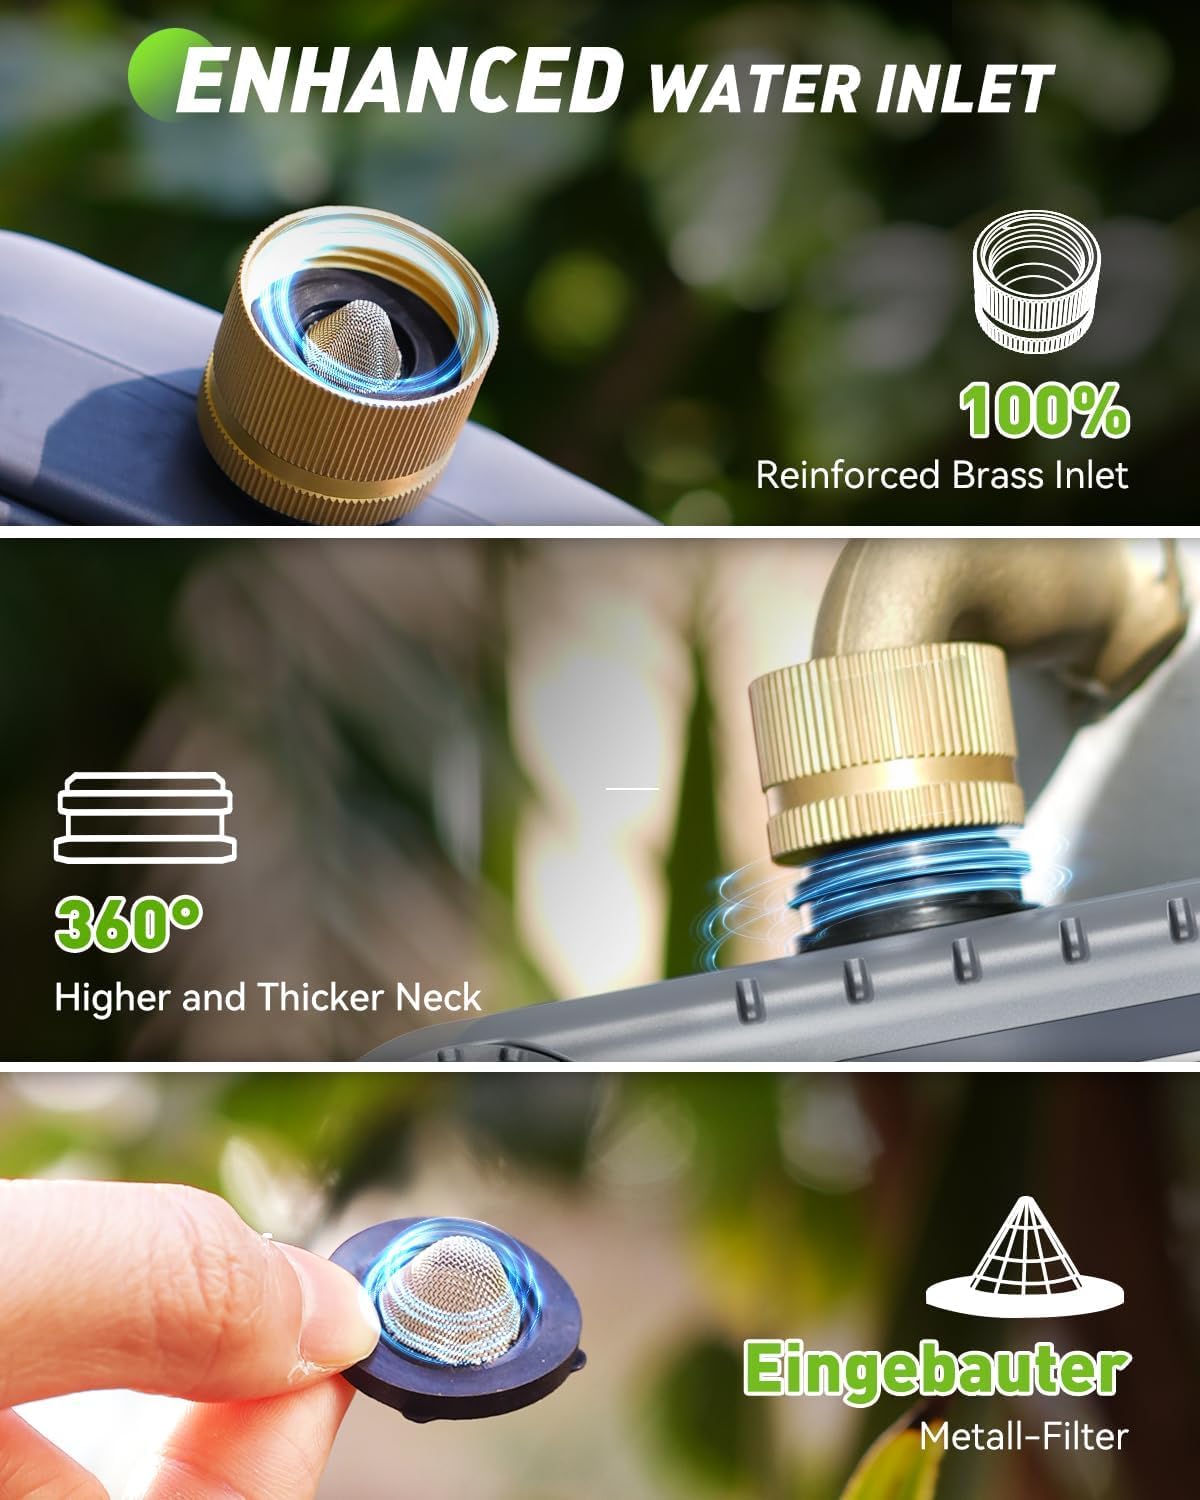
그림 2.2: 상세 view of the enhanced water inlet, featuring a reinforced brass connection and an integrated metal filter for durability and clean water flow.
2.2 주요 특징
- 3개의 독립 구역: Program distinct watering schedules for up to three different areas.
- Enhanced Timer Performance: Durable brass inlet and reinforced solenoid valve for stable water flow.
- 비 지연 기능: Pause watering for 24, 48, or 72 hours to prevent overwatering during rainfall.
- 수동 물뿌리기 모드: Initiate immediate watering without affecting programmed schedules.
- 대형 LCD 디스플레이: Clear and easy-to-read screen for programming and monitoring.
- 배터리 부족 보호: Alerts for low battery and automatically shuts off the valve to prevent water waste.
3. 설정
3.1 배터리 설치
The irrigation computer requires 4 AA 1.5V batteries (not included). To install:
- 장치 뒷면에서 배터리 칸을 찾으세요.
- Gently pull up the two tabs on the back cover to open the compartment.
- AA 배터리 4개를 올바른 극성(+/-)에 맞춰 넣으세요.
- Close the battery compartment securely, pressing down until the tabs click into place.
Note: The LCD screen will activate upon successful battery installation.
3.2 Installation to Faucet
Before connecting, ensure your faucet is clean and free of debris.
- Attach the brass inlet of the irrigation computer to your outdoor faucet. Ensure the included sealing washer is properly seated to prevent leaks.
- Tighten the connection by hand until secure. Do not overtighten.
- Connect your garden hoses to the three independent outlets at the bottom of the unit. Ensure each hose is securely fastened.

Figure 3.1: Installation of the irrigation computer to a standard outdoor faucet, highlighting the ergonomic design for easy handling.
4. 사용 설명서
4.1 시계 설정
- 조절 다이얼을 다음으로 돌립니다. 시계 설정.
- 사용하세요 +/- 현재 시간을 조정하려면 버튼을 누르세요. 확인/수동 확인합니다.
- 사용하세요 +/- buttons to adjust the current minute. Press 확인/수동 확인합니다.
- 이제 시계가 설정되었습니다.
4.2 Programming Watering Schedules (Automatic Mode)
Each of the three zones can be programmed independently. The device will execute plans for one zone at a time to maintain water pressure.

Figure 4.1: The LCD display illustrating the customizable settings for watering schedules, including start time, duration, and frequency.
- 조절 다이얼을 다음으로 돌립니다. 시작 시간.
- 를 누르세요 ZONE +/- button to select the zone you wish to program (ZONE 1, 2, or 3).
- 사용하세요 +/- buttons to set the desired start time for the selected zone. Press 확인/수동 확인합니다.
- 조절 다이얼을 다음으로 돌립니다. 얼마나 걸려요.
- Ensure the correct zone is selected using ZONE +/-. 사용하세요 +/- buttons to set the watering duration (from 1 minute to 4 hours). Press 확인/수동 확인합니다.
- 조절 다이얼을 다음으로 돌립니다. 얼마나 자주.
- Ensure the correct zone is selected using ZONE +/-. 사용하세요 +/- buttons to set the watering frequency (from 1-12 hours or 1-7 days). Press 확인/수동 확인합니다.
- Repeat steps for other zones as needed.
- 조절 다이얼을 다음으로 돌립니다. ON to activate the programmed schedules.
Important Note: The device can only execute the plan for one zone at a time. If there is a conflict in activation plans for multiple zones, only one zone will operate, and the others will wait for the previous zone's execution to complete before starting. This ensures optimal water pressure for each zone.
4.3 수동 급수
To initiate immediate watering without affecting your programmed schedules:

Figure 4.2: A user demonstrating manual watering, with the display showing options to select and activate specific zones for immediate watering.
- 조절 다이얼을 다음으로 돌립니다. ON.
- 를 누르세요 확인/수동 button. The display will show "MANUAL".
- 사용하세요 ZONE +/- button to select the zone you wish to water manually.
- 사용하세요 +/- buttons to set the desired manual watering duration (from 1 minute to 8 hours).
- 누르다 확인/수동 수동 급수를 시작합니다.
- 수동 급수를 중지하려면 누르세요. 확인/수동 다시 또는 다이얼을 돌리세요 끄다.
4.4 강우 지연 기능
The rain delay function allows you to temporarily suspend your watering schedule for a set period, preventing overwatering during rainy conditions.
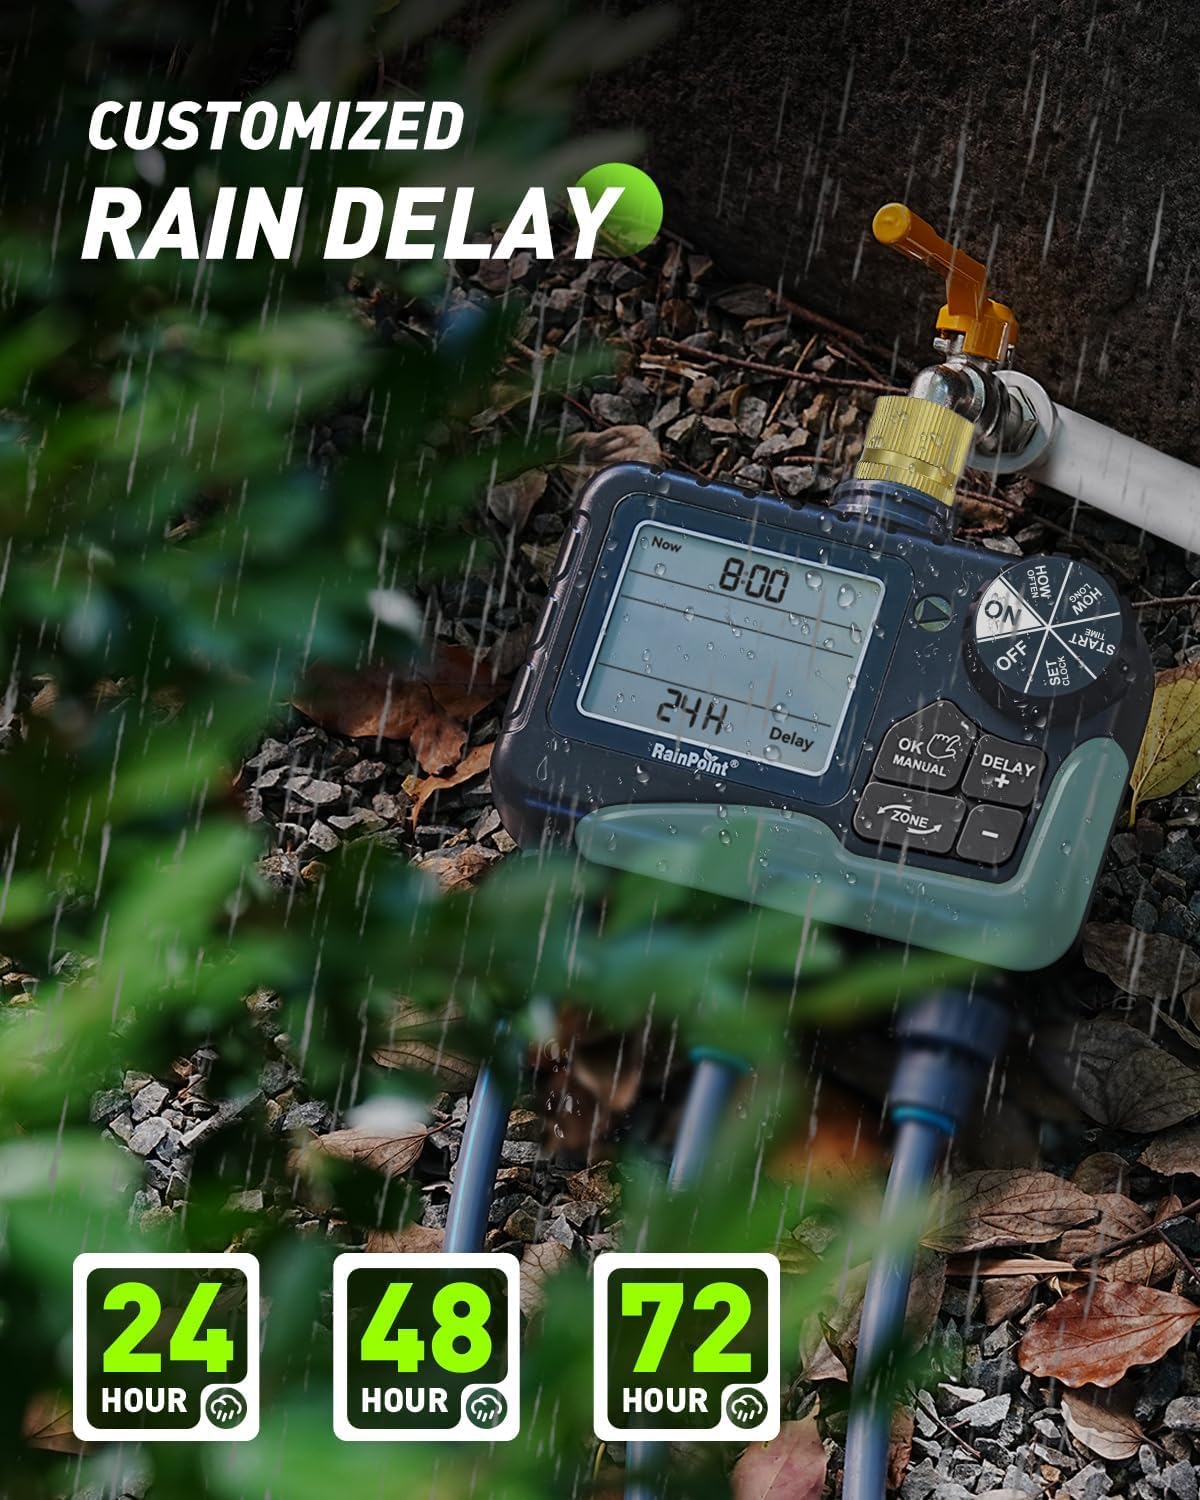
Figure 4.3: The irrigation computer displaying the rain delay options, allowing users to pause watering for 24, 48, or 72 hours.
- 조절 다이얼을 다음으로 돌립니다. ON.
- 를 누르세요 지연/+ button. The display will show "DELAY".
- 사용하세요 +/- buttons to select the desired delay duration (24H, 48H, or 72H).
- 누르다 확인/수동 to activate the rain delay. The timer will automatically resume its schedule after the selected delay period.
- 우천으로 인한 경기 지연을 취소하려면 누르세요. 지연/+ again and select "0H" or turn the dial to 끄다 그리고 다시 돌아와서 ON.
4.5 Turning Off the Device
To stop all watering and programming, turn the control dial to 끄다. This will suspend all active schedules until the dial is turned back to ON.
5. 유지관리
- 배터리 교체: Replace batteries when the low battery indicator appears on the LCD. The valve will automatically shut off when batteries are critically low to prevent water waste.
- 청소: Periodically clean the brass inlet filter to prevent debris from entering the unit and affecting water flow. Remove the filter, rinse it under running water, and reinsert.
- 겨울 보관: During freezing temperatures, remove the irrigation computer from the faucet and store it indoors in a dry, frost-free location. Remove batteries before storage.
- 밸브 유지보수: The improved coil valve design minimizes shock and ensures smoother water flow. No specific user maintenance is required for the internal valve beyond keeping the inlet filter clean.

Figure 5.1: The display indicating a low battery reminder and the automatic shut-off feature to conserve water.

Figure 5.2: Visual comparison highlighting the structural design improvements of the upgraded coil valve, leading to less water pressure loss compared to older valve types.
6. 문제 해결
| 문제 | 가능한 원인 | 해결책 |
|---|---|---|
| 물이 흐르지 않습니다. |
|
|
| Watering does not start at programmed time. |
|
|
| 연결부에서 누출이 발생합니다. |
|
|
| 디스플레이가 비어 있거나 어둡습니다. |
|
|
7. 사양
| 특징 | 세부 사항 |
|---|---|
| 모델 번호 | B-ITV347 |
| 치수 | Approx. 18.7D x 19.5W x 10.9H cm |
| 무게 | 약 866그램 |
| 재료 | Brass (inlet), ABS Plastic |
| 수압 범위 | 0.5 - 8 Bar (7.25 - 116 PSI) |
| 유량 | 5 - 35 Liters per minute |
| 작동 온도 | 3°C - 50°C |
| 전원 | 4 x AA 1.5V 배터리(포함되지 않음) |
| 물주기 시간 | 1 minute to 4 hours (programmable) |
| 급수 빈도 | 1-12 hours or 1-7 days (programmable) |
| 비로 인한 연기 옵션 | 24시간, 48시간, 72시간 |
| 침투 방지 | IP65 |
8. 보증 및 지원
RAINPOINT offers lifetime support for this product. If you require further assistance, have questions, or encounter any issues not covered in this manual, please contact RAINPOINT customer service.
For warranty information and to register your product for a 5-year guarantee, please refer to the contact details provided with your purchase or visit the official RAINPOINT web대지.


