1. 서론
This manual provides detailed instructions for the ACEMIC AT-5 Acoustic Guitar Wireless Microphone System. This system is designed to provide high-fidelity audio transmission for plucked string instruments, offering freedom of movement and clear sound reproduction. It utilizes UHF frequency for stable wireless connectivity and features a flexible gooseneck microphone for precise sound capture.
2. 패키지 내용
아래 나열된 모든 품목이 패키지에 포함되어 있는지 확인하세요.
- 1 x ACEMIC AT-5 Wireless Microphone Transmitter (with gooseneck microphone)
- 1 x ACEMIC AT-5 Wireless Receiver (with 6.35mm jack and antenna)
- 1 x USB-C 충전 케이블
- 1 x 3.5mm Audio Jack Adapter
- 5 x Velcro Adhesive Attachments
- 1 x Spare Microphone Foam Cover
- 1 x 사용자 설명서
- 1 x 운반 가방
3. 제품 오버view
The ACEMIC AT-5 system consists of two main components: the Transmitter and the Receiver.
3.1. Transmitter (Microphone Unit)
- 구즈넥 마이크: Flexible arm for precise positioning.
- Microphone Foam Cover: 파열음과 풍절음을 줄여줍니다.
- 전원 버튼: 기기를 켜거나 끄는 데 사용합니다.
- 충전 포트(USB-C): 내부 배터리를 충전합니다.
- 적외선 센서: For automatic pairing with the receiver.
3.2. 수신기
- 6.35mm 오디오 잭: 연결 amp앰프, 믹서 또는 PA 시스템.
- 안테나: 안정적인 신호 수신을 위해.
- 전원 버튼: 기기를 켜거나 끄는 데 사용합니다.
- 충전 포트(USB-C): 내부 배터리를 충전합니다.
- 표시하다: 채널 정보를 표시합니다.
- 채널 전환 버튼: For manual channel selection.
- 적외선 센서: For automatic pairing with the transmitter.

4. 설정 지침
Follow these steps to set up your ACEMIC AT-5 wireless microphone system:
4.1. 기기 충전
- Connect the USB-C charging cable to the charging ports on both the transmitter and receiver units.
- 케이블의 다른 쪽 끝을 USB 전원 어댑터(별도 구매) 또는 전원이 공급되는 USB 포트에 연결하십시오.
- The charging indicator will illuminate. A full charge typically takes 2.5 to 3 hours.
- Once fully charged, the indicator light will change or turn off, depending on the unit.

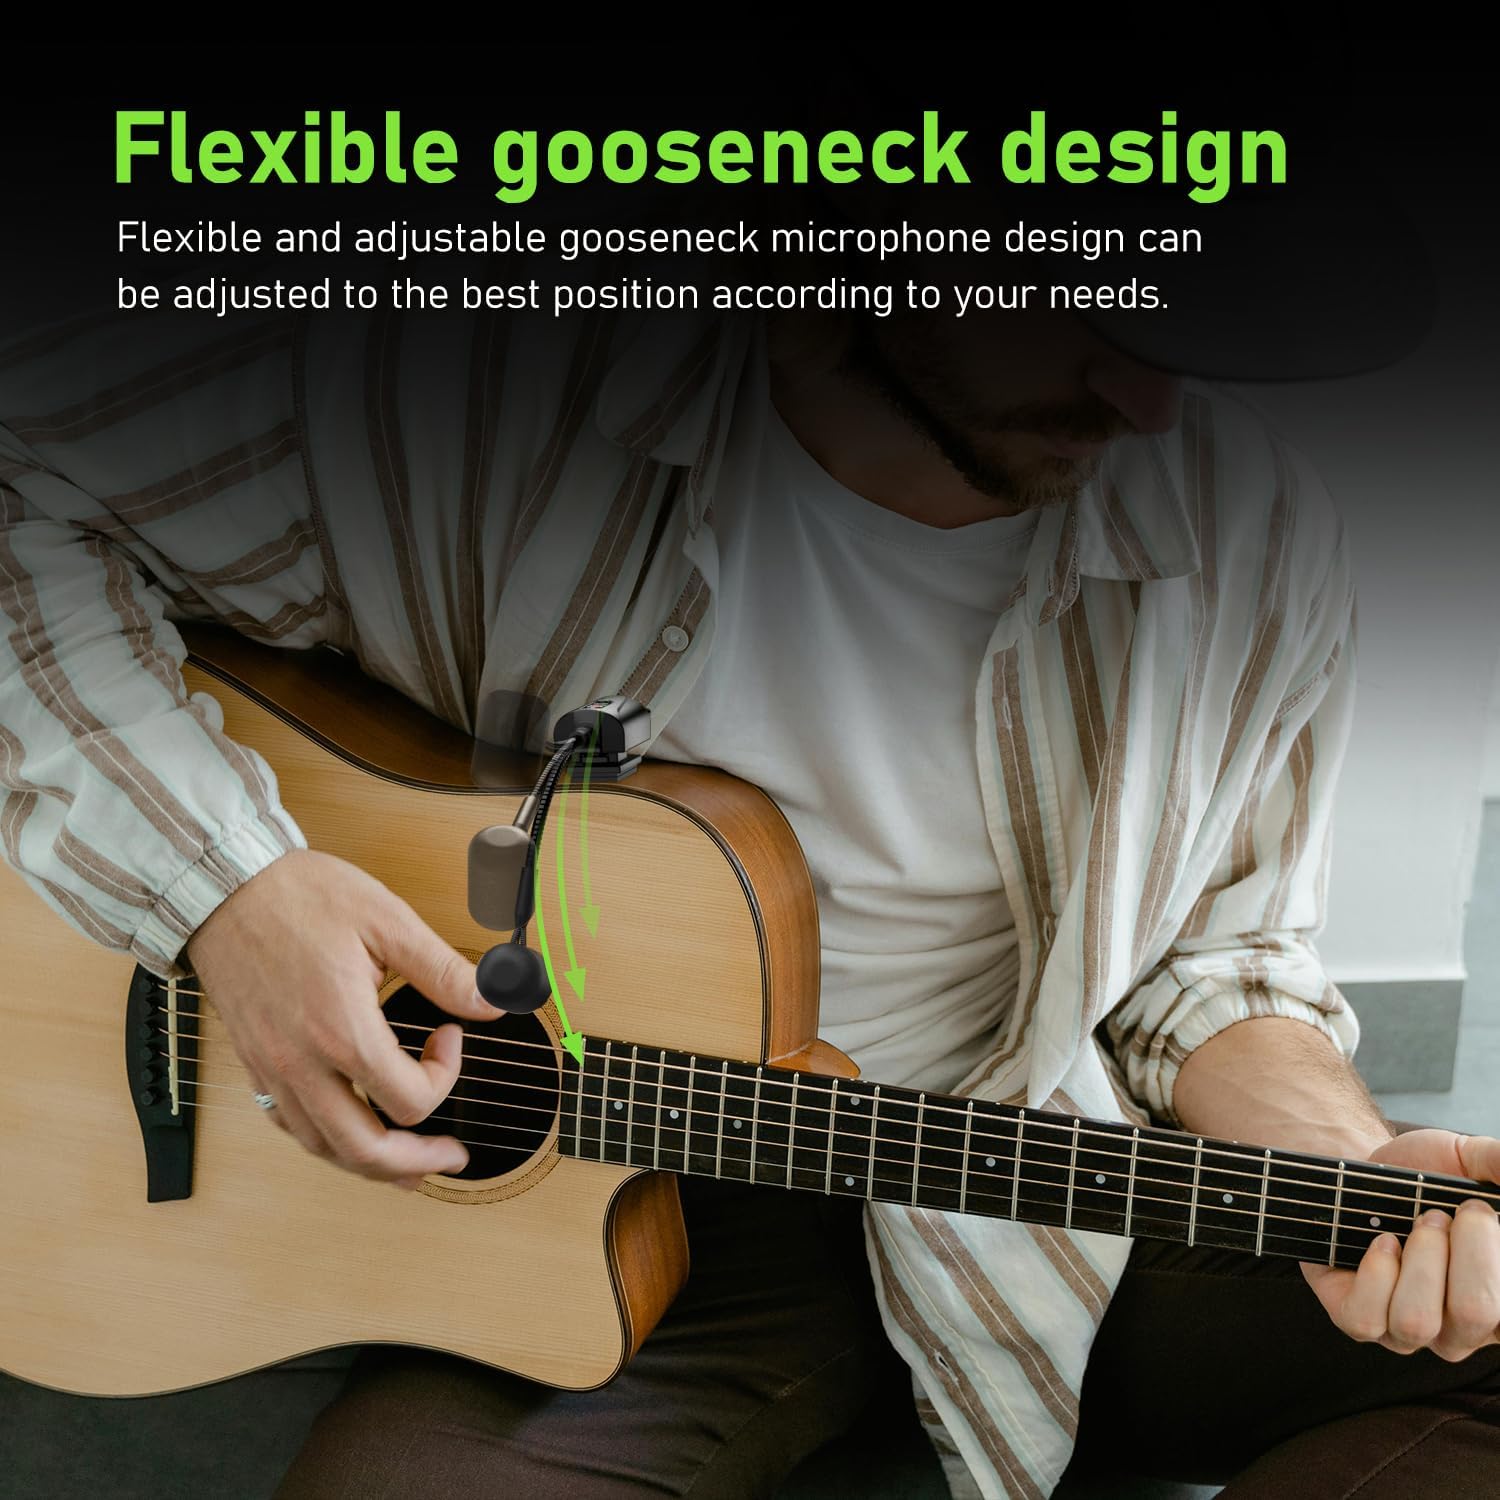
4.2. Attaching the Transmitter to Your Instrument
- Select a suitable location on your acoustic guitar, typically near the sound hole, where the transmitter can be securely attached without obstructing your playing.
- Peel the backing from one of the Velcro adhesive attachments.
- Apply the adhesive side firmly to the chosen spot on your guitar.
- Attach the transmitter unit to the Velcro. Ensure it is secure.
- Adjust the flexible gooseneck microphone to point towards the sound hole or strings for optimal sound capture.

4.3. 수신기 연결
- Ensure the antenna on the receiver is correctly installed and extended.
- Plug the 6.35mm audio jack of the receiver directly into the input of your amplifier, PA system, or audio mixer.
- If your device requires a 3.5mm input, use the provided 3.5mm audio jack adapter.
4.4. 유닛 페어링
The ACEMIC AT-5 system features automatic infrared pairing:
- Power on both the transmitter and the receiver units.
- Place the IR sensors of the transmitter and receiver close to each other (within a few inches).
- The units will automatically pair. A successful connection is usually indicated by a stable light on both units.

5. 운영
5.1. 전원 켜기 / 끄기
Press and hold the power button on each unit to turn it on or off.
5.2. 채널 선택
The system offers 16 preset groups of adjustable channels to mitigate potential interference. If you experience interference, you can manually switch channels on the receiver using the channel switch button. Ensure that the transmitter and receiver are on the same channel for proper operation.

5.3. 마이크 배치
Adjust the flexible gooseneck microphone to achieve the desired sound. Experiment with different angles and distances from the sound hole or strings to find the optimal position for your instrument and playing style. The built-in high-sensitivity condenser microphone is designed to capture clear and realistic audio.

5.4. 무선 전송
The ACEMIC AT-5 system uses UHF frequency for stable transmission up to 130 feet (approximately 40 meters) in open areas. Performance may vary depending on environmental factors and obstacles.

6. 유지관리
6.1. 청소
부드럽고 마른 천으로 제품을 닦으세요. 액체 세척제나 용제는 마감재나 내부 부품을 손상시킬 수 있으므로 사용하지 마세요.
6.2. 보관
When not in use, store the ACEMIC AT-5 system in its carrying bag in a cool, dry place, away from direct sunlight and extreme temperatures. Ensure the units are turned off before storage.
6.3. 배터리 관리
To prolong battery life, avoid completely discharging the units regularly. Recharge them periodically, even if not in frequent use.
7. 문제 해결
If you encounter issues with your ACEMIC AT-5 system, refer to the following common problems and solutions:
| 문제 | 가능한 원인 | 해결책 |
|---|---|---|
| 사운드 출력이 없습니다 | 전원이 켜지지 않은 장치 짝이 맞지 않는 유닛 Receiver not connected to audio input Receiver antenna not installed/extended 배터리 부족 | 송신기와 수신기 모두 전원이 켜져 있는지 확인하세요. Re-pair the units using the infrared sensors. Verify the receiver is securely plugged into your amp정수기/믹서. Ensure the receiver antenna is properly installed and extended. 두 장치를 모두 완전히 충전하세요. |
| 간섭 또는 정적 소음 | 근처 전자기기 Other wireless signals 부대 간 장애물 | 간섭을 일으킬 수 있는 곳에서 멀리 떨어지세요. Change the operating channel on the receiver. Ensure a clear line of sight between the transmitter and receiver. |
| Poor sound quality (e.g., muffled, weak) | 마이크 위치가 잘못되었습니다 마이크가 음원에서 너무 멀리 떨어져 있습니다. 배터리 부족 | Adjust the gooseneck microphone closer to the sound hole or strings. 기기가 완전히 충전되었는지 확인하십시오. |
| 짧은 전송 범위 | 신호를 막는 장애물 환경적 요인 배터리 부족 | Minimize obstacles between transmitter and receiver. 기기가 완전히 충전되었는지 확인하십시오. |
| Transmitter not attaching securely | Velcro adhesive worn out | Use a fresh Velcro adhesive attachment. (5 spare pieces are included). |
8. 사양
| 특징 | 세부 사항 |
|---|---|
| 모델명 | AT-5 |
| 상표 | 에이스믹 |
| 연결 기술 | 초고주파 |
| 마이크 폼 팩터 | 구즈넥 |
| 채널 수 | 16 |
| 전원 | 배터리 구동(리튬 폴리머 배터리 2개 필요) |
| 작동 시간 | 6시간 |
| 충전 시간 | 2.5~3시간 |
| 전송 범위 | Up to 130 feet (approx. 40 meters) in open areas |
| Samp링율 | 48kHz |
| 숨어 있음 | <6ms |
| 품목 무게 | 0.46킬로그램(1.01파운드) |
| 극성 패턴 | 단방향 |
| 커넥터 유형 | 6.35mm 잭 (3.5mm 어댑터 포함) |
| 한국어: | 797417770397 |
9. 보증 및 지원
For warranty information and technical support, please refer to the documentation provided with your purchase or contact the seller/manufacturer directly. Specific warranty terms may vary by region and retailer.


