1. 서론
This manual provides essential information for setting up, operating, and maintaining your GenMachine Mini PC AMD Ryzen 7 7735HS. Please read this manual thoroughly before using the device to ensure proper functionality and safety.
2. 안전 정보
기기 손상이나 부상을 방지하기 위해 다음 안전 지침을 준수하십시오.
- 기기를 물, 습기 또는 극한 온도에 노출시키지 마세요.
- 과열을 방지하기 위해 적절한 환기를 유지하세요. 환기구를 막지 마세요.
- 제공된 전원 어댑터만 사용하세요.
- 장치를 떨어뜨리거나 강한 충격을 가하지 마십시오.
- 기기를 직접 열거나 수리하지 마십시오. 모든 정비는 자격을 갖춘 기술자에게 맡기십시오.
3. 패키지 내용
패키지에 모든 품목이 들어 있는지 확인하세요.
- GenMachine Mini PC
- 사용자 설명서
- 전원 어댑터
- HDMI 케이블
- 장착 브래킷(나사 포함)

이미지: 패키지 구성품. This image displays the items included in the GenMachine Mini PC box: the Mini PC unit, user manual, power adapter, HDMI cable, and a mounting bracket with screws.
4. 제품 오버view
The GenMachine Mini PC is a compact, high-performance computer designed for various applications, from home office tasks to multimedia consumption. Its small footprint allows for versatile placement.

이미지: 앞면 View of GenMachine Mini PC. This image shows the front panel of the GenMachine Mini PC, featuring the power button, USB-C port, audio jack, and two USB 3.0 ports.
4.1 전면 패널
- 전원 버튼: 을 눌러 장치를 켜거나 끕니다.
- USB-C 포트: 데이터 전송 및 화면 출력을 위해.
- 오디오 잭 : 헤드폰이나 외부 스피커용.
- USB 3.0 포트(x2): 키보드, 마우스, 외부 저장 장치 등의 주변 장치를 연결하는 데 사용됩니다.
4.2 후면 패널

이미지: 후면 View of GenMachine Mini PC. This image illustrates the rear panel of the Mini PC, highlighting the power input, HDMI ports, Ethernet ports, and additional USB ports.
- 전원 입력(DC IN): 여기에 전원 어댑터를 연결하세요.
- HDMI 포트(x2): Connect to monitors or TVs for video output. Supports 4K resolution.
- 이더넷 포트(2개): For wired network connections (Dual 2.5G).
- USB 2.0 포트(x2): 다양한 USB 장치를 연결하는 데 사용됩니다.
4.3 디자인 및 치수

Image: GenMachine Mini PC Size Comparison. This image compares the compact size of the GenMachine Mini PC to a traditional tower chassis, illustrating its space-saving design. Dimensions are shown as 126mm x 130mm x 40mm.
The GenMachine Mini PC features an ultra-durable, lightweight metal casing. Its compact design (approximately 126 x 130 x 40 mm) makes it significantly smaller than traditional desktop computers, ideal for any work environment.
5. 설정
5.1 주변기기 연결하기
- Connect your monitor(s) to the HDMI ports or the USB-C port using appropriate cables.
- USB 키보드와 마우스를 사용 가능한 USB 포트에 연결하세요.
- If using wired internet, connect an Ethernet cable to one of the Ethernet ports.
- 전원 어댑터를 미니 PC의 DC IN 포트에 연결한 다음 전원 콘센트에 꽂으십시오.
5.2 전원 켜기
Press the power button on the front panel of the Mini PC. The power indicator light will illuminate, and the system will begin to boot.
5.3 초기 운영 체제 설정
Upon first boot, you will be guided through the operating system setup process (e.g., Windows 11). Follow the on-screen instructions to configure language, region, network, and user accounts.
6. 사용 설명서
6.1 네트워크 연결
- 와이파이: During initial setup or via the operating system's network settings, select your Wi-Fi network and enter the password. The Mini PC supports Wi-Fi 6 for faster and more stable wireless connections.
- 이더넷: If an Ethernet cable is connected, the system should automatically detect and connect to the wired network. The Mini PC features dual 2.5G network ports for enhanced connectivity.
6.2 블루투스 장치
The Mini PC supports Bluetooth 5.2. To pair a Bluetooth device (e.g., headphones, keyboard, mouse):
- Enable Bluetooth on your device and set it to pairing mode.
- On the Mini PC, go to the operating system's Bluetooth settings.
- 검색 and select your device from the list, then follow any on-screen prompts to complete pairing.
6.3 다중 디스플레이 설정
The GenMachine Mini PC supports up to four displays simultaneously, utilizing its two HDMI ports and one full-function USB-C port (which supports 4K display output).
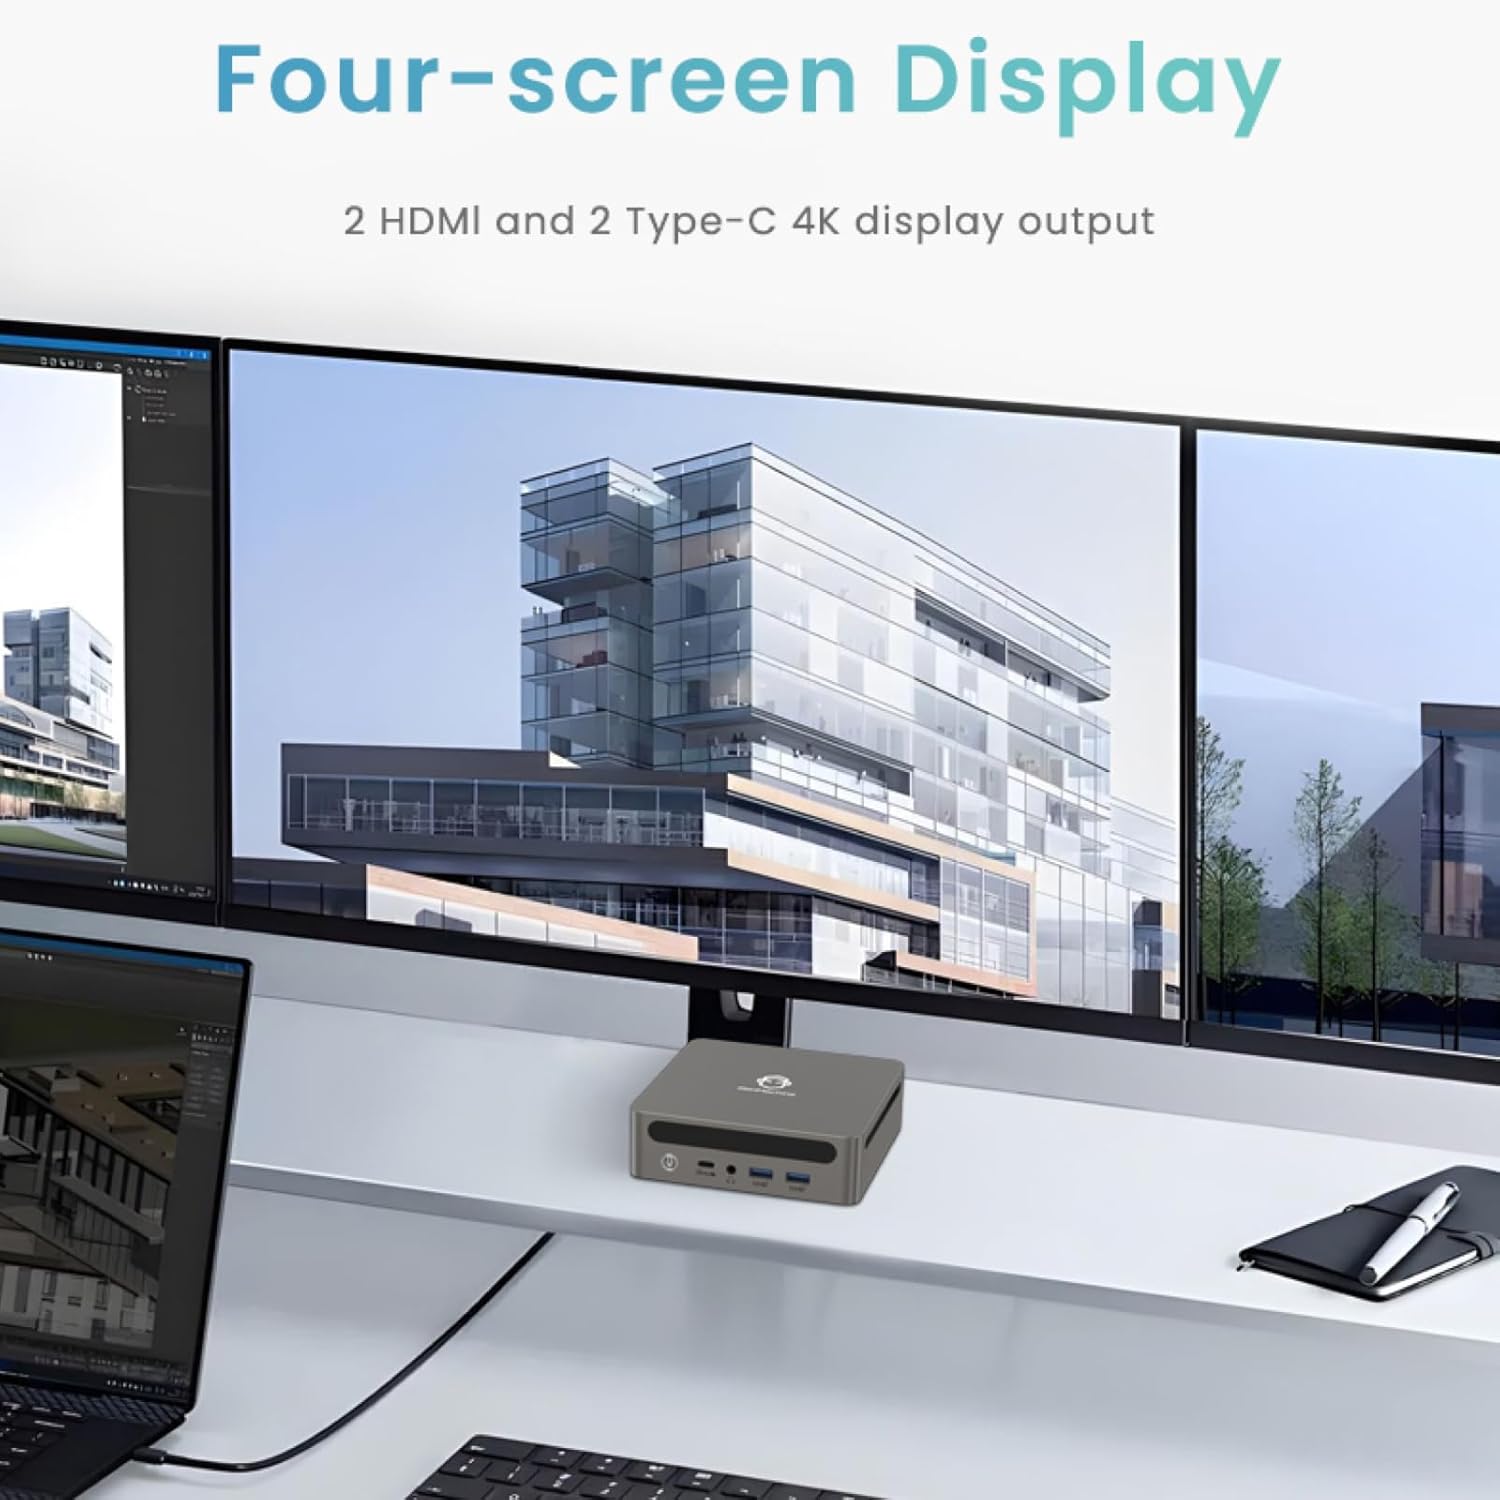
Image: Four-Screen Display Setup. This image demonstrates the GenMachine Mini PC connected to four monitors, showcasing its multi-display capabilities for enhanced productivity.
To configure multiple displays, connect your monitors and then adjust display settings within your operating system (e.g., Extend, Duplicate, or Second screen only).
7. 유지관리
7.1 청소
Regularly clean the exterior of the Mini PC with a soft, dry cloth. For stubborn dirt, slightly dampen the cloth with water. Do not use harsh chemicals or abrasive cleaners. Ensure ventilation openings are free of dust buildup.
7.2 소프트웨어 업데이트
최적의 성능과 보안을 유지하려면 운영 체제와 드라이버를 최신 상태로 유지하세요. 운영 체제 설정에서 정기적으로 업데이트를 확인하십시오.
7.3 보관
장기간 사용하지 않을 경우 미니 PC를 직사광선과 극한 온도 변화를 피해 서늘하고 건조한 곳에 보관하십시오.
8. 문제 해결
| 문제 | 가능한 원인 | 해결책 |
|---|---|---|
| 전원이 없습니다 | 전원 어댑터가 연결되지 않았습니다. 전원 콘센트가 고장났습니다. | 전원 어댑터가 Mini PC와 전원 콘센트에 제대로 연결되어 있는지 확인하세요. 다른 콘센트를 사용해 보세요. |
| 모니터에 표시되지 않음 | Monitor not connected; incorrect input source selected on monitor; faulty cable. | Check HDMI/USB-C cable connections. Ensure the monitor is set to the correct input source. Try a different cable or monitor. |
| Wi-Fi가 연결되지 않음 | Incorrect password; router issue; Wi-Fi adapter driver issue. | Verify Wi-Fi password. Restart your router. Check operating system settings for Wi-Fi adapter status and drivers. |
| 시스템 속도가 느리거나 응답하지 않습니다. | Too many applications running; insufficient free storage; outdated drivers. | Close unnecessary applications. Free up disk space. Update operating system and drivers. Restart the Mini PC. |
9. 사양
The following table details the technical specifications of the GenMachine Mini PC AMD Ryzen 7 7735HS:
| 특징 | 세부 사항 |
|---|---|
| 프로세서 | AMD Ryzen 7 7735HS (3.2 GHz, 8 Cores, 16 Threads, up to 4.75 GHz Max Boost Clock) |
| 제도법 | AMD Radeon Graphics (Integrated, 680 MB RAM) |
| 숫양 | 32GB LPDDR5 (up to 6400 Mb/s) |
| 저장 | 512GB 2280 SSD (PCIE x 16 interface) |
| 운영 체제 | OS (Windows 11 typically pre-installed) |
| 비디오 출력 | 2x HDMI (4K @ 60Hz), 1x USB-C (4K display output), supports up to 3 displays |
| USB 포트 | 2x USB 3.0, 2x USB 2.0, 1x USB-C (full-function USB 4.0 port) |
| 네트워킹 | Wi-Fi 6, Bluetooth 5.2, Dual 2.5G Ethernet |
| 오디오 | 오디오 잭 |
| 치수 | 6.34 x 6.3 x 3.62인치(약 16.1 x 16 x 9.2cm) |
| 무게 | 2.4파운드(약 1.09kg) |
| 색상 | 찢어진 조각 |

Image: AMD Ryzen 7 7735HS Processor. This image highlights the specifications of the AMD Ryzen 7 7735HS processor, including its 8 cores, 16 threads, and up to 4.75 GHz max boost clock.

Image: LPDDR5 Memory Performance. This image illustrates the enhanced speed of LPDDR5 RAM, showing a 50% increase in maximum DRAM bandwidth compared to LPDDR4X, reaching up to 6400 Mb/s.
10. 보증 및 지원
For warranty information and technical support, please refer to the documentation included with your purchase or visit the official GenMachine web사이트. 보증 청구를 위해 구매 증빙 자료를 보관하세요.
For further assistance, you may contact GenMachine customer service through their official channels.


