1. 서론
This manual provides detailed instructions for the safe and effective operation, maintenance, and troubleshooting of your Nitecore MH40S rechargeable flashlight and NB10000 power bank. Please read this manual thoroughly before use to ensure optimal performance and longevity of your devices.
2. 패키지 내용
아래 나열된 모든 품목이 패키지에 들어 있는지 확인하세요.
- Nitecore MH40S Flashlight
- 2 x Nitecore NL2150 5,000mAh Li-ion Batteries
- Nitecore NB10000 10,000mAh Power Bank
- 무선 원격 스위치
- QC 어댑터
- USB-C 충전 케이블
- 예비 O- 링
- 매는 밧줄
- 후크 앤 루프 패스너
- 2 x Hook-and-loop Straps
- 홀스터

3. 제품 특징
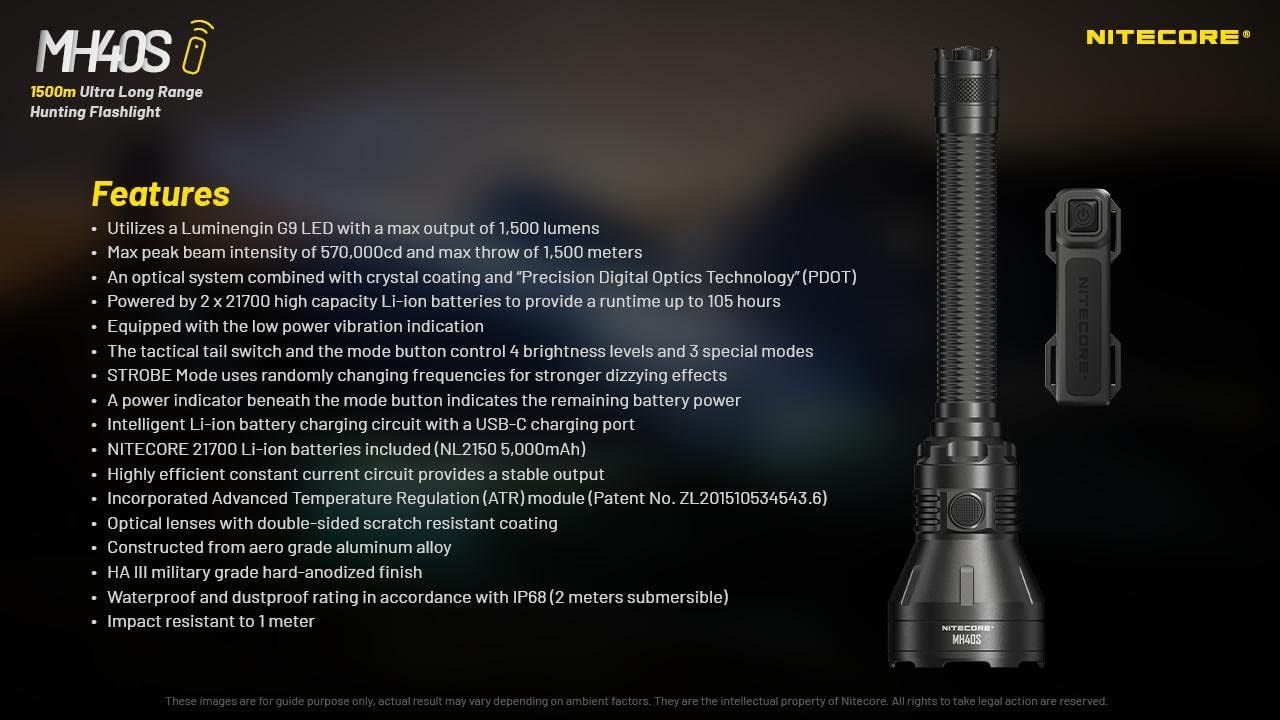
- Utilizes a Luminengin G9 LED with a maximum output of 1,500 lumens.
- Maximum peak beam intensity of 570,000cd and a maximum throw of 1,500 meters.
- Optical system combines crystal coating and "Precis Digital Optics Technology" (PDOT).
- Powered by 2x high-capacity Li-ion batteries, providing a runtime of up to 105 hours.
- Equipped with a low power vibration indicator.
- Tactical tail switch and mode button control 4 brightness levels and 3 special modes.
- STROBE mode uses randomly changing frequencies for enhanced disorienting effects.
- Power indicator beneath the mode button displays remaining battery power.
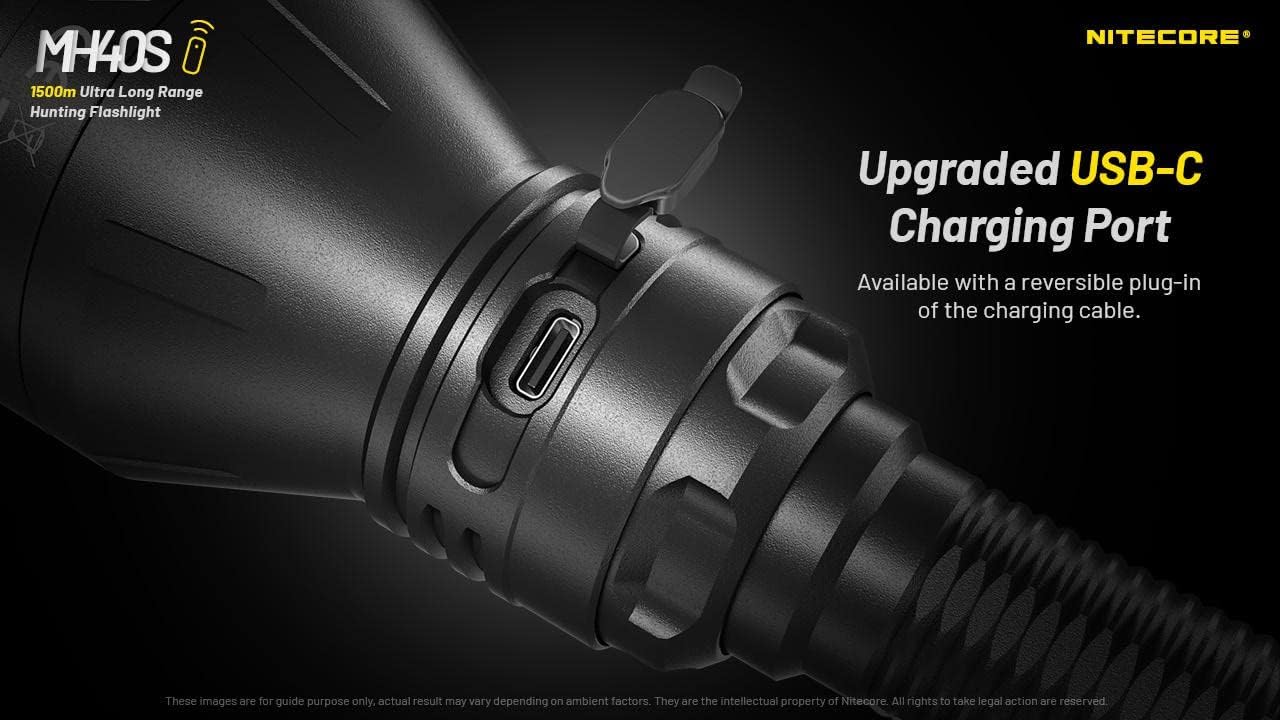
- Intelligent Li-ion battery charging circuit with a USB-C charging port.
- Includes Nitecore NL2150 5,000mAh Li-ion batteries.
- Highly efficient constant current circuit ensures stable output.
- Incorporates Advanced Temperature Regulation (ATR) module.
- Optical lenses feature double-sided scratch-resistant coating.
- HA III 군용 등급의 하드 양극 산화 마감 처리가 된 항공 등급 알루미늄 합금으로 제작되었습니다.
- Waterproof and dustproof rating in accordance with IP68 (2 meters submersible).
- 1m까지 충격에 강합니다.

4. 사양
4.1 MH40S Flashlight Technical Data
| FL1 표준 | 터보 | 높은 | 중간 | 낮은 | 스트로브 | 봉홧불 | 위급 신호 |
|---|---|---|---|---|---|---|---|
| 산출 | 1,500루멘 | 500루멘 | 150루멘 | 18루멘 | 1,500루멘 | 1,500루멘 | 1,500루멘 |
| 실행 시간 | 3시간 15분 | 7시간 15분 | 25시간 | 105시간 | — | — | — |
| 빔 거리 | 1,500m | 860m | 450m | 150m | — | — | — |
| 빔 강도 | 570,000cd | 186,000cd | 51,000cd | 5,800cd | — | — | — |
Note: The stated data is measured in accordance with international flashlight testing standards ANSI/PLATO FL 1-2019, using 2x 21700 Li-ion batteries (5,000mAh) under laboratory conditions. Actual data may vary due to different battery types or environmental conditions.

4.2 일반 사양
- 주도의: Luminengin G9 LED
- 반사기: SMO
- 배터리: 2 x 21700 Li-ion (NL2150 5,000mAh included)
- 특수 모드: Location Beacon, SOS, Strobe
- Beam Color: 백색광
- 길이: 256mm(10.08인치)
- 머리 크기: 65mm(2.56인치)
- 무게: 245.8g(8.67oz)(배터리 제외)
- 재료: 항공 등급 알루미늄 합금
- 마치다: HA III military-grade hard-anodized
- 방수 등급: IP68(2미터 수중)
- 충격 저항 : 1 미터
4.3 NB10000 Power Bank Specifications
- 용량: 10,000mAh 3.85V
- 정격 에너지: 6,400mAh 5V
- 입력(USB-C): 5V - 2.4A / 9V - 2A
- 출력(USB-C): 5V - 3A / 9V - 2A / 12V - 1.5A
- Dual Ports Output: 5V - 3A (MAX)
- 재료: Carbon fiber frame and panels
- 치수: 4.8인치 x 2.32인치 x 0.42인치
- 무게: 5.29 온스
- 특징: Dual output channels (USB and USB-C), LED remaining power level indicator, one-touch low current mode.
5. 설정
5.1 배터리 설치
- Unscrew the tail cap of the MH40S flashlight.
- Insert the two Nitecore NL2150 21700 Li-ion batteries with the positive (+) terminals facing the head of the flashlight.
- 적절한 접촉과 방수 기능을 보장하기 위해 꼬리 캡을 다시 단단히 조여주세요.
경고: Ensure batteries are inserted with correct polarity. Incorrect insertion can damage the device.
5.2 초기 충전
Before first use, fully charge the MH40S flashlight and the NB10000 power bank.
5.2.1 Charging the MH40S Flashlight
- 손전등 본체에서 USB-C 충전 포트를 찾으세요.
- Open the rubber cover protecting the port.
- Connect the USB-C charging cable to the flashlight and the QC Adapter.
- Plug the QC Adapter into a power outlet.
- The power indicator beneath the mode button will flash during charging and remain solid when fully charged.
- Close the rubber cover after charging to maintain water and dust resistance.
5.2.2 Charging the NB10000 Power Bank
- Connect the USB-C charging cable to the USB-C input port on the NB10000.
- Connect the other end of the cable to a USB power source (e.g., QC Adapter, computer USB port).
- The LED indicators on the power bank will show the charging status.
6. 사용 설명서
6.1 Basic Flashlight Operation
The MH40S features a tactical tail switch and a mode button for control.

6.1.1 켜기/끄기
- 순간 켜짐: 전술용 후면 스위치를 반쯤 누른 상태로 유지하세요. 손을 떼면 전원이 꺼집니다.
- 계속 켜짐/꺼짐: Fully press the tactical tail switch until a click is heard to turn on. Fully press again to turn off.
6.1.2 밝기 조절
- With the flashlight on, press the mode button to cycle through brightness levels: LOW - MID - HIGH - TURBO.
- The flashlight will memorize the last used brightness level (except for special modes) when turned off and on again.
6.1.3 Special Modes (STROBE, BEACON, SOS)
- With the flashlight on, press and hold the mode button to activate STROBE mode.
- While in STROBE mode, press the mode button again to cycle through BEACON and SOS modes.
- To exit special modes, short press the mode button or turn off the flashlight.
6.2 Wireless Remote Switch Operation
The included wireless remote switch allows for convenient control of the MH40S from a distance of up to 1 meter (3.28 feet).

- 순간 켜짐: Press and hold the designated button on the remote switch. Release to turn off.
- 계속 켜짐/꺼짐: Press the designated button on the remote switch to turn on. Press again to turn off.
- 스트로브 : Press the designated STROBE button on the remote switch to activate. Press again to turn off.
The remote switch is powered by a 3V CR1632 button cell battery and features advanced power cut-off (APC) technology for extended standby time.
6.3 NB10000 Power Bank Usage
- 충전 장치 : Connect your device to the USB-A or USB-C output port of the NB10000 using an appropriate charging cable.
- 전력 레벨 표시기: Press the power button on the NB10000 to check the remaining battery level via the LED indicators.
- 저전류 모드: For charging delicate electronics (e.g., Bluetooth earphones, smartwatches), activate the low current mode by pressing and holding the power button until a specific indicator lights up.
7. 유지관리
- 청소: 손전등 본체를 부드러운 천으로 닦으세요.amp 천. 연마성 세척제나 용매를 사용하지 마십시오.
- 나사산과 O-링: Lubricate the threads and O-rings regularly with silicone grease to maintain water resistance. Replace worn O-rings as needed.
- 배터리 관리 : 장기간 손전등을 사용하지 않을 경우 배터리를 제거하십시오. 배터리는 서늘하고 건조한 곳에 보관하십시오.
- 충전 포트: Keep the USB-C charging port clean and free of debris. Ensure the rubber cover is securely closed when not charging.
8. 문제 해결
- 손전등이 켜지지 않음:
- 배터리 극성을 확인하십시오.
- 배터리가 완전히 충전되었는지 확인하세요.
- 꼬리 캡을 단단히 조이세요.
- Clean battery contacts with an alcohol swab.
- 밝기 감소 또는 작동 시간 단축:
- 배터리 잔량이 부족할 수 있습니다. 충전하세요.
- Batteries may be aging; consider replacement.
- Ensure the flashlight head and tail cap are tightly screwed on.
- Remote switch not responding:
- Check the distance between the remote and the flashlight (max 1 meter).
- Replace the CR1632 battery in the remote switch.
- 장애물이 신호를 차단하고 있지 않은지 확인하세요.
- 충전 문제:
- Verify the USB-C cable is properly connected.
- Ensure the power source (QC Adapter) is functioning.
- 충전 포트에 이물질이 있는지 청소하십시오.
9. 안전 정보
- 손전등을 눈에 직접 비추지 마십시오.
- 어린이의 손이 닿지 않는 곳에 보관하세요.
- Do not disassemble or modify the flashlight or power bank, as this voids the warranty and may cause damage.
- 기기를 극한 온도나 직사광선에 장시간 노출시키지 마십시오.
- 권장하는 배터리와 충전 액세서리만 사용하세요.
- 현지 규정에 따라 배터리를 폐기하십시오.
10. 보증 및 지원
Nitecore products are covered by a warranty. For detailed warranty information and support, please refer to the official Nitecore web사이트를 방문하거나 가까운 대리점에 문의하세요. 보증 청구를 위해 구매 영수증을 보관하세요.
추가 지원을 받으려면 다음을 방문하세요. 아마존의 나이트코어 스토어 or the official Nitecore web대지.


