소개
Thank you for choosing the Anmytek Shoe Cabinet. This manual provides essential information for the safe and efficient assembly, operation, and maintenance of your new shoe cabinet. Please read this manual thoroughly before beginning assembly and retain it for future reference.
안전 정보
To ensure safe use of your Anmytek Shoe Cabinet, please observe the following precautions:
- 긁힘을 방지하려면 항상 깨끗하고 평평하며 부드러운 표면에 캐비닛을 조립하세요.
- 조립하기 전에 모든 부품이 있는지, 손상되지 않았는지 확인하십시오. 부품이 누락되었거나 손상된 경우 조립을 진행하지 마십시오.
- Use the provided anti-tipping kit to secure the cabinet to a wall. This is crucial for preventing accidental tipping, especially in households with children or pets.
- Do not overload the cabinet. Distribute weight evenly across shelves and drawers.
- 질식 위험을 방지하기 위해 작은 부품과 포장재를 어린이의 손이 닿지 않는 곳에 보관하세요.
- 모든 연결부와 패스너가 단단히 고정되어 있는지 주기적으로 점검하세요.
패키지 내용
조립하기 전에 아래 나열된 모든 구성품이 패키지에 포함되어 있는지 확인하세요. 부품이 누락되었거나 손상된 경우 고객 지원 센터에 문의하세요.
구성 요소:
- 본체 패널(상단, 하단, 측면, 후면)
- Flip Drawers (2 sets)
- Side Cabinet Door
- Adjustable Shelves (for side cabinet)
- Top Slide Drawer
- 다리(4개)
- Hardware Pack (screws, dowels, cam locks, hinges, handles, anti-tipping kit)
필요한 도구 (포함되지 않음):
- Phillips 헤드 스크루 드라이버
- 망치(선택 사항, 다웰용)
- Drill (optional, for anti-tipping kit wall anchor)
- 수준
설정 및 조립
Follow these step-by-step instructions for assembling your Anmytek Shoe Cabinet. It is recommended to have two people for assembly.
1단계: 지역 준비
Clear a spacious area and lay down a blanket or cardboard to protect the cabinet parts and your floor from scratches during assembly.
Step 2: Assemble the Base and Legs
Attach the four golden legs to the bottom panel of the cabinet using the provided screws. Ensure they are securely fastened.

Image: The fully assembled Anmytek Shoe Cabinet, highlighting its design and the golden legs.
Step 3: Construct the Main Frame
Connect the side panels to the bottom panel, then attach the back panel. Use cam locks and dowels as indicated in the detailed assembly diagram (refer to the included paper manual for specific diagrams). Ensure all connections are tight and flush.
Step 4: Install Flip Drawers and Side Cabinet
Install the mechanisms for the two flip drawers into their respective compartments. Attach the flip drawer fronts. For the side cabinet, install the hinges and attach the door. Insert the adjustable shelves into the side cabinet at your desired height.
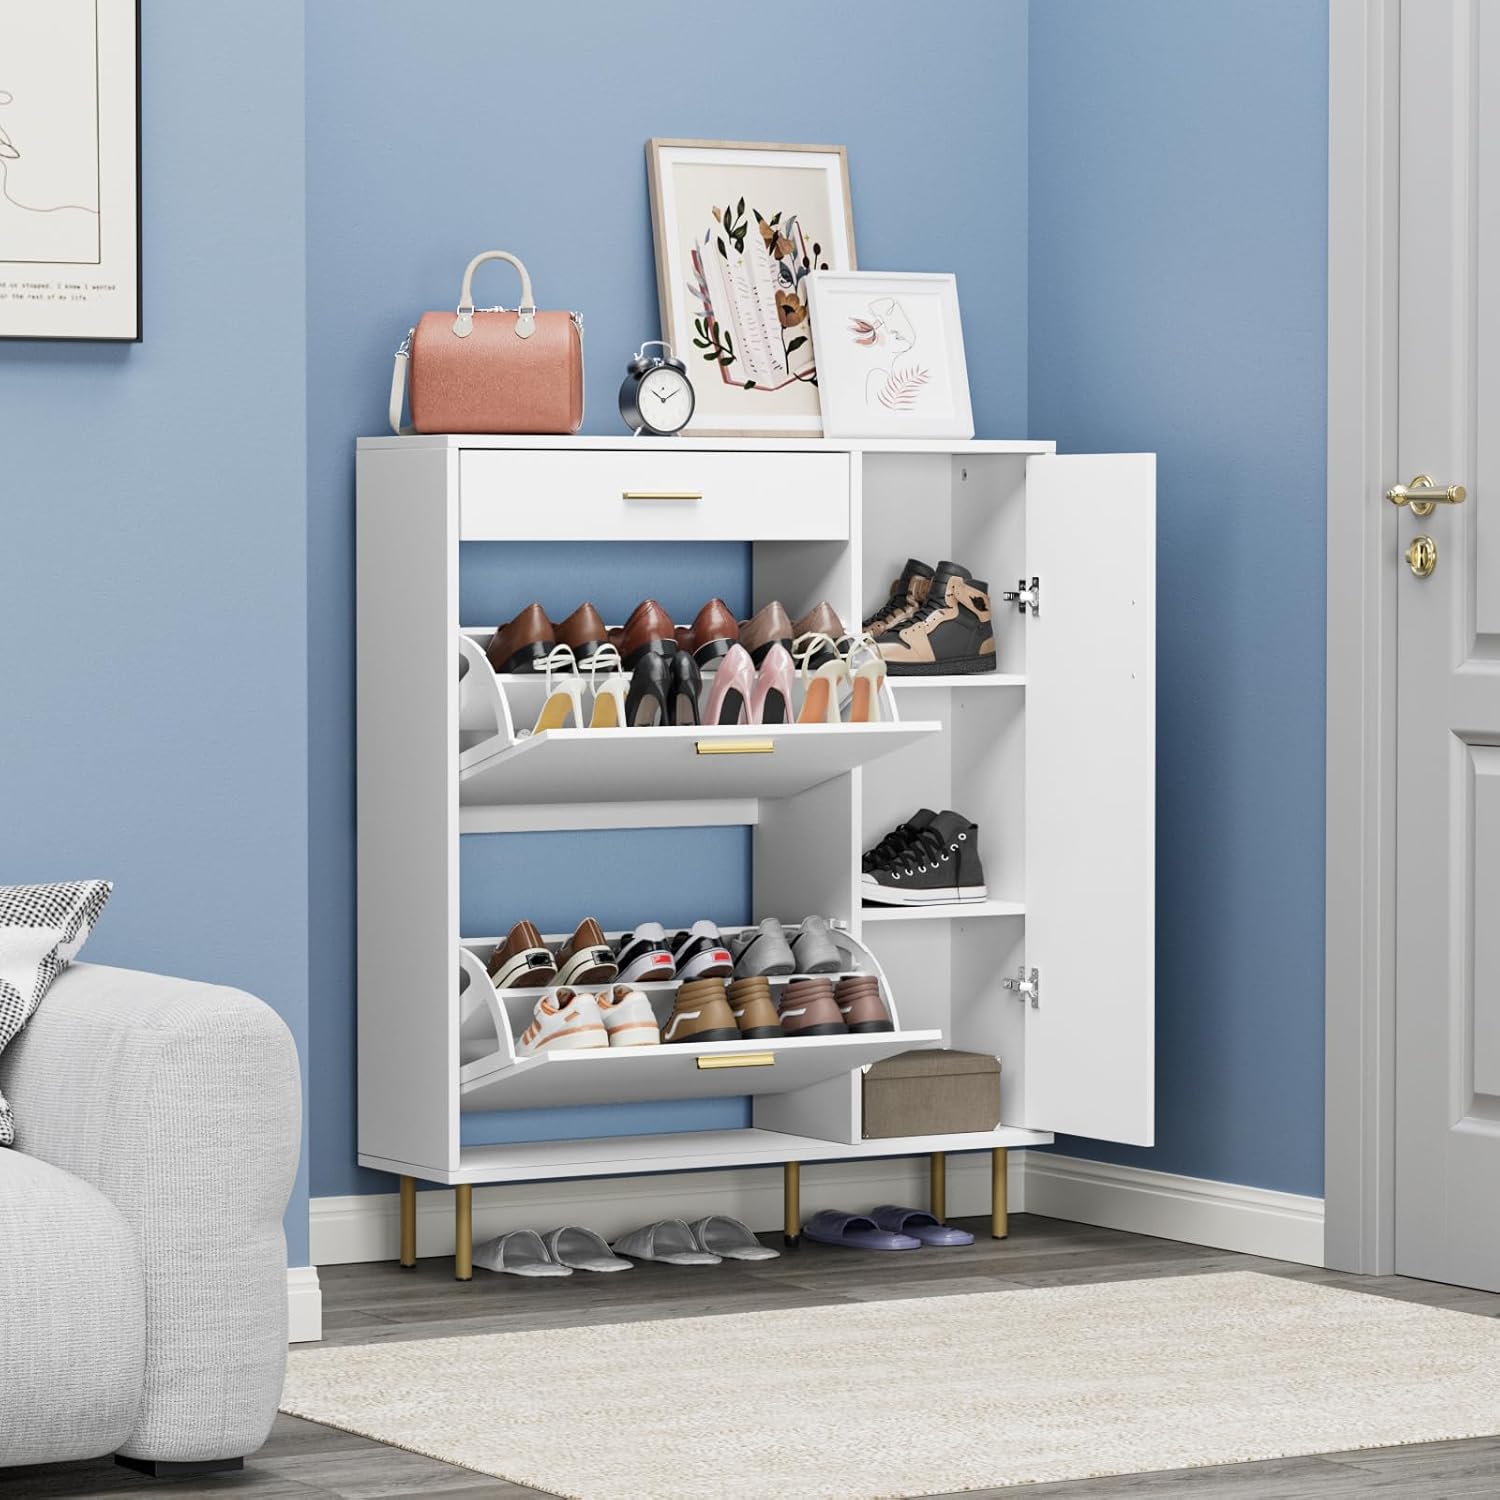
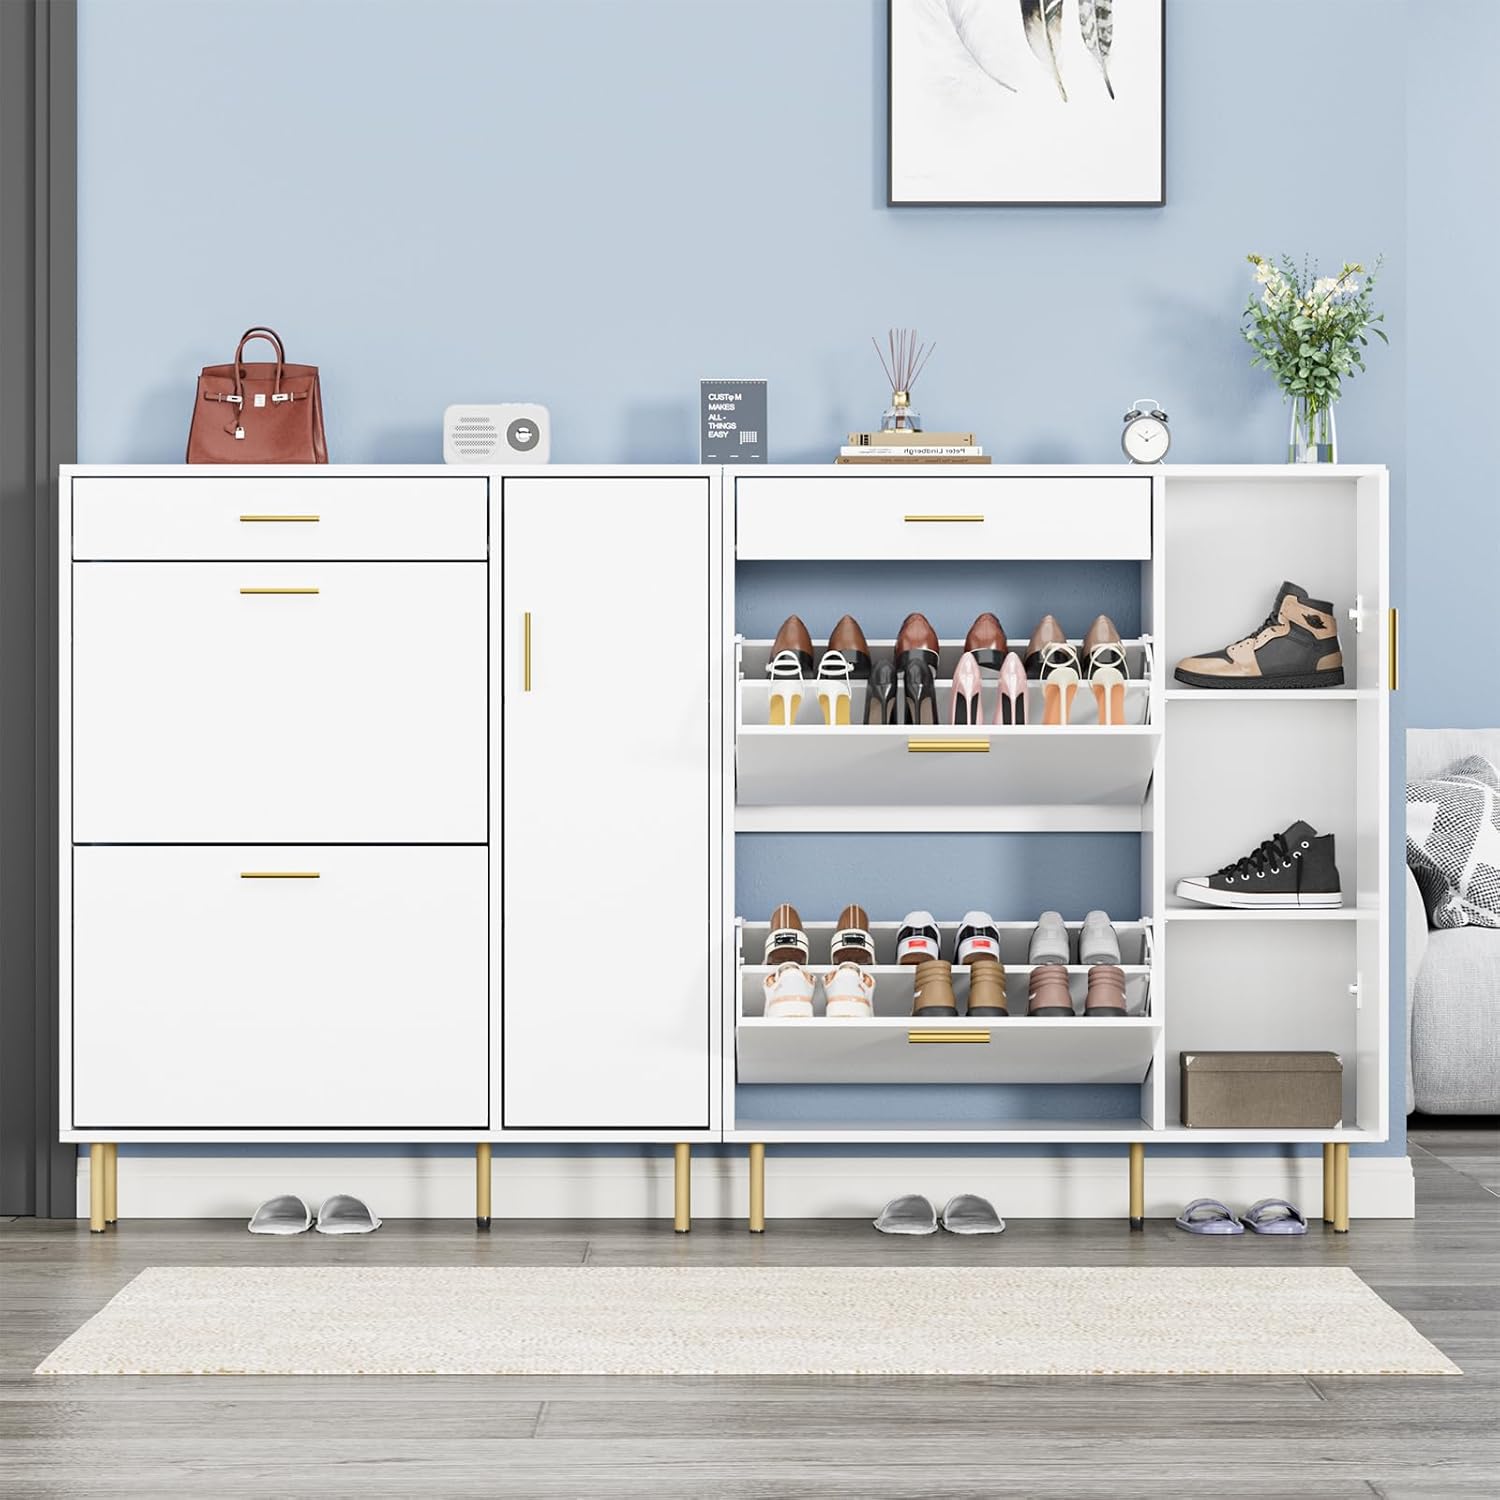
Image: The shoe cabinet with its flip drawers open, displaying shoes, and the side cabinet with its door closed. This illustrates the storage capacity and design.

Image: A detailed diagram illustrating how the panels within the flip-out drawers can be adjusted or removed, and how the shelves in the side cabinet are adjustable and removable to accommodate different shoe sizes, including boots.
Step 5: Install Top Slide Drawer
Assemble the top slide drawer and install its runners. Slide the drawer into its designated slot at the top of the cabinet.
Step 6: Attach Handles and Anti-Tipping Kit
Attach the golden handles to the flip drawers, side cabinet door, and top slide drawer. Finally, install the anti-tipping kit to secure the cabinet to a wall. This step is critical for stability and safety.

Image: The shoe cabinet positioned in an entryway, demonstrating its space-saving design and how it can store different types of footwear.
작동 지침
플립 드로어 사용
Gently pull the handle of the flip drawer to open it. The internal mechanism will tilt the shoe racks forward, allowing easy access to your shoes. To close, push the drawer back until it clicks securely into place. The internal panels can be adjusted or removed to accommodate different shoe heights, such as sneakers, high heels, or flat shoes.
이미지: 클로즈업 view of the shoe cabinet with one flip drawer open, demonstrating how shoes are organized and stored within the tilting compartments.
Using the Side Cabinet
Open the side cabinet door to access the internal shelves. These shelves are adjustable, allowing you to customize the storage space for taller items like boots or larger shoes. Simply remove and re-insert the shelf pins into the desired holes.
Using the Top Slide Drawer
The top slide drawer is ideal for storing small items such as keys, wallets, or other entryway essentials. Pull the handle to open and push to close.
관리 및 유지 보수
Proper care will extend the life and appearance of your Anmytek Shoe Cabinet:
- 청소: 부드러운 d로 표면을 닦으십시오.amp 천으로 닦으십시오. 연마성 세제나 독한 화학 약품은 마감재를 손상시킬 수 있으므로 사용하지 마십시오.
- 가루 살포: 마른 부드러운 천으로 정기적으로 먼지를 닦아주세요.
- 유출: 얼룩이 생기거나 가공 목재가 손상되는 것을 방지하기 위해 액체를 쏟았을 경우 즉시 닦아내십시오.
- 햇빛: 직사광선에 장시간 노출되면 퇴색이나 변색이 발생할 수 있으므로 피하세요.
- 습기: 목재의 뒤틀림이나 갈라짐을 방지하려면 실내 습도를 안정적으로 유지하세요.
- 하드웨어 검사: Periodically check all screws, bolts, and fasteners to ensure they are tight. Re-tighten if necessary.
문제 해결
| 문제 | 가능한 원인 | 해결책 |
|---|---|---|
| 캐비닛이 흔들리거나 불안정합니다. | 고정 장치가 헐거워져 있고, 바닥이 고르지 않으며, 전복 방지 장치가 설치되어 있지 않습니다. | Ensure all screws and cam locks are tightened. Use a level to check the floor and place shims if necessary. Install the anti-tipping kit securely to a wall. |
| Flip drawers do not open/close smoothly. | Obstruction; misaligned mechanism; overloaded. | Check for any shoes or objects blocking the mechanism. Verify that the drawer mechanism is correctly installed and aligned. Reduce the number of shoes if overloaded. |
| Side cabinet door is misaligned. | 경첩이 헐거워졌거나 제대로 조정되지 않았습니다. | Adjust the screws on the hinges to realign the door. Refer to the hinge adjustment instructions in the assembly manual. |
| 조립 중 부품이 누락되었습니다. | 포장 오류. | Do not proceed with assembly. Contact Anmytek customer support immediately with your purchase details and the list of missing parts. |
제품 사양
- 상표: 안미텍
- 모델: H0153
- 색상: 하얀색
- 제품 크기: 9.4"D x 35.4"W x 41.3"H (24cm D x 90cm W x 105cm H)
- 재료: 엔지니어링 목재
- 특별 기능: Space Saving, Anti-Tipping, Adjustable Shelf
- 장착 유형: 플로어 마운트
- 객실 유형: 현관, 거실, 복도
- 선반 수: 4 (adjustable in side cabinet) + 2 flip drawers (multiple compartments)
- 품목 무게: 52.8파운드(24킬로그램)
- 필요한 조립: 예
- 용량: Stores up to 15-20 pairs of shoes (varies by shoe size and style)

Image: A detailed diagram showing the dimensions of the Anmytek Shoe Cabinet, including height, width, and depth, along with internal measurements for various compartments.
보증 및 지원
Anmytek stands behind the quality of its products. For any issues regarding defective products, missing parts, or general inquiries, please contact our customer support team.
지원팀에 문의: If you encounter any problems, please click "Contact Seller" on the platform where you purchased the product to receive a satisfactory solution. Please have your order number and product model (H0153) ready when contacting support.
While specific warranty terms are not detailed in this manual, Anmytek is committed to providing prompt assistance for product-related concerns.


