소개
Thank you for choosing the Cyclami BR-2000 LED Bicycle Light. This high-performance bicycle headlight is designed to provide superior illumination and visibility for your cycling adventures. With its durable aluminum alloy construction, powerful 2000 lumen output, and long-lasting battery, the BR-2000 ensures you can see clearly and be seen by others, enhancing your safety on the road or trail.
This manual provides detailed instructions for the proper setup, operation, and maintenance of your Cyclami BR-2000 bicycle light. Please read it thoroughly before first use to ensure optimal performance and longevity of your device.
패키지 내용
아래 나열된 모든 품목이 패키지에 들어 있는지 확인하세요.
- Cyclami BR-2000 LED Bicycle Headlight
- Handlebar Mounting Strap
- 고프로 어댑터
- USB-C 충전 케이블
- 사용 설명서(본 문서)
제품 끝view
Familiarize yourself with the components of your Cyclami BR-2000 bicycle light.

그림 1: 앞쪽 view of the Cyclami BR-2000 LED Bicycle Light, showing the main light unit and the attached handlebar mounting bracket.

그림 2: 맨 위 view of the light, highlighting the power button (left) and mode selection button (right), along with the Cyclami branding.

그림 3: 맨 아래 view of the light, illustrating the secure mounting interface for attaching to the handlebar strap or GoPro adapter.

그림 4: 끝 view of the light, showing the protective cover for the USB-C charging port and approximate dimensions.
설정
1. 배터리 충전
Before first use, fully charge the Cyclami BR-2000. The light features an efficient, USB-C rechargeable battery.
- Locate the USB-C charging port cover on the end of the light (refer to Figure 4).
- Gently open the rubber cover to expose the USB-C port.
- Connect the provided USB-C cable to the light and the other end to a USB power source (e.g., computer, wall adapter).
- The power indicator light will show charging status. Refer to the "Smart Power Indicator" section for details.
- 완전히 충전되면 케이블을 분리하고 고무 덮개를 단단히 닫아 방수 기능을 유지하세요.

그림 5: Smart Power Indicator. Green indicates 100%-61% charge, Red indicates 61%-21% charge, and Flashing Red indicates 21%-1% charge, signaling a need for recharging.
2. 조명 설치
The Cyclami BR-2000 can be mounted using the included handlebar strap or a GoPro adapter.
핸들바 장착:
- Attach the handlebar mounting strap to the bottom of the light by sliding it into the mounting groove until it clicks securely.
- Position the light on your bicycle handlebar.
- Wrap the strap around the handlebar and secure it tightly. Ensure the light is stable and does not rotate freely.
- Adjust the angle of the light to illuminate the path ahead effectively.
GoPro Adapter Mounting:
The light supports GoPro hanging for alternative mounting options (e.g., helmet mount, out-front mount).
- Attach the GoPro adapter to the bottom of the light, ensuring it is securely fastened.
- Connect the GoPro adapter to your desired GoPro-compatible mount.
- 주행 전 모든 연결부가 단단히 고정되었는지 확인하십시오.

그림 6: Illustration of the Cyclami BR-2000 mounted in a normal handlebar position (top) and inverted using a GoPro adapter for hanging (bottom).
작동 지침
전원 켜기/끄기
- 빛을 켜려면 ON: 전원 버튼을 길게 누릅니다.ⓘ) for approximately 1 second. The light will turn on in the last used mode.
- 빛을 켜려면 끄다: 전원 버튼을 길게 누릅니다.ⓘ) for approximately 1 second.
모드 변경
The Cyclami BR-2000 features 5 distinct lighting modes. Once the light is on, short press the Mode button (3세) to cycle through the modes:
- 하이 모드: 2000 lumens, ~650 foot effective range. (Approx. 6 hours battery life)
- 중간 모드: 1200 lumens, ~500 foot effective range. (Approx. 12 hours battery life)
- 저모드: 600 lumens, ~325 foot effective range. (Approx. 29 hours battery life)
- Flash 1 Mode (8Hz): 2000 lumens. (High visibility flashing)
- Flash 2 Mode (SOS): 1200 lumens. (Emergency signal)
The light has a 120-degree beam spread to ensure wide visibility.
스마트 전원 표시기
The power indicator provides real-time battery status:
- 녹색불: 배터리 충전량은 100%에서 61% 사이입니다.
- 빨간불: 배터리 충전량은 61%에서 21% 사이입니다.
- 깜박이는 빨간불: Battery charge is between 21% and 1%. Recharge the light as soon as possible.
유지
- 청소: 부드러운 천으로 라이트 본체를 닦으세요.amp cloth. Do not use abrasive cleaners or solvents, as they may damage the finish or lens. Keep the lens clean for optimal light output.
- 방수 기능: The Cyclami BR-2000 has an IP6X water resistance rating, meaning it is protected against dust ingress and strong jets of water. Ensure the USB-C port cover is securely closed at all times when not charging to maintain water resistance. Do not submerge the light in water.
- 저장: If storing the light for an extended period, charge the battery to approximately 50-70% before storage. Recharge every 3-6 months to prevent battery degradation. Store in a cool, dry place away from direct sunlight.
- 온도: While the BR-2000 is designed to manage heat effectively, avoid operating it in extremely high ambient temperatures for prolonged periods.
문제 해결
| 문제 | 가능한 원인 | 해결책 |
|---|---|---|
| 조명이 켜지지 않습니다. | 배터리가 소진되었습니다. | 제공된 USB-C 케이블을 사용하여 조명을 충전하세요. |
| 예상치 못하게 불이 꺼집니다. | 배터리가 부족합니다. | 빛을 충전하십시오. |
| 광 출력이 어둡습니다. | 배터리가 약하거나 렌즈가 더러워졌습니다. | Charge the light. Clean the lens with a soft cloth. |
| Light is loose on handlebar. | Mounting strap not tight enough. | Re-tighten the handlebar mounting strap. Ensure the light is securely clicked into the mount. |
| 충전 표시등이 작동하지 않습니다. | 케이블 또는 전원 공급 장치에 문제가 있습니다. | 다른 USB-C 케이블이나 전원 어댑터를 사용해 보세요. 케이블이 완전히 삽입되었는지 확인하십시오. |
명세서
| 특징 | 세부 사항 |
|---|---|
| 모델 | BR-2000 |
| 상표 | Cyclami |
| 최대 밝기 | 2000루멘 |
| 빔 스프레드 | 120도 |
| 조명 모드 | 5 (High, Middle, Low, Flash 1, Flash 2 SOS) |
| 배터리 수명(대략) | High: 6 hours, Middle: 12 hours, Low: 29 hours |
| 충전 포트 | USB-C |
| 재료 | 알루미늄 합금 |
| 방수성 | IP6X |
| 크기(대략) | Length: 4.45 inches (11.3 cm), Width: 1.75 inches (4.4 cm), Height: 1.25 inches (3.2 cm) |
| 무게 | 208g(0.46파운드) |
| 장착 유형 | Handlebar Mount, GoPro Compatible |
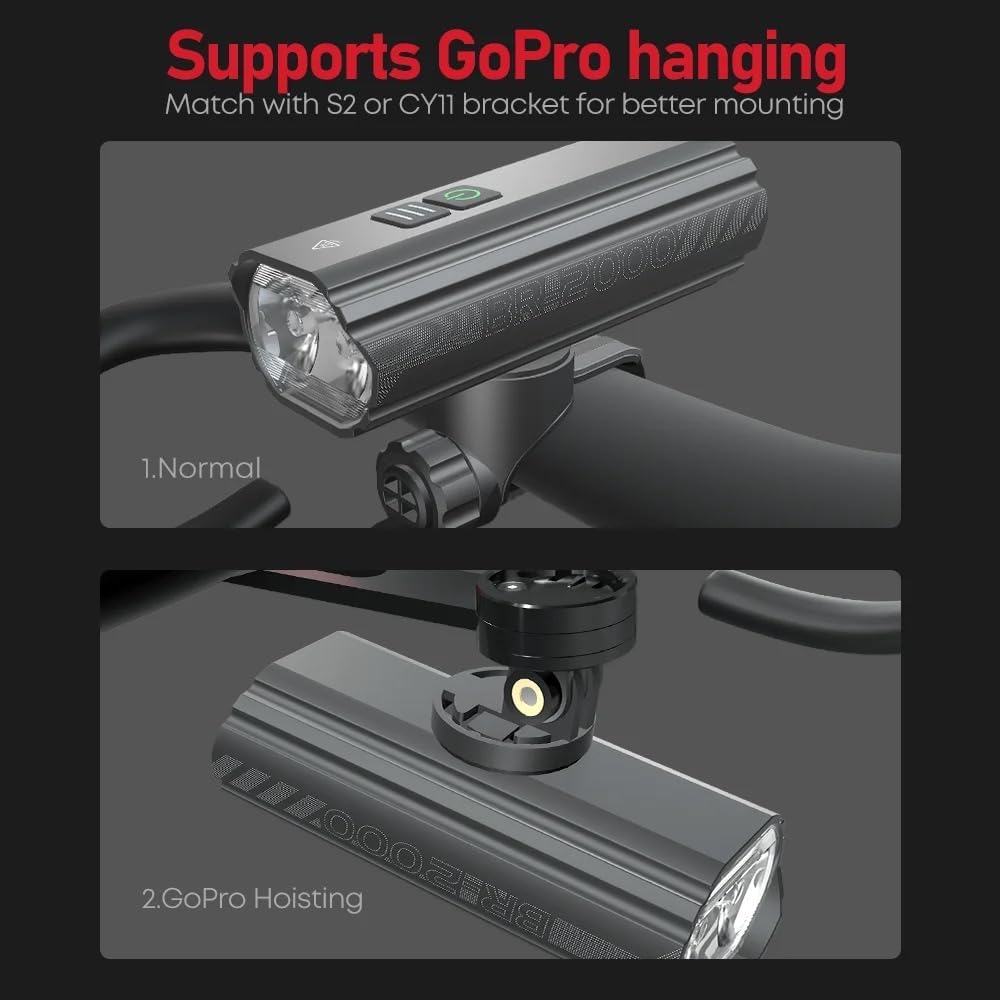
그림 7: 옆 view of the Cyclami BR-2000, illustrating its approximate length (4 7/16 inches) and width (1 3/4 inches).
보증 및 지원
For warranty information, technical support, or any inquiries regarding your Cyclami BR-2000 LED Bicycle Light, please refer to the seller or manufacturer's official website or contact their customer service directly. Details are typically provided on the product packaging or purchase receipt.
보증 청구를 위해 구매 증빙서류를 보관하세요.


