1. 서론
The UCTRONICS PoE Hat is a Power over Ethernet (PoE) module designed to provide power to your Raspberry Pi 5, Raspberry Pi 4B, or Raspberry Pi 3B+ directly through an Ethernet cable. This eliminates the need for a separate power supply, simplifying cable management and deployment in various environments. It also includes an integrated cooling solution to maintain optimal operating temperatures for your Raspberry Pi.
2. 특징
- 전력 예산: IEEE 802.3af/at compliant, providing a maximum output power of 5V 4.5A. Requires a Power Sourcing Equipment (PSE) device port to deliver at least 45-57V, 25W of power output.
- Isolated Power Supply: Features a fully isolated switched-mode power supply (SMPS) for stable and safe operation.
- 효율적인 열 발산: Equipped with a brushless active cooling fan, three pre-installed thermal tapes, and four heatsinks (one for the hat board and three for the Raspberry Pi) to ensure effective thermal management.
- 컴팩트한 사이즈: Designed to be compact, occupying only 6 pins of the 40-pin GPIO header and measuring 65x58mm.
- 사전 조립: The PoE hat comes pre-assembled for easy setup with Raspberry Pi 5/4B/3B+. It also supports mounting on most UCTRONICS rackmounts, such as RM0013/RM0004.
3. 상자 안에 무엇이 들어있나요?
패키지에 다음 구성품이 모두 포함되어 있는지 확인하세요.
- 1 x UCTRONICS PoE Hat (pre-assembled with fan and heatsink)
- 3 x Additional Heatsinks for Raspberry Pi
- 4 x Short Brass Standoffs
- 4 x Long Brass Standoffs
- 4 x M2.5*14 나사
- 2 x Thermal Pads (pre-installed on the hat)
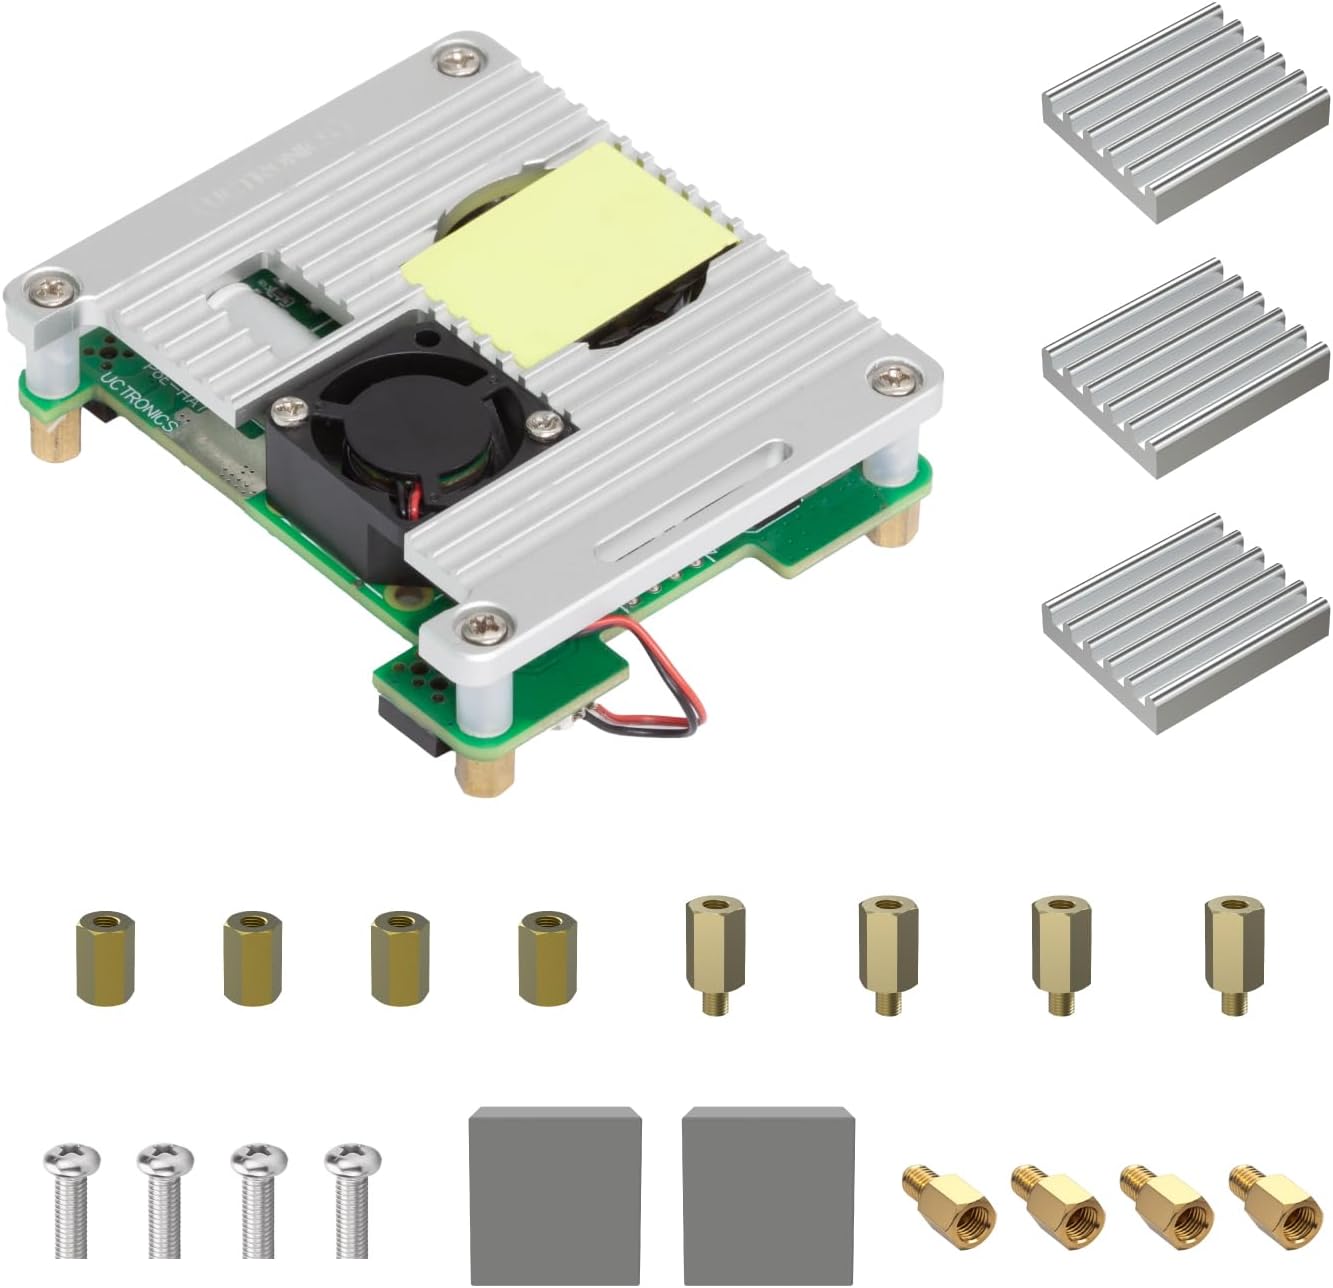
This image displays all components included with the UCTRONICS PoE Hat: the pre-assembled PoE HAT board with an integrated fan and heatsink, three additional heatsinks for the Raspberry Pi, various standoffs (short and long), mounting screws, and thermal pads.
4. 설정 및 설치
Follow these steps to properly install the UCTRONICS PoE Hat onto your Raspberry Pi.
4.1 호환성
The UCTRONICS PoE Hat is compatible with Raspberry Pi 5, Raspberry Pi 4B, and Raspberry Pi 3B+ models.

This image illustrates the compatibility of the PoE Hat with Raspberry Pi 3B+, 4B, and 5 models. It also shows the PoE Hat installed on a Raspberry Pi within a UCTRONICS rackmount, demonstrating its compact integration.
4.2 설치 단계
- 라즈베리 파이를 준비하세요: Ensure your Raspberry Pi is powered off and disconnected from any power source.
- Apply Thermal Tapes/Heatsinks: The PoE Hat comes with pre-installed thermal tapes. For the Raspberry Pi, apply the additional heatsinks to the main chips (CPU, RAM, etc.) as appropriate.
- 스탠드오프를 부착하세요: Screw the appropriate standoffs (short or long, depending on your setup) into the mounting holes of the Raspberry Pi.
- Mount PoE Hat: Carefully align the 40-pin GPIO header of the PoE Hat with the GPIO pins on your Raspberry Pi. Gently press down until the hat is securely seated.
- 나사로 고정: Use the provided screws to secure the PoE Hat to the standoffs, ensuring a firm connection.
- 팬 연결: Ensure the fan connector from the PoE Hat is properly plugged into the designated fan header on the Raspberry Pi (if applicable for your Pi model).

An exploded diagram illustrating the assembly process of the PoE Hat onto a Raspberry Pi. It clearly shows the placement of M2.5*14 screws, M3*5-9 nylon standoffs, the heatsink, 4pcs M2.5*4 screws, thermal tapes, and M2.5*8 standoffs. A note advises replacing preinstalled M2.5*8 standoffs with shorter ones for rack mounting.
5. 사용 설명서
Once the PoE Hat is installed, operating your Raspberry Pi with PoE is straightforward.
5.1 Powering the Raspberry Pi
Connect an Ethernet cable from a PoE-enabled network switch (IEEE 802.3af/at compliant) to the Ethernet port on your Raspberry Pi. The PoE Hat will draw power from the Ethernet cable and convert it to the necessary 5V 4.5A to power the Raspberry Pi.

This diagram demonstrates how to connect the Raspberry Pi with the UCTRONICS PoE Hat to a PoE-enabled network switch. It highlights that the PoE Hat uses only 4 pins, leaving 36 pins of the 40-pin GPIO header available for other uses.
5.2 Cooling Fan Operation
The onboard cooling fan will automatically activate when the Raspberry Pi's temperature reaches a certain threshold, ensuring efficient heat dissipation and stable performance.

자세한 탑다운 view of the PoE Hat, highlighting its dimensions (65x58mm), the specific PoE power supply input points for Raspberry Pi 4/Pi3B+, the fan connector, and the 5V 4.5A power output.
6. 유지관리
To ensure the longevity and optimal performance of your UCTRONICS PoE Hat, consider the following maintenance tips:
- 먼지 제거: Periodically inspect the fan and heatsinks for dust accumulation. Use compressed air or a soft brush to gently remove any dust, ensuring proper airflow and cooling efficiency.
- 연결 확인: Occasionally check that all connections, especially the GPIO pins and fan connector, are secure.
- 환경 조건: Operate the device in a clean, dry environment within its specified temperature range to prevent damage.
7. 문제 해결
If you encounter issues with your UCTRONICS PoE Hat, consider the following common troubleshooting steps:
- No Power to Raspberry Pi:
- Ensure the Ethernet cable is securely connected to both the PoE switch and the Raspberry Pi.
- Verify that your network switch is PoE-enabled (IEEE 802.3af/at compliant) and providing sufficient power (45-57V, 25W minimum).
- Check that the PoE Hat is correctly seated on the Raspberry Pi's GPIO pins.
- 팬이 회전하지 않음:
- Confirm the fan cable is properly connected to the Raspberry Pi's fan header.
- The fan may only spin when the Raspberry Pi reaches a certain temperature threshold. Monitor the Pi's temperature to see if it activates under load.
- Check for any obstructions preventing the fan blades from spinning.
- 과열 문제:
- Ensure all heatsinks are properly attached to the Raspberry Pi's chips and the PoE Hat.
- Verify that the thermal tapes are making good contact.
- Ensure adequate airflow around the Raspberry Pi and PoE Hat.
8. 사양
| 재산 | 값 |
|---|---|
| 상표 | 유크로닉스 |
| 모델명 | 우627803 |
| 연결 기술 | 이더넷 |
| 전원 입력 | 45-57V (IEEE 802.3af/at) |
| 전력 출력 | 5V 4.5A |
| 네트워크 표준 | IEEE 802.3af / at |
| 치수 | 65 x 58mm(2.55 x 2.28인치) |
| 품목 무게 | 3.52 온스 |
| 운영 체제 호환성 | 리눅스 |
| 포함된 구성 요소 | Raspberry PI 5 PoE hat, Heatsinks |

This image presents a table summarizing key specifications of the PoE Hat: Power Input (45-57V), Power Output (5V 4.5A), Network Standard (IEEE 802.3af/at), and Dimensions (65*58mm).
9. 지원
For technical support, warranty information, or further inquiries regarding your UCTRONICS PoE Hat, please visit the official UCTRONICS website or contact their customer service directly. Refer to your purchase documentation for specific warranty terms and conditions.
UCTRONICS Official Web대지: www.uctronics.com


