1. 서론
This manual provides essential instructions for the installation, operation, and maintenance of your GLEDOPTO ESP32 WLED Digital LED Controller (Model GL-C-015WL-D). Please read this manual thoroughly before using the product to ensure proper function and safety.
2. 중요한 안전 정보
- The controller chip is ESP32. Verify firmware version information carefully before upgrading. Incorrect firmware upgrades can damage the product.
- 입력 볼륨을 확인하세요tage (5-24V DC) matches your power supply and LED strip requirements.
- Do not exceed the maximum output current of 10A per channel or 15A total.
- Operate the device within the specified temperature range of -20 to 45 °C.
- 이 제품은 실내에서만 사용하도록 설계되었습니다.
- 배선 작업이나 유지관리 작업을 하기 전에 전원을 분리하세요.
3. 제품 오버view
3.1 패키지 내용
- 1 x GLEDOPTO ESP32 WLED Digital LED Controller with Mic / UART (Model: GL-C-015WL-D)
- 1 x 사용자 설명서
- 1 x 3cm Damper
3.2 주요 특징
- ESP32 칩: High-performance processing and stable network connectivity.
- 통합 마이크: Captures ambient sounds for music synchronization and dynamic lighting effects.
- UART Download Port: Facilitates firmware upgrades and debugging without complex hardware operations.
- Simple Wiring & Expandability: Easy connection ports and an added IO33 port for customization.
- 풍부한 동적 모드: Over 100 dynamic lighting effects available.
- 폭넓은 호환성: Supports various addressable LED strips including WS2811, WS2812, WS2812B, FL19038, SK6812, SM16703P, SM16703SP3, TM1814, WS2813, WS2815, and FCOB.
- 낮은 전력 소모: Integrated switching regulator for ESP32 power and a MOSFET relay to disable output power when WLED is off.
4. 사양
| 모델 번호 | GL-C-015WL-D |
| 입력 Voltage | DC 5-24V |
| Max Addressable ICs | 800 |
| 채널당 출력 전류 | 최대 10A |
| 총 출력 전류 | 최대 15A |
| 치수 | 108 x 45 x 18mm |
| 작동 온도 | -20 ~ 45 ° C |
| Supported LED Strip ICs | WS2811, WS2812, WS2812B, FL19038, SK6812, SM16703P, SM16703SP3, TM1814, WS2813, WS2815, FCOB, etc. |
| 연결성 | WiFi (ESP32) |
| 특별 기능 | Dimmable, Microphone Function, UART Port |
5. 설정 및 설치
5.1 컨트롤러 레이아웃

5.2 배선 지침
Follow these steps for proper wiring of your LED strip to the controller:

- Connect the positive (+) terminal of your power supply to the V+ input on the controller.
- Connect the negative (-) terminal of your power supply to the V- input on the controller.
- Connect the VCC wire from your LED strip to the V output terminal on the controller.
- Connect the DATA wire from your LED strip to the D (GPIO16) output terminal on the controller. This is the default output. The other D (GPIO2) can be used after configuration in the app.
- Connect the GND wire from your LED strip to the G output terminal on the controller.
5.3 Quick Connect Port Design
The controller features a quick connect port design for convenient wiring:

- 커넥터를 위쪽으로 열어주세요.
- 피복을 벗긴 전선을 포트에 삽입하세요.
- 커넥터를 눌러 전선을 고정하세요.
6. 운영
6.1 버튼 기능
The controller has two physical buttons for basic control:

- 재시작 버튼: Pressing this button will temporarily power off the controller module. Releasing it will power it back on. This is useful for restarting the controller after configuring the microphone or other settings.
- 선택 버튼:
- 짧은 보도: 장치의 전원을 켜거나 끕니다.
- 길게 누르기(1초): Switches between available colors or effects.
- 길게 누르기(10초): Resets the WLED controller and activates the WLED-AP hotspot for initial setup or re-configuration.
6.2 앱 제어
The GLEDOPTO controller is primarily managed through the WLED application, offering extensive control over your LED strips.
6.2.1 동적 효과
The WLED app provides access to over 100 dynamic lighting effects, allowing for personalized ambiance.

6.2.2 분할 색상 제어
Customize individual segments of your LED strip to display different colors simultaneously.

6.2.3 마이크 기능
The built-in microphone allows the LED lights to synchronize with music or ambient sounds, creating immersive audio-reactive lighting experiences.


6.3 알렉사 통합
The controller supports integration with Amazon Alexa for voice control. Follow these steps to connect:
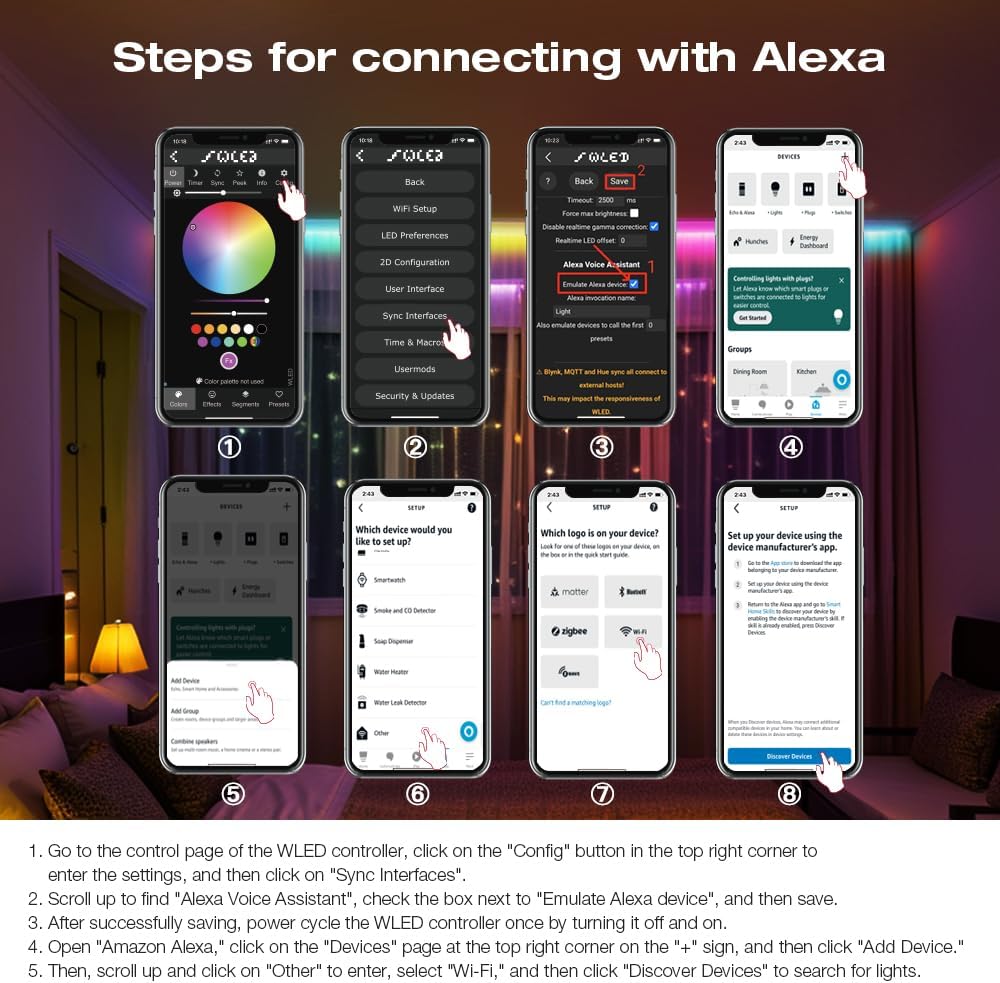
- Go to the control page of the WLED controller in the app, click on the "Config" button in the top right corner to enter the settings, and then click on "Sync Interfaces".
- 위로 스크롤하여 "Alexa 음성 비서"를 찾고, "Alexa 기기 에뮬레이션" 옆의 확인란을 선택한 다음 저장하세요.
- 저장이 완료되면 WLED 컨트롤러의 전원을 껐다가 다시 켜서 전원을 재부팅하십시오.
- Open the Amazon Alexa app, click on the "Devices" page at the top right corner on the "+" sign, and then click "Add Device".
- 다음으로 위로 스크롤하여 "기타"를 클릭하고, "Wi-Fi"를 선택한 다음 "기기 검색"을 클릭하여 조명을 검색합니다.
7. 펌웨어 업데이트
The integrated UART port allows for convenient firmware updates. Refer to the official WLED documentation or GLEDOPTO support resources for detailed instructions on how to perform firmware updates. Always ensure you are using the correct firmware version for your ESP32 chip to prevent damage.
8. 유지관리
- 컨트롤러를 깨끗하게 유지하고 먼지가 쌓이지 않도록 하세요. 마른 부드러운 천으로 닦아주세요.
- 컨트롤러를 습기나 극한 온도에 노출시키지 마세요.
- 과열을 방지하려면 장치 주변을 적절하게 환기시키십시오.
9. 문제 해결
- 컨트롤러 전원이 켜지지 않음: Check power supply connections and ensure the input voltage는 5~24V DC 범위 내에 있습니다.
- LED 스트립에 불이 들어오지 않음: Verify all wiring connections (VCC, DATA, GND) are secure and correct. Ensure the LED strip type is supported by the controller.
- Wi-Fi 연결 없음: Perform a long press (10 seconds) on the Opt button to reset the controller and activate the WLED-AP hotspot for re-configuration. Ensure your router is operating on a 2.4GHz band.
- Alexa 연동 문제: Double-check that "Emulate Alexa device" is enabled in the WLED app settings and that you have power cycled the controller after saving. Ensure the Alexa app is discovering devices on the correct network.
- 색상이나 효과가 잘못되었습니다: Verify the LED strip type and IC settings in the WLED app.
10. 보증 및 지원
For warranty information and technical support, please refer to the GLEDOPTO official web사이트를 방문하거나 판매점에 문의하세요. 보증 청구를 위해 구매 영수증을 보관하세요.


