1. 서론
This manual provides instructions for the assembly, operation, and maintenance of your Glitzhome 7.5ft Prelit Artificial Christmas Tree. Please read these instructions carefully before assembly and retain for future reference.

Image 1: The Glitzhome 7.5ft Prelit Artificial Christmas Tree, shown unlit with wrapped gifts around its base.
2. 안전 정보
안전한 작동을 보장하고 부상이나 손상을 방지하려면 다음 안전 지침을 준수하세요.
- Keep all electrical components away from water or moisture.
- 전기 콘센트에 과부하를 걸지 마세요.
- Ensure all connections are secure before plugging in the tree.
- Keep children and pets away from the tree during assembly and while it is powered on.
- 나무를 열원이나 화기 근처에 두지 마십시오.
- 사용하지 않을 때나 유지 보수를 하기 전에는 트리의 전원을 뽑으십시오.
- 이 제품은 실내에서만 사용하세요.
3. 패키지 내용
조립을 시작하기 전에 모든 구성 요소가 있는지 확인하세요.
- Tree Sections (3 sections)
- 접이식 금속 스탠드
- Remote Controller for LED Lights
- 전원 어댑터
- White Gloves (for handling branches)

Image 2: Visual representation of the tree components and assembly steps.
4. 설정 지침
인공 크리스마스 트리를 조립하려면 다음 단계를 따르세요.
- 스탠드 조립: Open the folding metal stand and place it on a stable, level surface. Tighten the screws on the stand to secure it.
Image 3: Step 1 of assembly, illustrating how to set up the tree stand.
- Insert Tree Section 1 (Bottom): Carefully insert the bottom section of the tree trunk into the assembled stand. Ensure it is firmly seated.
Image 4: Step 2 of assembly, showing the insertion of the bottom tree section into the stand.
- Insert Tree Section 2 (Middle): Place the middle tree section onto the bottom section. Align the sections carefully.
- Insert Tree Section 3 (Top): 맨 위쪽 나무 부분을 중간 부분 위에 올려놓으세요.
- 전원 코드를 연결하세요: Locate the red ribbon labels on the electrical cords between each tree section. Connect the corresponding male and female connectors. Ensure all connections are snug.
Image 5: Detail of connecting the electrical cords between tree sections.
- 가지 모양을 만드세요: Begin unfolding the hinged branches, starting from the lowest section and working your way up. Gently spread out each branch tip to achieve a full and natural appearance. Wear the provided white gloves to protect your hands.
- 플러그인: Connect the power adapter to the tree's main power cord and then plug it into a standard electrical outlet.
설정 비디오 가이드:
Video 1: A step-by-step guide demonstrating the assembly process for the Glitzhome 7.5ft Prelit Artificial Christmas Tree.
5. 사용 설명서
Your Glitzhome Christmas tree features 400 LED lights with 9 different lighting modes, controlled by the included remote.

Image 6: Illustration of the nine light functions available, including breathing, twinkle, and solid modes.
원격 제어 기능:
- 켜기/끄기: 조명을 켜거나 끄려면 누릅니다.
- 오시는 길 : Cycle through the 9 different lighting modes (e.g., Combination, Warm white steady on, Color light steady on, Warm white Slo-Glo, Color light Slo-Gol, Warm white and Color light sequential, Warm white and Color light twinkle, Warm white and Color slow fade, Single light Slo-Glo).
- 시간제 노동자: (If applicable, refer to remote for specific timer functions)
- 명도: 조명의 밝기를 조정합니다.

Image 7: The Christmas tree illuminated with vibrant multi-color LED lights, surrounded by wrapped presents.
6. 유지관리
Proper care will extend the life of your artificial Christmas tree:
- 청소: Dust the branches gently with a soft, dry cloth. Do not use liquid cleaners or solvents.
- 저장: Before storing, ensure the tree is completely unplugged and dry. Disassemble the tree in reverse order of assembly. Gently compress the branches. Store all sections and the stand in their original packaging or a suitable storage bag in a cool, dry place.
- 빛 관리: If a light bulb burns out, replace it promptly to maintain the integrity of the light string. Refer to the power adapter for bulb specifications.
7. 문제 해결
If you encounter issues with your tree, refer to the following common problems and solutions:
| 문제 | 가능한 원인 | 해결책 |
|---|---|---|
| 표시등이 켜지지 않습니다. |
|
|
| Some sections of lights are off. |
|
|
| 나무가 불안정합니다. |
|
|
8. 사양
| 특징 | 세부 사항 |
|---|---|
| 상표 | 글리츠홈 |
| 모델 | Emerald Elegance Slim Fir Tree |
| 키 | 7.5피트(90인치) |
| 기본 직경 | 4.2피트(50인치) |
| 지점 팁 | 1336 |
| LED 조명 | 400, Color Changing |
| 라이트 모드 | 9 (리모컨으로 제어) |
| 재료 | 폴리염화비닐(PVC), 금속 |
| 품목 무게 | 23.5 파운드 |
| 특징 | Prelit, Hinged Branches |
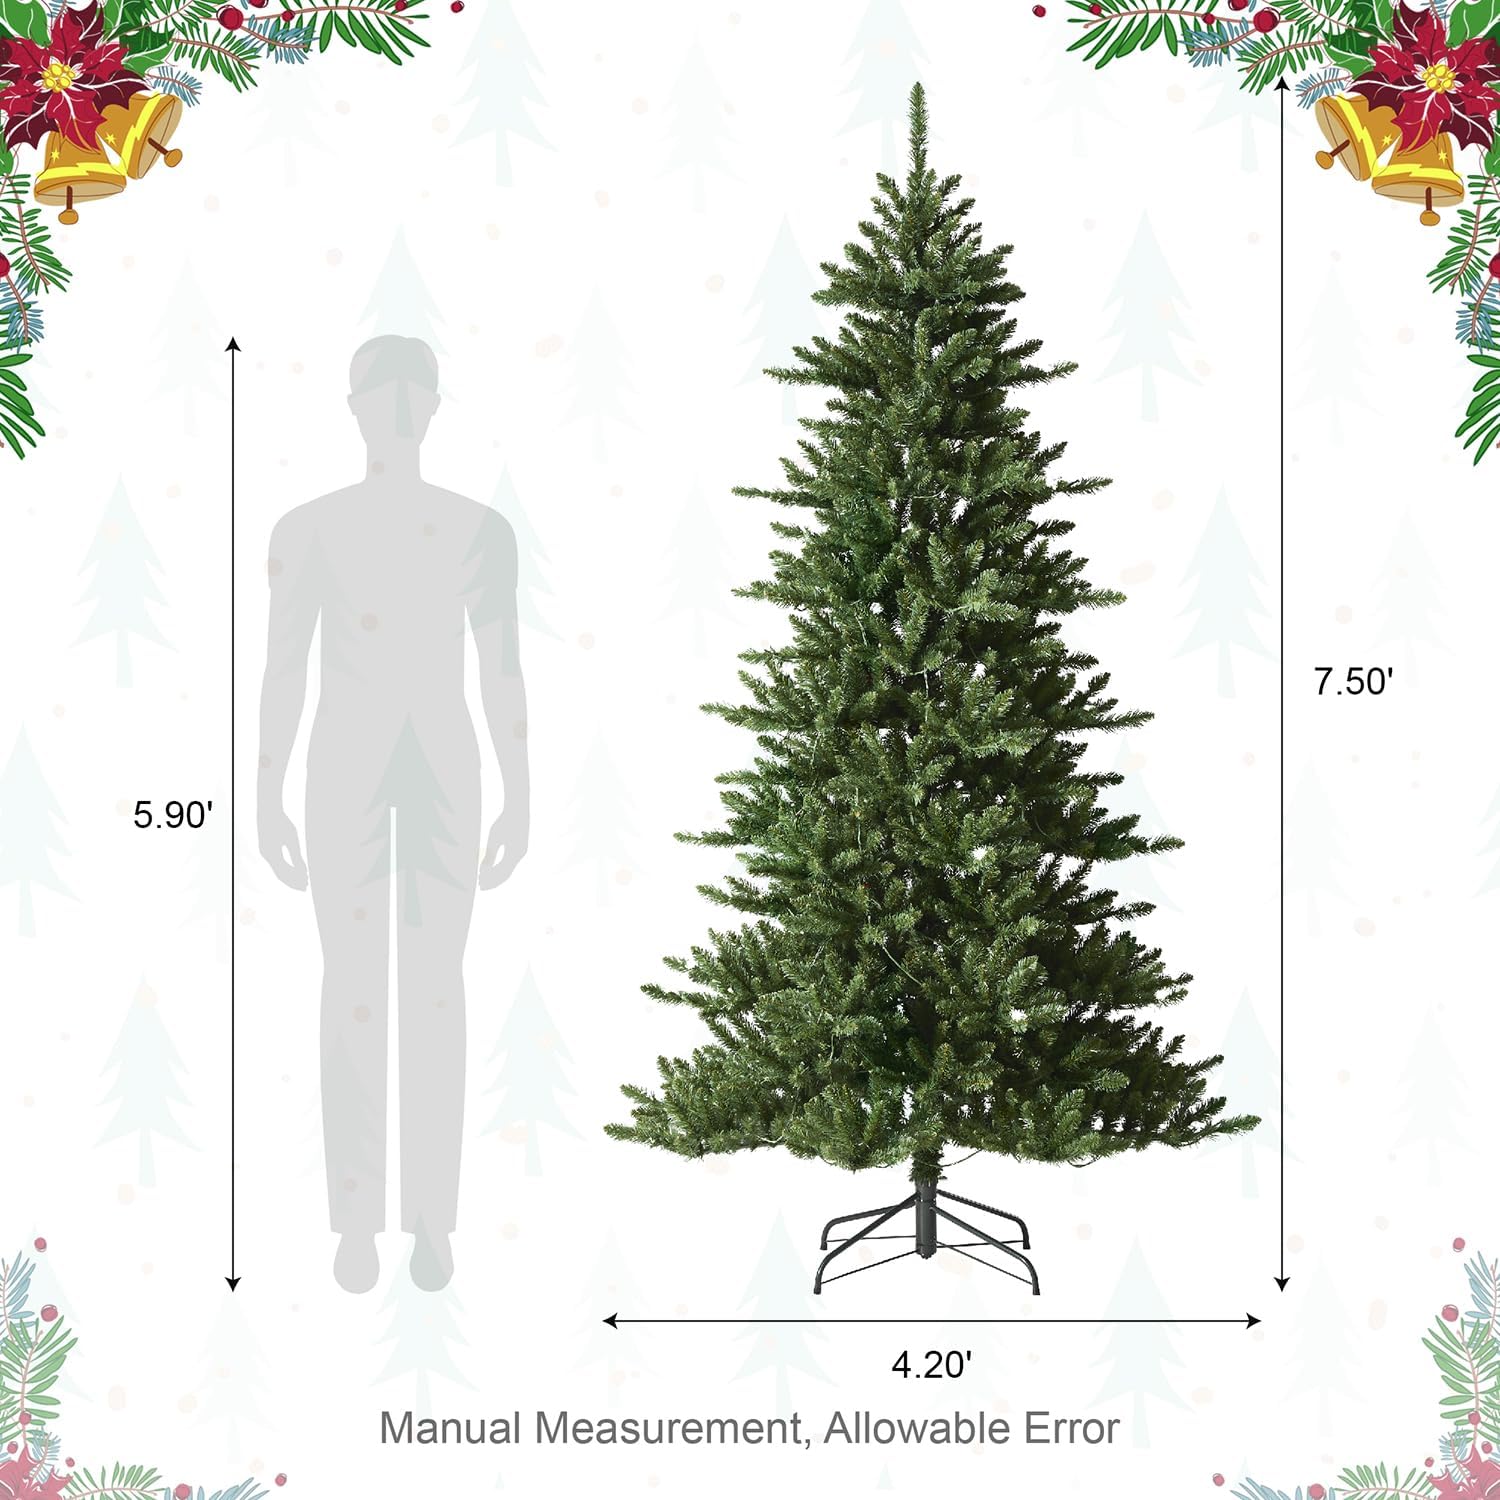
Image 8: Dimensions of the Glitzhome 7.5ft Prelit Artificial Christmas Tree.
9. 보증 및 지원
For warranty information or technical support, please contact Glitzhome customer service. Refer to your purchase documentation for specific contact details or visit the official Glitzhome web대지.
온라인 리소스:
- 방문하세요 Glitzhome Store on Amazon 더 많은 제품과 정보를 확인하세요.


