1. 이상view
The Waveshare ESP32-S3 7inch Capacitive Touch Screen Development Board is a high-performance microcontroller board designed for various applications. It integrates a 7-inch capacitive touch LCD with an 800x480 resolution and 65K RGB colors. Powered by an Xtensa 32-bit LX7 dual-core processor running up to 240MHz, it supports 2.4GHz Wi-Fi (802.11 b/g/n) and Bluetooth 5 (LE) with an onboard antenna. The board features 5-point capacitive touch control via an I2C interface with interrupt support, and includes 8MB Flash and 8MB PSRAM. Multiple external peripheral interfaces such as CAN, RS485, I2C, and a Micro SD card slot are available, along with a full-speed USB serial port.

Figure 1: Waveshare ESP32-S3 7inch Capacitive Touch Screen Development Board with connection cables.
주요 특징:
- 7-inch capacitive touch screen with 800x480 resolution and 65K colors.
- Xtensa 32비트 LX7 듀얼 코어 프로세서, 최대 240MHz 메인 주파수.
- 2.4GHz Wi-Fi(802.11 b/g/n) 및 블루투스 5(LE)를 지원하며, 내장 안테나가 있습니다.
- 인터럽트를 지원하는 I2C 인터페이스를 통한 5포인트 정전식 터치 제어.
- 512KB SRAM과 384KB ROM이 내장되어 있으며, 온보드 플래시 메모리는 8MB, PSRAM은 8MB입니다.
- Onboard CAN, RS485, I2C interfaces, Micro SD card slot, and full-speed USB serial port.
- Flexible clock and independent module power supply settings for low power consumption.
2. 패키지 내용
아래 나열된 모든 품목이 패키지에 포함되어 있는지 확인하세요.
- ESP32-S3-Touch-LCD-7 x1
- HY2.0 2핀-2핀 수형 케이블 10cm x 2
- HY2.0 2핀-3핀 수형 케이블 10cm x 1
- HY2.0 2핀-4핀 수형 케이블 10cm x 2
3. 사양
| 특징 | 세부 사항 |
|---|---|
| 제품 치수 | 7 x 7 x 7 인치 |
| 품목 무게 | 10.2 온스 |
| 모델명 | ESP32-S3-터치-LCD-7 |
| 설치된 RAM 메모리 크기 | 8메가바이트 |
| 메모리 저장 용량 | 8메가바이트 |
| CPU 속도 | 240MHz |
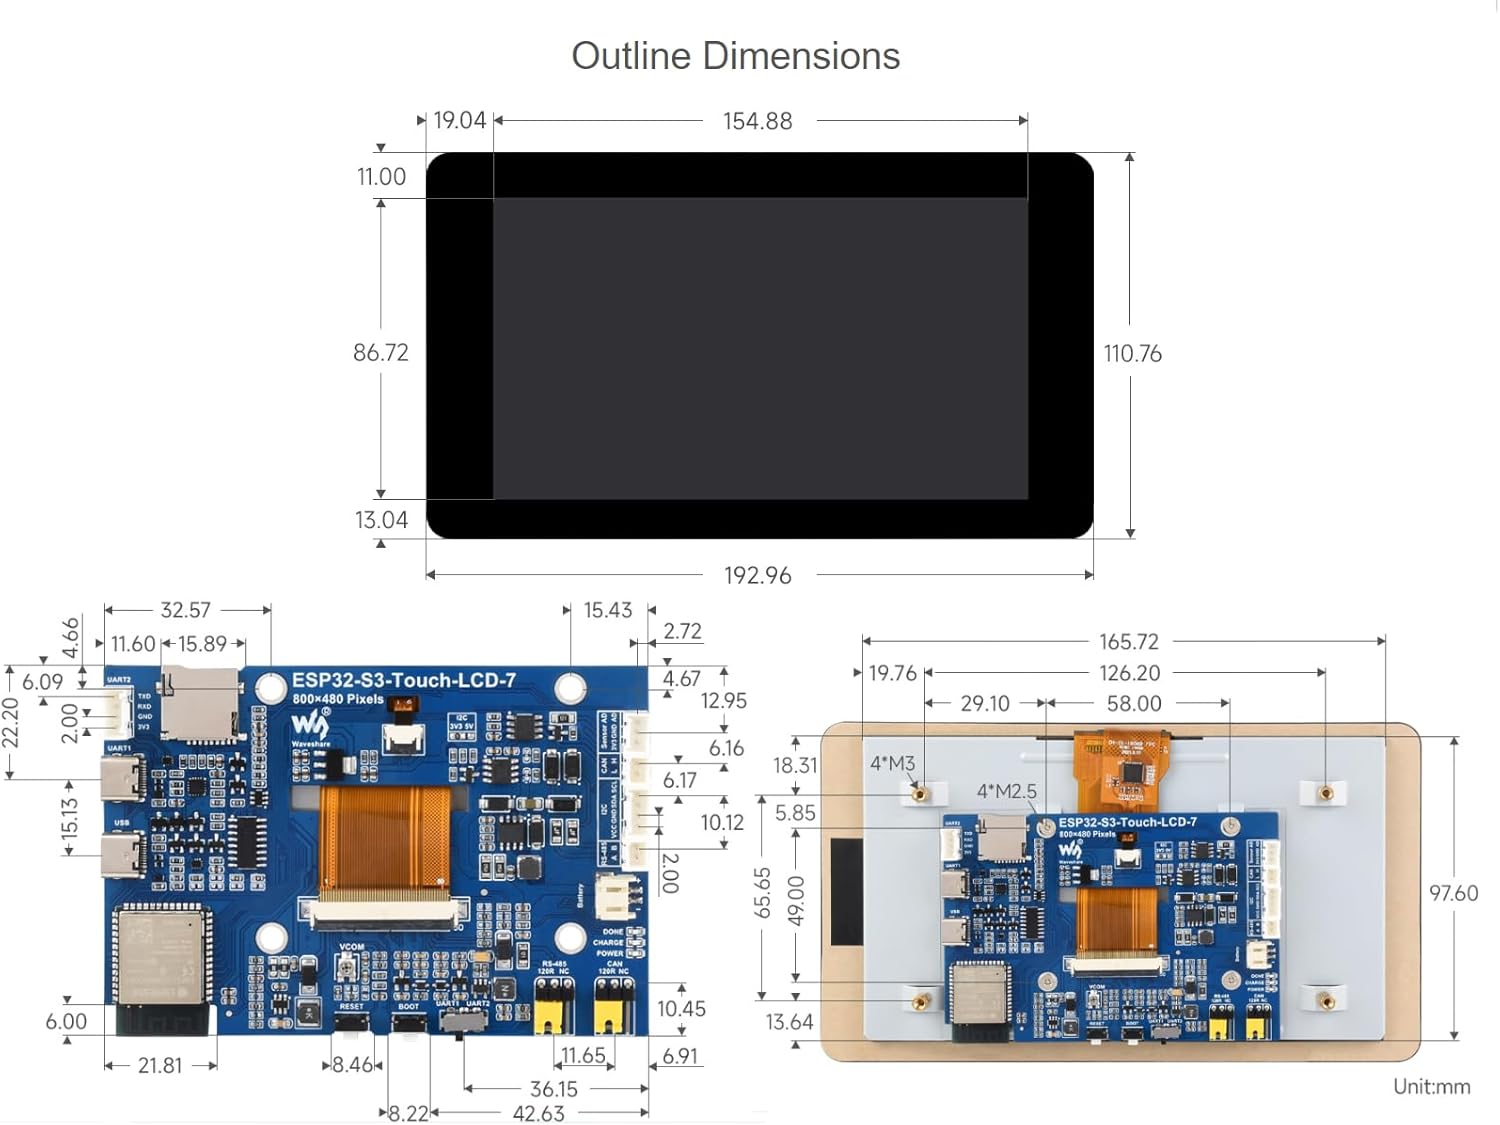
Figure 2: Outline dimensions of the ESP32-S3 7inch LCD development board.
4. 설정
4.1 하드웨어 오버view
The development board features various components and interfaces. Familiarize yourself with the layout for proper connection and operation.
Figure 3: Labeled diagram of the ESP32-S3 7inch LCD board components.
- ESP32-S3N8R8: SoC with WiFi and Bluetooth, up to 240MHz, 8MB PSRAM and Flash.
- 3.7V single lithium battery PH2.0 header.
- Touch panel connector.
- CAN terminal resistor selection.
- TF 카드 슬롯.
- RS485 terminal resistor selection.
- USB Type-C 포트.
- UART selection: select UART1 or UART2.
- UART1 Port.
- BOOT button: Press and hold while powering on for program burning.
- UART2 connector.
- 리셋 버튼.
- Sensor header.
- I2C level selection: 3.3V / 5V.
- CAN header.
- 완료: 리튬 배터리 충전 완료 표시등.
- I2C header.
- CHG: 리튬 배터리 충전 표시등.
- RS485 header.
- PWR: 전원 공급 표시등.
4.2 소프트웨어 설치 (아두이노 IDE)
To program the ESP32-S3 development board, you will typically use the Arduino IDE. Follow these steps for proper setup:
- 라이브러리 설치: Select the correct installation library path in your Arduino IDE preferences. If a 'libraries' folder does not exist, create one. Copy all necessary library file이 폴더에 들어있습니다.
- 이사회 구성원을 선택하세요: In the Arduino IDE, navigate to 'Tools' -> 'Board' and select 'ESP32S3 Dev Module'.
- Configure Flash Mode: Set the 'Flash Mode' to 'QIO 80MHz'.
- Configure Flash Size: Select 'Flash Size' as '8MB (64Mb)'.
- Configure PSRAM: Select 'PSRAM' as 'OPI PSRAM'.
- COM 포트를 선택하십시오. Before uploading, ensure you select the correct COM port corresponding to your connected device under 'Tools' -> 'Port'.
- Compile and Upload: Click the 'Upload' button to compile and upload your code to the board.
Video 1: This video demonstrates the software setup and upload process for an ESP32-S3 Touch-LCD board using the Arduino IDE. While it features a 4.3-inch model, the library installation, board selection, and upload steps are generally applicable to the 7-inch model.
5. 장치 작동
5.1 기본 상호작용
The 7-inch capacitive touch screen allows for intuitive interaction with your applications. The 5-point touch support enables multi-touch gestures, enhancing user experience for GUI interfaces developed with frameworks like LVGL.

Figure 4: The ESP32-S3-Touch-LCD-7 displaying a graphical user interface.
5.2 응용 시나리오
This development board is suitable for a wide range of applications, including Human-Machine Interfaces (HMI) and GUI development using LVGL. Its multiple peripheral interfaces allow for integration with various sensors and external devices.

그림 5: 예amples of application scenarios for the ESP32-S3 board.
5.3 주변부 확장
The board supports expansion of multiple peripherals via its CAN, RS485, and I2C interfaces, as well as UART and USB ports. This flexibility allows for complex system designs.

Figure 6: The ESP32-S3 board supporting multiple peripherals.

그림 7: example of the ESP32-S3 board in an application setup.
6. 유지관리
To ensure the longevity and optimal performance of your Waveshare ESP32-S3 7inch Capacitive Touch Screen Development Board, follow these maintenance guidelines:
- 청소: Use a soft, dry cloth to clean the screen and board. Avoid abrasive materials or harsh chemicals that could damage the components or screen coating.
- 저장: Store the board in a cool, dry environment away from direct sunlight, extreme temperatures, and high humidity.
- 손질: Handle the board by its edges to avoid touching sensitive electronic components. Static electricity can damage the board, so use anti-static precautions when necessary.
- 전원 공급 장치: Always use a stable and appropriate power supply as specified in the documentation to prevent damage.
7. 문제 해결
This section addresses common issues and their potential solutions:
- CAN reception failure:
- UCANV2.0.exe에서 COM 포트를 다시 시작하고 ESP32-S3-Touch-LCD-7 재설정 버튼을 여러 번 누릅니다.
- 직렬 포트 디버깅 도우미에서 DTR 및 RTS를 선택 취소합니다.
- No screen response after uploading an Arduino demo for RGB screen displaying:
- Check whether the correct configurations are set in Arduino IDE -> Tools. Ensure 'Flash (8MB)' and 'PSRAM (8MB OPI)' are enabled.
- Fails to compile an Arduino demo for the RGB screen and shows errors:
- Verify that the ESP32-S3-Touch-LCD-7_libraries are correctly installed. Refer to the installation steps in Section 4.2.
8. 보증 및 지원
보증 정보, 기술 지원 및 추가 자료는 Waveshare 공식 웹사이트를 방문하십시오. web해당 웹사이트를 방문하거나 고객 서비스 센터에 문의하십시오. 보증 청구를 위해 구매 영수증을 보관하십시오.


