1. 서론
The VOCOO Wireless Indoor Outdoor Thermometer Hygrometer (Model 5276) provides accurate, real-time monitoring of temperature and humidity both indoors and outdoors. This device features a large LCD display, a wireless remote sensor, and various functions to help you maintain a comfortable and healthy environment. This manual will guide you through the setup, operation, and maintenance of your device to ensure optimal performance.

그림 1.1: 본체 및 무선 실외 센서.
2. 상자 안에 무엇이 들어있나요?
- 1 x Indoor Thermometer Unit
- 1 x 무선 실외 센서
- AAA 배터리 4개 (사전 설치되어 있거나 별도로 제공될 수 있습니다)
3. 제품 특징
- 무선 모니터링: Connects to 1 wireless outdoor sensor (IP43 waterproof) with a transmission range of up to 100m/328ft in open areas.
- 대형 백라이트 LCD 디스플레이: A 3.7-inch screen (90x87x23 mm) for easy reading of temperature, humidity, and settings, even from a distance or in low light conditions.
- High Precision & Fast Refresh: Updates readings every 10 seconds for current data.
- 넓은 측정 범위:
- Indoor Temperature: 14°F~140°F (-10℃~60℃)
- Outdoor Temperature: -40°F~158°F (-40℃~70℃)
- 습도 : 10 % ~ 95 % RH
- 정확성: Temperature ±1℃, Humidity ±3-5%RH.
- 다기능 디스플레이: Includes switchable ℃/℉ units, 12/24 hour time and date display, air comfort indicators, temperature and humidity trend arrows, and a low battery icon.
- 최소/최대 레코드: Displays maximum and minimum temperature/humidity data, which automatically clears after 24 hours.
- 유연한 장착 옵션: The indoor unit has a wall-hanging hole and a retractable stand for tabletop placement. The outdoor sensor includes a hook for easy mounting.

이미지 3.1: 이상view 제품 특징.
4. 설정
4.1 배터리 설치
- 실내 단위 : 본체 뒷면의 배터리함 덮개를 여세요. 극성(+/-)을 확인하여 AAA 배터리 2개를 넣으세요. 덮개를 닫으세요.
- 실외 센서: 실외 센서 뒷면의 배터리함 덮개를 엽니다. 극성(+/-)을 확인하여 AAA 배터리 2개를 넣습니다. 덮개를 닫습니다.
4.2 센서 페어링
The indoor unit and outdoor sensor should automatically pair once batteries are installed. If the outdoor temperature/humidity is not displayed after a few minutes, follow these steps:
- 두 장치 모두에 새 배터리가 들어 있는지 확인하세요.
- Place the outdoor sensor close to the indoor unit.
- Press and hold the 'CLEAR' button on the indoor unit for 3 seconds to clear previous data and initiate a new search for the sensor.
- If pairing fails, remove batteries from both units, wait 1 minute, and reinsert them.
4.3 배치
- 실내 단위 : Place the indoor unit on a flat surface using its retractable stand, or mount it on a wall using the hanging hole. Ensure it is away from direct sunlight, heat sources, or drafts that could affect readings.
- 실외 센서: Mount the outdoor sensor in a shaded, dry location, protected from direct rain and sunlight, to ensure accurate readings. Avoid placing it near metal objects or large electrical appliances that could interfere with the wireless signal. The maximum effective range is 100m/328ft in an open area, but walls and obstacles will reduce this distance.

Image 4.1: Dimensions and mounting options for the main unit and sensor.

Image 4.2: Wireless transmission range and recommended placement for the outdoor sensor.
5. 사용 설명서
5.1 온도 단위 선택 (℃/℉)
Press the '℃/℉' button on the back of the indoor unit to switch between Celsius and Fahrenheit temperature displays.
5.2 최소/최대 레코드
The device automatically records the maximum and minimum temperature and humidity values over a 24-hour period. These records are automatically cleared every 24 hours.
- Press the 'MAX/MIN' button once to view 기록된 최대값.
- Press the 'MAX/MIN' button again to view 기록된 최소값.
- 현재 판독값으로 돌아가려면 'MAX/MIN' 버튼을 세 번째 누르세요.
- To manually clear the Min/Max records, press and hold the 'MAX/MIN' button for 3 seconds while view기록 중.

Image 5.1: Display showing Min/Max temperature and humidity records.
5.3 백라이트 작동
The LCD display features a white backlight for improved visibility in dark conditions.
- Touch the light icon area at the bottom of the screen to activate the backlight.
- The backlight will remain on for a few seconds before automatically turning off to conserve battery power.

Image 5.2: Backlit LCD display for clear visibility.
5.4 시간 및 날짜 설정
The device displays the current time and date. Refer to the specific instructions on the back of the unit or the included quick start guide for detailed steps on setting the time and date (12/24 hour format).
6. 디스플레이 정보
The large LCD screen provides comprehensive information at a glance:
- 밖으로: Displays outdoor temperature and humidity from the wireless sensor.
- 안에: Displays indoor temperature and humidity measured by the main unit.
- CH1 : Indicates the channel for the outdoor sensor (this model supports one sensor).
- 온도/습도 변화 추이 화살표: 화살표는 온도나 습도가 상승하는지, 하강하는지, 또는 안정적으로 유지되는지를 나타냅니다.
- 공기 쾌적 표시기: A colored bar graph categorizes the current indoor humidity level into DRY (0-30%), COMFORT (31-70%), or WET (71-99%).
- 시간 및 날짜 : Current time and date (AM/PM indicator for 12-hour format).
- 배터리 부족 아이콘: Appears when batteries in either the main unit or sensor need replacement.
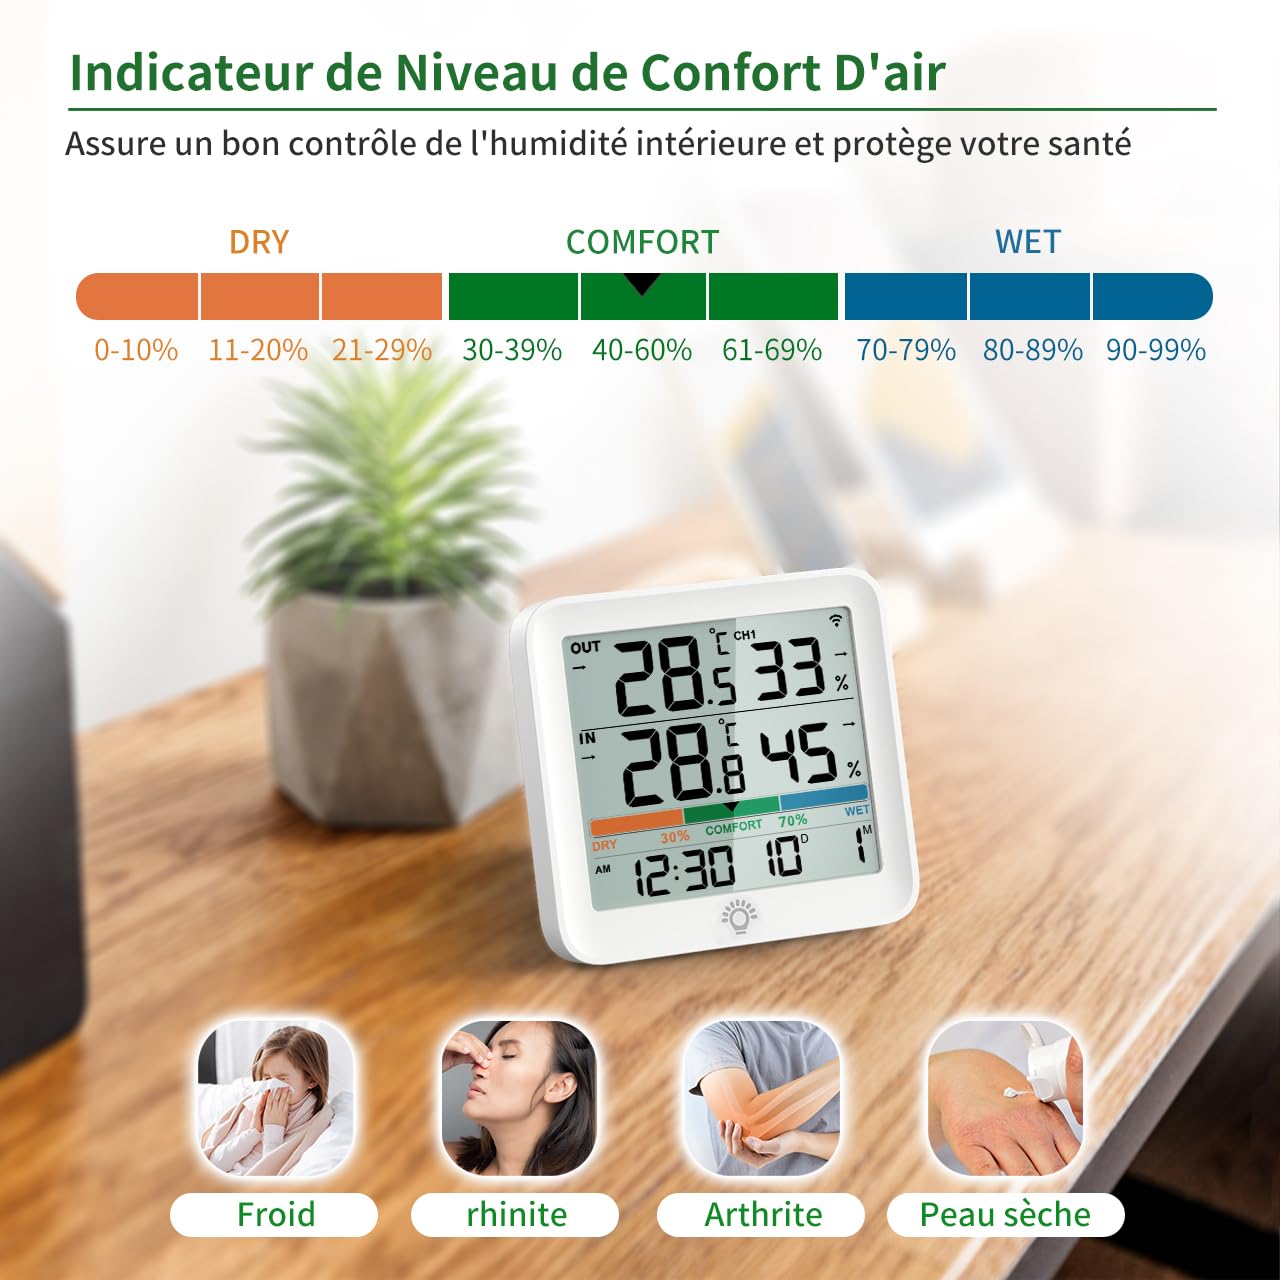
Image 6.1: Air comfort indicator showing DRY, COMFORT, and WET zones.
7. 사양
| 특징 | 사양 |
|---|---|
| 모델 번호 | 5276 |
| 실내 온도 범위 | -10℃ ~ 60℃ (14°F ~ 140°F) |
| 실외 온도 범위 | -40℃ ~ 70℃(-40°F ~ 158°F) |
| 습도 범위 | 상대습도 10% ~ 95% |
| 온도 정확도 | ±1°C |
| 습도 정확도 | ±3-5% 상대습도 |
| 무선 전송 범위 | 최대 100m / 328ft (개방된 공간 기준) |
| 전원 | AAA 배터리 4개 (본체용 2개, 센서용 2개) |
| 본체 치수 | 17 x 11 x 4cm |
| 장착 유형 | Wall mount, Tabletop |
| 한국어: | 677222587383 |

Image 7.1: Detailed temperature and humidity monitoring ranges.
8. 유지관리
8.1 배터리 교체
When the low battery icon appears on the display, replace the batteries in the respective unit (main unit or outdoor sensor) with new AAA batteries. Ensure correct polarity.
8.2 청소
기기와 센서를 부드러운 천으로 닦아주세요.amp cloth. Do not use abrasive cleaners or immerse the units in water. Ensure the outdoor sensor's waterproof seal is intact after battery replacement.
9. 문제 해결
- No Outdoor Temperature/Humidity Reading:
- Check if the outdoor sensor batteries are installed correctly and are not depleted.
- Ensure the outdoor sensor is within the effective transmission range (100m/328ft in open air) and there are no major obstructions or sources of interference between the sensor and the main unit.
- Try re-pairing the sensor by pressing and holding the 'CLEAR' button on the main unit for 3 seconds.
- 부정확한 판독:
- Ensure both units are placed away from direct sunlight, heat sources, or strong drafts.
- 초기 설치 또는 이동 후 장치가 최소 30분 동안 안정화되도록 하십시오.
- Compare readings with another known accurate thermometer/hygrometer.
- 디스플레이가 작동하지 않음:
- Check and replace the batteries in the main unit.
- 배터리가 올바른 극성에 맞게 삽입되었는지 확인하세요.
10. 보증 및 지원
This product comes with a standard return policy. For specific warranty details, technical support, or further assistance, please refer to the manufacturer's official website or contact customer service through your point of purchase. Keep your purchase receipt for warranty claims.


