1. 서론
This manual provides detailed instructions for the setup, operation, maintenance, and troubleshooting of your Koiiko Wireless Gaming Controller Z01. This versatile controller is designed for compatibility across multiple platforms, including iOS, Android, PC, Nintendo Switch, PlayStation 3, and PlayStation 4, offering an enhanced gaming experience with its advanced features.

이미지 1.1: 앞면 view of the Koiiko Wireless Gaming Controller Z01, showcasing its design and illuminated elements.
2. 컨트롤러 구성 요소
Familiarize yourself with the various buttons and features of your Koiiko Z01 controller:
- Left/Right Analog Sticks (Hall Effect): For precise 3D movement and input, featuring Hall Effect sensors to prevent drift.
- 방향 패드: Directional pad for digital input.
- 동작 버튼(A, B, X, Y): Standard gaming input buttons, with interchangeable key values.
- Shoulder Buttons (LB, RB) & Triggers (Hall Effect Linear): For additional actions and responsive input, featuring Hall Effect linear triggers.
- 홈 버튼: For system menu access and power control.
- Select/Share Button: 다양한 게임 내 기능 또는 시스템 기능을 위해.
- Start/Options Button: 다양한 게임 내 기능 또는 시스템 기능을 위해.
- M1/M2 버튼: Programmable back buttons for custom actions.
- 터보 버튼: Activates continuous input for other buttons.
- Light Adjustment Button: Controls the 7-color RGB breathing light modes.
- USB-C 포트: 컨트롤러를 충전하려면.

이미지 2.1: 상세도view of the Koiiko Wireless Gaming Controller Z01, highlighting its main features.
3. 주요 특징
- 광범위한 호환성: Supports iOS (iPhone, iPad), Android (phones, tablets), PC, Nintendo Switch/Switch OLED/Switch Lite, PlayStation 3, and PlayStation 4. Compatible with Steam, Xbox Game Pass, Nvidia GeForce Now, Amazon Luna, Google Stadia, and other cloud gaming services.
- 홀 효과 기술: Equipped with Hall Effect joysticks and linear triggers for enhanced precision, durability, and prevention of stick drift.
- 맞춤형 RGB 조명: Features a 7-color RGB breathing light with 5 distinct lighting modes on the joysticks, adjustable via a dedicated button.
- 프로그래밍 가능한 버튼: Includes two programmable back buttons (M1, M2) and highly customizable LB, RB buttons, supporting up to 30 action keys.
- Six-Axis Gyro: Built-in 6-axis gyroscope for motion control, supported on PC, PS3, PS4, and Switch.
- 터보 기능 : Allows for continuous input with a single press, enhancing gameplay for rapid actions.
- 오래 지속되는 배터리: Integrated 600mAh lithium battery provides approximately 10-15 hours of continuous use on a single charge.
- 휴대성 있는 디자인: Small and lightweight, making it easy to carry and store.

Image 3.1: Illustration of the Hall Effect 3D joystick, highlighting its drift-prevention design.
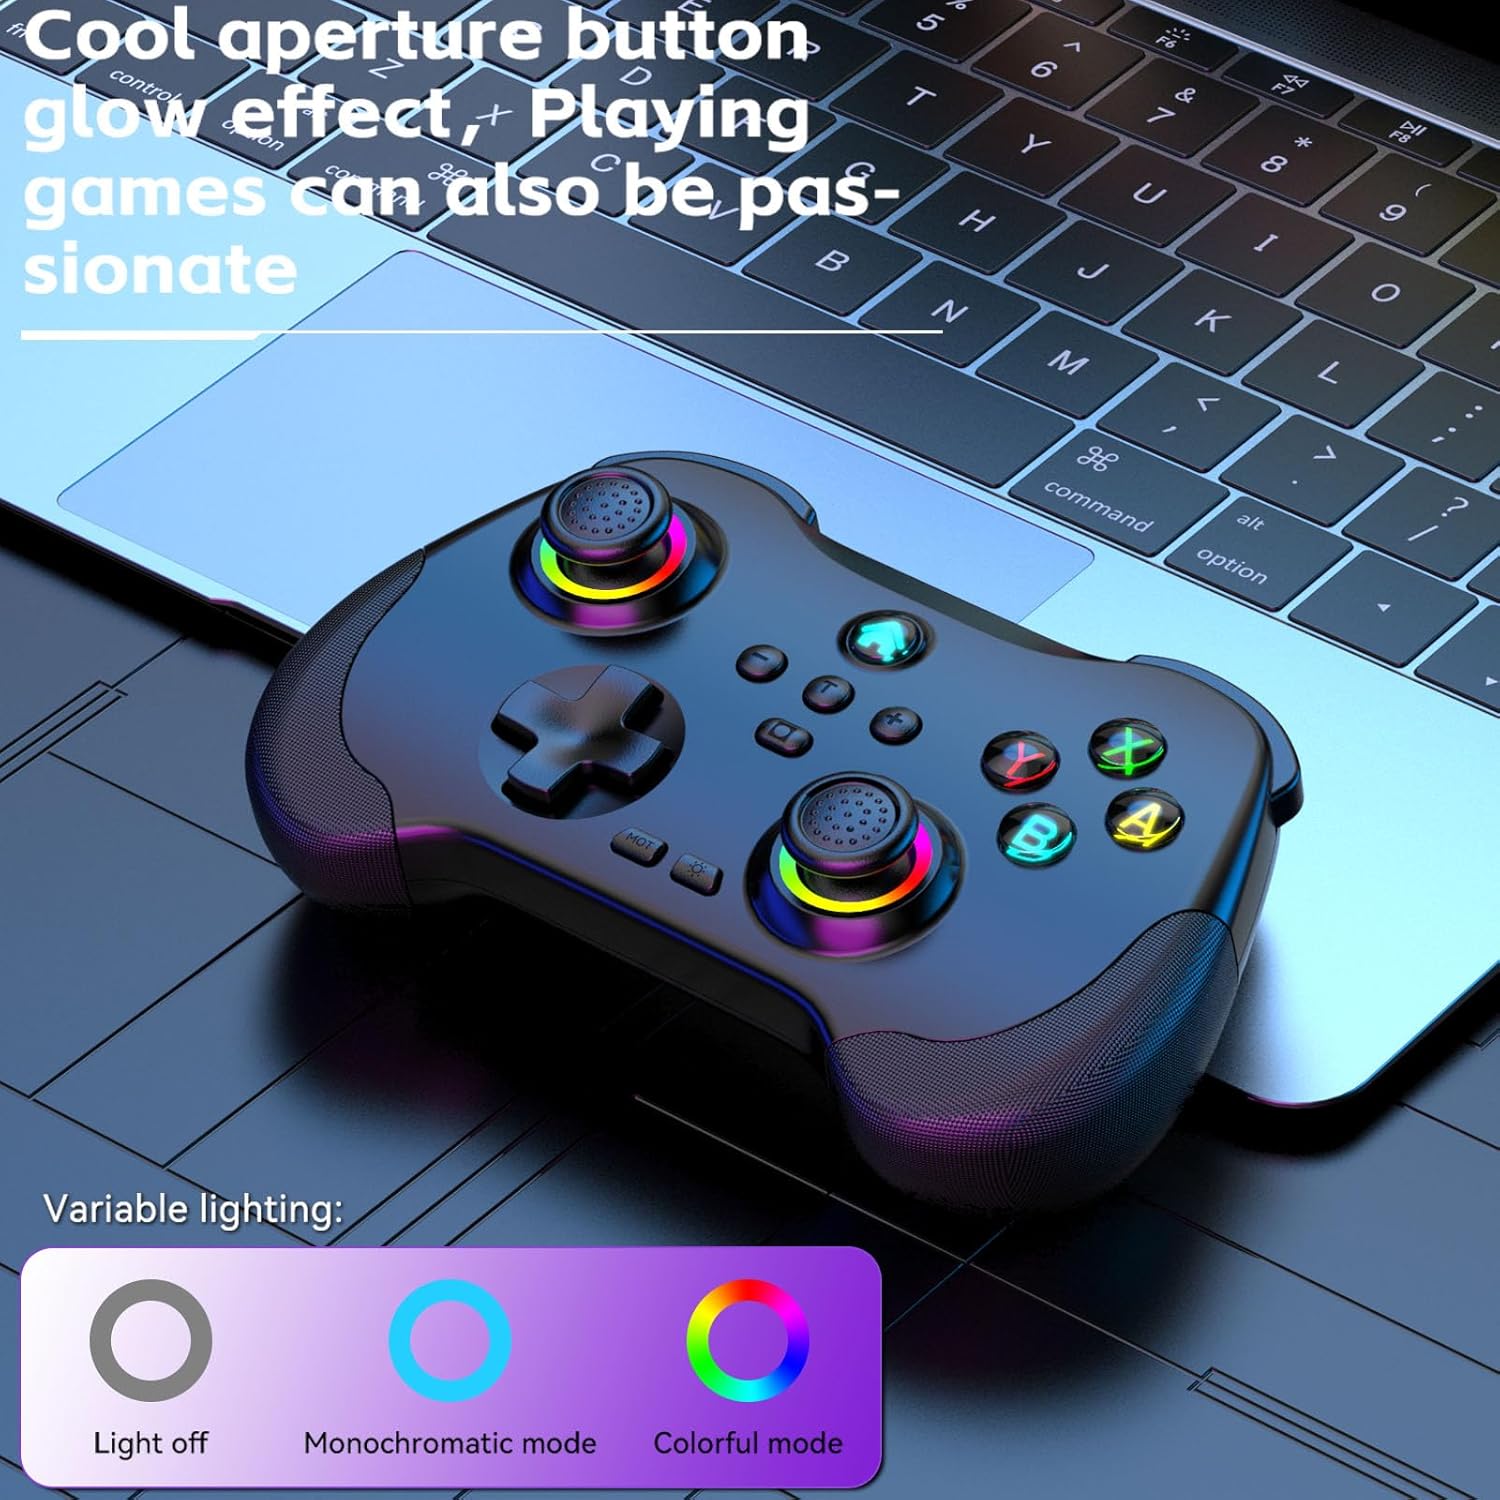
Image 3.2: The controller displaying its customizable RGB lighting on joysticks and buttons.
4. 설정 및 충전
4.1. 컨트롤러 충전
Before first use, fully charge the controller. Connect the included USB-C cable to the controller's charging port and the other end to a USB power source (e.g., computer, wall adapter). The LED indicators will show charging status and turn off or change color when fully charged.
- 배터리 용량: 600mAh
- 충전 시간: 약 2시간
- 지구력: 약 10-15시간
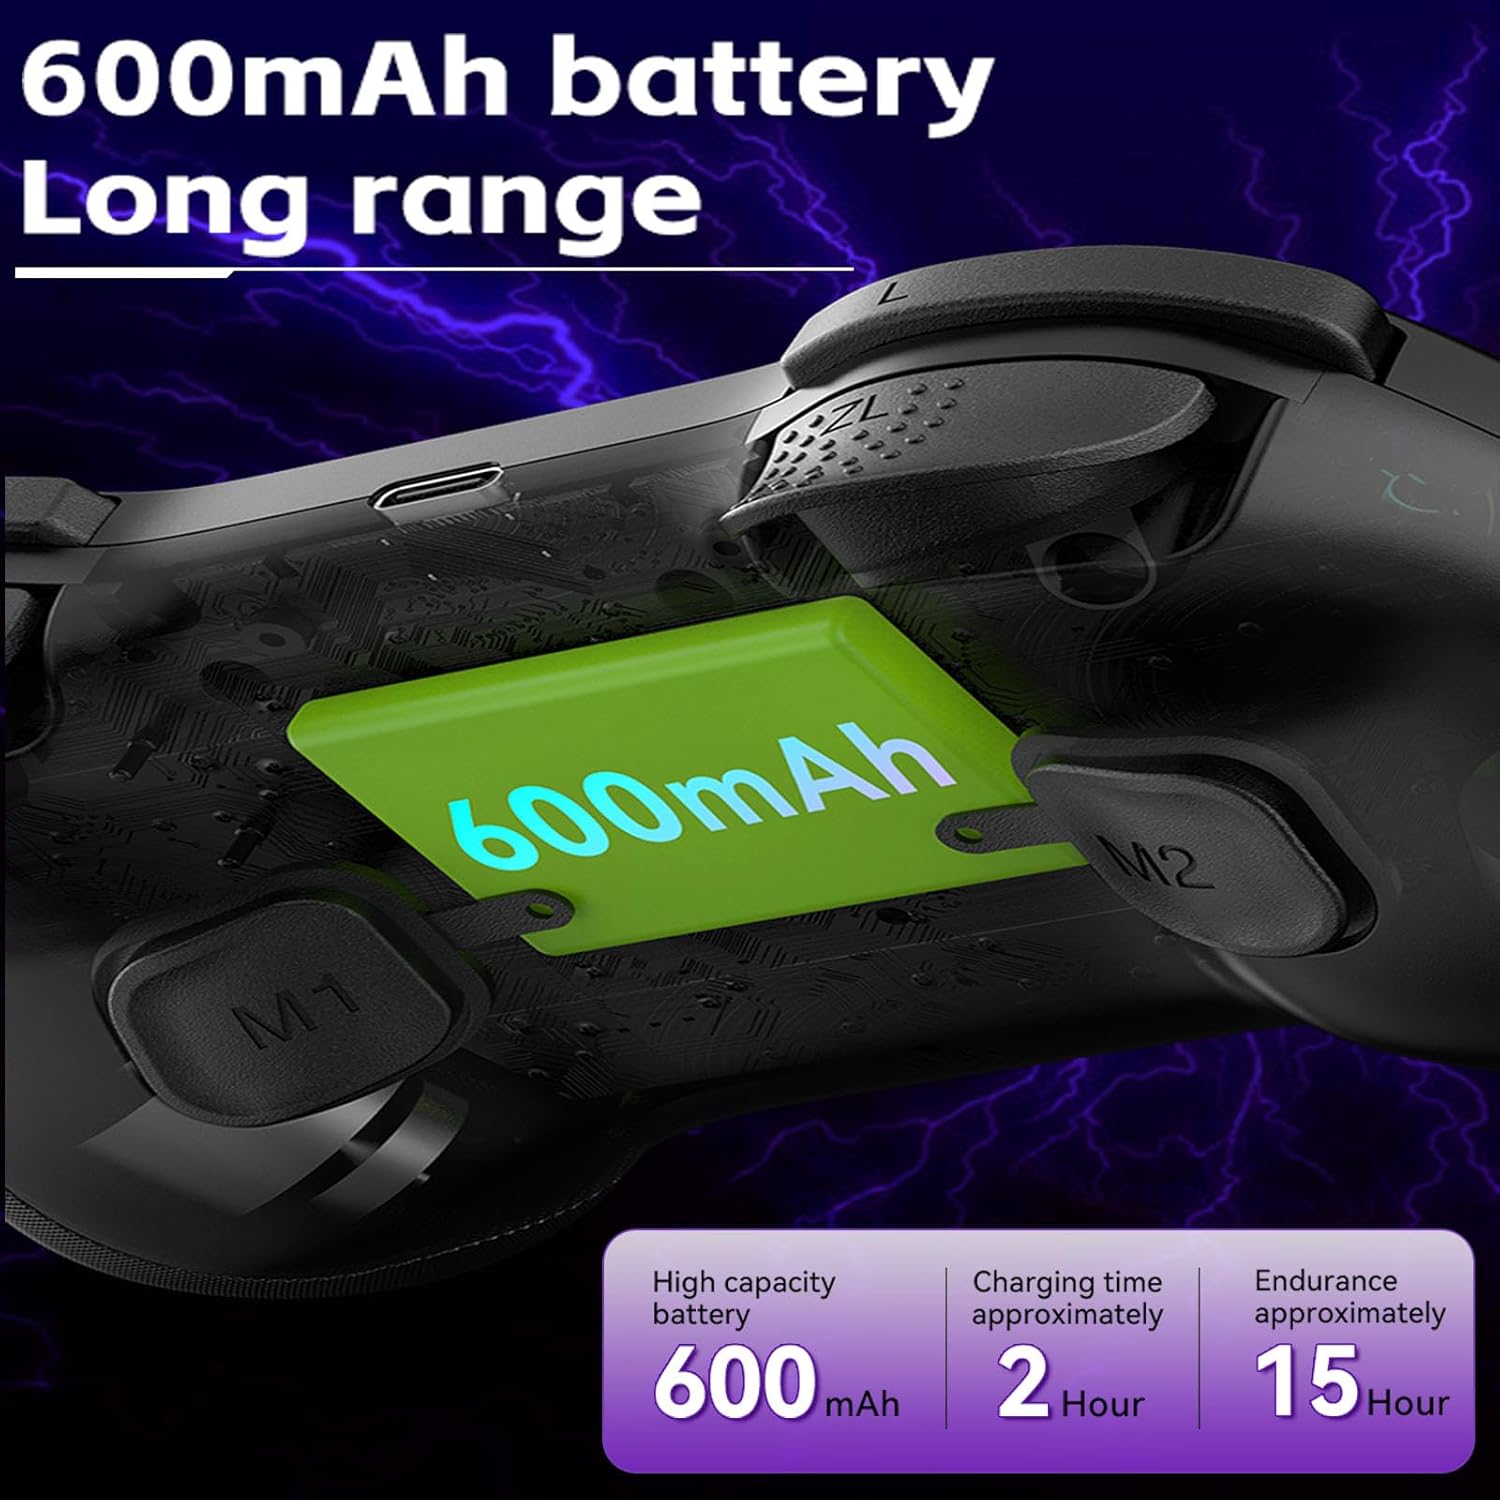
Image 4.1: Diagram illustrating the 600mAh battery capacity and charging specifications.
4.2. 전원 켜기 / 끄기
- 전원을 켜려면: Press and hold the Home button for 1-2 seconds.
- 전원을 끄려면: Press and hold the Home button for 3-5 seconds until the indicator lights turn off.
5. 사용 설명서
5.1. 장치에 연결
The Koiiko Z01 controller supports various connection modes. The specific button combination to enter pairing mode may vary by platform. Please refer to the included physical user manual for exact button combinations for each mode. Below are general guidelines:
- 일반 블루투스 페어링: Typically involves holding a combination of buttons (e.g., Home + X, Home + A, Home + B) until the indicator lights flash rapidly, indicating pairing mode. Then, search for "Koiiko Z01" or similar on your device's Bluetooth settings and connect.
- 닌텐도 스위치: Navigate to the 'Controllers' menu on your Switch, then 'Change Grip/Order'. Hold the specific pairing button combination on the controller until it connects.
- PC(윈도우): Ensure your PC has Bluetooth enabled. Hold the specific pairing button combination, then go to 'Bluetooth & other devices' in Windows settings and add a new Bluetooth device. The controller will typically connect as an X-Input device.
- iOS/안드로이드: Enable Bluetooth on your mobile device. Hold the specific pairing button combination, then select the controller from the list of available Bluetooth devices.
- 플레이스테이션 3/4: Connect the controller via USB cable first to register it, then it may be used wirelessly. Specific pairing methods may vary; consult your console's instructions.

Image 5.1: Connection guideline for PC.

Image 5.2: Connection guideline for Nintendo Switch.
5.2. ABXY 키-값 교환
The controller allows you to switch the ABXY button layout between Nintendo Switch and Xbox settings without physically removing the buttons.
- To Interchange: 를 누르고 계세요 X + B + 홈 keys simultaneously. The controller will switch its ABXY key value. Repeat the combination to revert to the previous setting.

Image 5.3: ABXY key value interchange function.
5.3. RGB 조명 조정
The controller features customizable RGB lighting around the joysticks and on the buttons.
- 모드를 변경하려면: Press the dedicated Light Adjustment button (refer to the controller diagram in your physical manual for location) to cycle through the 5 available RGB light modes, including a mode to turn the lights off.
5.4. 프로그래밍 가능한 뒤로 가기 버튼(M1/M2)
The M1 and M2 buttons on the back of the controller can be programmed to perform specific actions or sequences.
- 프로그래밍 단계: Refer to your physical user manual for detailed instructions on how to program the M1 and M2 buttons, as the process typically involves entering a programming mode and then inputting the desired button sequence.
5.5. 터보 기능
The Turbo function allows a button to register continuous presses when held down.
- 활성화하려면 : 를 누르세요 터보 button simultaneously with the desired action button (e.g., TURBO + A).
- 비활성화하려면: Repeat the activation step (TURBO + A) for the same button.

이미지 5.4: 이상view of advanced functions including macro programming and Turbo mode.
6. 유지관리
적절한 관리를 하면 컨트롤러의 수명을 연장할 수 있습니다.
- 청소: 부드럽고 마른 천을 사용하여 컨트롤러를 닦으세요. 잘 지워지지 않는 오염의 경우, 가볍게 두드리세요.amp천에 물을 묻혀 닦으세요. 강한 화학 물질이나 연마성 세제는 사용하지 마세요.
- 저장: 컨트롤러는 직사광선과 극한의 온도를 피해 서늘하고 건조한 곳에 보관하세요.
- 배터리 관리 : To maintain battery health, avoid fully discharging the controller frequently. If storing for an extended period, charge it to about 50% every few months.
- 물리적 충격을 피하십시오: 컨트롤러를 떨어뜨리거나 강한 충격을 주지 마십시오. 내부 구성 요소가 손상될 수 있습니다.
7. 문제 해결
If you encounter issues with your Koiiko Z01 controller, try the following solutions:
| 문제 | 가능한 해결책 |
|---|---|
| 컨트롤러의 전원이 켜지지 않습니다. | 컨트롤러가 충전되어 있는지 확인하세요. USB-C 케이블을 사용하여 전원에 연결하세요. |
| Bluetooth를 통해 연결할 수 없습니다. |
|
| Buttons or joysticks are unresponsive or drifting. |
|
| RGB 조명이 작동하지 않습니다. | Press the Light Adjustment button to cycle through modes or turn them on. Ensure the controller is powered on. |
| 컨트롤러가 자주 연결이 끊어집니다. |
|
8. 사양
| 특징 | 세부 사항 |
|---|---|
| 모델 | Z01 |
| 제품 치수 | 2.44 x 6.85 x 4.84인치(6.2 x 17.4 x 12.3cm) |
| 품목 무게 | 12.6 온스(357.2그램) |
| 배터리 | AA 배터리 1개 필요 (포함) - Note: Product features mention 600mAh Lithium, please refer to product packaging for exact battery type. |
| 배터리 용량 | 600mAh (Lithium, built-in) |
| 충전 시간 | 약 2시간 |
| 사용 기간 | 약 10-15시간 |
| 블루투스 전송 거리 | ≤ 8 미터 |
| 작업 볼륨tage | 직류3.7V |
| 작업 전류 | < 35mA |
| 제조업체 | 선전 산완 테크놀로지 유한회사 |
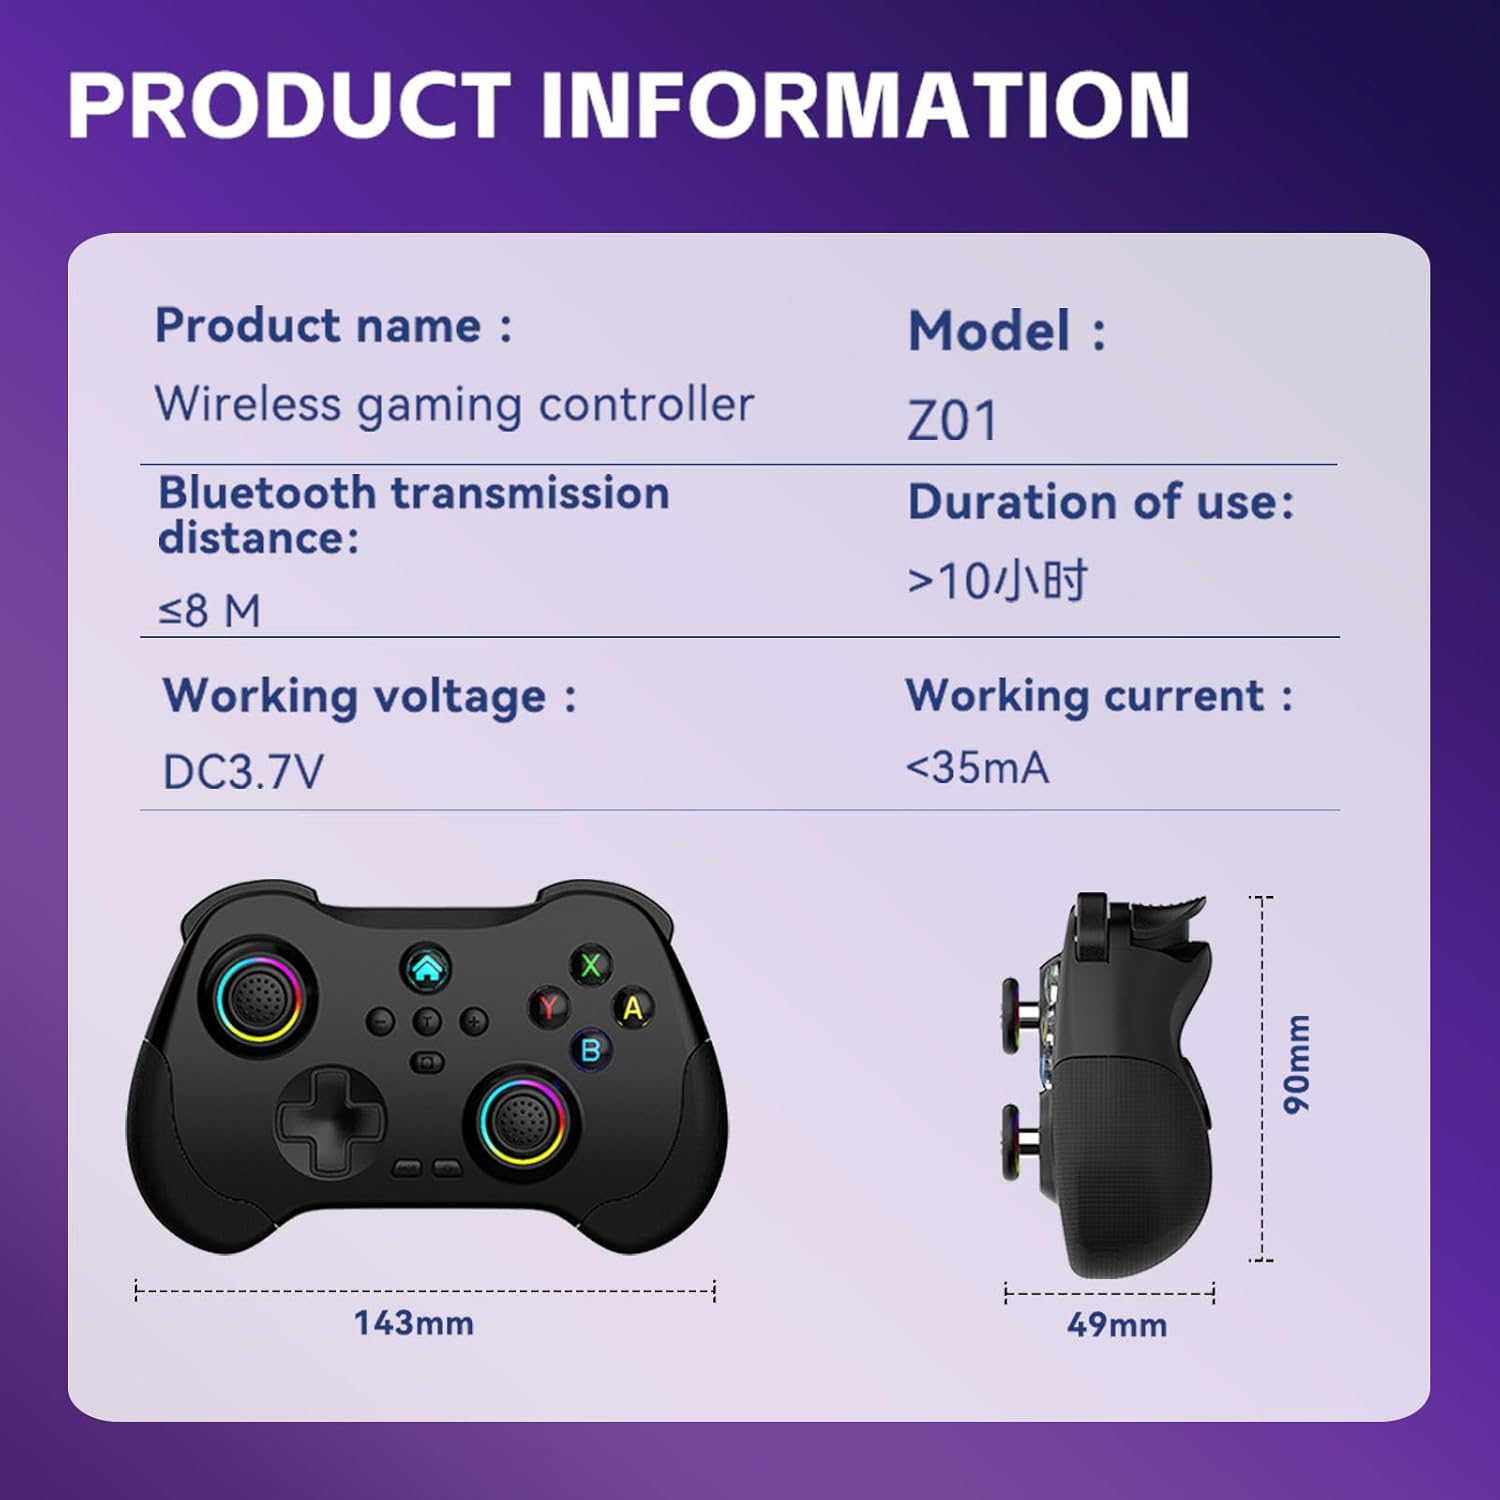
Image 8.1: Product information table with key specifications.
9. 보증 및 지원
Koiiko provides technical support for its products. If you have any questions, encounter issues, or require assistance with your Koiiko Wireless Gaming Controller Z01, please contact our customer support team.
- 연락처 정보: Please refer to the contact details provided on your product packaging or the official Koiiko web최신 지원 채널을 제공하는 사이트입니다.
- 보증: Information regarding product warranty periods and terms can be found on the official Koiiko web웹사이트 또는 제품 포장 내부에 있습니다.