소개
This manual provides detailed instructions for the Svetaecho Wireless Controller. This controller is designed for use with Nintendo Switch, Switch Lite, Switch OLED, Windows PC (wired connection), iOS, and Android devices. Please read this manual thoroughly before use to ensure proper operation and to maximize your gaming experience.
메모: This controller does not support Xbox games.
제품 특징
- Customizable Macro Buttons: Two back buttons (ML/MR) can be programmed to map 1-20 combined functions from A/B/X/Y/L/ZL/R/ZR/L3/R3/D-pad for enhanced gameplay. Double-click SR/SL to temporarily enable/disable macro functions.
- 조절 가능한 터보 기능: Supports both Auto and Manual Turbo modes with three adjustable speeds: 5 shots/s, 12 shots/s, and 20 shots/s.
- 듀얼 진동 모터: Built-in motors provide 3-level vibration feedback (None, Weak, Strong) for Switch and Windows PC games. Adjust intensity by pressing and holding L, R, ZL, ZR simultaneously.
- 6축 자이로 센서: High-sensitivity gyro sensors offer precise motion control for Nintendo Switch games.
- One-Key Wake-Up (Switch Only): After initial connection, press the HOME button to wake up and reconnect the Switch console.
- 대용량 배터리 : Integrated 1000mAh battery provides over 16 hours of playtime in LED lit mode. Fully charges in approximately 3 hours via USB Type-C.
- 자동 절전 모드: The controller automatically shuts down after 20 minutes of inactivity in a connected state. Press the HOME button to wake and reconnect.
패키지 내용
- 1x Svetaecho Wireless Controller
- 1x USB Type-C 충전 케이블
- 1x 사용자 매뉴얼(이 문서)
컨트롤러 레이아웃

영상: 앞쪽 view of the Svetaecho Wireless Controller, highlighting the main buttons, joysticks, D-pad, and the M1/M2 back buttons.
The controller features standard gaming buttons including A, B, X, Y, L, R, ZL, ZR, D-pad, Left and Right Analog Sticks, HOME button, SHARE button, TURBO button, and two programmable back buttons (M1/ML and M2/MR).

영상: 뒤쪽 view of the Svetaecho Wireless Controller, showing the SR, SL, and M buttons, along with the ML and MR programmable back buttons.
설정 및 페어링
1. Nintendo Switch Pairing
- 닌텐도 스위치 홈 메뉴에서 '컨트롤러' > '그립/순서 변경'을 선택하세요.
- Press and hold the HOME button on the Svetaecho controller for 3-5 seconds until the LED indicators begin to flash rapidly.
- 연결이 완료되면 컨트롤러의 해당 플레이어 LED가 계속 켜집니다.
- To wake up the Switch console after the first connection, simply press the HOME button on the controller.
2. PC (유선 연결)
- Connect the controller to your Windows PC using the provided USB Type-C cable.
- 컨트롤러는 자동으로 유선 게임패드로 인식됩니다.
- Vibration function is supported on Windows PC.
3. iOS/Android Pairing (Wireless)

영상: The Svetaecho Wireless Controller shown alongside various compatible devices including Nintendo Switch, PC, iOS, and Android phones/tablets.
- iOS 또는 Android 기기에서 블루투스가 활성화되어 있는지 확인하십시오.
- Press and hold the HOME button on the controller for 3-5 seconds until the LED indicators flash rapidly.
- On your device, search for Bluetooth devices and select the controller (e.g., 'Pro Controller' or similar).
- 페어링이 완료되면 LED 표시등이 계속 켜져 있습니다.
작동 지침
1. Custom Macro Buttons (ML/MR)
- 프로그램 작성: Press and hold the 'M' button, then press the ML or MR button you wish to program. The LED will flash. Now, press the sequence of buttons (up to 20) you want to assign. Press ML or MR again to save the macro.
- Using Macro: Simply press the programmed ML or MR button to execute the assigned sequence.
- Enable/Disable Macro: Double-click the SR or SL button to temporarily enable or disable the macro function.
2. 터보 기능

영상: The Svetaecho Wireless Controller illustrating the three adjustable Turbo speeds: 5 shots/s, 12 shots/s, and 20 shots/s.
- 수동 터보: Press and hold the TURBO button, then press the desired action button (A/B/X/Y/L/R/ZL/ZR) to enable Turbo for that button. Release TURBO. Now, holding the action button will trigger rapid presses.
- 자동 터보: Press and hold the TURBO button, then double-press the desired action button. Release TURBO. The action button will now continuously trigger rapid presses without being held down.
- 터보 속도 조정: With Turbo enabled for a button, press and hold the TURBO button, then move the Right Analog Stick Up or Down to cycle through the three speeds (5, 12, 20 shots/s).
- 클리어링 터보: To clear Turbo for a single button, press and hold TURBO, then press the action button twice. To clear all Turbo settings, press and hold the TURBO button for 5 seconds.
3. Vibration Adjustment (Switch/PC Only)

영상: The Svetaecho Wireless Controller highlighting its 6-axis gyro sensor for precise motion control and dual motor vibration with adjustable intensity levels (None, Weak, Strong).
To cycle through vibration intensities (None, Weak, Strong), press and hold the L, R, ZL, and ZR buttons simultaneously.
4. Motion Control (Switch Only)
The built-in 6-axis gyro sensor provides motion control capabilities for compatible Nintendo Switch games. No special setup is required; the feature activates automatically when supported by the game.
5. LED 조명 모드
The controller features multi-RGB lighting. Specific instructions for changing LED modes are typically found in the quick start guide or by pressing a dedicated button (often indicated by a lightbulb icon) on the controller. Refer to the quick start guide for detailed steps on adjusting LED patterns and colors.
배터리 및 충전
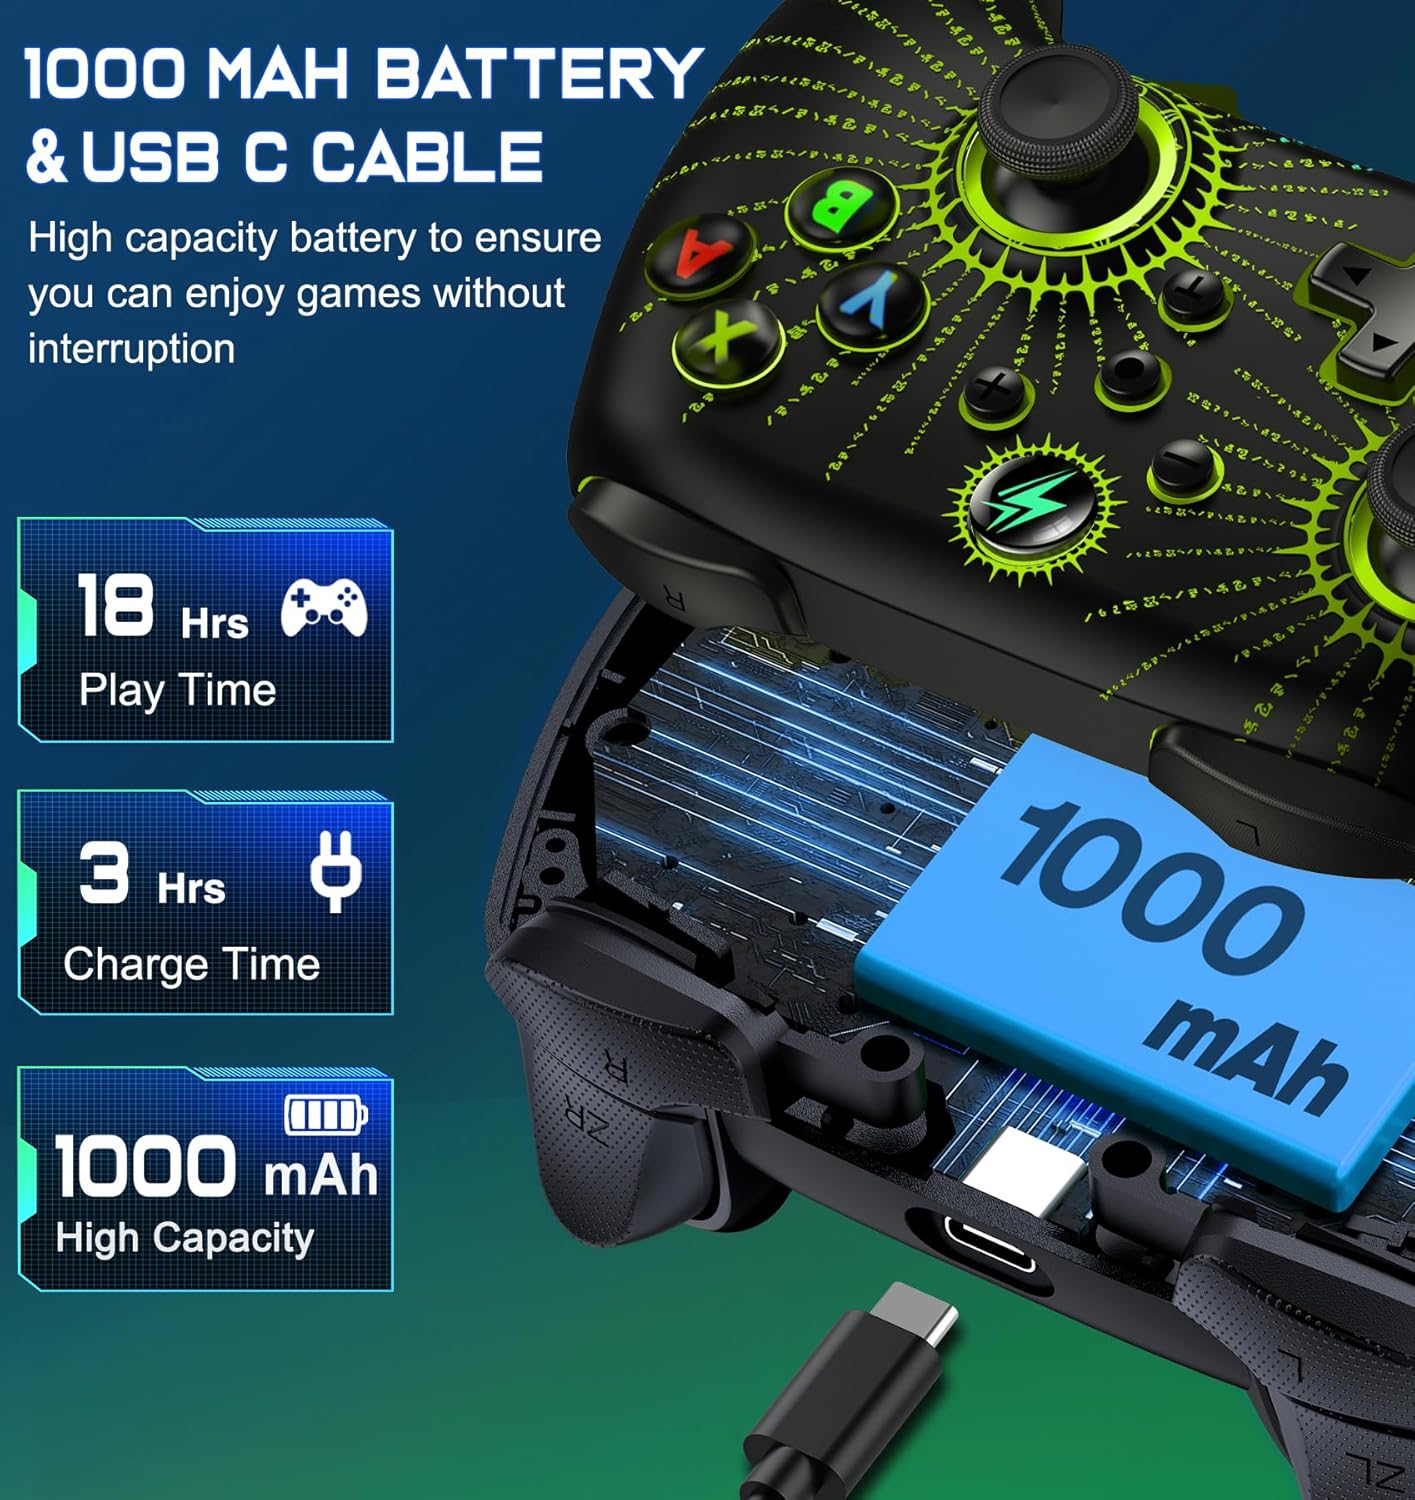
영상: 폭발 view of the Svetaecho Wireless Controller showing the internal 1000mAh battery and the USB Type-C charging port with cable.
- 컨트롤러에는 1000mAh 충전식 배터리가 장착되어 있습니다.
- Connect the controller to a USB power source (e.g., Switch dock, PC, USB wall adapter) using the provided USB Type-C cable to charge.
- 완전 충전에 소요되는 충전 시간은 약 3시간입니다.
- A full charge provides over 16 hours of playtime with LED lighting active.
- LED 표시등은 충전 상태를 표시하고, 완전히 충전되면 꺼지거나 색상이 바뀝니다.
유지
- 컨트롤러를 건조하고 극한 온도에 두지 마세요.
- 컨트롤러는 부드럽고 마른 천으로 닦으십시오. 강한 화학 약품이나 연마제를 사용하지 마십시오.
- 컨트롤러를 분해하려고 시도하지 마십시오. 분해 시 보증이 무효화되고 제품이 손상될 수 있습니다.
- 사용하지 않을 때는 컨트롤러를 안전한 곳에 보관하여 우발적인 손상을 방지하세요.
문제 해결
- 컨트롤러가 연결되지 않음: Ensure the controller is charged. Re-attempt the pairing process. For Switch, ensure 'Pro Controller Wired Communication' is enabled in system settings if using wired mode.
- 입력 지연 또는 연결 끊김: Ensure there are no strong wireless interferences nearby. Move closer to the console/device. Ensure the controller battery is not low.
- 버튼이 응답하지 않음: Check if the macro function is temporarily disabled (double-click SR/SL). If the issue persists, try resetting the controller (a small reset button may be located on the back, often requiring a pin to press).
- 진동이 작동하지 않습니다: Ensure the vibration intensity is not set to 'None'. Check game settings for vibration support.
- 컨트롤러가 충전되지 않음: Ensure the USB-C cable is securely connected to both the controller and the power source. Try a different USB port or cable.
Firmware Update for Switch 2

영상: A step-by-step guide demonstrating how to update the controller's firmware for Switch 2 compatibility using the 'KeyLinker' mobile application.
메모: All functions are supported except "One Press Home key to Wake up the Switch 2 console" and "Open voice menu" after the update.
- 1단계: 검색 the "KeyLinker" app in your mobile app store, then download and install it.
- 2단계: Turn on Bluetooth on your phone and pair the controller with your phone. (Refer to the pairing method in this manual).
- 3단계: Open the "KeyLinker" app.
- 4단계: In the app, search for the Bluetooth name "NC100" and tap to pair. (If the controller's Bluetooth name does not appear on the screen, press and hold the screen, then pull down to refresh several times.)
- 5단계: Tap the three dots in the top right corner, then select "Update device".
- 6단계: Enter the upgrade interface, tap "Update Now" at the bottom of the screen, and confirm. (If the update button doesn't appear, please wait a few minutes.)
- 7단계: Wait for the update to complete. (If the upgrade fails, please try several more times.)
명세서
| 제조업체 | 스베타에코 |
| 품목 무게 | 11.3 온스 |
| 패키지 크기 | 6.38 x 4.72 x 2.64 인치 |
| 배터리 용량 | 1000mAh |
| 충전 시간 | 약 3시간 |
| Playtime (LED Lit Mode) | 16시간 이상 |
| 연결성 | 무선(블루투스), 유선(USB 타입-C) |
| 호환성 | Nintendo Switch/Lite/OLED, Windows PC, iOS, Android |
보증 및 지원
For warranty information or technical support, please refer to the contact details provided with your purchase or visit the official Svetaecho web대지. 보증 청구를 위해 구매 영수증을 보관하십시오.


