1. 서론
The Makerfire Digital Thermostat Temperature Controller is a versatile plug-in device designed for precise temperature management. It features an external temperature sensor, supports both heating and cooling modes, and includes advanced functions such as a programmable timer, temperature alarms, and multiple operating modes. This device helps maintain optimal temperatures for various applications while promoting energy efficiency.
The controller operates on AC230V 50HZ and has a maximum output of 16A 3680W.

이미지 1.1: 앞면 view of the Makerfire Digital Thermostat Temperature Controller with its external temperature probe.
2. 제품 오버view
2.1 주요 특징
- 외부 온도 센서: Accurately detects and controls temperature.
- Heating and Cooling Control: Supports both heating and cooling equipment.
- 프로그래밍 가능한 타이머 기능: Divide the day into 3 time periods with distinct temperature settings.
- 알람 기능: High and low-temperature alarms with buzzer and backlight flashing alerts.
- 다양한 작동 모드: Includes TC Mode (temperature control), TC + Time Mode (timer and temperature control), Time Mode (timer only), and Alarm Mode.
- 온도 교정: Allows for precise adjustment of temperature readings.
- Celsius/Fahrenheit Switchable: 온도 단위를 쉽게 전환할 수 있습니다.
- 폭넓은 호환성: Suitable for greenhouses, reptile enclosures, incubators, aquariums, freezers, refrigerators, fermentation, and more.
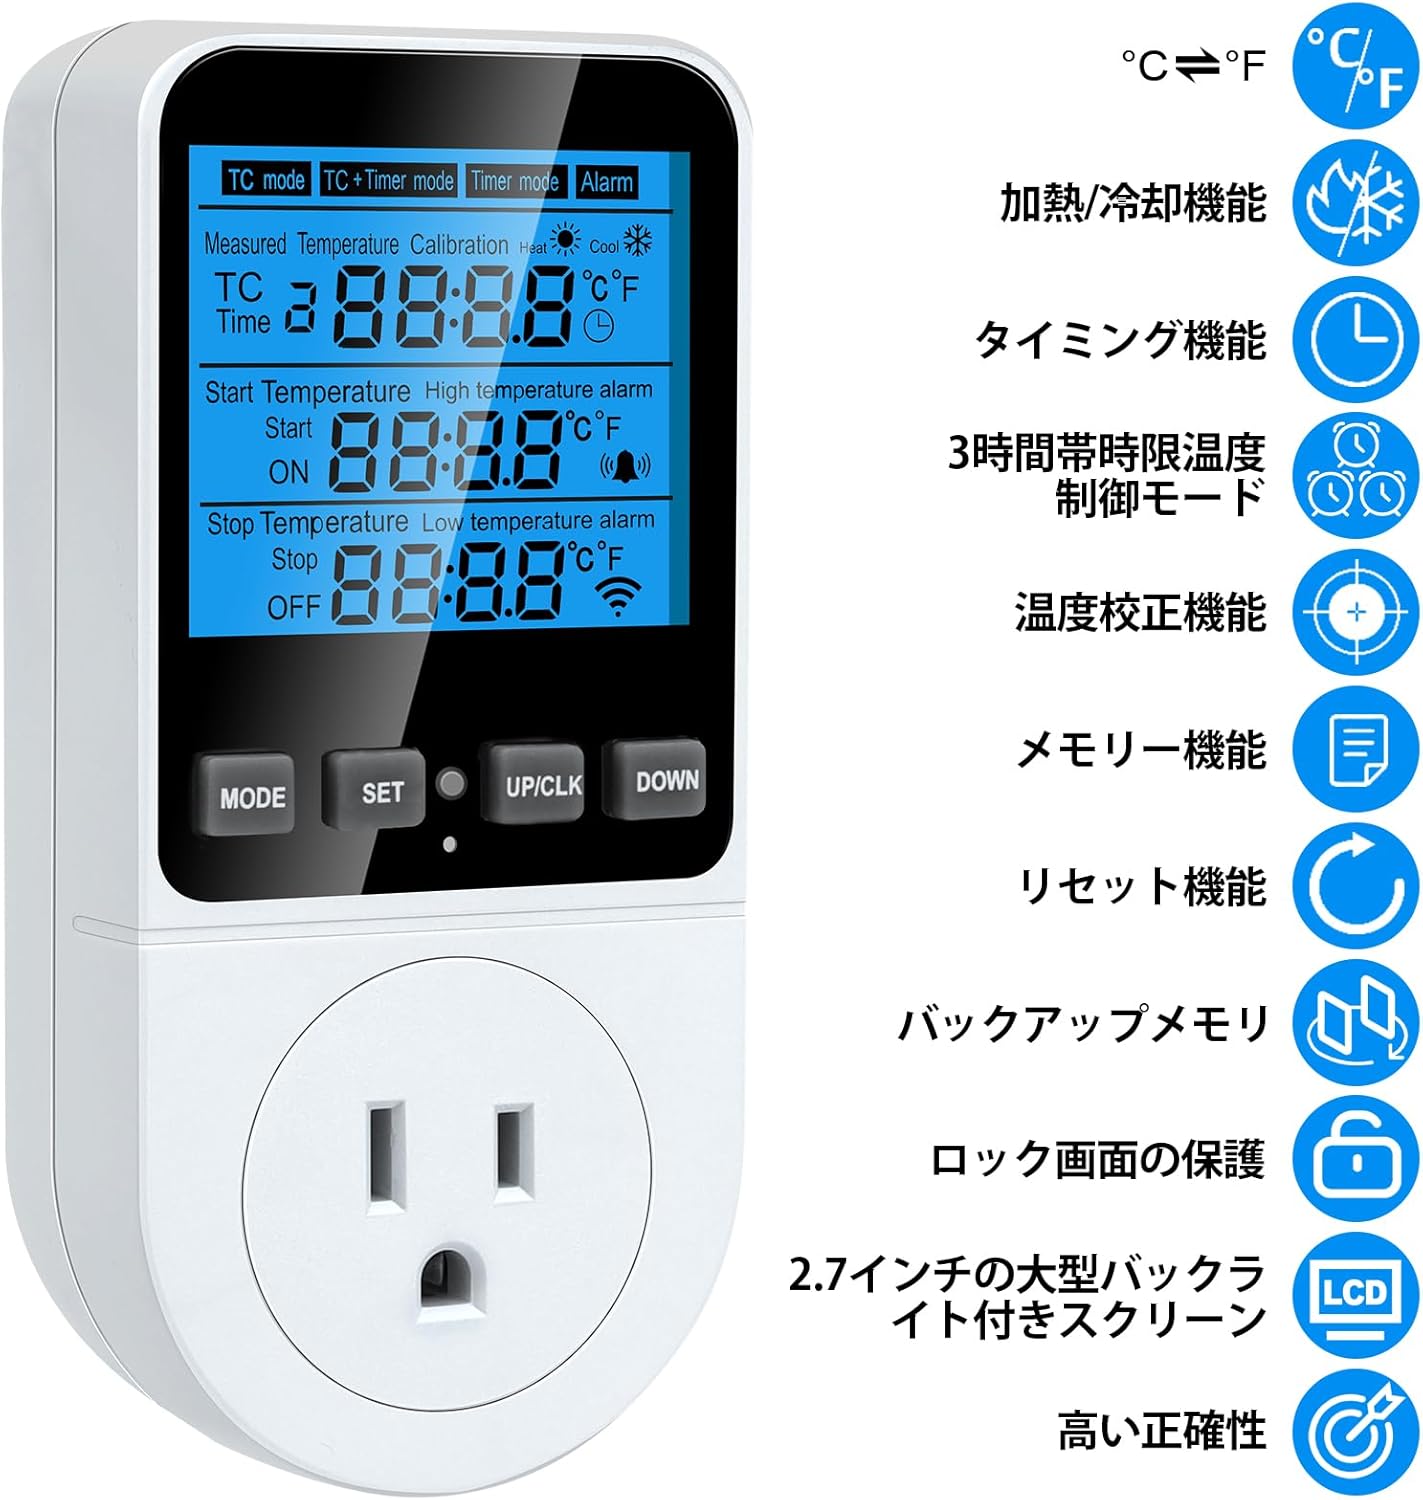
Image 2.1: Visual representation of the controller's key features, including heating/cooling, timing, alarm, and calibration.
2.2개의 구성요소

Image 2.2: Diagram illustrating the main components of the temperature controller, including the display, control buttons (MODE, SET, UP/CLK, DOWN), power outlet, and external sensor probe.
- 디스플레이 화면: Shows measured temperature, set temperatures, time, and mode indicators.
- MODE 버튼: Cycles through operating modes and confirms settings.
- 설정 버튼: Enters setting mode for parameters.
- UP/CLK Button: Increases values, adjusts clock, and mutes alarms.
- 다운 버튼: 값을 감소시킵니다.
- 전원 콘센트: Connects to heating or cooling devices. Features a safety protection door.
- 센서 프로브: External probe for accurate temperature measurement.
- 표시등: 작동 상태를 나타내기 위해 표시등이 켜집니다.
3. 설정
3.1 초기 연결
- Insert the external temperature sensor probe into the designated port on the side of the controller.
- Plug the temperature controller into a standard AC230V 50HZ power outlet.
- Connect your heating or cooling device (e.g., heater, fan) to the power outlet on the front of the controller.
Note: Some users have reported that the 3-pin plug may not fit all Japanese 2-pin outlets. An adapter may be required. The product is rated for 230V, but some reviews suggest it supports a wider range (100-250V). Please verify compatibility with your local power supply before use.
3.2 온도 단위 선택 (섭씨/화씨)
The device supports switching between Celsius (°C) and Fahrenheit (°F). Refer to the operating instructions for specific button combinations to change the unit.
3.3 온도 교정
To ensure accurate temperature readings, you can calibrate the sensor:
- 를 누르고 계세요 방법 보정 모드로 들어가려면 버튼을 4초 동안 누르세요.
- 사용하세요 UP/CLK 그리고 아래에 buttons to adjust the temperature value.
- 를 누르고 계세요 방법 button for 4 seconds again to exit calibration mode and save the setting.
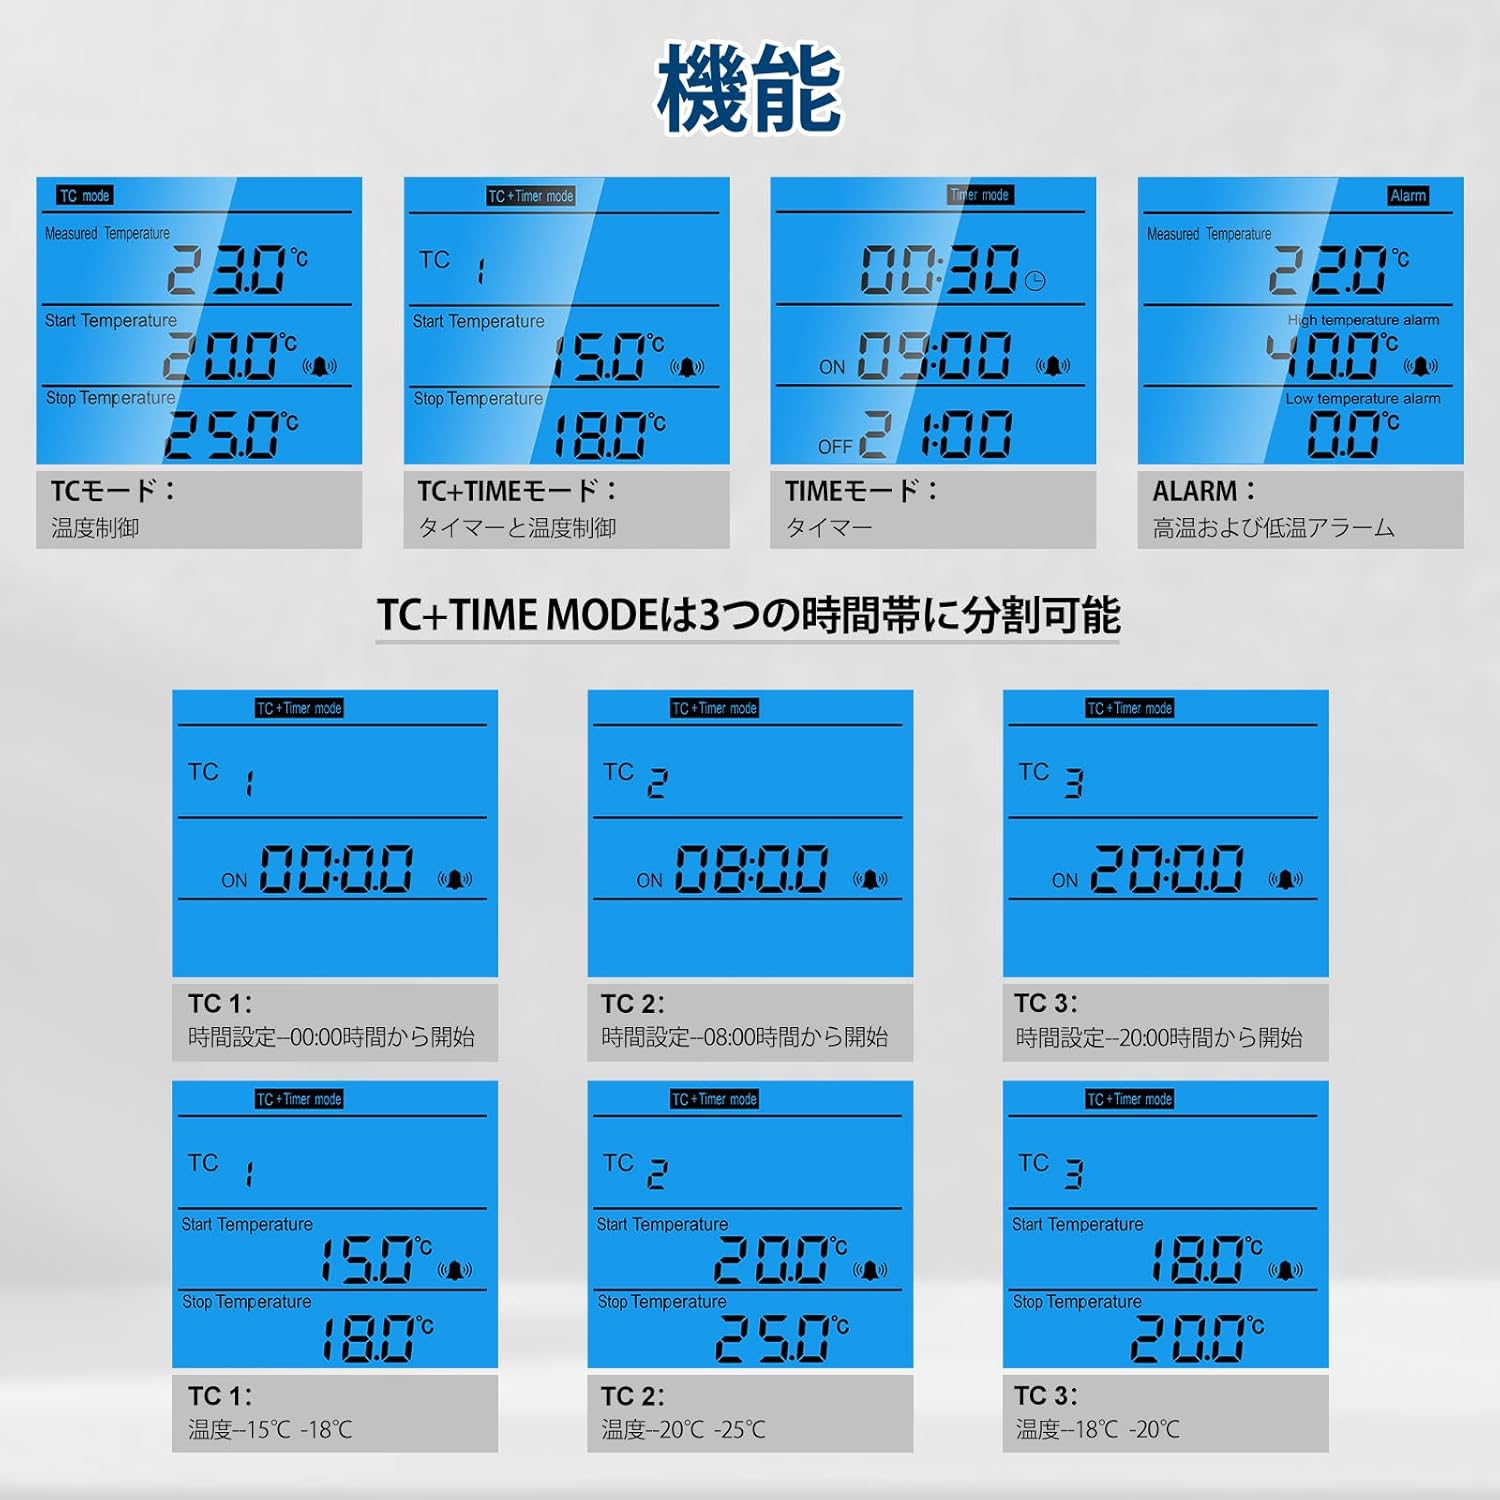
Image 3.1: Illustration of the temperature calibration process using the MODE, UP/CLK, and DOWN buttons.
4. 사용 설명서
The controller offers four distinct operating modes: TC Mode, TC+Timer Mode, Timer Mode, and Alarm Mode. Press the 방법 이러한 모드를 순환하려면 버튼을 클릭하세요.

이미지 4.1: 이상view of the four operating modes: TC Mode, TC+Timer Mode, Timer Mode, and Alarm Mode.
4.1 TC Mode (Temperature Control)
This mode controls the temperature based on a set start and stop temperature. It displays the current measured temperature, the temperature to start adjustment, and the temperature to stop adjustment.

Image 4.2: Display and setting method for TC Mode, showing current, start, and stop temperatures.
설정 방법 :
- 누르다 세트: The value to be adjusted will flash.
- 사용 UP/CLK 그리고 아래에: Increase or decrease the value.
- 누르다 방법: Setting complete.
4.2 TC + Timer Mode (Temperature Control with Timer)
This mode combines temperature control with a timer function, allowing for temperature adjustments across three distinct time periods within a day. The display shows current temperature/time in sequence, the temperature to start adjustment, and the temperature to stop adjustment.
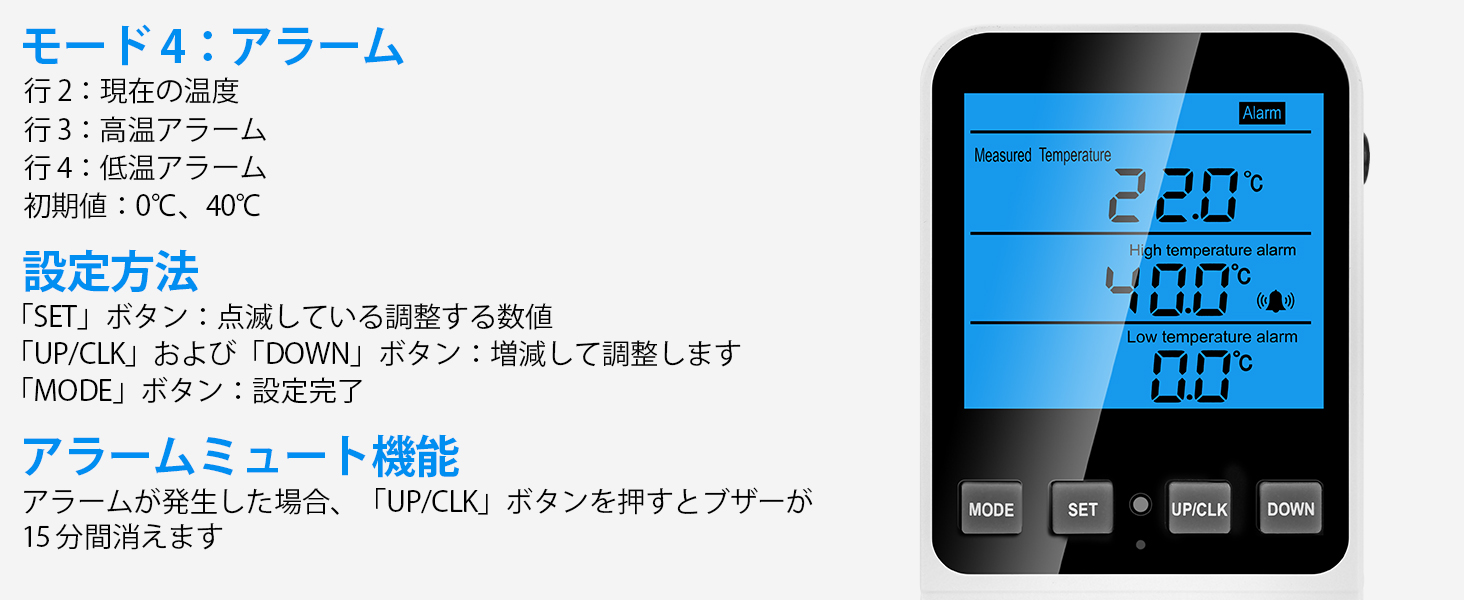
Image 4.3: Display and setting method for TC+Timer Mode, supporting three time-based temperature controls.
설정 방법 :
- 누르다 세트: Cycles through setting items (TC1 Time, TC1 Temperature; TC2 Time, TC2 Temperature; TC3 Time, TC3 Temperature).
- 사용 UP/CLK 그리고 아래에: Increase or decrease the values.
- 누르다 방법: Confirms the current setting and automatically moves to the next setting.
This mode divides the day into three periods. The start time of TC2 is the end time of TC1. The start time of TC3 is the end time of TC2. The start time of TC1 is the end time of TC3. (If no time is set for TC3, the start time of TC1 becomes the end time of TC2).
4.3 타이머 모드
This mode functions as a standalone timer, allowing you to set specific ON and OFF times for connected devices. It displays the current time, the start time for timing, and the stop time for timing.

Image 4.4: Display and setting method for Timer Mode, showing current time, ON time, and OFF time.
설정 방법 :
- 누르다 세트: The value to be adjusted will flash.
- 사용 UP/CLK 그리고 아래에: Increase or decrease the value.
- 누르다 방법: Setting complete.
Alarm Mute Function:
경보음이 울리면 버튼을 누르세요. UP/CLK button to silence the buzzer for 15 minutes.
Current Time Calibration:
를 누르고 계세요 UP/CLK button for 3 seconds to calibrate the current time.
4.4 알람 모드
This mode allows you to set high and low-temperature alarm thresholds. If the measured temperature exceeds these thresholds, an alarm will activate. The display shows the current temperature, the high-temperature alarm setting, and the low-temperature alarm setting. Initial values are 0°C and 40°C.

Image 4.5: Display and setting method for Alarm Mode, showing current temperature, high alarm, and low alarm settings.
설정 방법 :
- 누르다 세트: The value to be adjusted will flash.
- 사용 UP/CLK 그리고 아래에: Increase or decrease the value.
- 누르다 방법: Setting complete.
Alarm Mute Function:
경보음이 울리면 버튼을 누르세요. UP/CLK button to silence the buzzer for 15 minutes.
5. 유지관리
5.1 청소
To clean the device, wipe it with a soft, dry cloth. Do not use abrasive cleaners or immerse the device in water. Ensure the device is unplugged before cleaning.
5.2 리셋 기능
If the product's display or operation is abnormal, you can reset it to factory default settings:
- Locate the small reset button on the device.
- Use a matching reset tool (e.g., a thin pin) to press the 다시 놓기 단추.
- The system will reset all parameters to their initial default values.

Image 5.1: Illustration showing the location of the reset button and the use of a reset tool.
6. 문제 해결
- 장치가 켜지지 않음: Ensure the controller is securely plugged into a functional power outlet. Check the power source.
- 온도가 변하지 않음: Verify that the heating or cooling device is properly connected to the controller's outlet and is functioning correctly. Check the set temperatures and mode.
- 예상치 못하게 경보가 울립니다. Review the high and low-temperature alarm settings in Alarm Mode. Ensure they are appropriate for your application. Press the UP/CLK button to temporarily mute the alarm.
- 부정확한 온도 측정: 섹션 3.3에 설명된 대로 온도 교정을 수행하십시오. 센서 프로브가 올바르게 위치하고 손상되지 않았는지 확인하십시오.
- Plug compatibility issues: If the 3-pin plug does not fit your local outlet, a suitable adapter may be required.
- Display or function abnormalities: Use the reset function (Section 5.2) to restore default settings.
7. 사양
| 사양 | 값 |
|---|---|
| 상표 | 메이커파이어 |
| 모델 (ASIN) | B0CZHX6JFN |
| 권tage | 교류230V |
| 빈도 | 50Hz(XNUMXHz) |
| 최대 출력 | 16A 3680W |
| 온도 범위 | -40°C ~ 120°C |
| 온도 제어 유형 | 프로그래밍 가능 |
| 컨트롤러 유형 | 핸드 컨트롤 |
| 패키지 크기 | 14.6 x 8.5 x 7.2cm |
| 패키지 무게 | 0.21kg |
| 배터리 사용 | 아니요 |

Image 7.1: Detailed dimensions of the temperature controller and its sensor probe.
8. 보증 및 지원
Warranty information for this product is not provided in the available data. For details regarding warranty coverage, please refer to the product packaging or contact the manufacturer directly.
For technical support, troubleshooting assistance, or any inquiries about the product, please contact Makerfire customer service or the seller from whom you purchased the device.


