1. 서론
The SOAR 24V Ride On UTV for Kids is designed to provide a realistic and exciting driving experience for children. Featuring dual driving modes, robust power, and a multi-functional dashboard, this UTV ensures hours of fun while prioritizing safety. This manual provides essential information for assembly, operation, maintenance, and troubleshooting to ensure safe and optimal performance of your new ride-on toy.

주요 특징:
- 듀얼 드라이빙 모드: Manual operation for children and remote control for parental supervision.
- 2WD/4WD Switchable: Adaptable driving modes for various terrains.
- 강력한 모터: Equipped with four 200W motors for strong performance.
- 오래 지속되는 배터리: 24V7AH battery for extended playtime.
- 안전 기능: LED headlights, adjustable seatbelt, emergency brake, and slow start technology.
- Multi-Functional Dashboard: MP3 player, USB port, one-button start, headlight adjustment, music control, and horn.
2. 설치 및 조립
Follow these steps carefully to assemble your SOAR 24V Ride On UTV. It is recommended to watch the assembly video for visual guidance.
2.1. 언박싱 및 구성품 식별
This video provides a detailed guide on unboxing and assembling the UTV. It covers all major steps from unpacking to final checks.

Ensure all components are present and undamaged before beginning assembly. Refer to the parts list in your packaging.
2.2. 조립 단계
- Install Rear Suspension: Attach the yellow shock absorbers to the rear of the UTV chassis. Ensure they are securely fastened with the provided screws. (Refer to video: 0:28)
- Attach Rear Axle and Wheels: Slide the rear axle through the designated slots. Connect the motor wires if not pre-connected. Secure the rear wheels using the washers and nuts, then attach the hubcaps. (Refer to video: 0:58)
- Install Front Axle and Wheels: Insert the front axle. Secure the front wheels with washers and nuts, then attach the hubcaps. (Refer to video: 2:00)
- Attach Front Bumper: Secure the front bumper to the chassis using the provided screws. (Refer to video: 2:21)
- Install Rear Storage/Seat Support: Attach the rear storage compartment, which also serves as seat support, to the back of the UTV. Secure it with screws. (Refer to video: 2:40)
- 배터리 연결: Locate the battery compartment, usually under the seat. Connect the battery terminals (red to red, black to black). Ensure a secure connection. (Refer to video: 4:47)
- 좌석 설치: Place the seat onto the UTV and secure it with the appropriate screws. Ensure the seatbelt is accessible and functional. (Refer to video: 5:34)
- Install Dashboard Display: Carefully place the dashboard display unit into its slot and connect any necessary wiring. Secure it with screws. (Refer to video: 5:50)
- 스티어링 휠을 부착하세요: Connect the steering wheel's wiring to the UTV's main wiring harness. Slide the steering wheel onto the steering column and secure it with the provided screw and nut. (Refer to video: 6:08)
- Install Roll Bar: Attach the roll bar to the top of the UTV, ensuring it clicks into place or is secured with screws. (Refer to video: 6:42)
3. 사용 설명서
Familiarize yourself with the UTV's controls and features for a safe and enjoyable experience.
3.1. Starting the UTV
- 배터리가 완전히 충전되었고 올바르게 연결되어 있는지 확인하세요.
- 를 누르세요 원버튼 시작 on the dashboard to power on the UTV. You will hear an engine start-up sound.
3.2. 주행 모드

The UTV offers two primary driving modes:
- Manual Operate Mode: For older children, the UTV is controlled directly by the child using the foot pedal for acceleration and the steering wheel for direction.
- 자녀 보호 원격 제어 모드: For younger children or for parental supervision, the UTV can be fully controlled by an adult using the included remote control. This mode allows parents to steer, accelerate, brake, and switch between speeds.
This video demonstrates the UTV's driving capabilities and the transition between manual and remote control modes.
3.3. Multi-Functional Dashboard

The dashboard provides various controls for an immersive experience:
- MP3 Player & USB Port: 음악을 재생하려면 외부 기기를 연결하세요.
- 헤드라이트 조정: Control the LED headlights for visibility.
- Music Control & Horn: Play pre-loaded tunes or use the horn for added realism.
- 2WD/4WD Switch: Select between two-wheel drive and four-wheel drive for optimal performance on different surfaces.
This video showcases the UTV in various outdoor settings, highlighting its performance and features.
4. 유지관리
Proper maintenance ensures the longevity and safe operation of your UTV.
4.1. 배터리 충전
- Always use the original charging adapter provided.
- Charge the battery for 8-12 hours before first use, and for 8-12 hours after each use. Do not charge for more than 20 hours to prevent battery damage.
- Do not exhaust the battery completely. Recharge when power is low.
- The charging port is typically located near the battery compartment or on the dashboard.
4.2. 청소 및 보관
- Clean the UTV with a damp 옷감. 가혹한 화학 물질이나 연마성 세제를 사용하지 마십시오.
- Store the UTV in a dry, cool place away from direct sunlight and moisture.
- If storing for an extended period, disconnect the battery and charge it periodically (once a month) to maintain its health.
5. 문제 해결
다음은 몇 가지 일반적인 문제와 이에 대한 잠재적 해결책입니다.
| 문제 | 가능한 원인 | 해결책 |
|---|---|---|
| UTV does not start | Battery not connected or low charge; Power switch off; Loose wiring. | Check battery connection and charge; Ensure power switch is ON; Inspect all wiring connections. |
| 리모컨이 작동하지 않습니다 | 리모컨 배터리 방전; 리모컨 페어링 안 됨; 간섭 발생. | Replace remote batteries; Re-pair remote according to instructions; Move away from other electronic devices. |
| 전력 또는 속도 감소 | Low battery charge; Overload (exceeding weight limit); Driving on unsuitable terrain. | Recharge battery fully; Ensure child's weight is within limits; Drive on appropriate surfaces. |
| 특이한 소음 | Loose parts; Debris in wheels/motors. | Check for and tighten any loose screws; Remove any obstructions from wheels or motor areas. |
6. 사양
| 사양 | 세부 사항 |
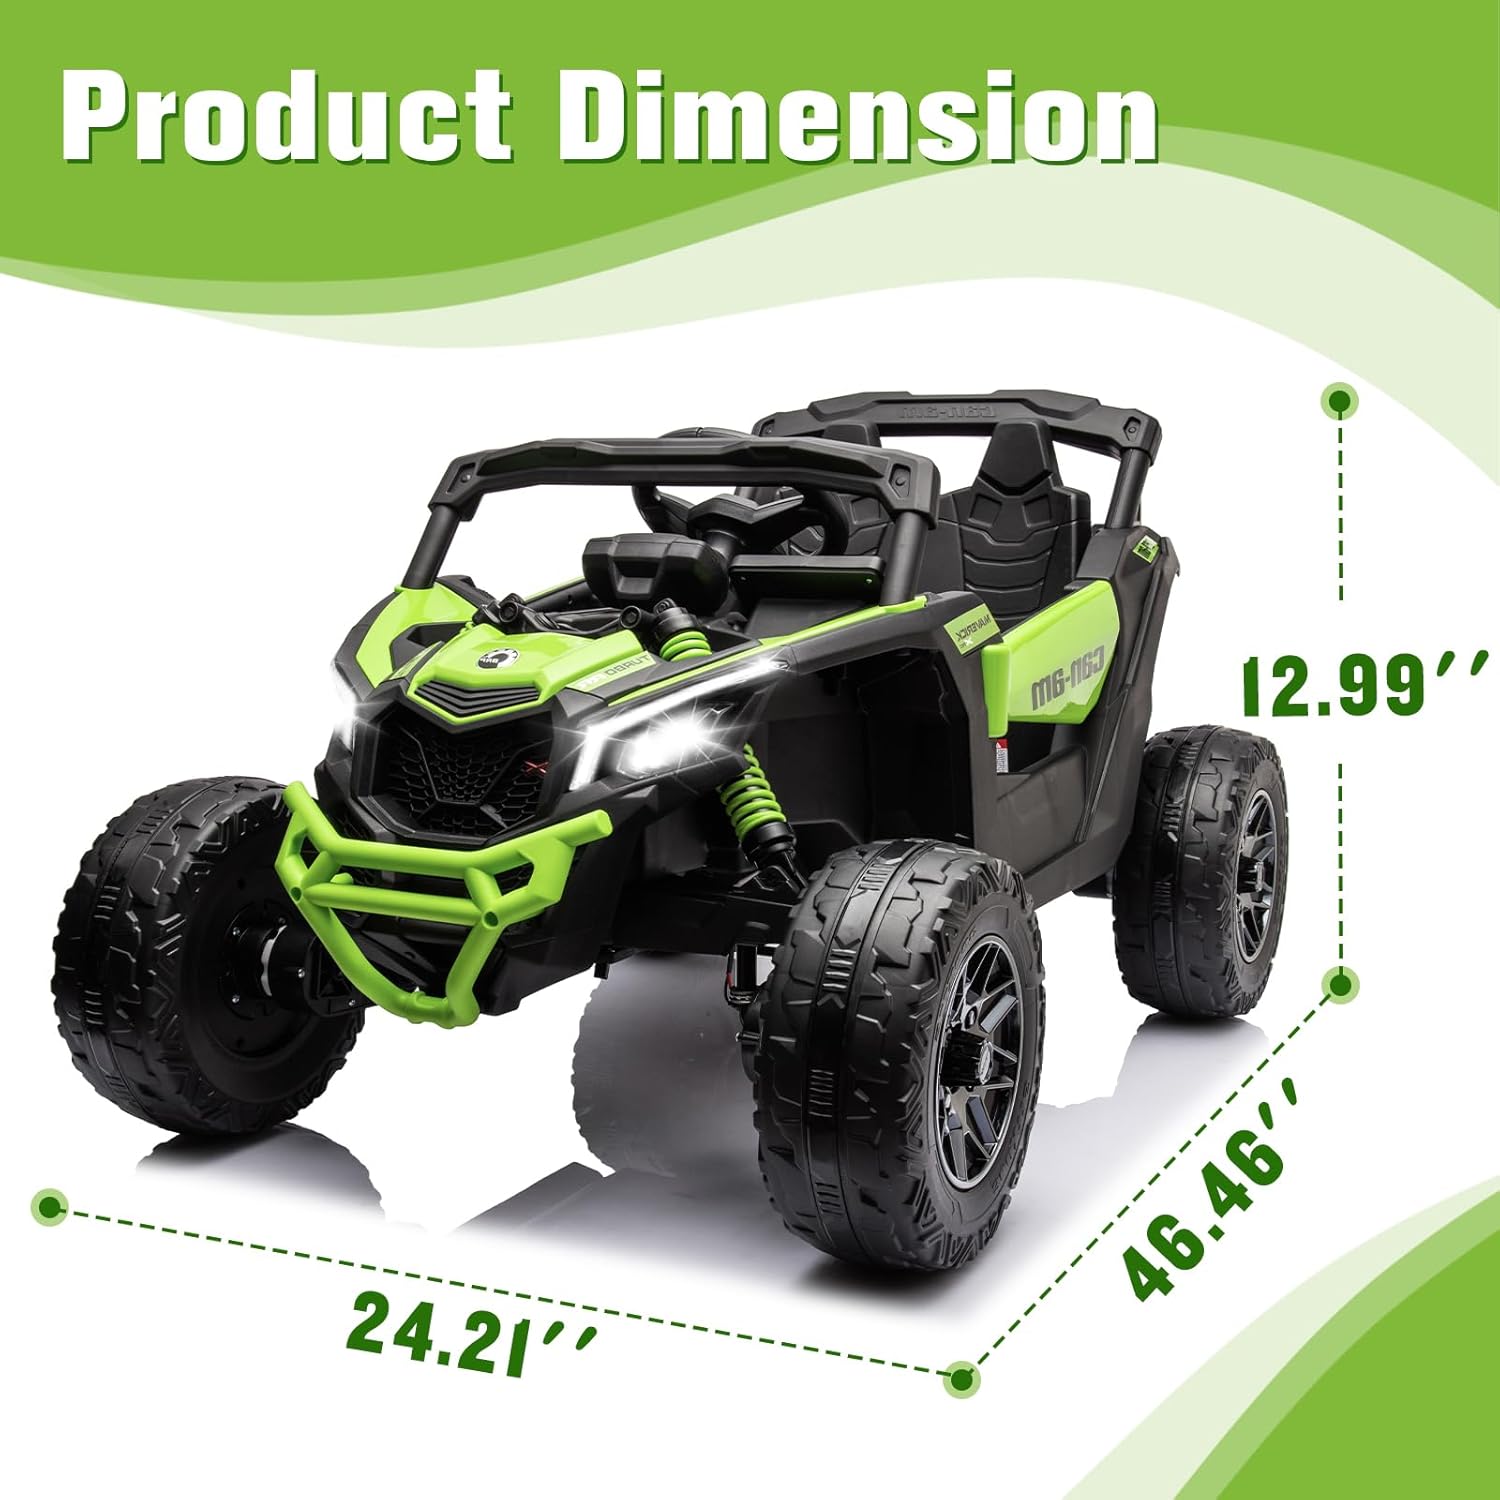
|---|---|
| 제품 치수 | 46.45 x 24 x 13 인치 |
| 품목 무게 | 53파운드 |
| 제조업체 권장 연령 | 3 years and up (36 to 84 months) |
| 최대 부하 | 66kg / 30 파운드 |
| 배터리 | 24V7AH |
| 모터 | 4 x 200W |
| 충전 시간 | 8-12시간 |
| 속도 | 2-5 miles/hour |
| ASIN | B0CXY9QP62 |
| 제조업체 | 날기 |
7. 보증 및 지원
SOAR is committed to providing high-quality products and excellent customer service. For any questions, concerns, or issues regarding your SOAR 24V Ride On UTV, please contact SOAR DIRECT customer support. Please retain your proof of purchase for warranty claims.
추가 지원이 필요하면 다음을 방문하세요. SOAR Store on Amazon 또는 제품 포장에 제공된 연락처 정보를 참조하세요.


