소개
This manual provides detailed instructions for the setup, operation, and maintenance of your ARRIS Jumper T20S V2 Radio Controller. Please read this manual thoroughly before using the device to ensure proper function and safety.
주요 특징
- RDC90 Sensor Gimbals: Experience precise and sensitive control for your RC devices.
- Vivid OLED Screen Display: Stay informed with crucial flight data, telemetry, and settings on a high-resolution screen.
- ELRS and EdgeTX Compatibility: Benefit from reliable, extended-range communication and advanced firmware capabilities.
- 다중 프로토콜 지원: Connect effortlessly to a wide array of RC models and brands.
- Customization for Personalized Flying: Tailor your control setup with configurable switches, buttons, and functions via EdgeTX.
제품 끝view
Familiarize yourself with the components and design of your Jumper T20S V2 Radio Controller.

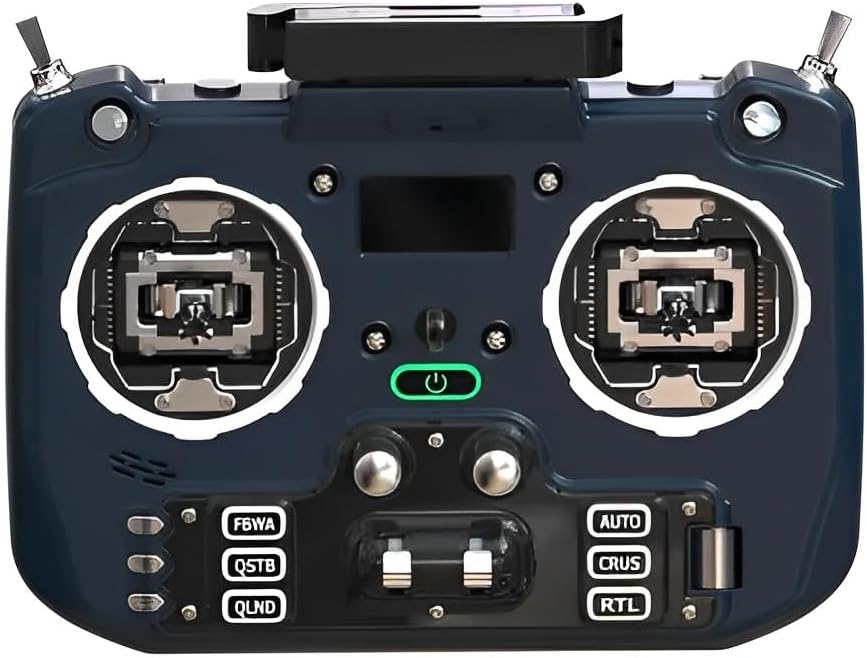
이미지: 앞면 view of the Jumper T20S V2 Radio Controller, showing the gimbals, OLED screen, power button, and various control switches and buttons.
이미지: 각진 앞면 view of the Jumper T20S V2 Radio Controller, highlighting the gimbals and control layout.

이미지: 측면 view of the Jumper T20S V2 Radio Controller, showing the foldable antenna in an extended position.

이미지: 후면 view of the Jumper T20S V2 Radio Controller, displaying the external cooling fan and battery compartment area.

Image: Diagram illustrating the airflow and cooling fan system integrated into the Jumper T20S V2 for high-power ELRS operation.

이미지: 클로즈업 view of the omnidirectional foldable antenna, designed to provide stable signal support in all directions.
설정
1. 배터리 설치
- Open the battery compartment cover located on the rear of the controller.
- Insert two 21700 batteries, ensuring correct polarity.
- 배터리 덮개를 단단히 닫으세요.
2. 초기 전원 켜기
- Press and hold the power button (located centrally on the front panel) until the OLED screen illuminates.
- The controller will boot into the EdgeTX operating system.
3. Gimbal Calibration (Recommended)
For optimal performance, it is recommended to calibrate the gimbals after initial setup or if you experience inconsistent control. Refer to the EdgeTX documentation for detailed calibration procedures.
작동 지침
1. 내비게이션 및 메뉴 시스템
The Jumper T20S V2 utilizes the EdgeTX firmware. Navigation is primarily done using the scroll wheel and menu buttons. The OLED screen displays all relevant information.
- 스크롤 휠: 메뉴를 탐색하고 값을 조정하는 데 사용됩니다.
- 메뉴 버튼: 다양한 설정 및 기능에 접근할 수 있습니다.
- 시스템 메뉴: Configure global settings, model setup, and radio calibration.
2. Model Setup and Binding
To control an RC model, you must first create a model profile and bind the controller to the receiver.
- Navigate to the Model Select screen in EdgeTX.
- Create a new model or select an existing one.
- Configure the internal or external RF module settings (e.g., ELRS, Multi-Protocol) to match your receiver.
- Initiate the binding process on both the controller and the receiver according to their respective manuals.
- Verify successful binding by checking receiver telemetry or control response.
3. 컨트롤 사용자 지정
The Jumper T20S V2 offers extensive customization. You can assign functions to switches, buttons, and sliders through the EdgeTX firmware.
- Access the Mixer and Special Functions menus within EdgeTX to configure control assignments.
- Adjust gimbal tension and stick settings by disassembling the radio, if desired (refer to advanced user guides for detailed instructions).
유지
- 청소: 컨트롤러 외부를 닦을 때는 부드럽고 마른 천을 사용하십시오. 연마성 세척제나 용제는 사용하지 마십시오.
- 저장: Store the controller in a cool, dry place, away from direct sunlight and extreme temperatures. Remove batteries if storing for extended periods.
- 펌웨어 업데이트: Regularly check for and install the latest EdgeTX firmware updates to ensure optimal performance and access new features. Refer to the official EdgeTX web지침 사이트.
- 짐벌 관리: Keep gimbals free from dust and debris. Avoid applying excessive force.
문제 해결
- 컨트롤러 전원이 켜지지 않습니다.
- Ensure batteries are correctly installed and fully charged. Check battery polarity.
- No response from RC model:
- Verify that the controller is properly bound to the receiver. Check model settings in EdgeTX for correct RF protocol and channel assignments. Ensure the RC model's battery is charged and connected.
- OLED screen is blank or flickering:
- Restart the controller. If the issue persists, ensure firmware is up to date. Contact support if the problem continues.
- Gimbal movement is erratic:
- Perform a gimbal calibration through the EdgeTX system menu. Check for any physical obstructions or damage to the gimbals.
명세서
| 특징 | 세부 사항 |
|---|---|
| MCU | STM32F407ZGT6 |
| 외부 모듈 인터페이스 | Reserved (1.25mm-5P) |
| 화면 | 1.3" OLED (128*64) |
| External Module Power Supply | XT30 (2S2A output) |
| SD 카드 | Chip-based internal (officially recommended by EdgeTX) |
| 짐벌 타입 | Standard full size gimbal |
| 권tage | 6-8.4V |
| Gimbal Sensors | RDC90 / Hall optional |
| 배터리 | 2pcs 21700 (not included) |
| 전력 출력 | 최대 1W |
| 무게 | 449g (배터리는 포함되지 않음) |
| 품목 모델 번호 | LA0316 |
| 패키지 크기 | 8.7 x 7.91 x 3.78 인치 |
| Item Weight (with batteries) | 약 10.6온스(300g) |
보증 및 지원
보증 정보 및 기술 지원에 대해서는 구매 시 제공된 설명서를 참조하거나 ARRIS 공식 웹사이트를 방문하십시오. web사이트. 보증 청구를 위해 구매 증빙 자료를 보관하세요.
For further assistance with EdgeTX firmware, visit the official EdgeTX project website and community forums for comprehensive resources and community support.


