1. 서론
구매해주셔서 감사합니다asing the KIMO Cordless Electric Tacker, Model QIMO-9419. This manual provides essential information for the safe operation, maintenance, and troubleshooting of your tool. Please read this manual thoroughly before use and keep it for future reference.

이미지 설명: The KIMO QIMO-9419 Cordless Electric Tacker in green and black, shown with two batteries, a charger, a carrying bag, and various sizes of nails/staples. This image provides an overview 제품 및 제품에 포함된 액세서리에 대한 설명입니다.
2. 안전 지침
To prevent accidental firing and ensure safe operation, the KIMO QIMO-9419 Cordless Electric Tacker incorporates a three-step safety mechanism. Always follow these steps:
- Step 1: Engage Safety Lock. Before operating, ensure the safety lock is pushed upwards to the "locked" position.
- Step 2: Unlock and Prepare. Once the safety lock is disengaged (moved to the "unlocked" position), the trigger button can be pulled.
- Step 3: Activate Safety Pin. The tool will only fire a fastener when the safety pin at the nose of the tool is pressed completely against the workpiece.
Adhering to these three steps is crucial to avoid potential safety hazards from unintended operation.

이미지 설명: A diagram showing the KIMO tacker and its three safety features: the trigger button, the safety lock, and the safety pin. Insets demonstrate the locked and unlocked states of the safety lock and the firing mechanism when the safety pin is depressed.
3. 제품 오버view
The KIMO QIMO-9419 is a cordless electric tacker designed for various fastening tasks. Key components include:
- 배터리 칸: Houses the 12V Lithium-ion battery.
- 트리거 버튼: 발사 메커니즘을 활성화합니다.
- 안전 잠금 장치: Prevents accidental firing.
- 안전핀: Must be depressed against the workpiece for firing.
- 잡지: Holds fasteners (nails/staples).
- 깊이 조절 손잡이: Allows modification of fastener driving depth.
- LED 작업등: 작업 영역을 밝게 합니다.
- 벨트 후크: 휴대가 간편하고 임시 보관이 가능합니다.

이미지 설명: A user on a ladder with the KIMO tacker attached to their belt via a hook. An inset shows a close-up of the metal belt hook attachment. This highlights the portability and convenience of the tool.
4. 설정
4.1 배터리 설치 및 충전
The tacker operates on 12V 2000mAh Lithium-ion batteries. Ensure batteries are fully charged before use.
- To install: Align the battery with the battery compartment and slide it in until it clicks into place.
- To remove: Press the battery release button and slide the battery out.
- To charge: Connect the battery to the provided charger and plug the charger into a power outlet. Refer to the charger's instructions for charging indicators.

이미지 설명: Two KIMO 12V MAX Lithium-ion batteries, each with a capacity of 2000mAh, indicating the power source for the tacker.
4.2 체결 부품 장착
This tacker uses F10-30 type fasteners, with dimensions of 1.26mm length and 1.05mm width. The magazine capacity is 100 fasteners.
- Ensure the tool is disconnected from the battery before loading.
- Open the magazine latch and pull out the pusher.
- Insert a strip of fasteners into the magazine with the points facing down.
- Push the pusher back until it locks into place.

이미지 설명: A diagram illustrating the magazine capacity of 100 fasteners and a firing speed of 80 shots per minute. It also details the compatible fastener types (F10-30) and their dimensions (1.26mm length, 1.05mm width).
5. 사용 설명서
5.1 Single Shot / Continuous Firing Mode
The tacker offers both single shot and continuous firing modes, selectable via a button on the tool. Choose the appropriate mode for your task to enhance efficiency.
- 싱글 샷 모드: For precise fastener placement. Each pull of the trigger fires one fastener.
- Continuous Firing Mode: For rapid fastening. Hold the trigger down, and the tool will fire fasteners as the safety pin is repeatedly depressed against the workpiece.

이미지 설명: A diagram illustrating the difference between single shot mode (for precise placement) and continuous firing mode (for increased speed, approximately 30% faster). The images show the tacker firing fasteners onto a wooden surface in both modes.
5.2 Driving Depth Adjustment
The driving depth of the fasteners can be adjusted to suit different material thicknesses and desired finishes. This is achieved by adjusting the length of the safety pin.
- To increase driving depth: Adjust the safety pin to a shorter length.
- To decrease driving depth: Adjust the safety pin to a longer length.
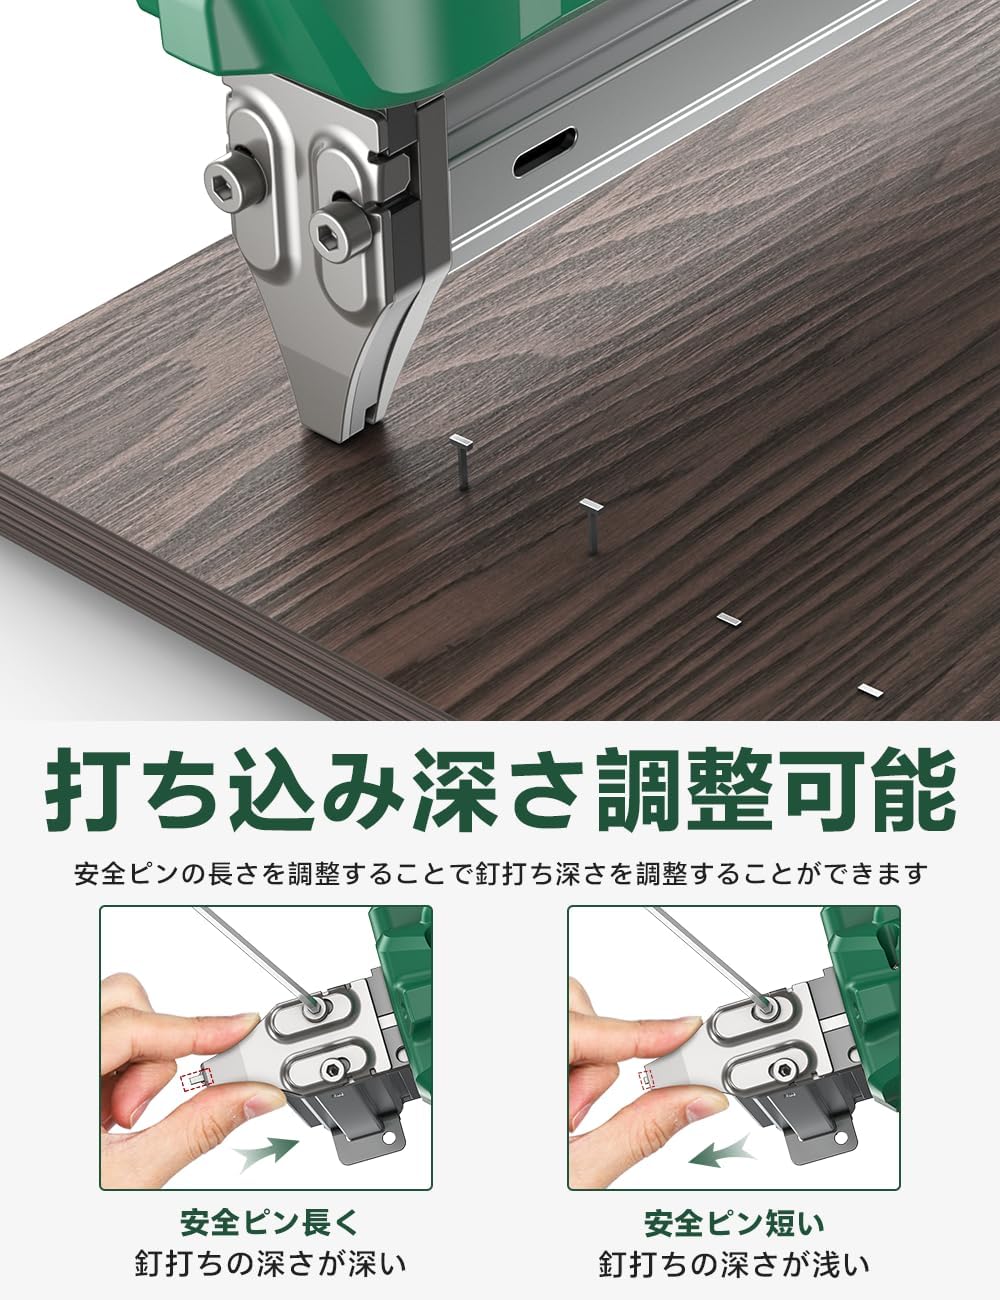
이미지 설명: A diagram demonstrating how to adjust the fastener driving depth. It shows two settings: one where the safety pin is shorter, resulting in deeper fastener penetration, and another where the safety pin is longer, resulting in shallower penetration.
5.3 LED 작업등
The tacker is equipped with an integrated LED light. When the power is on, the LED light at the front of the tool illuminates the work area, allowing for operation in low-light conditions.

이미지 설명: A close-up image of the KIMO tacker's front, showing the LED light activated and illuminating a dark work surface, indicating its utility in low-light environments.
6. 유지관리
Regular maintenance ensures the longevity and optimal performance of your KIMO Cordless Electric Tacker.
- 청소: Keep the tool clean and free of dust and debris. Use a dry cloth to wipe down the exterior. Do not use solvents or harsh chemicals.
- 패스너 매거진: 체결 부품 매거진에 걸림이나 휘어진 체결 부품이 있는지 주기적으로 점검하여 걸림 현상을 방지하십시오.
- 배터리 관리 : Store batteries in a cool, dry place. Do not expose them to extreme temperatures. Charge batteries fully before long-term storage.
- 점검: 공구에 손상, 헐거워진 나사 또는 마모된 부품이 있는지 정기적으로 점검하십시오. 손상된 공구는 작동하지 마십시오.
7. 문제 해결
This section addresses common issues you might encounter with your tacker.
| 문제 | 가능한 원인 | 해결책 |
|---|---|---|
| 도구가 발사되지 않습니다 |
|
|
| 패스너가 완전히 구동되지 않음 |
|
|
| 도구가 자주 걸림 |
|
|
8. 사양
| 특징 | 세부 사항 |
|---|---|
| 상표 | 키모 |
| 모델 | QIMO-9419 |
| 전원 | 무선 전기 |
| 배터리 유형 | 12V 2000mAh Lithium-ion (x2 included) |
| 패스너 유형 | F10-30 (1.26mm length, 1.05mm width) |
| 잡지 용량 | 패스너 100 개 |
| 발사 속도 | Up to 80 shots/min |
| 공구 본체 무게 | 약 1.8kg |
| 패키지 크기 | 38 x 28 x 9.5cm |
| 패키지 무게 | 4.2kg |
9. 보증 및 지원
Specific warranty information is not provided in the product details. For warranty claims, technical support, or service inquiries, please contact KIMO customer service directly or refer to the official KIMO web자세한 내용은 사이트를 참조하세요.
You can visit the KIMO store on Amazon for more products and support information: KIMO Store


