1. 서론
The Artillery Sidewinder X4 Plus is a high-speed 3D printer designed for efficient and precise additive manufacturing. Equipped with Klipper firmware and a powerful 64-bit high-frequency processor, it achieves impressive print speeds and acceleration. Its robust structure, large build volume, and advanced features make it suitable for a wide range of printing applications.
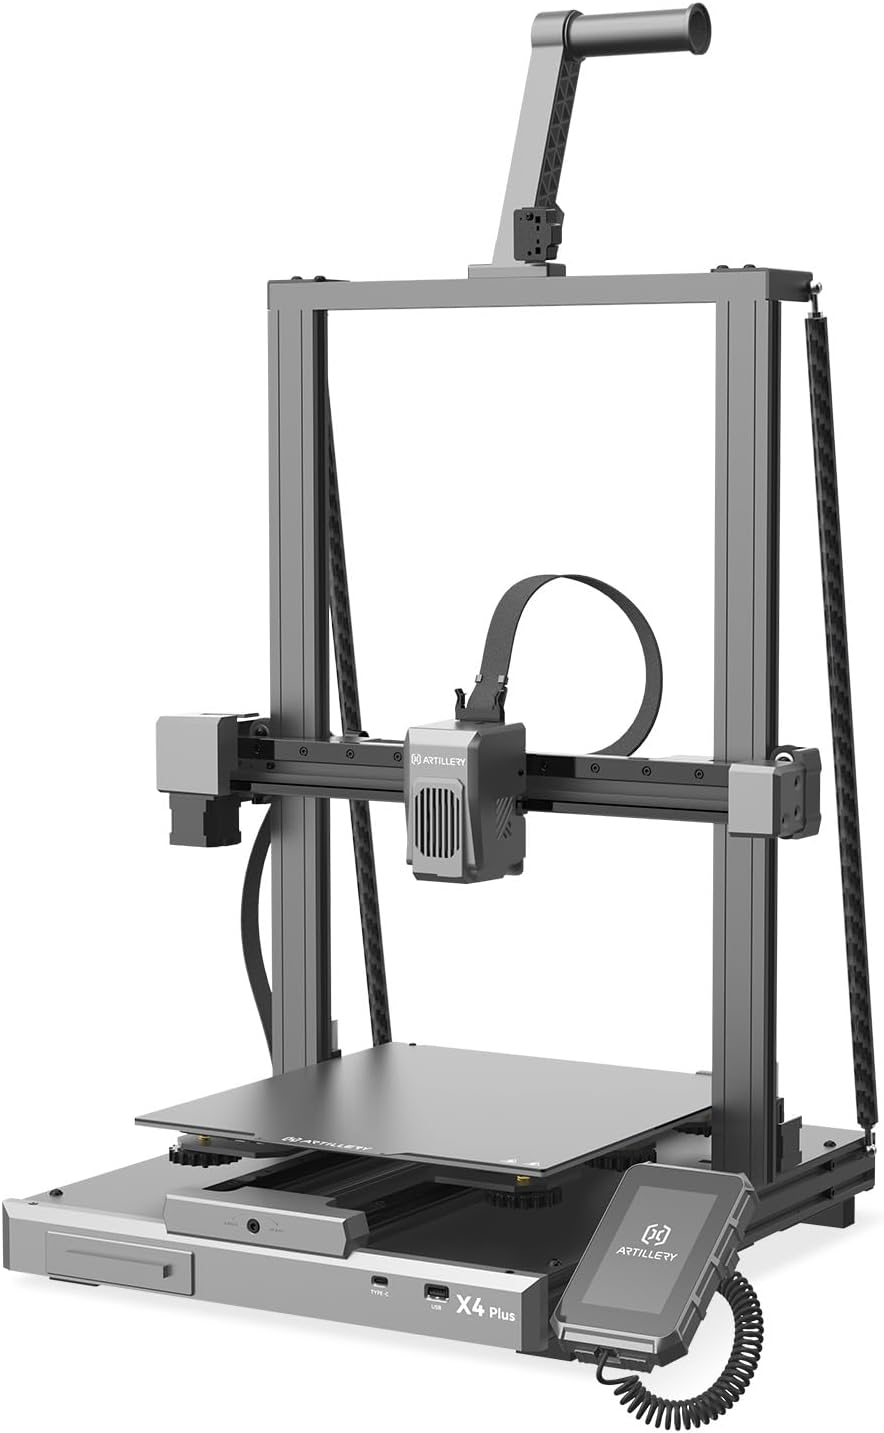
Figure 1: Artillery Sidewinder X4 Plus 3D Printer overview.
2. 설치 및 조립
The Sidewinder X4 Plus comes 95% pre-assembled, simplifying the initial setup process. Follow these steps to complete the assembly and prepare your printer for its first use.
- 포장에서 모든 구성 요소의 포장을 풉니다.
- Carefully place the main base unit on a stable surface.
- Attach the gantry frame to the base unit, ensuring all connections are secure.
- Install the filament holder and any other accessories as per the included quick start guide.
- 전원 케이블을 연결하고 프린터를 켭니다.
- Perform the initial bed leveling procedure as prompted by the printer's interface.

Figure 2: Visual guide for the printer assembly process.
3. 사용 설명서
3.1 고속 인쇄
The Sidewinder X4 Plus boasts a maximum print speed of 500 mm/s and an acceleration of 12,000 mm/s². For optimal results at high speeds, it is recommended to use fast filament types.

Figure 3: Illustration of the printer's high-speed capabilities.

Figure 4: Demonstrates 10X faster printing with no loss in quality, and the effect of Pressure Advance & Input Shaping.
3.2 대용량 빌드 볼륨
With a maximum build size of 11.8 x 11.8 x 15.7 inches (300x300x400mm), the Sidewinder X4 Plus is ideal for printing larger models. The stable triangular structure, reinforced by a rear side tie bar, effectively reduces vibration during printing, ensuring stability for large prints.

Figure 5: Depiction of the extra-large build platform and its dimensions.

Figure 6: Illustrates the larger print volume capability, suitable for more model printing.
3.3 XY-Axis Linear Guides
The printer incorporates metal linear rails on the X and Y axes, providing highly accurate and smooth linear motion. This design ensures precise positioning and stability of the print head, leading to more accurate print results and improved wear resistance compared to traditional rubber rollers.

Figure 7: Close-up of the XY-Metal Linear Guide Rail system.

그림 8: 상세 view and explanation of the linear rail system on X and Y axes.
3.4 Extruder and Cooling System
The printer features an optimized dual-motor, dual-Z-axis motion structure with a direct extruder. An 8,000 rpm cooling system ensures efficient melting and rapid cooling of filament. The all-metal hotend supports printing temperatures up to 300°C, allowing compatibility with various filaments like PLA, TPU, PETG, ABS, and Nylon.

Figure 9: Illustration of the 8000 rpm efficient cooling fans.

Figure 10: Depiction of the all-metal automatic cleaning hotend, supporting 300°C printing.

Figure 11: Explanation of the new integrated extruder with high temperature metal nozzles and powerful heat dissipation.
3.5 자동 베드 레벨링
The 121-point auto-leveling system uses a high-precision sensor to collect deviation data across the print bed, automatically compensating for any unevenness of the hotbed. This ensures a perfect first layer and consistent print quality.

Figure 12: Visual representation of the 121-point auto bed leveling process.
3.6 Connectivity and Control
The Sidewinder X4 Plus supports remote printing and slice preview, allowing for convenient operation from a computer or phone via WiFi link. The Klipper firmware's Resonance Compensation function intelligently adjusts motion control during X/Y-axis acceleration, reducing overflow and print resonance for smoother, clearer models.

Figure 13: Demonstrates remote printing and slice preview 능력.

Figure 14: Highlights the Klipper firmware features, including Resonance Compensation for improved print quality.

Figure 15: Shows additional features like flexible magnetic build plate and filament run-out detection.
4. 유지관리
Regular maintenance ensures the longevity and optimal performance of your 3D printer. Perform the following tasks periodically:
- 프린트 베드를 청소하세요: After each print, clean the print surface with isopropyl alcohol to remove any residue and ensure good adhesion for future prints.
- 노즐 검사: Periodically check the nozzle for clogs or wear. Replace if necessary.
- 움직이는 부품에 윤활유를 바르세요: Apply a small amount of lubricant to the linear rails and Z-axis lead screws every few months to ensure smooth movement.
- 팬 청소: Use compressed air to clean dust from the cooling fans to maintain efficient cooling.
- 펌웨어 업데이트: Check the official Artillery web프린터에 최신 기능과 버그 수정 사항이 적용되도록 펌웨어 업데이트가 있는지 해당 사이트를 확인하십시오.
5. 문제 해결
This section addresses common issues you might encounter with your Artillery Sidewinder X4 Plus. For more detailed troubleshooting, refer to the official Artillery support resources.
| 문제 | 가능한 원인 | 해결책 |
|---|---|---|
| Printer Halted / Error Messages | Firmware issue, loose connection, or component failure. | Restart the printer. Check all cable connections. If persistent, consult Artillery support for firmware reinstallation or component diagnosis. |
| 첫 번째 레이어 접착력 불량 | Unleveled bed, dirty print surface, incorrect nozzle Z-offset. | Perform auto bed leveling. Clean the print surface thoroughly. Adjust Z-offset during the first layer of a test print. |
| Extrusion Issues (Clogging, Under-extrusion) | Nozzle clog, incorrect temperature, filament tangle, worn extruder gear. | Perform a cold pull to clear the nozzle. Verify print temperature settings. Ensure filament spool unwinds freely. Inspect and clean extruder gears. |
| Warped Prints | Insufficient bed adhesion, drafts, incorrect bed temperature. | Ensure proper bed adhesion (e.g., glue stick, hairspray). Print in an enclosed environment or away from drafts. Adjust bed temperature according to filament type. |
6. 사양
Key technical specifications for the Artillery Sidewinder X4 Plus 3D Printer:
- 제품 크기: 19 x 20 x 25.6인치(48.26 x 50.8 x 65.02cm)
- 품목 무게: 30파운드(13.6kg)
- 볼륨을 빌드: 11.8 x 11.8 x 15.7인치(300 x 300 x 400mm)
- 인쇄 속도: Up to 500 mm/s (recommended with fast filament)
- 가속: 12,000mm/s²
- 펌웨어: 클리퍼
- 프로세서: 64-bit high-frequency processor
- 압출기 유형: 직접 구동 압출기
- Hotend Temperature: 최대 300°C
- 지원되는 필라멘트: PLA, TPU, PETG, ABS, Nylon
- 수준 측량: 121-point Automatic Bed Leveling
- 연결성: WiFi Link, USB
- 프레임 소재: 알류미늄
- 색상: 다크 그레이

그림 16: 차원view of the Artillery Sidewinder X4 Plus.
7. 보증 및 지원
For warranty information, technical support, and service inquiries, please contact Artillery customer service. You can often find detailed support resources, FAQs, and contact information on the official Artillery web웹사이트 또는 해당 브랜드 매장.
Visit the official Artillery Store for more information: Artillery Store on Amazon


