1. 소개 및 이상view
The Tilta Advanced Kit for BMCC 6K is designed to provide comprehensive protection and expandability for your Blackmagic Design Cinema Camera 6K. This kit enhances the camera's functionality by offering multiple mounting points for accessories, improved handling, and robust physical protection. It allows for various configurations, adapting to different shooting scenarios from handheld to tripod or stabilizer setups.

Image 1.1: The Tilta Advanced Kit for BMCC 6K, showcasing the full camera cage and various components.
2. 상자 안에 무엇이 들어있나요?
Please verify that all components listed below are included in your Tilta Advanced Kit:
- 1x Full Camera Cage for BMCC 6K – Black (TA-T64-FCC-B)
- 1x Tilta Xeno Top Handle (1/4″-20 with Locating Pins) – Black (TA-XTH1-B)
- 1x Tilta SSD Drive Holder for T5 – Black (TA-SSDH-T5-B)
- 1x 15mm Rod Holder for BMPCC 6K Pro – Black (TA-T11-RH-B)
- 1x HDMI 90-Degree Adapter for BMPCC 4K/6K (TA-T01-HDA-90)
- 1x Tiltaing 15mm LWS Baseplate Type VI – Black (TA-BSP6-15-B)
- 1x Advanced Side Handle Run/Stop Cable for USB-C Port (RS-TA3-USBC)
- 1x Tiltaing Left Side Advanced Power Handle with Run/Stop (F570 Battery) – Black (TA-LRH-57-B)
- 1x Tiltaing Advanced Left Side Handle Attachment Type VI – Black (TA-AHA6-L-B)
- 2x Aluminum Rod 15*200mm Black (R15-200-B)

이미지 2.1: 조립된 view of the Tilta Advanced Kit, illustrating the various components included.
3. 설정 및 설치
Follow these steps to properly assemble and install your Tilta Advanced Kit components onto your Blackmagic Design Cinema Camera 6K.
3.1. Full Camera Cage Installation
- Ensure your BMCC 6K camera is powered off and any attached accessories are removed.
- Align the camera with the base of the Full Camera Cage (TA-T64-FCC-B).
- Secure the camera to the cage using the primary mounting screw at the bottom.
- Utilize the three-point locking mechanism for a secure and stable installation, preventing camera rotation within the cage.

Image 3.1: Illustration of the three-point locking mechanism ensuring secure camera attachment.
3.2. 상단 손잡이 부착
- Attach the Tilta Xeno Top Handle (TA-XTH1-B) to the NATO rail located on the top of the Full Camera Cage.
- Tighten the locking screw to secure the handle firmly in place.

Image 3.2: The camera cage with the top handle attached, providing an additional grip point.
3.3. Advanced Side Handle Installation
- Mount the Tiltaing Advanced Left Side Handle Attachment Type VI (TA-AHA6-L-B) to the NATO rail on the left side of the camera cage.
- Attach the Tiltaing Left Side Advanced Power Handle (TA-LRH-57-B) to the attachment.
- Connect the Advanced Side Handle Run/Stop Cable (RS-TA3-USBC) from the handle to the USB-C port on your camera for remote run/stop functionality.
3.4. Baseplate and Rods Setup
- Attach the Tiltaing 15mm LWS Baseplate Type VI (TA-BSP6-15-B) to the bottom of the camera cage. This baseplate is ARCA compatible for quick mounting.
- Insert the two Aluminum Rods 15*200mm (R15-200-B) into the rod clamps on the baseplate.
- If needed, attach the 15mm Rod Holder (TA-T11-RH-B) to the rods for additional accessory mounting.
3.5. SSD Drive Holder and HDMI Adapter
- Mount the Tilta SSD Drive Holder for T5 (TA-SSDH-T5-B) to a suitable 1/4"-20 thread on the cage.
- Attach the HDMI 90-Degree Adapter (TA-T01-HDA-90) to the camera's HDMI port to protect the port and provide a more convenient cable routing.

Image 3.3: The camera cage with an SSD holder attached, demonstrating accessory integration.
4. Operating and Configurations
The Tilta Advanced Kit offers versatile configurations to suit various shooting requirements.
4.1. Detachable Design and Modes
The cage features a detachable design, allowing you to configure it as a full cage, half cage, or L-bracket setup. This flexibility is crucial for adapting to different camera setups and accessory needs.
- Full Cage: Provides maximum protection and numerous mounting points.
- Half Cage: Reduces weight and size while still offering essential protection and mounting.
- L-Bracket: Ideal for vertical shooting or specific mounting requirements.

Image 4.1: The detachable design of the cage allows for full cage, half cage, and L-bracket configurations.
4.2. Handheld, Tripod, and Stabilizer Use
- 핸드헬드: The top handle and advanced side handle provide comfortable and secure grip for handheld shooting, facilitating low-angle shots and dynamic movements.
- 삼각대: The ARCA-compatible baseplate allows for quick attachment and detachment from tripods, streamlining your workflow.
- 안정제 : The cage's design and mounting points are optimized for integration with popular stabilizers like the DJI RS 3/Pro, ensuring balanced and stable footage.
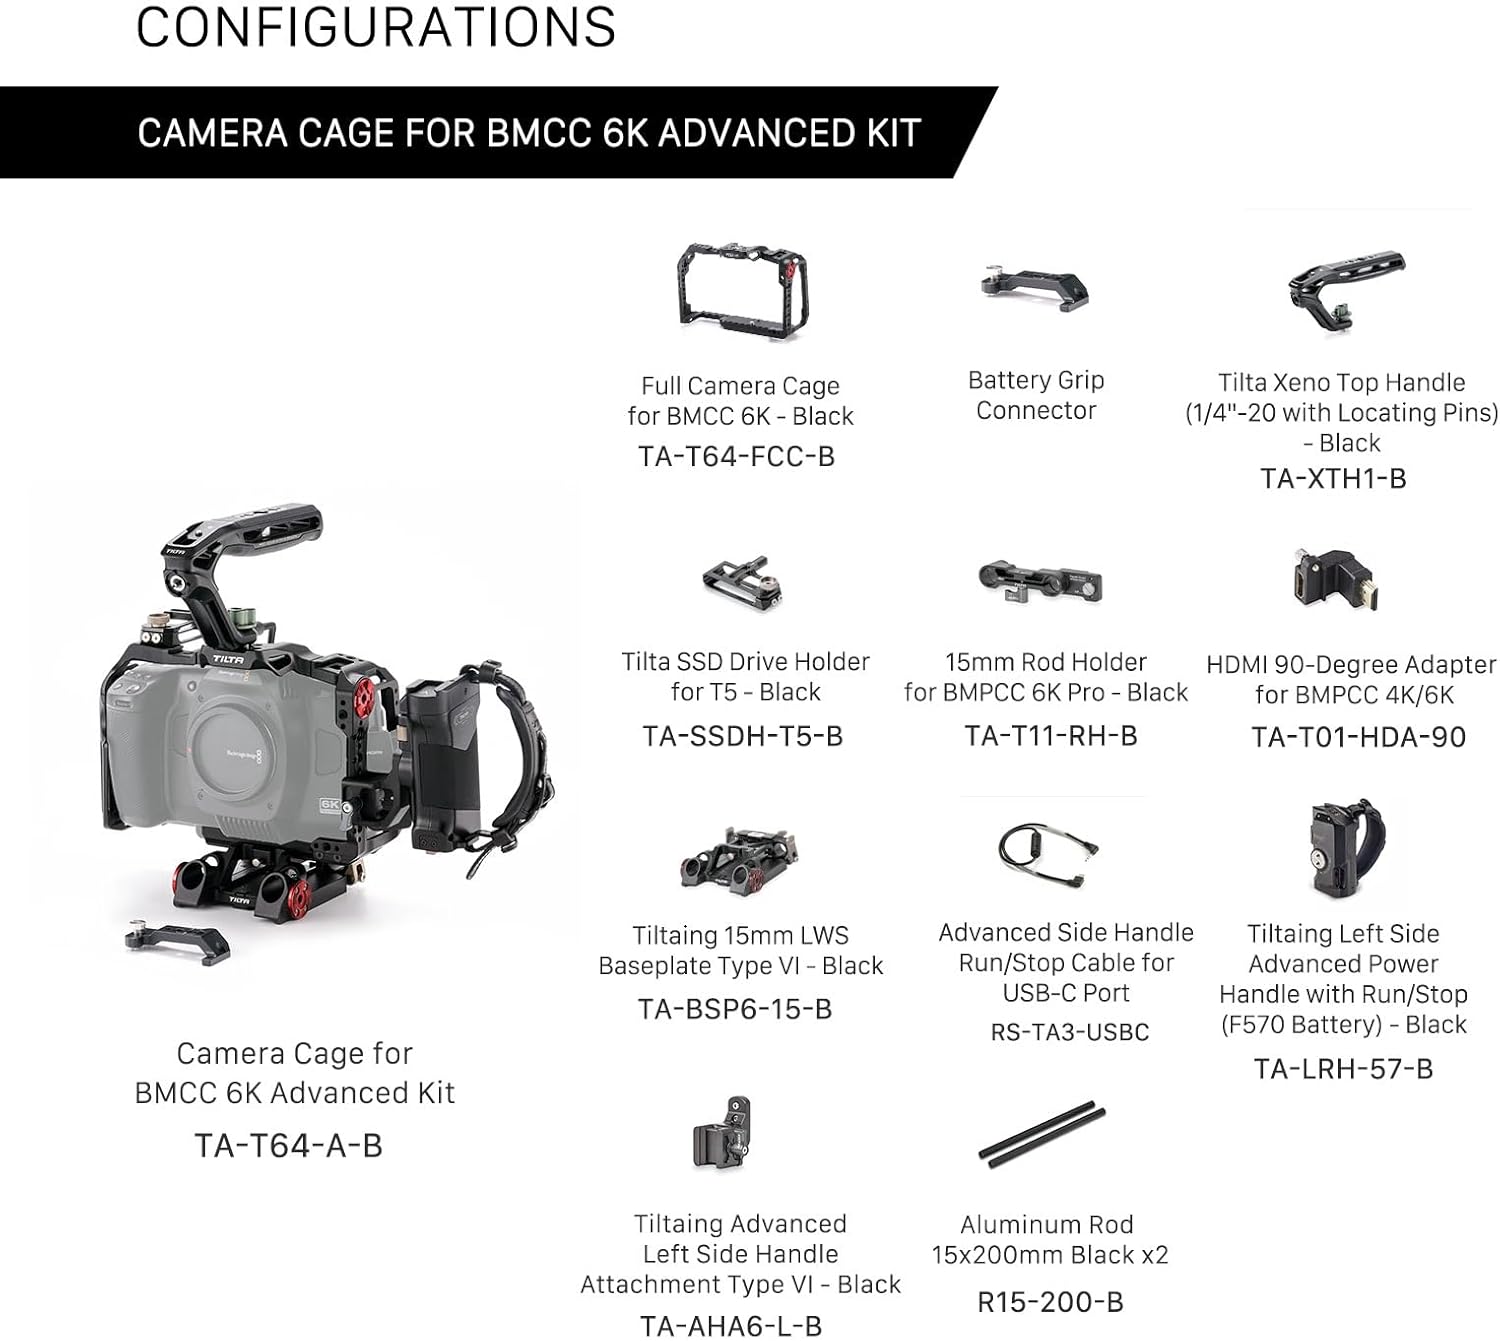
Image 4.2: The Tilta Advanced Kit mounted on a stabilizer, demonstrating its compatibility and stability for dynamic shots.
4.3. Battery Grip Compatibility
The cage is designed to be compatible with the original battery grip for the BMCC 6K. To use the battery grip, the baseplate of the cage must be removed. An adjustable bottom plate expansion bracket (optional, not included in this kit) can further enhance compatibility.

Image 4.3: The cage configured to accommodate the camera's battery grip, offering flexible power solutions.
5. 유지관리
To ensure the longevity and optimal performance of your Tilta Advanced Kit, follow these maintenance guidelines:
- 청소: Use a soft, dry cloth to wipe down the cage and accessories. For stubborn dirt, a slightly damp 천을 사용하여 즉시 건조할 수 있습니다. 강한 화학 물질이나 연마재는 사용하지 마십시오.
- 검사: Regularly check all screws and connections for tightness. Loose components can affect stability and potentially damage your camera.
- 저장: Store the kit in a clean, dry environment, away from extreme temperatures and humidity.
- 매끄럽게 하기: Moving parts, such as the top handle's pivot points, may benefit from a small amount of silicone-based lubricant if they become stiff over time.
6. 문제 해결
If you encounter any issues with your Tilta Advanced Kit, consider the following common solutions:
- 느슨한 연결: If any part of the rig feels wobbly, re-check all screws and locking mechanisms. Ensure they are tightened securely.
- 액세서리 장착 문제: Verify that accessories are compatible with the mounting points (e.g., 1/4"-20, 3/8"-16, NATO rail, Arri Rosette). Ensure correct orientation and proper tightening.
- Run/Stop Cable Not Working: Check that the USB-C cable is fully inserted into both the side handle and the camera. Ensure the camera's settings are configured to accept external run/stop commands.
- Camera Not Fitting: Confirm that you are using the Blackmagic Design Cinema Camera 6K (Full Frame). This cage is not compatible with BMPCC 4K, BMPCC 6K, or BMPCC 6K Pro models.
7. 사양
| 특징 | 세부 사항 |
|---|---|
| 모델 번호 | TA-T64-AB |
| 제품 치수 | 16.9 x 9.8 x 5.9 인치 |
| 품목 무게 | 4.6파운드 |
| 색상 | 검은색 |
| 재료 | Aluminum Alloy (typical for Tilta cages) |
| 호환 장치 | Blackmagic Design Cinema Camera 6K (Full Frame) |
| 장착점 | 1/4"-20 threads with locating pins, 3/8"-16 threads with locating pins, NATO rails, Cold Shoe receivers, Arri Rosette |
| Baseplate Compatibility | ARCA-Swiss compatible |
| Power Handle Battery | Requires 1 Nonstandard Battery (e.g., Sony F570 type for power handle) |
| 한국어: | 810076279510 |
8. 보증 및 지원
자세한 보증 정보 및 기술 지원은 Tilta 공식 웹사이트를 참조하십시오. web사이트를 방문하거나 고객 서비스에 직접 문의하세요. 보증 청구에 대비해 구매 증빙 자료로 구매 영수증을 보관하세요.
틸타 공식 Web대지: www.tilta.com


