소개
The Audibax Onyx 200 is a versatile and robust stand designed to support a wide range of musical and electronic equipment. Its adjustable height and stable construction make it suitable for keyboards, MIDI controllers, DJ mixers, laptops, and rack synthesizers. This manual provides essential information for safe assembly, operation, and maintenance of your stand.

이미지 설명: 정면 view of the Audibax Onyx 200 multifunction equipment stand, showcasing its black finish and X-frame design, ready for use.
안전 정보
- Ensure all components are securely fastened before placing any equipment on the stand.
- 최대 적재 용량은 20kg(44lbs)을 초과하지 마십시오.
- 넘어지지 않도록 스탠드를 평평하고 안정적인 표면에 놓으십시오.
- 높이 조절 중에는 움직이는 부품에 손이 닿지 않도록 하십시오.
- 스탠드에 마모나 손상 흔적이 있는지 정기적으로 점검하세요. 손상된 경우 사용하지 마세요.
패키지 내용
패키지에 다음 구성품이 모두 포함되어 있는지 확인하세요.
- Audibax Onyx 200 Stand Frame (X-shaped base)
- Equipment Platform (top surface with ventilation slots)
- Adjustment Lever and Locking Clutch Mechanism
- Rubber Sleeves/Feet for stability
설정 및 조립
- Unfold the Stand Frame: Carefully unfold the X-shaped base of the stand until it forms a stable structure.
- Attach the Equipment Platform: Place the equipment platform onto the upper arms of the stand frame. Ensure it is centered and securely seated. The platform features pre-drilled holes for ventilation and potential mounting, though specific mounting hardware is not included.
- 높이 조정: Refer to the "Height Adjustment" section for detailed instructions on setting the desired height.
- 안정성 보장: Verify that the stand is stable and all rubber sleeves/feet are making full contact with the floor. The adjustable rubber sleeves help compensate for uneven surfaces.

이미지 설명: A diagram illustrating the Audibax Onyx 200 stand. It highlights key dimensions such as adjustable height (330mm-980mm), upper arms depth (325mm), lower arms depth (450mm), and tube diameter (25mm). The diagram also indicates the material as steel and the maximum load capacity as 20 kg.
높이 조정
The Audibax Onyx 200 stand offers multiple height settings for ergonomic use. Follow these steps to adjust the stand's height:
- 조정 메커니즘을 찾으십시오: Find the spring-loaded lever and locking clutch at the center joint of the X-frame.
- 잠금을 해제하세요: Gently pull the lever to disengage the locking pin from its current position.
- 높이 조정: While holding the lever, carefully raise or lower the stand to your desired height. The stand has predefined positions (e.g., 95.5 cm, 90.5 cm, 82 cm, 71.5 cm).
- 잠금장치를 고정하세요: Once the desired height is reached, release the lever, ensuring the locking pin fully engages into one of the adjustment holes. A click sound confirms engagement.
- 안정성 확인: Before placing equipment, gently shake the stand to confirm it is locked securely at the chosen height.

이미지 설명: 클로즈업 view of the central pivot point of the Audibax Onyx 200 stand, showing the height adjustment mechanism. Numbered positions (1 through 7) are visible around the locking clutch, indicating the various height settings.
작동 지침
The Audibax Onyx 200 is designed for versatile use with various equipment. Follow these guidelines for optimal performance:
- Placement of Equipment: Carefully place your keyboard, MIDI controller, DJ mixer, laptop, or other compatible equipment onto the stand's platform. Ensure the weight is evenly distributed.
- 통풍: The platform features integrated slots to facilitate airflow, helping to maintain adequate temperature for your equipment during extended use. Position your devices to benefit from these ventilation openings.
- 케이블 관리 : While the stand does not include dedicated cable management, consider using external cable ties or clips to keep cables tidy and prevent tripping hazards.

이미지 설명: The Audibax Onyx 200 multifunction stand shown with a black electronic keyboard placed securely on its platform, demonstrating its use as a keyboard stand.
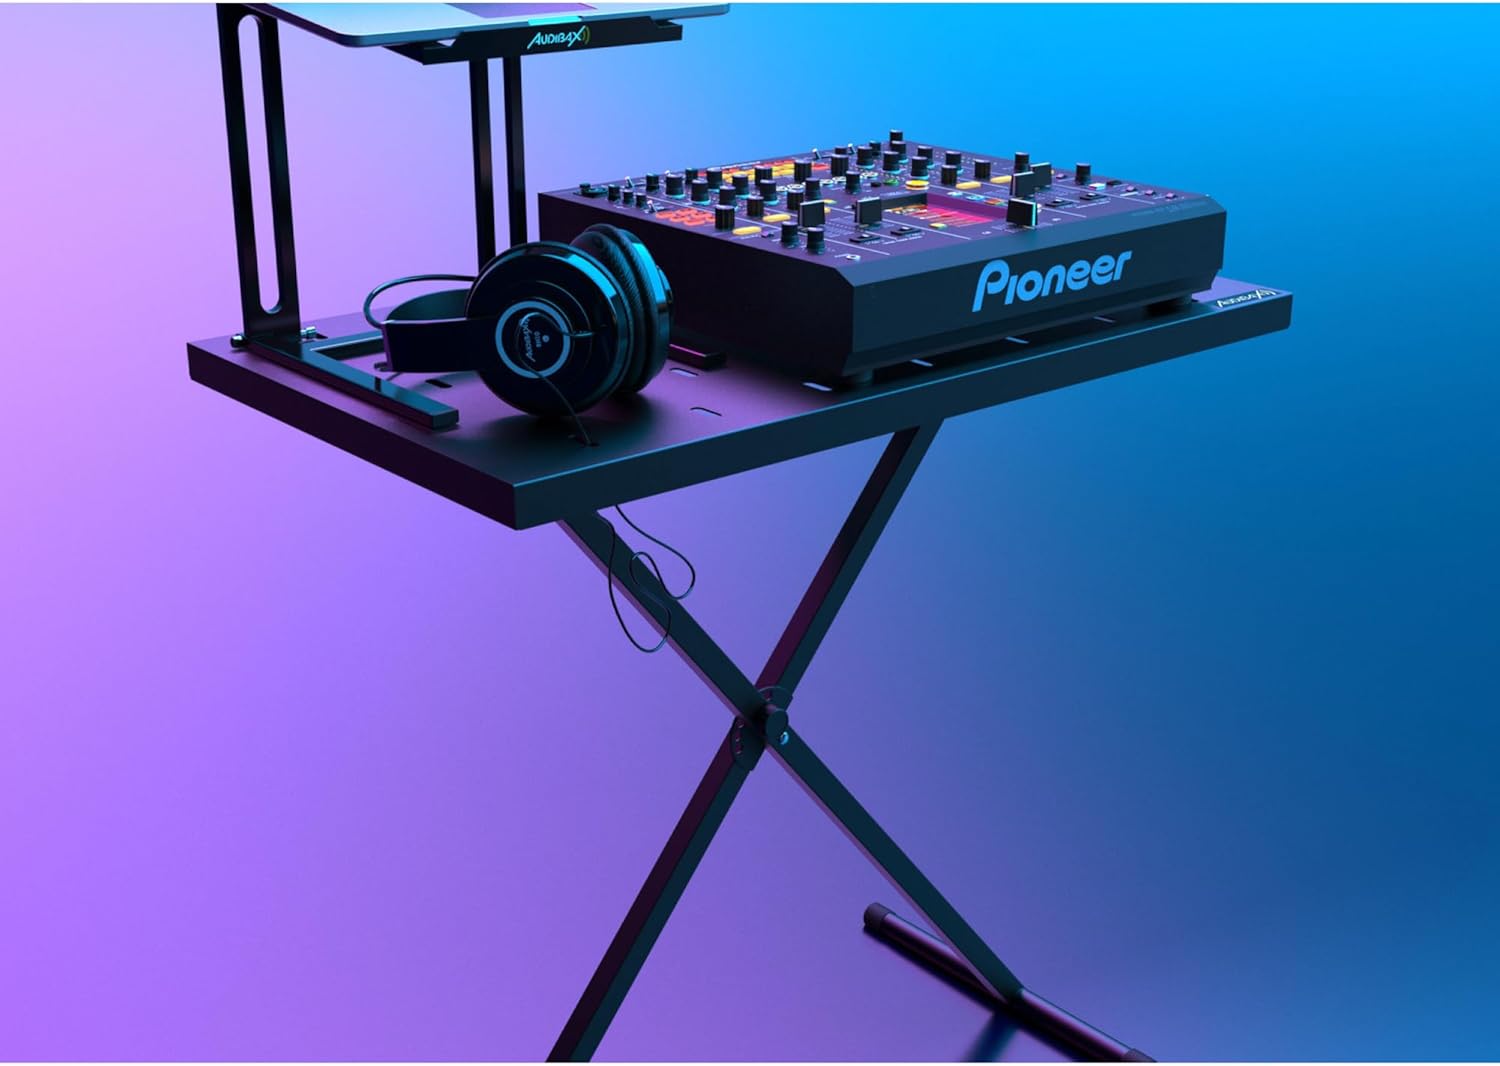
이미지 설명: The Audibax Onyx 200 stand in a studio setting, supporting a DJ mixer and a pair of headphones. The image highlights the stand's versatility for various audio equipment.

이미지 설명: 클로즈업 view of a DJ mixer and headphones placed on the Audibax Onyx 200 stand's platform, clearly showing the integrated ventilation slots designed to prevent overheating.
유지
- 청소: 스탠드를 부드러운 천으로 닦으세요.amp 먼지와 오염물을 제거할 때는 천을 사용하십시오. 마감재를 손상시킬 수 있는 연마성 세척제나 용제 사용은 피하십시오.
- 점검: Periodically check all joints, bolts, and the adjustment mechanism for tightness and proper function. Ensure the rubber feet are intact and provide adequate grip.
- 저장: When not in use, the stand can be folded for compact storage. Store in a dry environment away from extreme temperatures.
문제 해결
- 문제: 받침대가 불안정하거나 흔들거립니다.
- 해결책:
- Ensure the stand is placed on a completely flat and level surface.
- Check that the height adjustment locking pin is fully engaged in one of the designated holes.
- Verify that all rubber feet are making firm contact with the floor. Adjust the feet if necessary to compensate for minor unevenness.
- Confirm that the equipment placed on the platform is centered and its weight does not exceed the 20 kg load capacity.
- Issue: Difficulty adjusting height.
- 해결책:
- Ensure the spring-loaded lever is fully pulled to disengage the locking pin.
- Check for any obstructions or debris in the adjustment holes or around the locking mechanism.
- Apply a small amount of silicone lubricant to the moving parts of the adjustment mechanism if it feels stiff.
명세서
| 특징 | 세부 사항 |
|---|---|
| 모델 번호 | 10268542 |
| 재료 | 금속(스틸) |
| 색상 | 검은색 |
| 최대 하중 용량 | 20kg(44파운드) |
| 높이 조절 범위 | 71.5 cm to 95.5 cm (approx. 330mm to 980mm as per diagram) |
| 플랫폼 치수 | 82 x 46.5cm(약 32.3 x 18.3인치) |
| Upper Arms Depth | 325mm (XNUMXmm) |
| Lower Arms Depth | 450mm (XNUMXmm) |
| 튜브 직경 | 25mm (XNUMXmm) |
| 품목 무게 | 6.1kg(13.4파운드) |
| 마무리 유형 | 우아한 |
| 조립이 필요합니다 | No (referring to complex assembly, basic setup is needed) |
보증 및 지원
For warranty information, technical support, or service inquiries, please contact Audibax customer service through their official website or the retailer where the product was purchased. Please have your model number (Onyx 200 / 10268542) and purchase date available when contacting support.


