소개
This manual provides detailed instructions for the safe and effective use of your VASTFIRE USB-C Rechargeable Green Flashlight. Please read this manual thoroughly before operating the device to ensure optimal performance and longevity.

Image: The VASTFIRE USB-C Rechargeable Green Flashlight in use, demonstrating its green light beam and USB-C charging capability with a smartphone.
제품 특징
- Green Light Illumination: Specifically designed for hunting and tactical applications, providing a green light beam that is less disruptive to certain animal species.
- 조정 가능한 빔: Features a zoomable and focusable beam, allowing transition between a wide floodlight for close-range illumination (up to 500 feet) and a tight spotlight for long-range identification (up to 1000 yards).
- 다양한 작동 모드: Offers a single brightest mode when connected with the pressure switch for tactical use, and five modes (High, Mid, Low brightness, Strobe, and SOS) when using the tail cap switch.
- USB-C Rechargeable with Power Bank Function: Equipped with a USB-C charging port for convenient recharging and a standard USB Type-A output port to function as a power bank for charging other devices.
- 배터리 부족 표시기: A red indicator light illuminates to warn when the battery power is low.
- 내구성 있는 구조: Made from lightweight aluminum casing, water and dust-proof with an IP65 rating, ensuring reliability in various conditions.
- 다양한 장착 옵션: Features a 48mm bezel diameter and 1-inch body, compatible with most standard mounts, including universal scope and rail mounts.
패키지 내용
패키지를 열면 다음 구성품이 모두 포함되어 있는지 확인하세요.
- USB-C Green Light Rechargeable Flashlight
- Rechargeable Battery (1 D battery included)
- 충전 케이블(USB-C)
- Pressure Switch (Coiled tactical click switch tailcap)
- Push Button On/Off Tailcap
- 레일 마운트
- 스코프 마운트

이미지: 완전한 view of the VASTFIRE Green Flashlight kit, showing the flashlight, pressure switch, charging cable, battery, and various mounting accessories.
설정
1. 배터리 설치
- 손전등의 꼬리 캡을 시계 반대 방향으로 돌려서 풉니다.
- Insert the included D battery with the positive (+) end facing towards the flashlight head.
- 꼬리 캡을 시계 방향으로 돌려 단단히 조여질 때까지 다시 조입니다.
2. 손전등 충전하기
The flashlight features a USB-C charging port. Ensure the battery is installed before charging.
- Locate the USB-C input port on the flashlight body.
- Connect the provided USB-C charging cable to the flashlight's USB-C port.
- 케이블의 다른 쪽 끝을 호환되는 USB 전원(예: 벽면 어댑터, 컴퓨터 USB 포트)에 연결합니다.
- The power indicator light on the flashlight will turn red during charging and green when fully charged.

Image: Close-up of the VASTFIRE flashlight demonstrating its USB-C charging capability and its function as a power bank to charge a smartphone.
3. Mounting the Flashlight
The flashlight comes with both a rail mount and a scope mount for versatile attachment to firearms or other equipment.
- 레일 마운트: Attach the rail mount to your firearm's Picatinny or Weaver rail. Secure the flashlight into the mount and tighten the screws until firm.
- Scope Mount: Use the scope mount to attach the flashlight directly to your scope tube. Ensure the mount is securely fastened to both the scope and the flashlight.
- For optimal stability, ensure all mounting screws are tightened appropriately, but do not overtighten.
작동 지침
1. 전원 켜기/끄기 및 모드 선택
The flashlight offers two primary methods for operation: using the standard push-button tail cap or the coiled tactical pressure switch.
- Using the Push-Button Tail Cap:
- Press the button firmly to turn the flashlight ON or OFF.
- With the flashlight ON, lightly press the button (without clicking) to cycle through the five modes: High, Mid, Low, Strobe, and SOS. A full click will turn the flashlight off.
- Using the Coiled Tactical Pressure Switch:
- Replace the standard tail cap with the pressure switch tail cap.
- When the pressure switch is connected, the flashlight operates in a single, brightest mode.
- 압력 패드를 길게 누르면 잠시 켜지고, 손을 떼면 꺼집니다.
- Some pressure switches may have a constant on/off button in addition to the momentary pad. Refer to your specific pressure switch for details.

Image: Illustration of the VASTFIRE flashlight's operating modes, including the single brightest setting with the remote pressure switch and the five modes (High, Mid, Low, Strobe, SOS) available with the standard tail cap switch.
2. Adjusting the Beam (Zoom Function)
The flashlight features an adjustable head to change the beam from a wide floodlight to a focused spotlight.
- 빛을 조절하려면 손전등 헤드를 앞뒤로 부드럽게 움직이세요.
- Sliding the head forward will narrow the beam into a focused spotlight for long-range illumination.
- Sliding the head backward will widen the beam into a floodlight for broader area illumination.
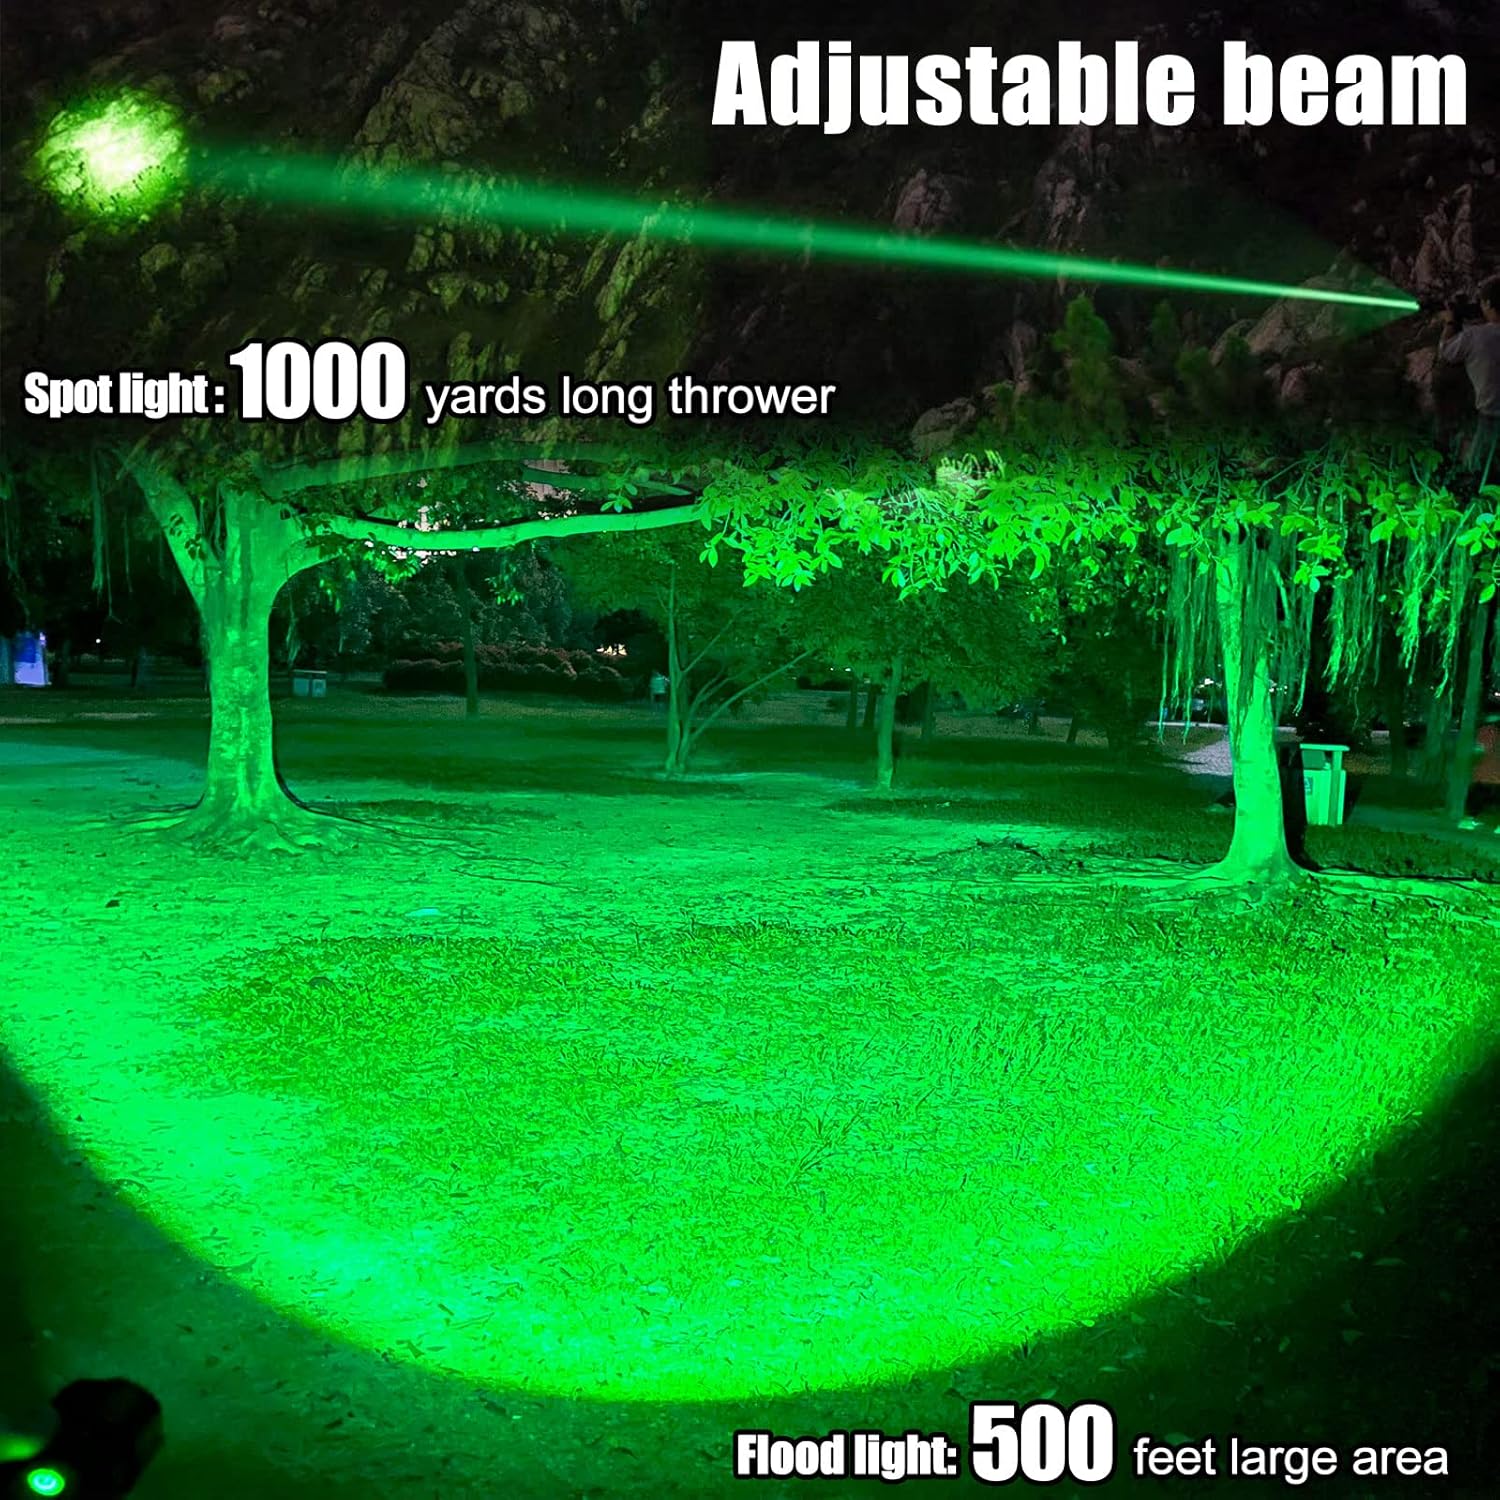
Image: The VASTFIRE flashlight showcasing its adjustable beam capability, transitioning from a narrow 1000-yard spotlight to a wide 500-foot floodlight.
3. 보조배터리로 사용하기
Your VASTFIRE flashlight can also serve as an emergency power bank to charge small electronic devices.
- Locate the standard USB Type-A output port on the flashlight body (next to the USB-C input).
- 기기의 충전 케이블을 이 USB 출력 포트에 연결하세요.
- 손전등이 기기 충전을 시작합니다. 기기의 충전 표시등을 확인하세요.
유지
- 청소: 깨끗하고 부드러운 천으로 손전등 본체를 닦으십시오. 잘 지워지지 않는 얼룩은 약간 거친 천으로 닦아내십시오.amp 천을 사용하세요. 연마성 세제나 용제를 사용하지 마세요.
- 매끄럽게 하기: 방수 기능과 원활한 작동을 유지하려면 주기적으로 O링과 나사산에 얇은 실리콘 그리스 층을 도포하십시오.
- 배터리 관리 : If the flashlight will not be used for an extended period, remove the battery to prevent leakage and damage. Store batteries in a cool, dry place.
- 저장: 손전등은 직사광선과 극한 온도 변화를 피해 서늘하고 건조한 곳에 보관하십시오.

Image: The VASTFIRE flashlight partially submerged in water, illustrating its IP68 standard for total protection against water and dust, including submersion up to 25 meters for 5 hours.
문제 해결
| 문제 | 가능한 원인 | 해결책 |
|---|---|---|
| 손전등이 켜지지 않습니다. | Low or dead battery; Incorrect battery insertion; Loose tail cap; Faulty switch. | Charge the battery or replace it. Ensure battery is inserted correctly (positive end towards head). Tighten the tail cap. If using pressure switch, ensure it is fully connected. |
| 빛이 어둡거나 깜빡입니다. | 배터리 부족; 연결 불량; 접촉면 오염. | Recharge the battery. Ensure tail cap and head are tightly screwed. Clean battery contacts and flashlight threads with a clean cloth. |
| 빔 조정이 뻣뻣합니다. | 줌 메커니즘에 먼지나 이물질이 있습니다. | Clean the exterior of the flashlight head. Avoid forcing the mechanism. |
| 모바일 배터리 기능이 작동하지 않습니다. | Flashlight battery too low; Incorrect cable; Device incompatibility. | Ensure flashlight battery is sufficiently charged. Use a known good charging cable. Verify device compatibility with standard USB charging. |
명세서
| 모델 이름: | VA-F04 |
| 광원 유형: | LED(녹색) |
| 명도: | 최대 2000 루멘스 |
| 최대 빔 거리: | 1000 Yards (Spotlight), 500 Feet (Floodlight) |
| 전원: | Battery Powered (1 D battery included) |
| 충전 중: | USB-C 충전식 |
| 재료: | 알류미늄 |
| 방수 수준: | IP65(방수) |
| 제품 크기: | Approx. 3"D x 3"W x 13"H (Length: 8 1/2 inches, Diameter: 2 1/4 inches) |
| 무게: | 1.2파운드(약 0.54kg) |

Image: A hand holding the VASTFIRE flashlight, illustrating its compact size with indicated weight (2.31 oz) and length (4.39 inches). Note: The image text for weight/length seems to contradict the product specifications, so the specifications table uses the provided product data.
보증 및 지원
Your VASTFIRE USB-C Rechargeable Green Flashlight comes with the following warranty:
- 압력 스위치: Free lifetime warranty.
- Flashlight Kit: 2년 제조업체 보증.
- 보고: 60일 반품 정책.
For any issues, missing parts, or defective items, please contact the manufacturer directly. There is no need to return the item through the retailer; a new, workable item will be provided.
제품 비디오
비디오: 오버view of the VASTFIRE Green Flashlight, demonstrating its components, features, and green light output. This video is provided by the seller, VASTFIRE DIRECT.


