소개
This manual provides detailed instructions for the assembly, operation, and maintenance of your Vetroo AL800 Mid Tower ATX PC Computer Case. Please read this manual thoroughly before beginning installation to ensure proper setup and optimal performance.

Figure 1: Vetroo AL800 Mid Tower ATX PC Computer Case (Black)
안전 정보
- 구성 요소를 설치하거나 제거하기 전에 항상 벽면 콘센트에서 전원 공급 장치를 분리하세요.
- 정전기 방전으로 인한 손상을 방지하기 위해 부품을 조심스럽게 다루십시오. 정전기 방지 손목 스트랩 사용을 고려해 보십시오.
- Keep the case and components away from liquids and excessive humidity.
- 과열을 방지하려면 적절한 환기를 유지하세요.
- 케이스 또는 구성품을 개조하지 마십시오. 개조 시 보증이 무효화될 수 있으며 안전상의 위험이 발생할 수 있습니다.
패키지 내용
패키지에 모든 품목이 들어 있는지 확인하세요.
- Vetroo AL800 Mid Tower ATX PC Computer Case
- 부속품 상자 (나사, 스탠드오프, 케이블 타이)
- Pre-installed 1x 120mm PWM/ARGB Fan (rear)
- 사용 설명서 (본 문서)
주요 특징
- ARGB LED Strip: Integrated LED lighting and ARGB case fans can be synchronized with compatible motherboards via a 5V 3-pin interface.
- Door Opening Design: Features a 4mm thick tempered glass side panel with a convenient door-opening mechanism for easy access to internal components.
- High Performance Airflow: A mesh front panel and strategically placed dust filters ensure optimal airflow and system cooling.
- 폭넓은 호환성: Supports ATX, M-ATX, and ITX motherboards. Accommodates GPUs up to 340mm in length and CPU coolers up to 165mm in height.
- 액체 냉각 지원: Front panel supports up to a 360mm liquid cooling radiator.
- 팬 지원: Supports up to 8 x 120mm fans.
- 간단한 케이블 관리: Includes two soft silicone cord grommets for organized cable routing.
- Powerful I/O Panel: Features 1x USB 3.2 Type-C port, 2x USB 3.0 ports, and a combined microphone/headphone jack.
설정 및 설치
1. 일반적인 준비 사항
- 케이스를 평평하고 안정적인 표면에 놓으십시오.
- Open the tempered glass side panel by gently pulling it open. It is hinged for easy access.
- Remove the tempered glass panel if necessary for easier installation by lifting it off its hinges once open.

Figure 2: Tempered Glass Door Opening Design
2. 마더보드 설치
- I/O 실드(해당되는 경우)를 케이스 후면 개구부에 설치합니다.
- Align your ATX, M-ATX, or ITX motherboard with the pre-installed standoffs.
- 부속품 상자에 들어 있는 나사를 사용하여 마더보드를 고정하십시오.
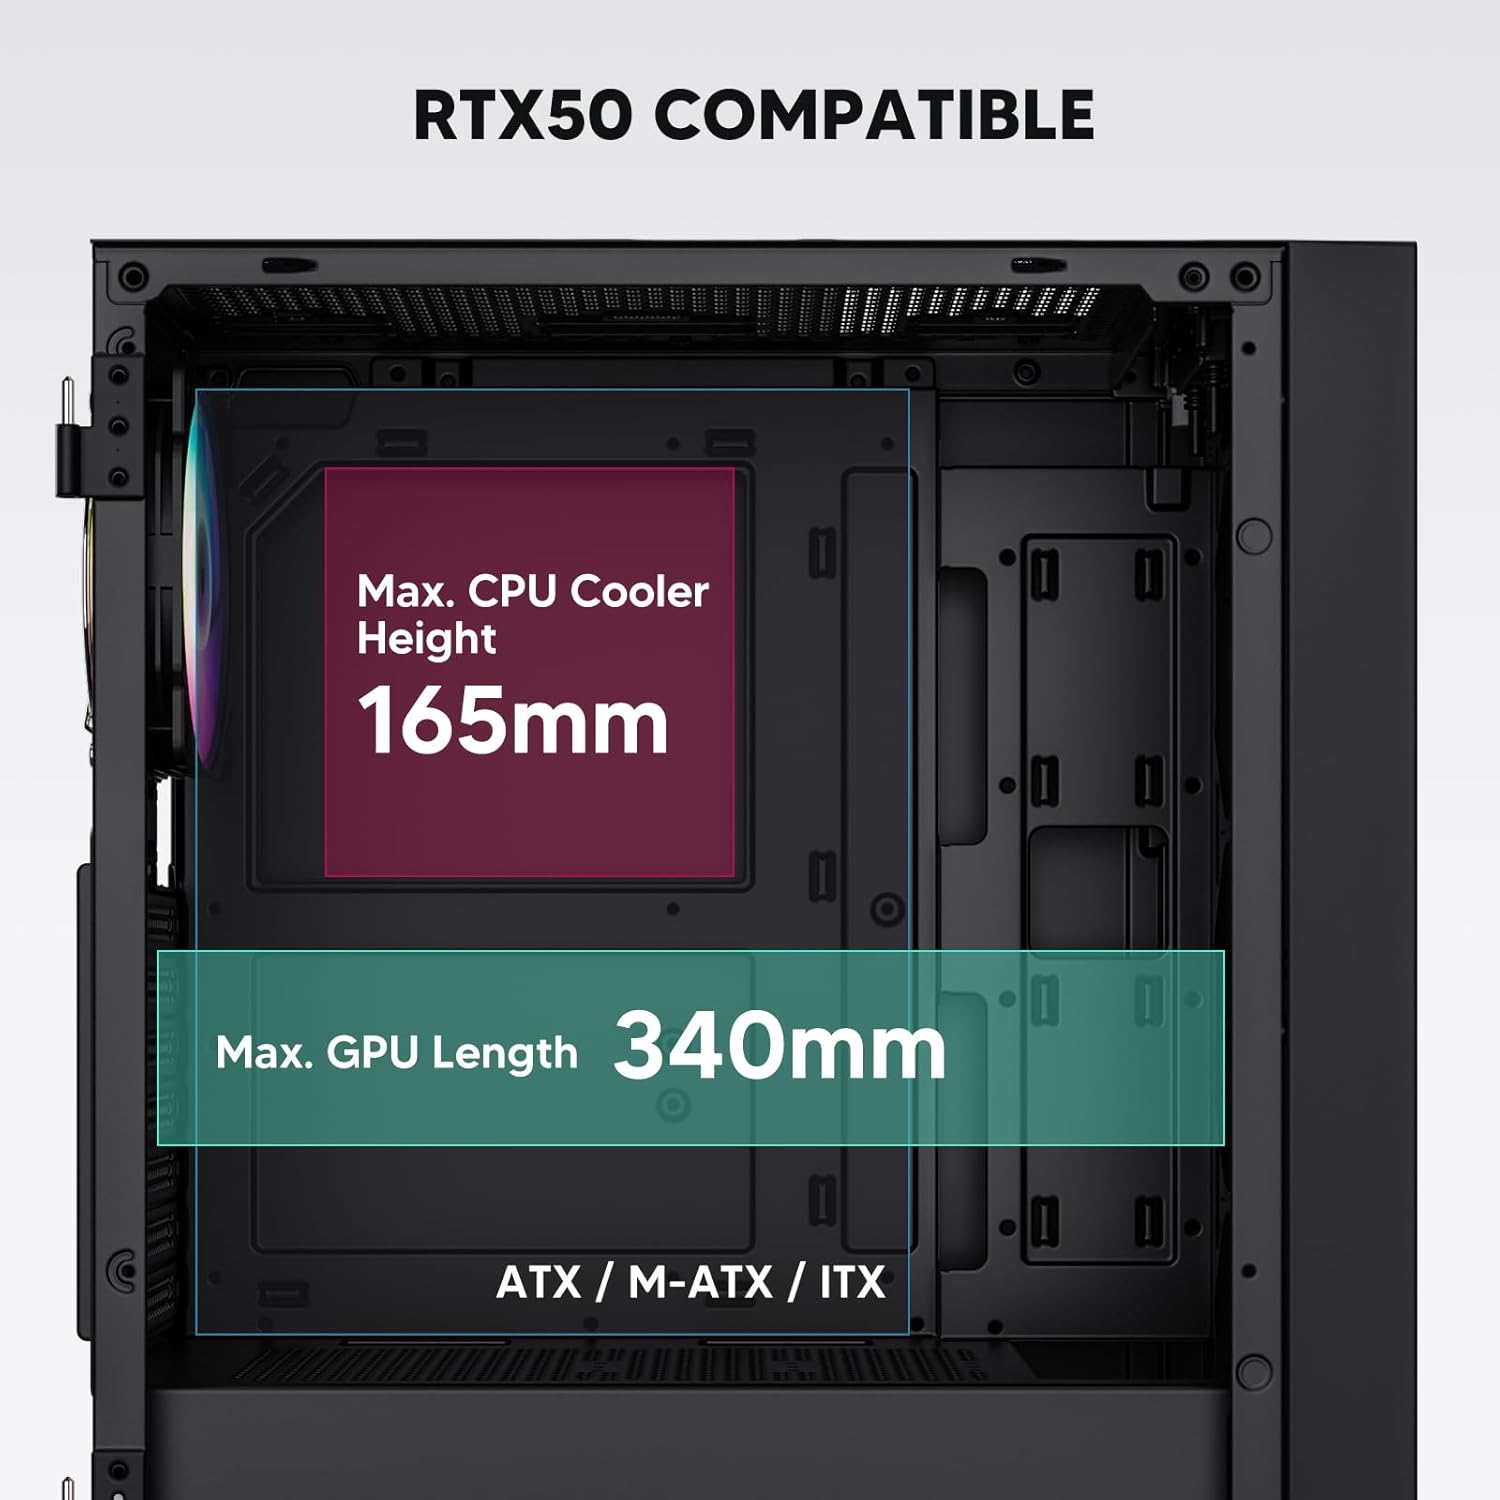
Figure 3: Motherboard and Component Clearance (Max CPU Cooler Height 165mm, Max GPU Length 340mm)
3. Storage Device Installation (HDD/SSD)
- Locate the dedicated mounting points for SSDs and HDDs.
- Install 2.5" SSDs onto the SSD trays or mounting brackets.
- Install 3.5" HDDs into the drive cage located at the bottom of the case.
- Secure all drives with the appropriate screws.

Figure 4: Internal Layout with Drive Bay Locations (SSD, HDD, Power Supply)
4. 전원 공급 장치 설치
- Mount your power supply unit (PSU) in the dedicated compartment at the bottom rear of the case.
- Ensure the PSU fan faces downwards (if the case has a bottom vent) or upwards, depending on your cooling preference.
- Secure the PSU with screws from the rear of the case. The case supports PSUs up to 200mm in length.
5. 확장 카드(GPU) 설치
- 케이스 뒷면에서 필요한 PCI-E 슬롯 커버를 제거합니다.
- Insert your graphics card or other expansion cards into the motherboard's PCI-E slots.
- Secure the cards with screws. The case supports GPUs up to 340mm in length.
6. 냉각 시스템 설치 (팬/라디에이터)
- The case comes with one pre-installed 120mm PWM/ARGB fan at the rear.
- Additional fans (120mm or 140mm) can be installed at the front, top, and bottom.
- Liquid cooling radiators up to 360mm can be installed at the front, and up to 240mm at the top.
- Refer to the diagram for supported fan and radiator configurations.

Figure 5: Fan and Liquid Radiator Support Diagram
7. 전면 패널 연결
- Connect the front panel cables (Power, Reset, USB 3.0, USB Type-C, HD Audio) to the corresponding headers on your motherboard.
- Consult your motherboard manual for the exact pin layout of these headers.
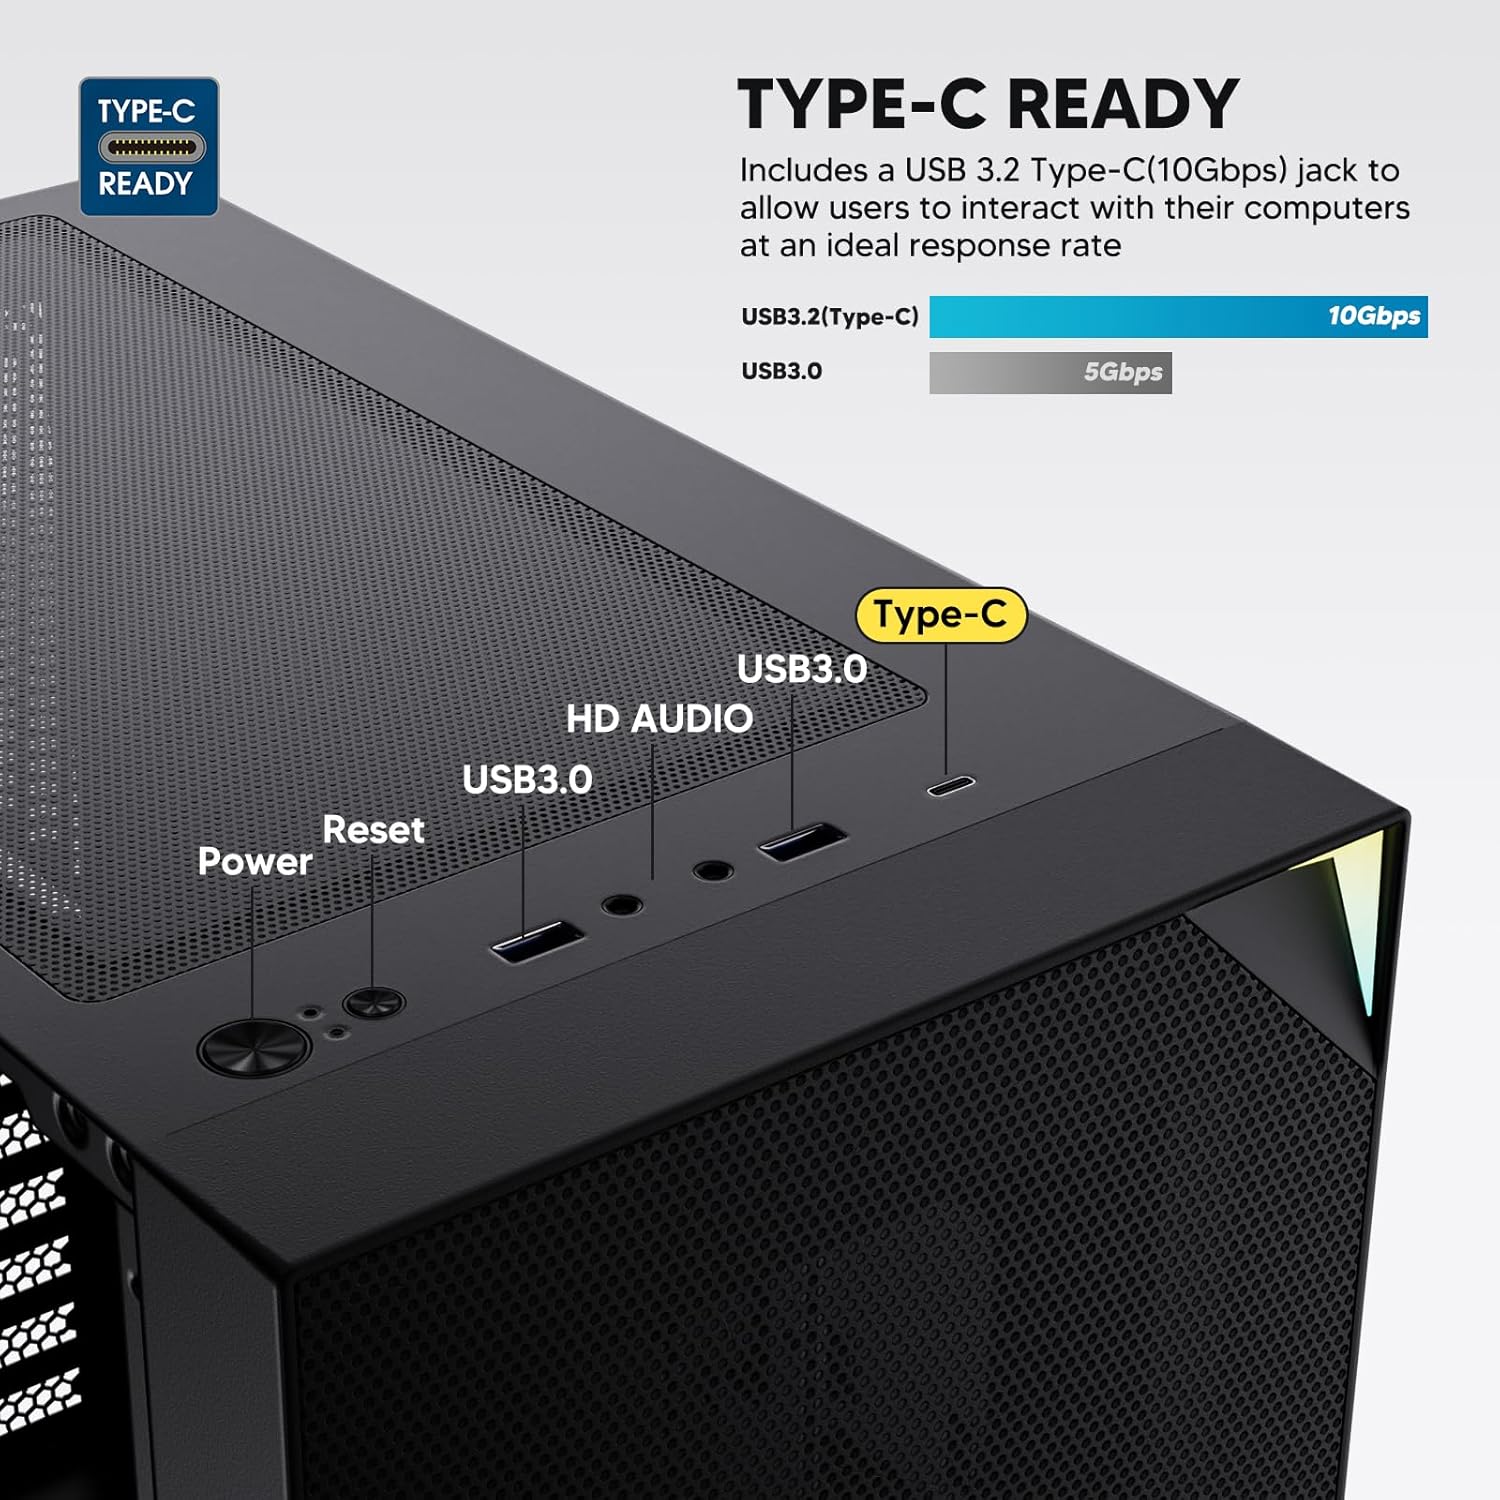
Figure 6: Top I/O Panel Connections
8. ARGB and PWM Connections
- The pre-installed fan and ARGB LED strip require connection to your motherboard.
- Connect the 4-pin PWM connector from the fan to a compatible fan header on your motherboard for speed control.
- Connect the 3-pin ARGB connector from the fan and LED strip to a 5V 3-pin ARGB header on your motherboard for lighting synchronization. 12V RGB 헤더에 연결하지 마십시오. LED가 손상될 수 있습니다.
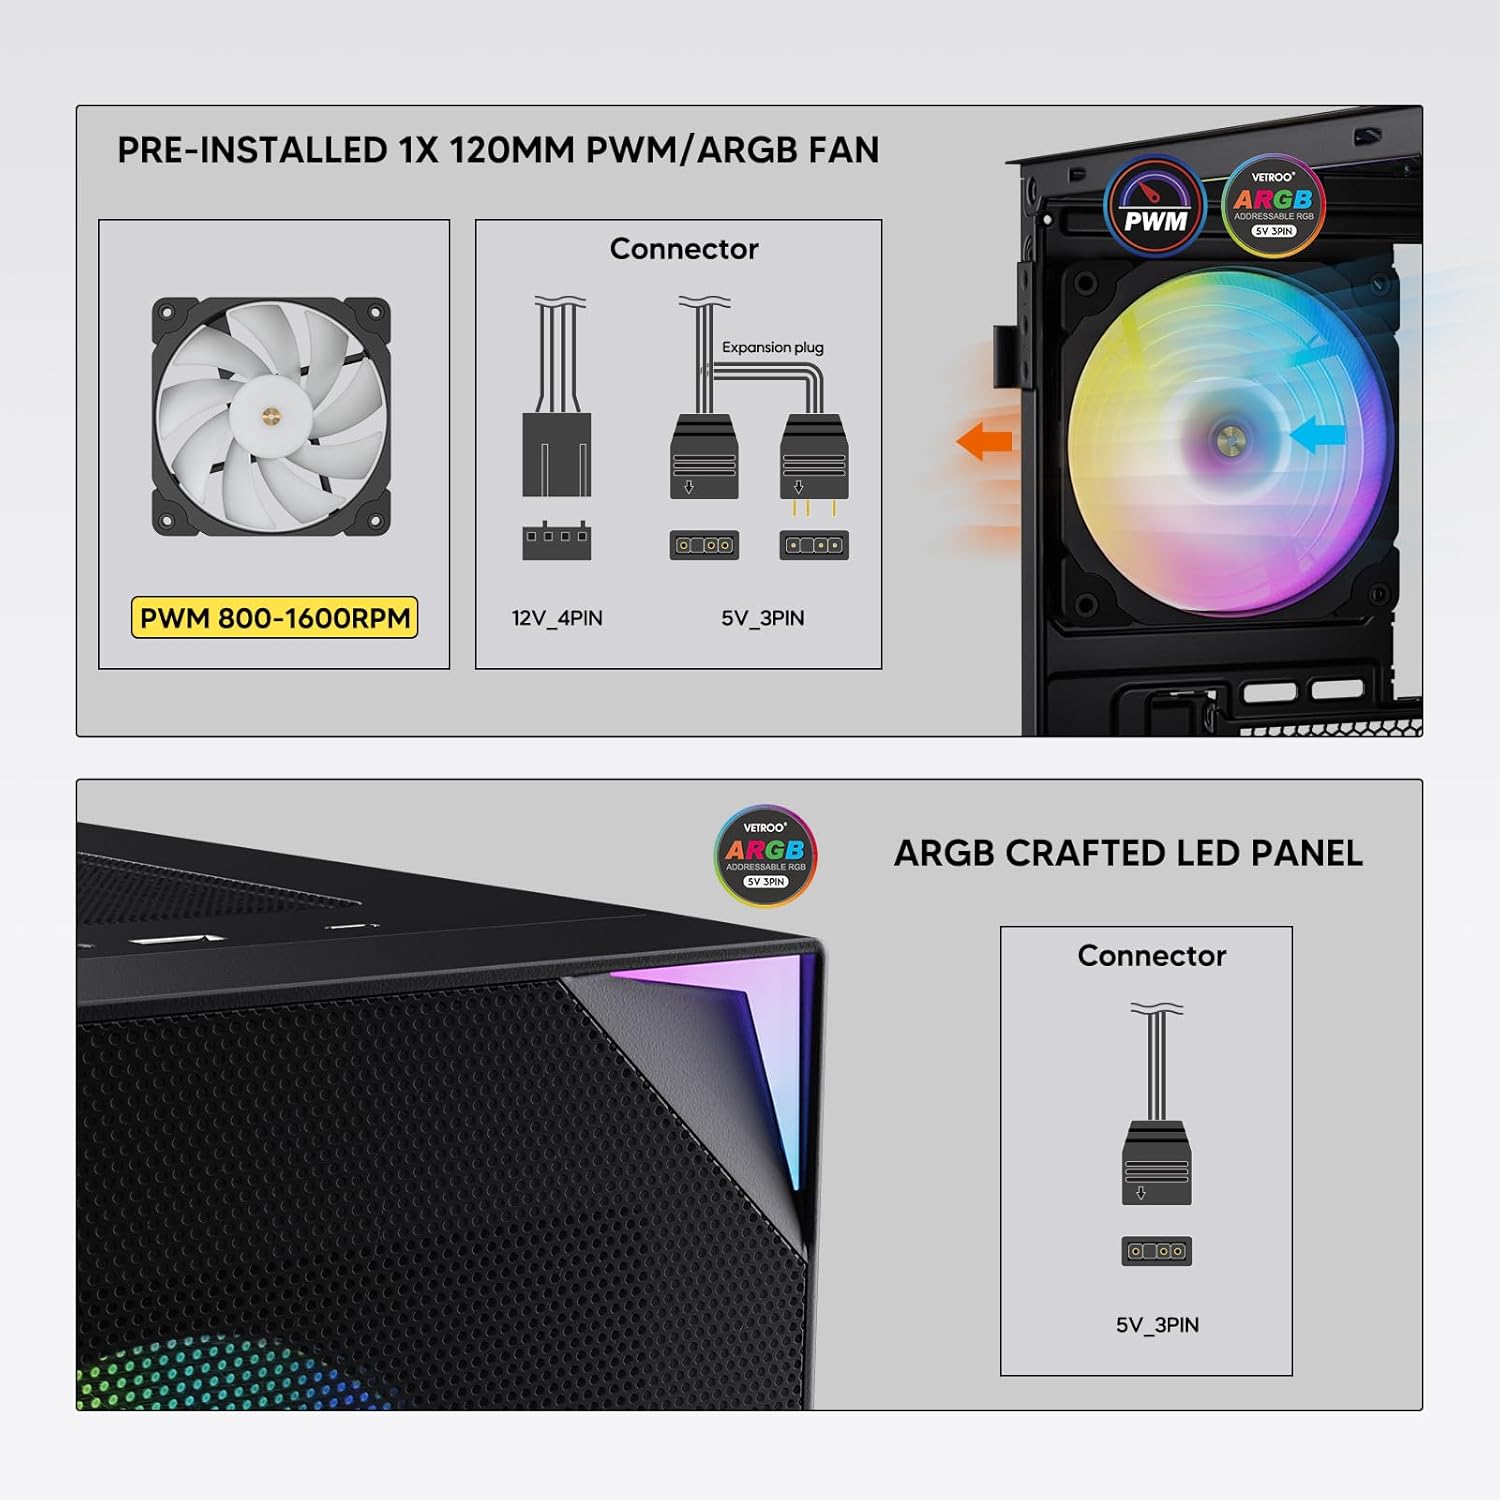
Figure 7: PWM and ARGB Connector Details
9. 케이블 관리
- 마더보드 트레이 뒤쪽의 케이블 정리용 홈과 고정 지점을 활용하여 케이블을 정리하십시오.
- The soft silicone grommets help protect cables and provide a clean look.
- 적절한 케이블 정리는 공기 흐름과 미관을 개선합니다.
작업
1. 초기 전원 켜기
- After all components are securely installed and cables connected, close the tempered glass side panel.
- 모니터, 키보드, 마우스 및 전원 케이블을 PC에 연결하세요.
- Flip the power switch on your PSU to the 'ON' position.
- Press the power button on the top I/O panel of the case to start your system.
2. ARGB 조명 제어
- If connected to a compatible motherboard's 5V 3-pin ARGB header, the lighting of the pre-installed fan and LED strip can be controlled via your motherboard's RGB software (e.g., ASUS Aura Sync, MSI Mystic Light Sync, Gigabyte RGB Fusion, ASRock Polychrome Sync).
- 메인보드 설명서를 참조하여 ARGB 제어 소프트웨어 사용 방법에 대한 자세한 지침을 확인하십시오.
3. 공기 흐름 관리
- The mesh front panel is designed for optimal air intake.
- Ensure that intake fans (typically front and bottom) and exhaust fans (typically rear and top) are configured to create positive or neutral air pressure for efficient cooling and dust prevention.

Figure 8: Airflow Diagram with Dust Filters
유지
1. 먼지 필터 청소
- The case is equipped with dust filters on the top and bottom panels.
- Regularly check and clean these filters to maintain optimal airflow and prevent dust buildup inside the system.
- Gently remove the magnetic dust filters and clean them with compressed air or by rinsing with water (ensure they are completely dry before re-installation).
2. Tempered Glass Panel Care
- 강화유리 패널은 부드럽고 보풀 없는 천과 연마성이 없는 유리 세정제를 사용하여 닦으십시오.
- 유리에 흠집을 내거나 손상시킬 수 있는 강한 화학 물질이나 연마재를 사용하지 마십시오.
문제 해결
- 시스템 전원이 켜지지 않습니다:
- 전원 케이블이 파워서플라이와 벽면 콘센트에 제대로 연결되어 있는지 확인하십시오.
- PSU 스위치가 'ON' 위치에 있는지 확인하세요.
- 전면 패널 전원 버튼 케이블이 마더보드 헤더에 올바르게 연결되어 있는지 확인하십시오.
- Confirm all power cables (24-pin ATX, CPU, GPU) are properly seated in the motherboard and components.
- 팬이 회전하지 않음 / ARGB 조명이 켜지지 않음:
- Check that the fan's PWM connector is securely plugged into a motherboard fan header.
- Verify the ARGB 3-pin connector is correctly attached to a 5V 3-pin ARGB header on the motherboard (not 12V RGB).
- 메인보드의 ARGB 소프트웨어가 올바르게 설치 및 구성되었는지 확인하십시오.
- USB 포트가 작동하지 않음:
- Confirm the USB 3.0 and USB Type-C front panel cables are correctly connected to their respective motherboard headers.
- 메인보드 설명서를 참조하여 헤더 위치를 확인하십시오.
- For other component-specific issues, refer to the instruction manuals for your motherboard, CPU, GPU, and other installed hardware.
명세서
| 상표 | 베트루 |
| 모델명 | AL800 |
| 품목 모델 번호 | VT-CASE-AL800-BK (FBA) |
| 케이스 유형 | 미드 타워 |
| 마더보드 호환성 | ATX, M-ATX, ITX |
| 색상 | 검은색 |
| 재료 | 금속, 강화 유리 |
| 품목 무게 | 12.37파운드(약 5.61kg) |
| 제품 크기(LxWxH) | 18.4 x 8.6 x 17.9인치(약 46.7 x 21.8 x 45.5cm) |
| 최대 GPU 길이 | 340mm (XNUMXmm) |
| 최대 CPU 쿨러 높이 | 165mm (XNUMXmm) |
| 최대 PSU 길이 | 200mm (XNUMXmm) |
| 전면 I / O 포트 | 1x USB 3.2 Type-C, 2x USB 3.0, HD Audio (Mic/Headphone), Power, Reset |
| 팬 지원 | Front: 3x 120mm or 2x 140mm; Top: 2x 120mm or 2x 140mm; Rear: 1x 120mm; Bottom: 2x 120mm |
| 라디에이터 지원 | Front: 120/140/240/280/360mm; Top: 120/140/240mm; Rear: 120mm |
| 사전 설치된 팬 | 1x 120mm PWM/ARGB (Rear) |
보증 및 지원
For warranty information, technical support, or to inquire about replacement parts, please visit the official Vetroo web사이트를 방문하거나 고객 서비스에 직접 문의하세요. 보증 청구를 위해 구매 증빙 자료를 보관하세요.
Official Vetroo Store: Vetroo Amazon Store
관련 문서 - AL800
 |
Vetroo AL800 PC 케이스 사용 설명서 Vetroo AL800 PC 케이스 사용 설명서입니다. 마더보드, 전원 공급 장치, 팬, 수냉 라디에이터, HDD, SSD, 그래픽 카드 등 구성품의 설치 단계를 자세히 설명합니다. I/O 패널 연결 가이드와 액세서리 목록이 포함되어 있습니다. |
 |
Vetroo AL800 풀타워 게이밍 케이스 사용 설명서 Vetroo AL800 풀타워 게이밍 PC 케이스에 대한 종합적인 사용 설명서입니다. 전원 공급 장치, 마더보드, 저장 장치(SSD/HDD), 그래픽 카드 설치 방법을 알아보고 팬 및 라디에이터 지원 옵션을 이해하세요. 액세서리 목록과 자세한 단계별 안내가 포함되어 있습니다. |
 |
Vetroo MESH-7C AL SERIES PC 케이스 사용 설명서 Vetroo MESH-7C AL SERIES PC 케이스에 대한 자세한 사용 설명서로, 컴퓨터를 조립하기 위한 사양, 치수, 액세서리 및 하드웨어 설치 단계를 다룹니다. |
 |
Vetroo M05 M-ATX PC 케이스 사용 설명서 Vetroo M05 M-ATX PC 케이스 조립에 대한 자세한 지침서로, 구성 요소 설치, 액세서리 사용 및 I/O 패널 연결에 대한 내용이 포함되어 있습니다. |
 |
Vetroo AL900 ATX PC 케이스 사용 설명서 Vetroo AL900 ATX PC 게임 케이스의 사용 설명서로, 조립, 전원 공급 장치와 I/O 패널 연결과 같은 구성 요소의 설치 방법을 자세히 설명합니다. |
 |
Vetroo U6 CPU 쿨러 사용 설명서 및 설치 가이드 Intel LGA 1700/1200/115X 및 AMD AM5/AM4/AM3(+)/AM2(+)/FM2(+)/FM1 소켓과의 호환성을 다루는 Vetroo U6 CPU 쿨러의 상세 사용 설명서 및 설치 가이드입니다. 부품 목록과 단계별 조립 설명서가 포함되어 있습니다. |