1. 서론
This manual provides comprehensive instructions for the setup, operation, and maintenance of your Xprinter XP-Q801K Thermal Receipt Printer. This printer is designed for efficient and reliable receipt printing in various business environments, featuring high-speed direct thermal printing and a USB interface for easy connectivity.

그림 1: 전면 view of the Xprinter XP-Q801K Thermal Receipt Printer, showing the paper output slot and control buttons.
2. 설정
2.1 풀기
Carefully remove the printer and all accessories from the packaging. Verify that all components are present:
- Xprinter XP-Q801K Thermal Receipt Printer
- 전원 어댑터
- USB 케이블
- Paper Roll (starter)
- 사용 설명서 (본 문서)
2.2 프린터 연결
Before connecting, ensure the printer is powered off. Locate the ports on the rear of the printer.
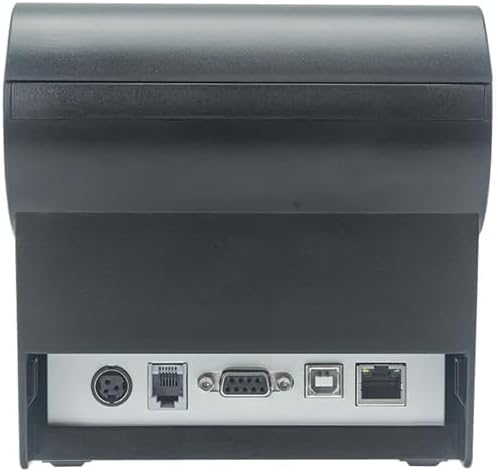
그림 2: 후면 view of the printer, highlighting the power, USB, and other interface ports.
- 전원 연결: Insert the power adapter cable into the printer's power input port (DC 24V/2.5A) and plug the adapter into a suitable electrical outlet (AC 100-240V, 50-60Hz).
- USB 연결: Connect one end of the provided USB cable to the USB port on the printer and the other end to an available USB port on your computer.
- Cash Drawer (Optional): If using a cash drawer, connect its cable to the cash drawer port (DC 24V/1A) on the printer.
2.3 용지 롤 장착
The printer uses 80mm wide thermal paper rolls.
- Open the paper cover by pushing the cover open button (usually located on the side or front).
- Insert the thermal paper roll with the printing surface facing the print head. Ensure the roll is seated correctly in the paper compartment.
- 커터 너머로 소량의 종이를 빼냅니다.
- Close the paper cover firmly until it clicks into place.
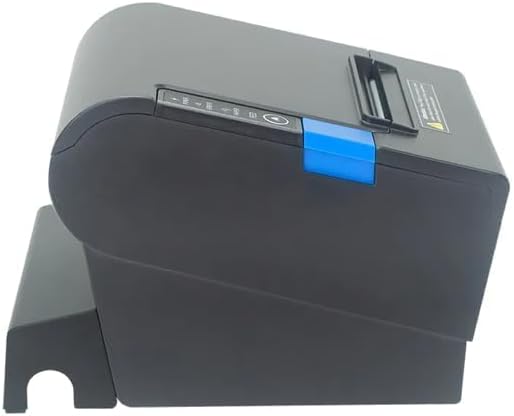
그림 3: 측면 view of the printer, illustrating the paper cover mechanism.
2.4 드라이버 설치
The printer requires a driver to communicate with your computer. Drivers are typically available for Windows, Linux, Android, and Mac operating systems.
- For Windows users, the printer often supports plug-and-play installation or requires a specific Windows driver.
- For Linux, Android, and Mac, SDKs (Software Development Kits) are usually provided for integration.
제조업체의 내용을 참조하세요 website or the included driver CD/USB drive for the latest drivers and installation instructions specific to your operating system.
3. 프린터 작동
3.1 전원 켜기/끄기
Locate the power switch on the side or rear of the printer. Flip the switch to the 'ON' position to power on the printer. The 'POWER' indicator light will illuminate. Flip to 'OFF' to power down.
3.2 Indicator Lights and Buttons
The front panel typically features several indicator lights and buttons:
- 힘: 프린터 전원이 켜져 있음을 나타냅니다.
- 오류: Illuminates or flashes to indicate an error condition (e.g., paper out, print head overheating, cutter error).
- 종이: Indicates that the paper roll is low or out.
- 피드 버튼: Press to manually feed paper. Hold to perform a self-test print (if supported by model).
3.3 기본 인쇄
Once the printer is connected and drivers are installed, you can print receipts from your POS software or application. Ensure the printer is selected as the default or active printer in your system settings.
The printer supports various print speeds up to 300 mm/s and automatic paper cutting after each print job.
4. 유지관리
정기적인 유지보수는 최적의 성능을 보장하고 프린터의 수명을 연장시켜 줍니다.
4.1 프린트 헤드 청소
프린트 헤드는 정기적으로 청소해야 하며, 특히 인쇄 품질이 저하되는 경우에는 더욱 그렇습니다.
- 프린터 전원을 끄고 전원 케이블을 분리하세요.
- 용지 덮개를 엽니다.
- 면봉을 이용하여 가볍게 닦아주세요.ampened with isopropyl alcohol (ethanol) to gently wipe the thermal elements of the print head.
- 프린트 헤드가 완전히 마를 때까지 기다린 후 덮개를 닫고 전원을 다시 연결하십시오.
4.2 Cleaning the Cutter
Paper dust can accumulate around the cutter blade, affecting its performance.
- 프린터 전원을 끄고 전원 케이블을 분리하세요.
- Carefully remove any visible paper dust or debris from around the cutter blade using a soft brush or compressed air.
- Do not use liquids on the cutter.
4.3 일반 청소
프린터 외부를 부드러운 천으로 닦으세요.amp 옷감. 가혹한 화학 물질이나 연마성 세제를 사용하지 마십시오.
5. 문제 해결
이 섹션에서는 프린터에서 발생할 수 있는 일반적인 문제에 대해 설명합니다.
| 문제 | 가능한 원인 | 해결책 |
|---|---|---|
| 프린터의 전원이 켜지지 않습니다. | 전원 케이블이 연결되지 않았습니다. 전원 콘센트가 고장났습니다. 전원 스위치가 꺼져 있습니다. | Ensure power cable is securely connected. Test power outlet. Turn power switch to 'ON'. |
| 인쇄 금지. | Paper out; Paper loaded incorrectly; Driver not installed or incorrect; USB cable loose; Printer not selected. | Load new paper roll. Re-load paper correctly. Install/reinstall correct driver. Check USB connection. Select printer in software. |
| ERROR light is on/flashing. | Paper out; Paper jam; Print head overheating; Cutter error. | Load paper. Clear paper jam. Allow printer to cool down. Check cutter for obstructions. |
| 인쇄 품질이 좋지 않습니다. | Dirty print head; Low quality paper; Old paper roll. | Clean the print head (see Section 4.1). Use high-quality thermal paper. Replace old paper rolls. |
이러한 해결 방법을 시도한 후에도 문제가 지속되면 고객 지원팀에 문의하세요.
6. 사양
| 특징 | 세부 사항 |
|---|---|
| 인쇄 방법 | 직접 열 |
| 용지 폭 | 80mm (XNUMXmm) |
| 인쇄 속도 | 230mm / s, 260mm / s, 300mm / s |
| 인터페이스 | USB |
| 줄 간격 | 3.75 mm (adjustable by commands) |
| Character Size (ANK) | Font A: 1.5 × 3.0 mm (12 × 24 dots) Font B: 1.1 × 2.1 mm (9 × 17 dots) |
| Character Size (Chinese/Traditional Chinese) | 3.0 × 3.0 mm (24 × 24 dots) |
| 바코드 유형 | UPC-A / UPC-E / JAN13 (EAN13) / JAN8 (EAN8) / CODE39 / ITF / CODABAR / CODE93 / CODE128 |
| 2D 바코드 | QR Code / PDF417 |
| NV Flash Memory | 256킬로바이트 |
| 입력 전원 | AC 100-240V, 50-60Hz |
| 출력 전력 | 직류 24V/2.5A |
| 현금 서랍 출력 | 직류 24V/1A |
| 무게 | 1.0kg |
| 치수(D × W × H) | 194.5 × 145 × 146.4mm |
| 작동 온도 | 0~45도 |
| 작동 습도 | 10~80% 상대습도 |
| 커터 라이프 | 1.5 백만 컷 |
| 프린트 헤드 수명 | 150km |
| OS 호환성 | Windows, Linux, Android, Mac |


