1. 소개 및 이상view
The Lexar NM790 M.2 2280 PCIe Gen 4x4 NVMe SSD is an internal solid-state drive engineered for high-performance computing environments. It is suitable for demanding applications such as gaming, professional content creation, and intensive data processing. This drive offers significant speed and efficiency improvements over previous generations, making it a versatile storage solution for compatible desktop computers, laptops, and the PlayStation 5 console.

Image 1.1: The Lexar NM790 M.2 2280 PCIe Gen4 NVMe SSD, a high-performance internal storage device.
2. 제품 특징
The Lexar NM790 SSD incorporates several features designed to enhance performance and user experience:
- 뛰어난 성능: Achieves sequential read speeds of up to 7400MB/s and sequential write speeds of up to 6500MB/s.
- High Endurance: Rated for 3000 Terabytes Written (TBW), ensuring long-term reliability for intensive workloads.
- Speed Advantage: Offers approximately 2x faster performance compared to PCIe Gen 3 SSDs.
- 전력 효율성: Consumes up to 40% less power than many DRAM cache-enabled PCIe Gen 4 SSDs, contributing to extended battery life in laptops.
- 첨단 기술: Utilizes Host Memory Buffer (HMB) 3.0 and Dynamic SLC Cache to optimize data transfer speeds and maintain consistent performance without a dedicated DRAM chip.
- 광범위한 호환성: Designed for seamless integration with desktop computers, laptops, and the PlayStation 5 console.
- 컴팩트한 디자인: Features a single-sided NVMe SSD form factor, making it ideal for systems with limited physical space, such as thin laptops.
- 신뢰할 수 있음: Backed by a five-year limited warranty, providing assurance of product quality and support.

Image 2.1: Illustration of the Lexar NM790's sequential read speed of 7400 MB/s and write speed of 6500 MB/s.

Image 2.2: Visual representation of the Lexar NM790's up to 40% lower power consumption compared to other PCIe Gen 4 SSDs.
3. 설정 및 설치
Proper installation is crucial for optimal performance. Always ensure your device is powered off and disconnected from power before beginning installation.
3.1 General Installation (Desktop/Laptop)
- 기기를 준비하세요: Power down your desktop or laptop completely and disconnect all power cables and peripherals.
- 내부 구성 요소에 액세스: 기기의 c를 여세요asing to access the motherboard. Refer to your device's manual for specific instructions on how to do this safely.
- M.2 슬롯 찾기: Identify an available M.2 slot on your motherboard. These slots are typically labeled and may have a small screw stand-off nearby.
- SSD 삽입: Gently insert the Lexar NM790 SSD into the M.2 slot at approximately a 30-degree angle. The gold contacts on the SSD should align with the slot.
- 보안 SSD: Once fully inserted, gently push the SSD down until it is parallel with the motherboard. Secure it with the small screw provided with your motherboard or the SSD.
- 다시 조립하고 전원을 켜세요: 기기의 c를 닫으세요asing, 모든 케이블을 다시 연결하고 시스템의 전원을 켭니다.
3.2 PlayStation 5 설치
The Lexar NM790 SSD is compatible with PlayStation 5 consoles. Ensure your PS5 system software is updated to the latest version before installation.

Image 3.1: The Lexar NM790 SSD prominently displayed with a 'PS5 Compatible' graphic, indicating its suitability for PlayStation 5 consoles.
- Update PS5 Software: Ensure your PlayStation 5 system software is updated to the latest version.
- Power Down PS5: Turn off your PS5 completely and disconnect the AC power cord and all other cables.
- Position PS5: Place the PS5 on a soft cloth on a flat surface. Position it so the PlayStation logo is facing down and the power button is facing away from you.
- Remove Console Cover: Gently lift and slide off the console cover.
- 확장 슬롯 찾기: Identify the expansion slot cover, which is secured by a screw. Remove this screw.
- Remove Expansion Slot Cover: Carefully remove the expansion slot cover.
- Adjust Spacer: Remove the screw and spacer from the expansion slot. Adjust the spacer to the 2280 position, which matches the length of the NM790 SSD.
- SSD 삽입: Hold the Lexar NM790 SSD by its edge and insert it into the expansion slot connector at an angle.
- 보안 SSD: Push the SSD down firmly until it is level, then secure it with the screw you removed earlier.
- Reattach Covers: Replace the expansion slot cover and secure it with its screw. Then, reattach the PS5 console cover.
- 전원 켜기 및 포맷: Reconnect all cables and power on your PS5. Follow the on-screen instructions to format the newly installed SSD.
4. 사용 설명서
After physical installation, the Lexar NM790 SSD requires initialization and formatting before it can be used for storage.
4.1 Initialization and Formatting
- Windows의 경우:
- 시작 버튼을 마우스 오른쪽 버튼으로 클릭하고 '디스크 관리'를 선택합니다.
- Locate the newly installed SSD, which will likely appear as 'Unallocated' space.
- Right-click on the disk and select 'Initialize Disk'. Choose GPT (GUID Partition Table) as the partition style.
- Right-click on the 'Unallocated' space again and select 'New Simple Volume'. Follow the wizard to assign a drive letter and format the drive (NTFS file system recommended).
- macOS의 경우:
- 응용 프로그램 > 유틸리티에서 '디스크 유틸리티'를 엽니다.
- Select the newly installed SSD from the sidebar.
- Click the 'Erase' button. Choose a name, format (APFS recommended), and scheme (GUID Partition Map). Click 'Erase' to confirm.
- 플레이스테이션 5용: Upon powering on the PS5 after installation, the console will automatically detect the new SSD and prompt you to format it. Follow the on-screen instructions to complete the process.
4.2 데이터 전송 및 사용
Once formatted, the Lexar NM790 SSD functions as a standard storage device. You can transfer files, install applications, or store games on it just like any other drive. For optimal performance, ensure your operating system and motherboard drivers are up to date.
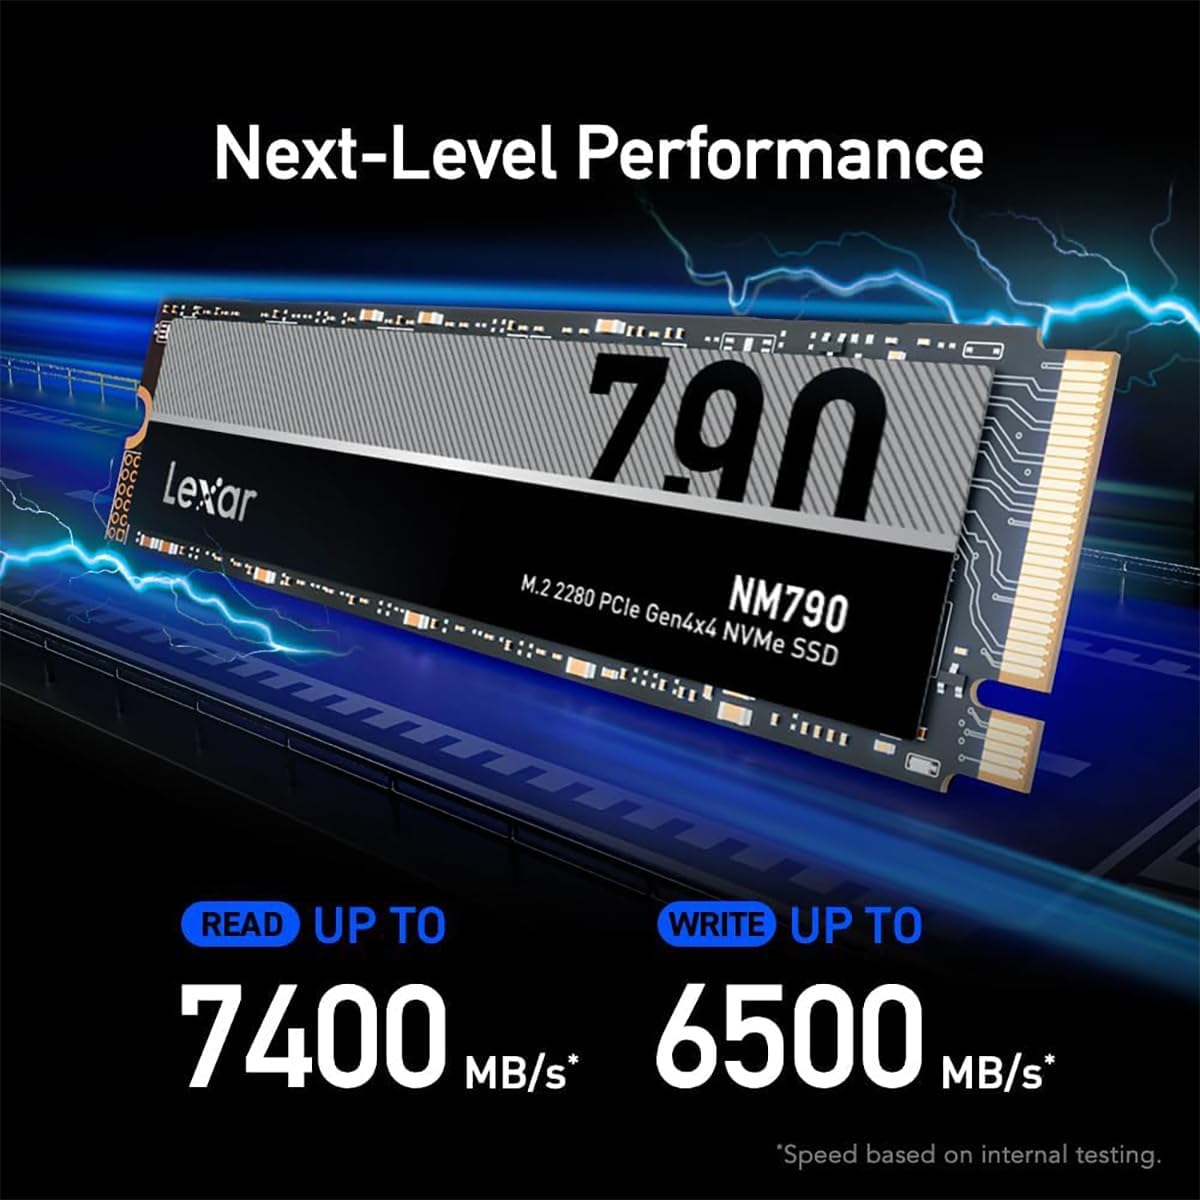
Image 4.1: The Lexar NM790 SSD integrated into a computer system, highlighting its Host Memory Buffer 3.0 technology for efficient data handling.
5. 유지관리
To ensure the longevity and sustained performance of your Lexar NM790 SSD, consider the following maintenance practices:
- 펌웨어 업데이트: Regularly check the official Lexar website for any available firmware updates for the NM790 SSD. Firmware updates can provide performance enhancements, bug fixes, and improved compatibility.
- TRIM 명령: Verify that the TRIM command is enabled in your operating system. TRIM helps maintain SSD performance by allowing the operating system to communicate which data blocks are no longer in use and can be internally erased by the SSD. Most modern operating systems enable TRIM by default.
- 조각 모음을 피하세요: Unlike traditional hard disk drives, SSDs do not benefit from defragmentation. Performing defragmentation on an SSD can unnecessarily increase write cycles and potentially reduce its lifespan without any performance gain.
- 건강 모니터링: Utilize SSD monitoring tools, often integrated into operating systems or available as third-party software, to check the drive's health status, temperature, and remaining lifespan.
- 충분한 여유 공간을 확보하십시오: While not strictly maintenance, keeping a reasonable amount of free space (e.g., 10-15%) on your SSD can help maintain optimal performance, especially for drives utilizing SLC caching.
6. 문제 해결
If you encounter issues with your Lexar NM790 SSD, refer to the following common troubleshooting steps:
6.1 SSD가 감지되지 않음
- Verify Physical Installation: Ensure the SSD is correctly seated in the M.2 slot and securely fastened with its screw. A loose connection can prevent detection.
- BIOS/UEFI 설정을 확인하세요: Access your system's BIOS/UEFI settings during startup. Confirm that the M.2 slot is enabled and configured correctly. Some motherboards may require specific settings for NVMe drives.
- Update Motherboard Drivers: Ensure your motherboard's chipset drivers are up to date. Outdated drivers can sometimes cause compatibility issues.
- Test in Another Slot/Device: If possible, test the SSD in a different compatible M.2 slot or another computer/device to determine if the issue lies with the drive or the original slot/system.
6.2 느린 성능
- Ensure PCIe Gen4 Compatibility: Verify that your motherboard and CPU fully support PCIe Gen4 speeds. If the SSD is installed in a PCIe Gen3 slot, its performance will be limited to Gen3 speeds.
- 운전자 확인: Update all relevant drivers, including chipset drivers and storage controller drivers, to their latest versions.
- Verify TRIM is Enabled: Confirm that the TRIM command is active in your operating system.
- 모니터 온도: Excessive heat can lead to thermal throttling, which reduces performance. Ensure your system has adequate airflow and cooling.
6.3 Formatting Issues
- Try Different Formatting Method: If standard formatting fails, attempt to format the drive using a different tool or method (e.g., Diskpart command-line utility in Windows).
- Check for Write Protection: Ensure the drive is not inadvertently write-protected by software or system settings.
7. 사양
Detailed technical specifications for the Lexar NM790 4TB SSD:
| 사양 | 세부 사항 |
|---|---|
| 상표 | 렉사 |
| 시리즈 | NM790 |
| 모델 번호 | LNM790X004T-RNNNU |
| 디지털 저장 용량 | 4000GB (4TB) |
| 하드 드라이브 인터페이스 | 넷기어 |
| 연결 기술 | M.2 |
| 하드 디스크 폼 팩터 | 2280 인치 |
| 하드 디스크 설명 | 솔리드 스테이트 드라이브 |
| 순차 읽기 속도 | 최대 7400MB/s |
| 순차 쓰기 속도 | 최대 6500MB/s |
| 쓴 총 바이트(TBW) | 3000톤 |
| 호환 장치 | 데스크톱, 노트북, PS5 |
| 설치 유형 | 내장 하드 드라이브 |
| 특징 | Single-sided design |
| 품목 무게 | 0.208 온스 |
| 제품 치수 | 6.5 x 4.8 x 0.5 인치 |
| 색상 | 검은색 |
| 제조업체 | Lexar International |
| 첫 번째 이용 가능 날짜 | 22년 2023월 XNUMX일 |
8. 보증 및 지원
The Lexar NM790 SSD is covered by a five-year limited warranty from the date of purchase. This warranty covers defects in materials and workmanship under normal use.
For warranty claims, technical support, or further assistance, please visit the official Lexar support website. You will typically need your proof of purchase (e.g., receipt or invoice) to validate your warranty claim.
- Lexar Official Web대지: www.lexar.com
- 지원 리소스: '지원' 또는 '다운로드' 섹션을 찾아보세요. website for drivers, firmware, and troubleshooting guides.