1. 서론
This manual provides detailed instructions for the safe and effective installation and maintenance of Wayne Dalton Torquemaster Plus (TM3/TMII) replacement springs. These heavy-duty springs are designed for Wayne Dalton garage doors utilizing the Torquemaster Plus spring system. Proper installation and regular maintenance are crucial for the safe and efficient operation of your garage door.
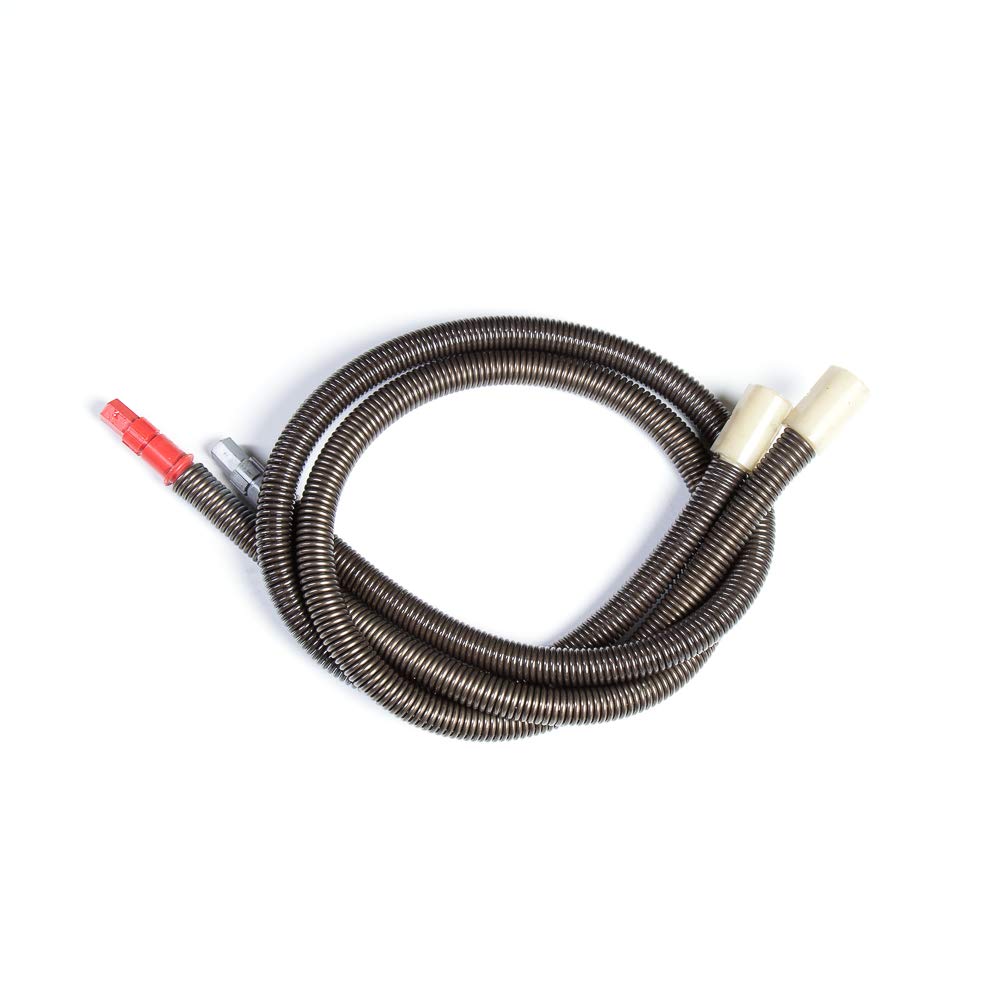
Figure 1: Wayne Dalton Torquemaster Plus Double Spring Set. This image shows two coiled metal springs, one with a red end cap and the other with a blue end cap, indicating left and right winding.
2. 안전 정보
경고: Garage door springs are under extreme tension and can cause serious injury or death if not handled properly. Installation and adjustment should only be performed by experienced individuals or qualified garage door technicians. Always wear appropriate safety gear, including safety glasses and gloves.
- 전원 분리: Always disconnect the garage door opener from its power source before beginning any work.
- 긴장을 푸세요: Ensure all spring tension is completely released before attempting to remove or install springs. Refer to the 'Removing Old Springs' section for detailed steps.
- 올바른 도구 사용: Only use the specified tools for winding and unwinding springs. Improvised tools can slip and cause injury.
- 지시사항을 따르세요: Adhere strictly to all instructions in this manual.
- 명확하게 유지: Keep hands, fingers, and clothing clear of moving parts and springs during installation and adjustment.
3. Identifying Your Spring Type, Door Height, and Weight
Before ordering or installing replacement springs, it is critical to correctly identify your existing Torquemaster system, door height, and door weight. Incorrect springs can lead to improper door balance and potential safety hazards.
3.1. Determine Spring Style (Torquemaster Plus vs. Original)
Examine the winding end of your existing spring system. Torquemaster Plus (TM3/TMII) systems typically feature a hexagonal winding end that is visible and protrudes from the bracket. Original Torquemaster (TM/TMI) systems have a counter gear visible on the outside of the bracket.

Figure 2: Comparison of Torquemaster Plus (left, hexagonal end) and Original Torquemaster (right, internal gear) spring ends. Note that end colors and material may vary.
3.2. Measure Door Height
Measure the height of your garage door. For doors measuring between 6'6" and 7'5", select a 7ft spring. For doors measuring between 7'6" and 8'2", select an 8ft spring. You may also find the door height listed on a label on the metal spring tube.
3.3. Measure Door Weight
The most crucial information for ordering the correct spring is your garage door's balance weight. Springs are specifically rated for a range of door weights. The weight is often listed on a label located on the metal tube. If not, you can weigh your door:
- Ensure all spring tension is released (refer to 'Removing Old Springs' section).
- Lift the door slightly and slide a bathroom scale under the center.
- Make sure the cables are fully slack on both sides to ensure the full weight is on the scale.
- Record the weight and select the spring within the appropriate weight range.
Video 1: How to Order Torquemaster Springs. This video provides a visual guide on identifying your Torquemaster spring type, measuring door height, and determining door weight to ensure correct spring replacement.
4. 설치
This section outlines the steps for replacing your Wayne Dalton Torquemaster Plus springs. It is highly recommended to watch the provided installation video before beginning.
Video 2: How to Install Wayne Dalton TorqueMaster Plus Springs. This video demonstrates the step-by-step process of installing Torquemaster Plus springs, including tool requirements, spring insertion, cable drum installation, end bracket mounting, cable adjustment, and spring winding.
4.1. 필요한 도구
- Power Drill with Socket Set
- Ratchet Wrench with 5/8-inch Socket
- 3-inch Socket Extension
- 플랫헤드 및 필립스 스크루드라이버
- 잠금 플라이어
- 송곳코 플라이어
- 발판 사닥다리
- 보안경 및 장갑
4.2. Removing Old Springs (Safety First!)
- 전원 분리: 차고 문 자동 개폐기의 플러그를 콘센트에서 뽑으세요.
- Release Door from Opener: Pull the emergency release cord to disconnect the door from the opener.
- Release Spring Tension: Using a 5/8-inch socket and ratchet, slowly turn the winding bolt counter-clockwise to release the spring tension. Ensure the pawl knob is in the 'up' position to allow winding. This process should be done carefully and gradually.
- Remove Brackets and Drums: Once tension is fully released, remove the end brackets and cable drums from both sides of the spring tube.
- Remove Spring Tube: Carefully remove the entire spring tube assembly from above the garage door.
- Remove Old Springs: Slide the old springs out of the metal tube. If applicable, transfer any plastic tubing from the old springs to the new ones.
4.3. Inserting New Springs
- Slide Springs into Tube: Slide your new right-hand and left-hand springs into the metal tube, perch end first.
- Reinstall Tube: Place the spring tube back onto the center wall bracket and flag brackets above your door.
- Optional Drum Wraps: If your system uses drum wraps (for rear-mount low headroom setups), install them now. They are labeled left and right; ensure the tabs face the correct direction.

Figure 3: Wayne Dalton Torquemaster Plus springs correctly inserted into the metal tube. The image shows the coiled springs extending from the ends of the tube.
4.4. Install Cable Drums
- Position Springs: Ensure the end of the spring hangs out of the tube about 5 inches on each side.
- 센터 튜브: Center the tube in the wall bracket and bend the center tab over the bushing to secure it.
- Install Drums: On the right side, the teardrop peak on the tube should point straight up. Slide the correct drum over the winding shaft until it is fully seated. Wrap the cables 1.5 turns or align with previous settings. Repeat for the left side.
- Single Springs: For single spring systems, insert the idler bracket until it clicks twice and seats flush.
4.5. Mount End Brackets
- 대괄호를 식별하세요: The right end bracket has a cable guide. If the ratchet wheel falls out, reinstall it with the teeth facing upward (clockwise).
- Slide Bracket: Slide the end bracket onto the winding shaft, matching the splines. Ensure the tab is seated.
- 안전한 브라켓: Attach the bracket to the flag angle using a carriage bolt, washer, and nut. Secure it to the jamb with a lag screw.
- Double Springs: For double springs, repeat this process on the left side.
- Single Springs: For single springs, ensure the left drum bearing is tight against the flag angle with no rubbing or gaps, then fasten your idler bracket.
4.6. Adjust Cables
- Right Side Adjustment: Start on the right side. Rotate the drum until the set screw faces away from the header, and ensure the spring tube peak is straight up.
- Loosen Set Screw: Loosen the set screw about half a turn.
- Confirm Cable Seating: Confirm the cable is seated in the first and second grooves.
- Slack 제거: Pull the cable tight to remove any slack and ensure tension is equal on both sides.
- Tighten Set Screw: Tighten the set screw snug.
- Add Extra Turns: Add one and a half extra turns.
- Trim Cable: Trim the excess cable to about six inches and insert it into the drum.
- Left Side Adjustment: 왼쪽에서 이 과정을 반복합니다.
4.7. Wind the Springs
- 보안 문: 부사장 cl 배치amps on both vertical tracks above the third roller to prevent the door from rising.
- 권선 도구: Use a ratchet with a 5/8-inch socket to wind the springs. Start on the right side.
- Add Turns: Turn the pawl knob up and rotate counter-clockwise to add turns. Mark the shaft to count your turns.
- 장력 확인: After two to three turns, stop and check cable tension on the left side. Once both sides are even, finish winding both sides to the required number of turns for your door height (refer to the winding chart in your included manual).
- Lock Ratchet: Move the pawl knob down to lock the ratchet.
4.8. Balance the Door
- Cl 제거amps: Remove the vice clamps.
- Test Balance: Lift the door halfway. If it rises by itself, remove turns. If it is heavy to lift, add turns. Always move the pawl knob up before making adjustments. A balanced door should stay in place when lifted halfway.
- Reconnect Opener: Ensure everything is tight and cables are aligned before reconnecting your opener.
5. 사양
| 특징 | 세부 사항 |
|---|---|
| 제조업체 | Wayne Dalton Parts |
| 부품 번호 | WD-TMS8586 |
| 제품 치수 | 12 x 9 x 3 인치 |
| 품목 모델 번호 | WD-TMS8586 |
| 크기 | Between 190-199lbs - Double Spring Set |
| 품목 패키지 수량 | 1 |
| 포함된 구성 요소 | (1) Right-hand and (1) Left-hand wound TorqueMaster Plus spring, Express Garage Doors installation reference manual |
| 첫 번째 이용 가능 날짜 | 1년 2020월 XNUMX일 |
6. 유지관리
Regular maintenance helps ensure the longevity and safe operation of your garage door springs. Perform these checks periodically:
- 시각적 검사: Annually inspect springs for signs of wear, rust, or damage. Look for gaps between coils, which may indicate a broken spring.
- 매끄럽게 하기: Lubricate springs with a silicone-based spray lubricant every 3-6 months. Do not use grease or oil, as these can attract dirt and debris.
- 균형 테스트: Perform a balance test (as described in 'Balance the Door' section) every few months. If the door does not stay in place when lifted halfway, the springs may need adjustment or replacement.
- 케이블 검사: Check cables for fraying or wear. Replace damaged cables immediately.
7. 문제 해결
다음은 몇 가지 일반적인 문제와 이에 대한 잠재적 해결책입니다.
- Door is Heavy to Lift: The springs may not have enough tension. Add turns as described in the 'Wind the Springs' section.
- Door Flies Up: The springs may have too much tension. Remove turns as described in the 'Wind the Springs' section.
- Door is Crooked: This could indicate uneven spring tension or a problem with the cables or drums. Check cable seating and tension on both sides.
- Loud Noises During Operation: Could be due to lack of lubrication on springs or other moving parts. Lubricate as per the 'Maintenance' section. If noises persist, inspect for worn or damaged components.
- Spring Appears Broken: If there is a visible gap in the spring coils, it is broken and requires immediate replacement. Do not attempt to operate the door with a broken spring.
8. 보증 및 지원
For specific warranty information regarding your Wayne Dalton Torquemaster Plus Replacement Springs, please refer to the documentation provided with your purchase or contact Wayne Dalton customer support directly. For technical assistance or further inquiries, please reach out to Express Garage Doors Inc, the seller of these springs.
연락처 정보: Please refer to your purchase receipt or the Express Garage Doors Inc web최신 연락처 정보는 사이트에서 확인하세요.


