소개
This manual provides detailed instructions for the installation, operation, and maintenance of your HIKVISION DS-7616NXI-K1 16 Channel 8MP 4K Network Video Recorder (NVR). Please read this manual thoroughly before using the product to ensure proper and safe operation. Keep this manual for future reference.
패키지 내용
포장을 풀 때 아래 나열된 모든 품목이 들어 있고 상태가 양호한지 확인하세요.
- HIKVISION DS-7616NXI-K1 NVR Main Unit
- 전원 어댑터
- USB 마우스
- 이더넷 케이블
- SATA 케이블(HDD 연결용)
- HDMI Cable (USEWEll HDMI Included)
- 빠른 시작 가이드

Figure 1: Package Contents. The image displays the NVR unit, power adapter, USB mouse, Ethernet cable, SATA cables, and a quick start guide, all neatly arranged as they would appear upon unboxing.
제품 끝view
주요 특징
- Supports up to 16 IP camera inputs.
- Advanced H.265+/H.265/H.264+/H.264 video formats for efficient storage and bandwidth usage.
- Equipped with Motion Detection 2.0 for enhanced security.
- Up to 160 Mbps incoming bandwidth to support multiple high-resolution cameras.
- AcuSense technology for intelligent analysis and reduced false alarms.
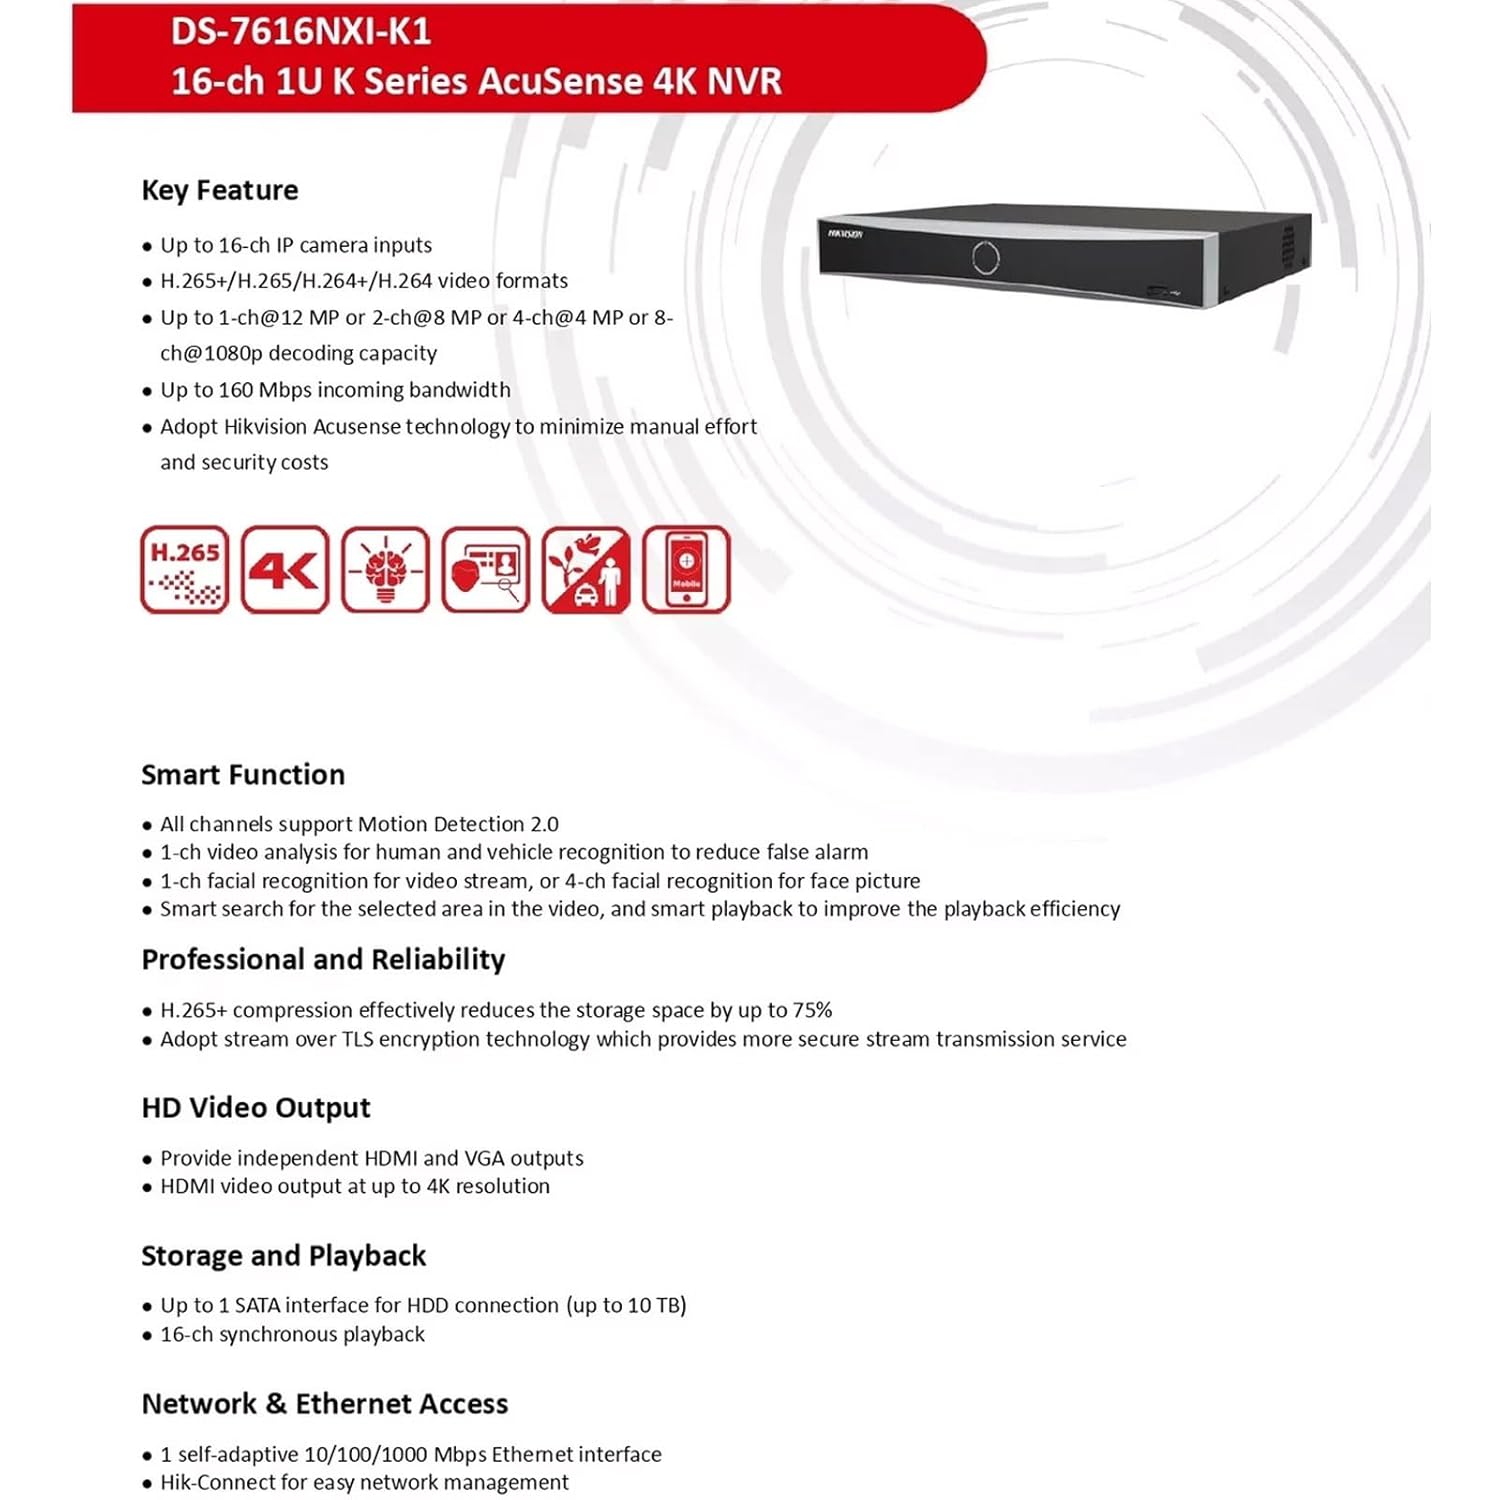
Figure 2: Key Features. This image highlights the main capabilities of the NVR, such as H.265+ compression, 4K resolution support, AcuSense technology, and various smart functions.
물리적 인터페이스
The NVR features a well-organized rear panel with various ports for connectivity. Refer to the diagram below for a detailed layout.

Figure 3: Physical Interface. This diagram illustrates the rear panel of the NVR, labeling ports such as LAN, Audio In/Out, HDMI, VGA, USB, and Power Supply.
| 아니요. | 설명 | 아니요. | 설명 |
|---|---|---|---|
| 1 | LAN 네트워크 인터페이스 | 6 | USB 인터페이스 |
| 2 | 오디오 입력 | 7 | 전원 공급 |
| 3 | 오디오 출력 | 8 | 전원 스위치 |
| 4 | HDMI 인터페이스 | 9 | 접지 |
| 5 | VGA 인터페이스 |

Figure 4: NVR Front and Rear View이 이미지는 명확한 정보를 제공합니다. view of the NVR's front panel with its minimalist design and the rear panel showcasing all connectivity options.
설정
Follow these steps to set up your HIKVISION NVR:
- Hard Drive Installation (Optional): If a hard drive is not pre-installed, open the NVR casing, connect the SATA power and data cables to the hard drive, and secure it within the NVR. Close the casing.
- 디스플레이 연결: Connect a monitor to the NVR's HDMI or VGA output port using the provided HDMI cable or a VGA cable.
- 마우스 연결: USB 마우스를 NVR의 USB 포트 중 하나에 연결하세요.
- 네트워크 연결 : Connect the NVR to your local network using an Ethernet cable. Ensure your network has internet access for remote view특징.
- 전원 켜기: Connect the power adapter to the NVR and then to a power outlet. Turn on the NVR using the power switch on the rear panel.
- 초기 구성: Follow the on-screen prompts to complete the initial setup, including setting up a password, network settings, and hard drive initialization.
- IP 카메라 연결: Connect your IP cameras to the same network as the NVR. The NVR will automatically search for and add compatible cameras. For non-PoE cameras, ensure they are powered separately and connected to the network.
작동 지침
NVR을 설정하면 감시 시스템을 모니터링하고 관리할 수 있습니다.
살다 View 그리고 녹음
- 라이브 액세스 view interface from the connected monitor or via the Hik-Connect app/web 인터페이스.
- Configure recording schedules and motion detection settings for each camera through the NVR's menu.
AcuSense Features
The NVR's AcuSense technology enhances security by providing intelligent detection capabilities:
- 모션 감지 2.0: Reduces false alarms caused by environmental factors (e.g., rain, leaves) by accurately classifying human and vehicle targets.
- 얼굴 인식: Supports face picture comparison and facial detection for specific applications.
- 경계 보호: Utilizes deep learning algorithms to reduce false alarms in intrusion detection and line crossing scenarios.
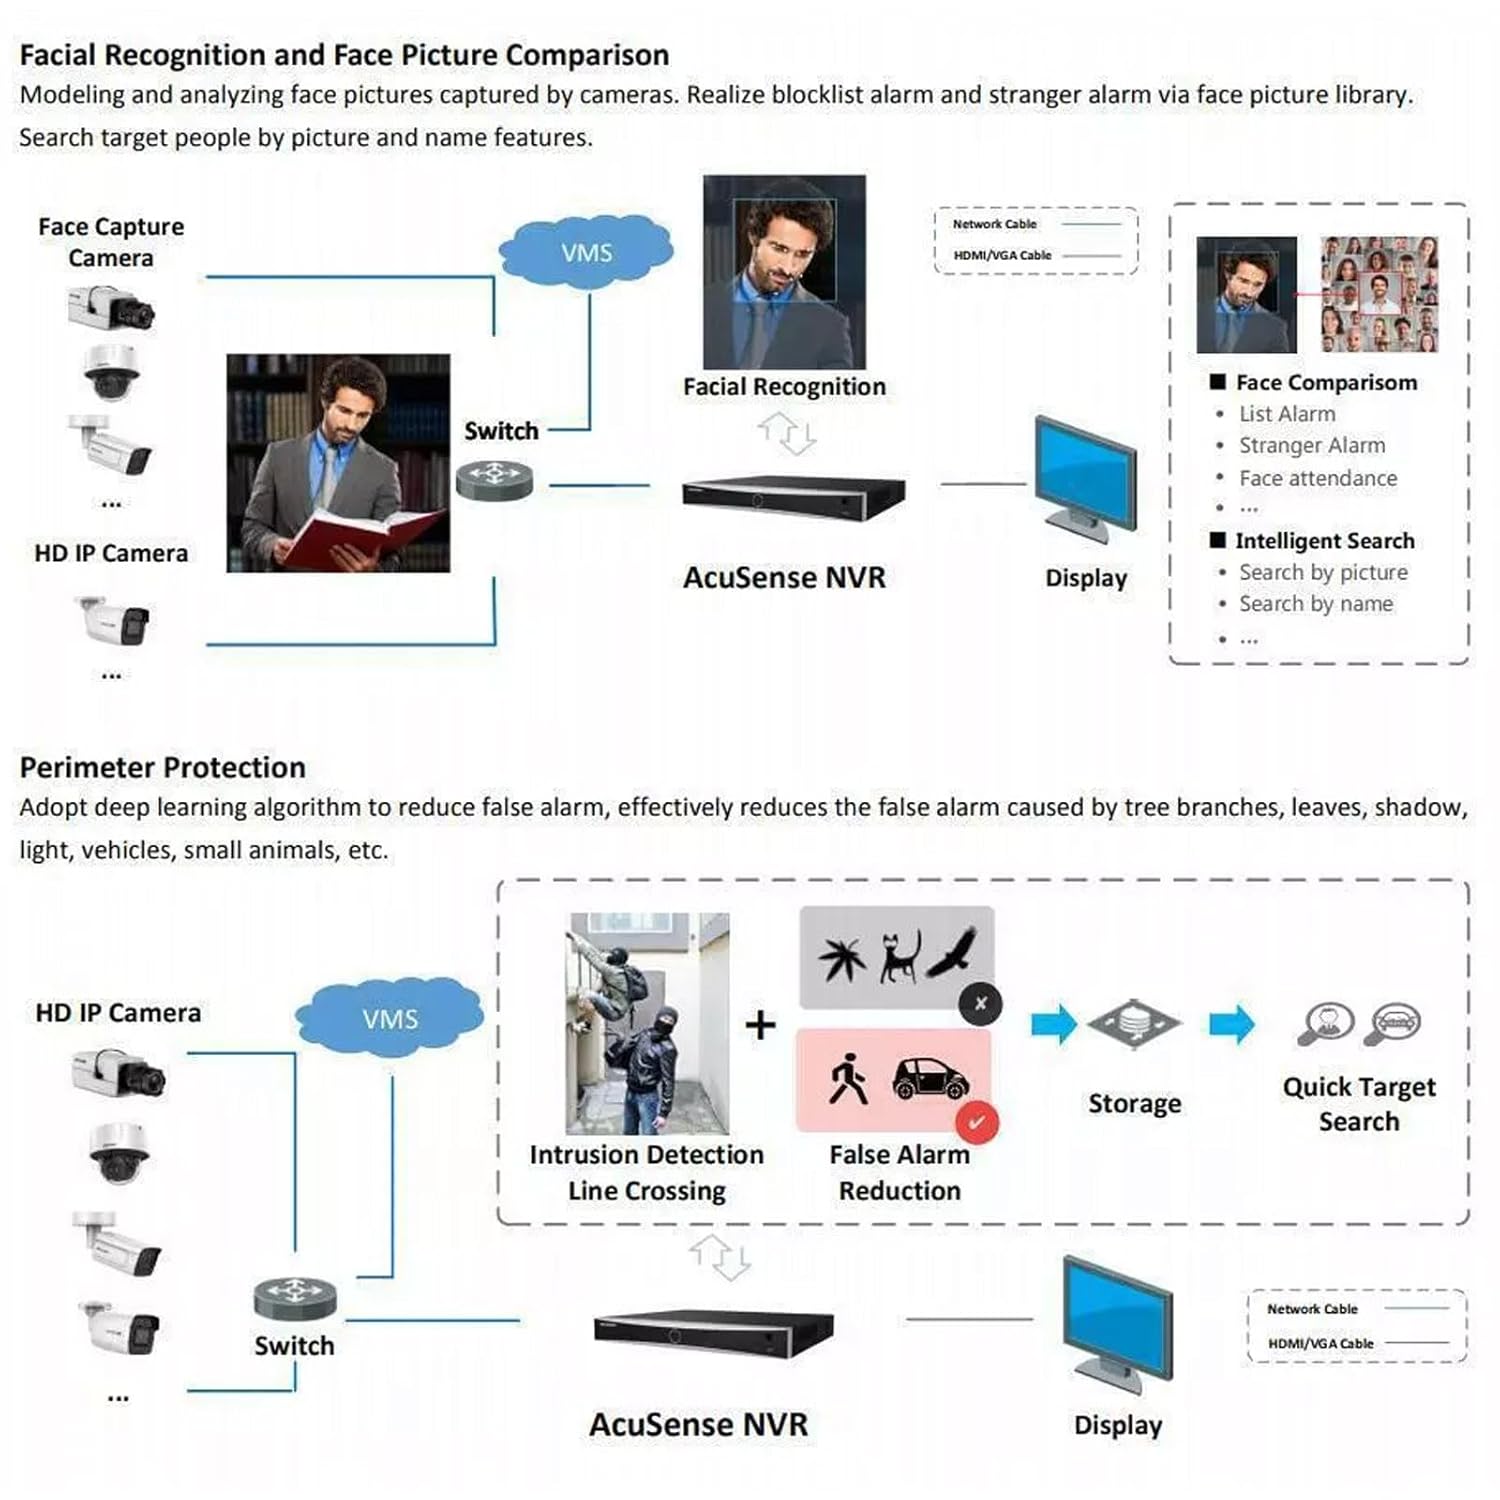
Figure 5: AcuSense Detection Capabilities. This image visually explains how AcuSense technology works for facial recognition and perimeter protection, showing the integration with cameras and the NVR.
원격 접속
Utilize the Hik-Connect P2P function for easy remote management and live viewing from your mobile device or web 브라우저.
유지
정기적인 유지관리를 통해 NVR 시스템의 최적의 성능과 수명을 보장할 수 있습니다.
- 청소: 부드럽고 마른 천으로 NVR 외부를 정기적으로 청소하십시오. 통풍구에 먼지나 이물질이 없는지 확인하십시오.
- 펌웨어 업데이트: Check the official HIKVISION website for the latest firmware updates. Regularly updating the firmware can improve system stability and add new features.
- 하드 드라이브 관리: Monitor the health of your hard drive(s) through the NVR's system settings. Ensure sufficient storage space is available for recordings.
- 백업 구성: 정기적으로 NVR의 구성 설정을 USB 드라이브나 네트워크 위치에 백업하세요.
문제 해결
이 섹션에서는 일반적으로 발생할 수 있는 문제에 대해 설명합니다.
- 비디오 출력 없음: Check all cable connections (HDMI/VGA, power). Ensure the monitor is on and set to the correct input. Restart the NVR.
- 카메라가 표시되지 않음: Verify that IP cameras are powered on and correctly connected to the network. Check network settings on both the NVR and cameras. Ensure cameras are added to the NVR.
- 네트워크 연결 문제: Confirm the Ethernet cable is securely connected. Check your router/switch status. Verify NVR network settings (IP address, gateway, DNS).
- Hard Drive Detection Issues: If the hard drive is not detected or shows errors, ensure it is properly connected inside the NVR. In some cases, an insufficient power supply to the NVR can cause HDD issues. Consider using a 12V 2A power adapter if the supplied 12V 1.5A adapter proves insufficient for your HDD.
- 허위 경보: Adjust the sensitivity and detection zones for motion detection. Utilize AcuSense features (Motion Detection 2.0, Perimeter Protection) to filter out non-human/vehicle events.
명세서
Detailed technical specifications for the HIKVISION DS-7616NXI-K1 NVR.
| 특징 | 세부 사항 |
|---|---|
| IP 비디오 입력 | 16채널 |
| 들어오는 대역폭 | 160Mbps |
| 발신 대역폭 | 80Mbps |
| HDMI 출력 | 1-ch, 4K (3840 × 2160)/30Hz, 2K (2560 × 1440)/60Hz, 1920 × 1080/60Hz, 1600 × 1200/60Hz, 1280 × 1024/60Hz, 1280 × 720/60Hz, 1024 × 768/60Hz |
| VGA 출력 | 1채널, 1920×1080/60Hz, 1280×1024/60Hz, 1280×720/60Hz |
| 디코딩 형식 | H.265 + / H.265 / H.264 + / H.264 |
| 녹화 해상도 | 12 MP/8 MP/6 MP/5 MP/4 MP/3 MP/1080p/UXGA/720p/VGA/4CIF/DCIF/2CIF/CIF/QCIF |
| 동기 재생 | 16-ch |
| SATA 인터페이스 | 1 SATA 인터페이스 |
| 메모리 저장 용량 | Up to 10 TB per HDD |
| USB 인터페이스 | Front panel: 1 × USB 2.0; Rear panel: 1 × USB 2.0 |
| 네트워크 인터페이스 | 1 RJ-45 10/100/1000Mbps 자체 적응형 이더넷 인터페이스 |
| 전원 공급 장치 | 12VDC, 1.5A |
| 전력 소비 | ≤ 10W (HDD 제외) |
| 작동 온도 | -10 °C ~ 55 °C (14 °F ~ 131 °F) |
| 작동 습도 | 10%에서 90%까지 |
| 치수(폭 × 깊이 × 높이) | 320mm × 240mm × 48mm(12.6" × 9.4" × 1.9") |
| 무게 | ≤ 1 kg (without HDD), 1.5 kg (Item Weight) |
| 원산지 | 인도 |

Figure 6: NVR Dimensions. This technical drawing provides precise measurements of the NVR unit in millimeters.
공식 제품 영상
Video 1: HIKVISION 16 Channel 8MP 4K NVR Overview. This video provides a brief visual introduction to the HIKVISION DS-7616NXI-K1 NVR, showcasing its design, package contents, and key features.
보증 및 지원
Your HIKVISION DS-7616NXI-K1 NVR comes with a 2년 보증, ensuring peace of mind regarding product quality and performance. For technical support, troubleshooting assistance, or warranty claims, please contact HIKVISION customer service or your authorized dealer.
Additionally, extended warranty plans are available for purchase:
- 1 Year Extended warranty by OneAssist
- 2 Year Extended warranty by OneAssist
For further information, visit the official HIKVISION web해당 웹사이트를 방문하거나 제품 설명서를 참조하십시오.


