1. 서론
The Lume Cube Panel Pro 2.0 is a versatile RGB camera light designed for photography and videography. It offers extensive color options, adjustable brightness, and color temperature, along with convenient Bluetooth app control. This manual provides instructions for setting up, operating, maintaining, and troubleshooting your device to ensure optimal performance.
2. 상자 안에 무엇이 들어있나요?
Carefully unpack your Lume Cube Panel Pro 2.0 and ensure all components are present:
- RGB Panel Pro 2.0 Light
- 연화 디퓨저
- DSLR Camera Mount
- USB-C to USB-A 케이블
- 여행용 파우치

Image: All items included with the Lume Cube Panel Pro 2.0.
3. 제품 오버view
The Panel Pro 2.0 features a compact design with powerful illumination capabilities. Key components include the LED panel, control buttons, an LCD screen, and a USB-C charging port.

Image: Front and back of the Panel Pro 2.0.

이미지: 상세 view LCD 화면의.
The device is equipped with an extra-large LCD screen for enhanced control, displaying critical information such as battery life, brightness, color temperature, scene settings, strobe speed, and hue.

Image: LCD Screen Information Diagram.
Physical controls include a Power/Mode button, an adjustment dial, and a USB-C recharge port, conveniently located for easy access.

Image: Side controls and USB-C port.
4. 설정
4.1. 장치 충전
Before first use, fully charge the Panel Pro 2.0 using the provided USB-C to USB-A cable. Connect the USB-C end to the light's port and the USB-A end to a compatible power source (e.g., wall adapter, computer USB port). The battery indicator on the LCD screen will show charging status.
4.2. Attaching the Softening Diffuser
The included softening diffuser can be snapped onto the front of the LED panel to soften the light output, reducing harsh shadows and creating a more even illumination.
4.3. Mounting to a Camera or Stand
The Panel Pro 2.0 includes a DSLR camera mount (cold shoe mount) and features three 1/4"-20 mounting options for versatile attachment to cameras, tripods, or light stands.

Image: Mounting the light to a camera.
5. 사용 설명서
5.1. 전원 켜기/끄기
Press and hold the Power/Mode button located on the side of the unit to turn the light on or off.
5.2. 밝기 조정
Rotate the adjustment dial to increase or decrease the brightness from 1% to 100%. The current brightness level is displayed on the LCD screen.
5.3. 색온도 조절
The Panel Pro 2.0 allows adjustment of color temperature from 2700K (warm) to 7500K (cool). Use the adjustment dial to cycle through color temperature settings. The selected temperature is shown on the LCD screen.
5.4. Selecting RGB Colors
Access millions of color options to match any creative need. Use the controls on the device or the Lume Cube App to select specific RGB values or preset colors.

이미지: 전amples of RGB color options.
5.5. Wireless Control via Bluetooth App
Download the Lume Cube App on your smartphone to wirelessly control the Panel Pro 2.0. The app provides comprehensive control over brightness, color temperature, RGB colors, and special effects.
- Download the 'Lume Cube' app from your device's app store.
- 스마트폰에서 Bluetooth가 활성화되어 있는지 확인하세요.
- Open the Lume Cube App and follow the on-screen instructions to pair with your Panel Pro 2.0.
- Once connected, use the app interface to adjust settings remotely.
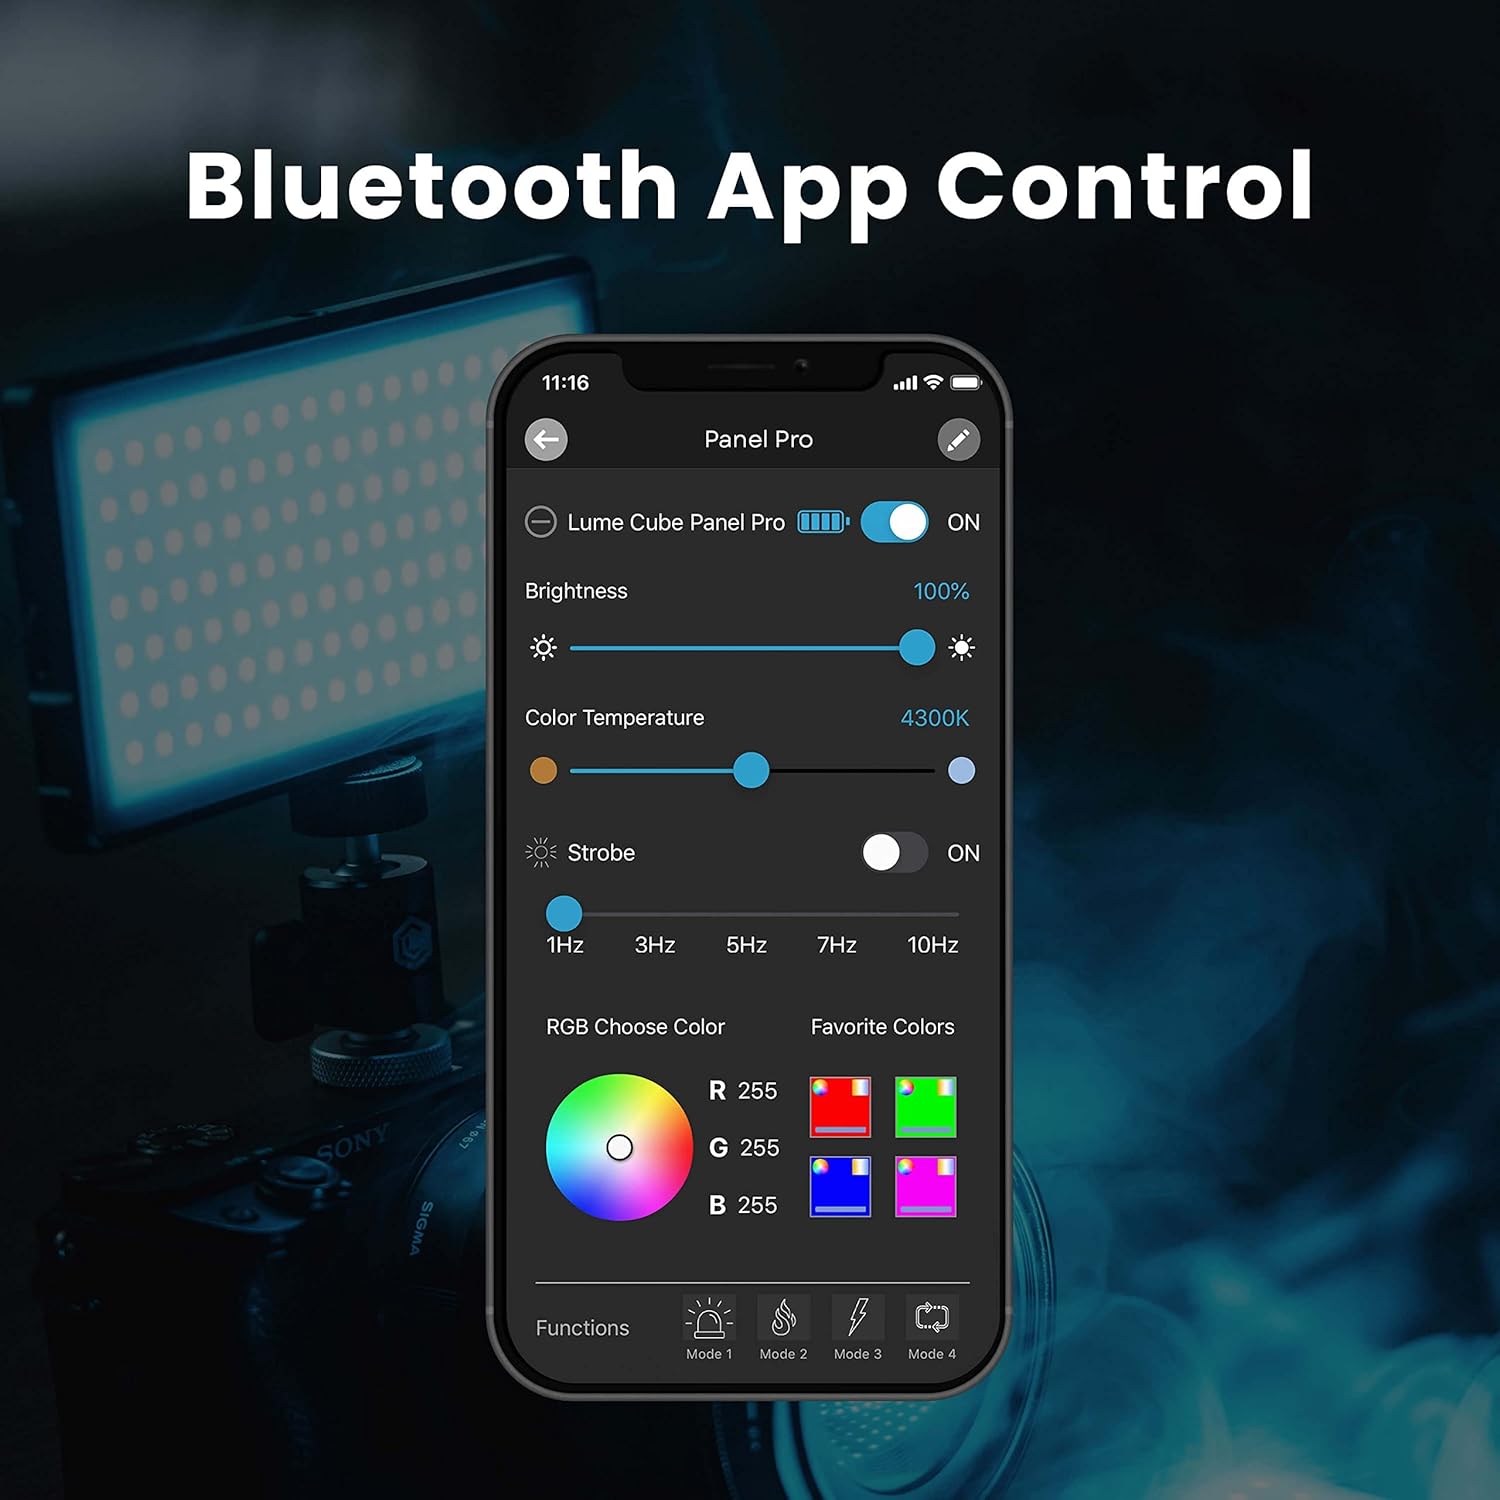
Image: Lume Cube App interface for wireless control.
6. 유지관리
To ensure the longevity and optimal performance of your Lume Cube Panel Pro 2.0, follow these maintenance guidelines:
- 청소: Use a soft, dry cloth to clean the exterior of the light. Avoid abrasive cleaners or solvents.
- 저장: Store the device in a cool, dry place away from direct sunlight and extreme temperatures. Use the provided travel pouch for protection.
- 배터리 관리 : For extended storage, charge the battery to approximately 50% every few months to maintain battery health. Avoid fully discharging the battery for prolonged periods.
7. 문제 해결
If you encounter issues with your Panel Pro 2.0, refer to the following common solutions:
- 조명이 켜지지 않음: Ensure the battery is charged. Connect the device to a power source using the USB-C cable and allow it to charge for at least 30 minutes before attempting to power on again.
- Cannot Connect via Bluetooth App:
- 스마트폰에서 Bluetooth가 활성화되어 있는지 확인하세요.
- Ensure the Panel Pro 2.0 is powered on and within range.
- Close and reopen the Lume Cube App.
- 조명과 스마트폰을 모두 재시작하세요.
- 밝기/색상이 일정하지 않음: Check the battery level. Low battery can affect performance. Ensure no physical obstructions are blocking the light output.
- 충전 문제: Try a different USB-C cable or power adapter to rule out faulty accessories. Ensure the charging port is clean and free of debris.
If problems persist, contact Lume Cube customer support for further assistance.
8. 사양
| 특징 | 세부 사항 |
|---|---|
| 제품 치수 | 8.4 x 6.8 x 1.6 인치 |
| 품목 무게 | 1.08파운드 |
| 배터리 유형 | 1개의 리튬 이온 배터리(포함) |
| 배터리 수명 | Approximately 3.66 Hours (at 100% brightness) |
| 연결 기술 | 블루투스 |
| 색온도 범위 | 2700K에서 7500K까지 |
| 밝기 조정 | 1%에서 100%까지 |
| 크리 | > 96 |
| 루멘 출력 | 1000루멘 |
| 럭스 출력 | 1500 Lux at 1.5 Feet |
| 한국어: | 810019501463 |

Image: Premium Output details.
9. 보증 및 지원
Lume Cube products are designed for durability and performance. For information regarding warranty coverage, product registration, or technical support, please visit the official Lume Cube web사이트를 방문하거나 고객 서비스 부서에 문의하세요. 보증 청구를 위해 구매 증빙 자료를 보관하세요.
온라인 리소스: www.lumcube.com


