1. 서론
This manual provides essential information for the safe and effective operation of your SCULPFUN S30 Ultra 33000mW Laser Engraving Machine. This high-power laser engraver is designed for precision engraving and cutting of various materials, including wood, metal, and acrylic. Please read this manual thoroughly before initial use to ensure proper setup, operation, and maintenance.

Figure 1.1: SCULPFUN S30 Ultra 33000mW Laser Engraving Machine with example engravings.
2. 안전수칙
WARNING: Laser radiation can cause eye and skin damage. Always follow safety guidelines.
- Due to the powerful laser, never operate the engraving machine unsupervised. Pause operation if you must leave the area.
- Always install the laser protective cover before operating the machine. If the cover is not installed, wear appropriate laser safety goggles.
- Do not touch the laser beam with your hands or any body part, as this can cause severe burns.
- Avoid strong impacts to the machine, which could damage components or misalign the laser.
- Children under the age of 14 are prohibited from using this product. Children over 14 require adult supervision during operation.
- Do not direct the laser beam at any specular (mirror-like) reflective objects, as this can cause injury to the operator or damage the laser.
- Ensure adequate ventilation in the work area to dissipate fumes and particles generated during engraving and cutting.
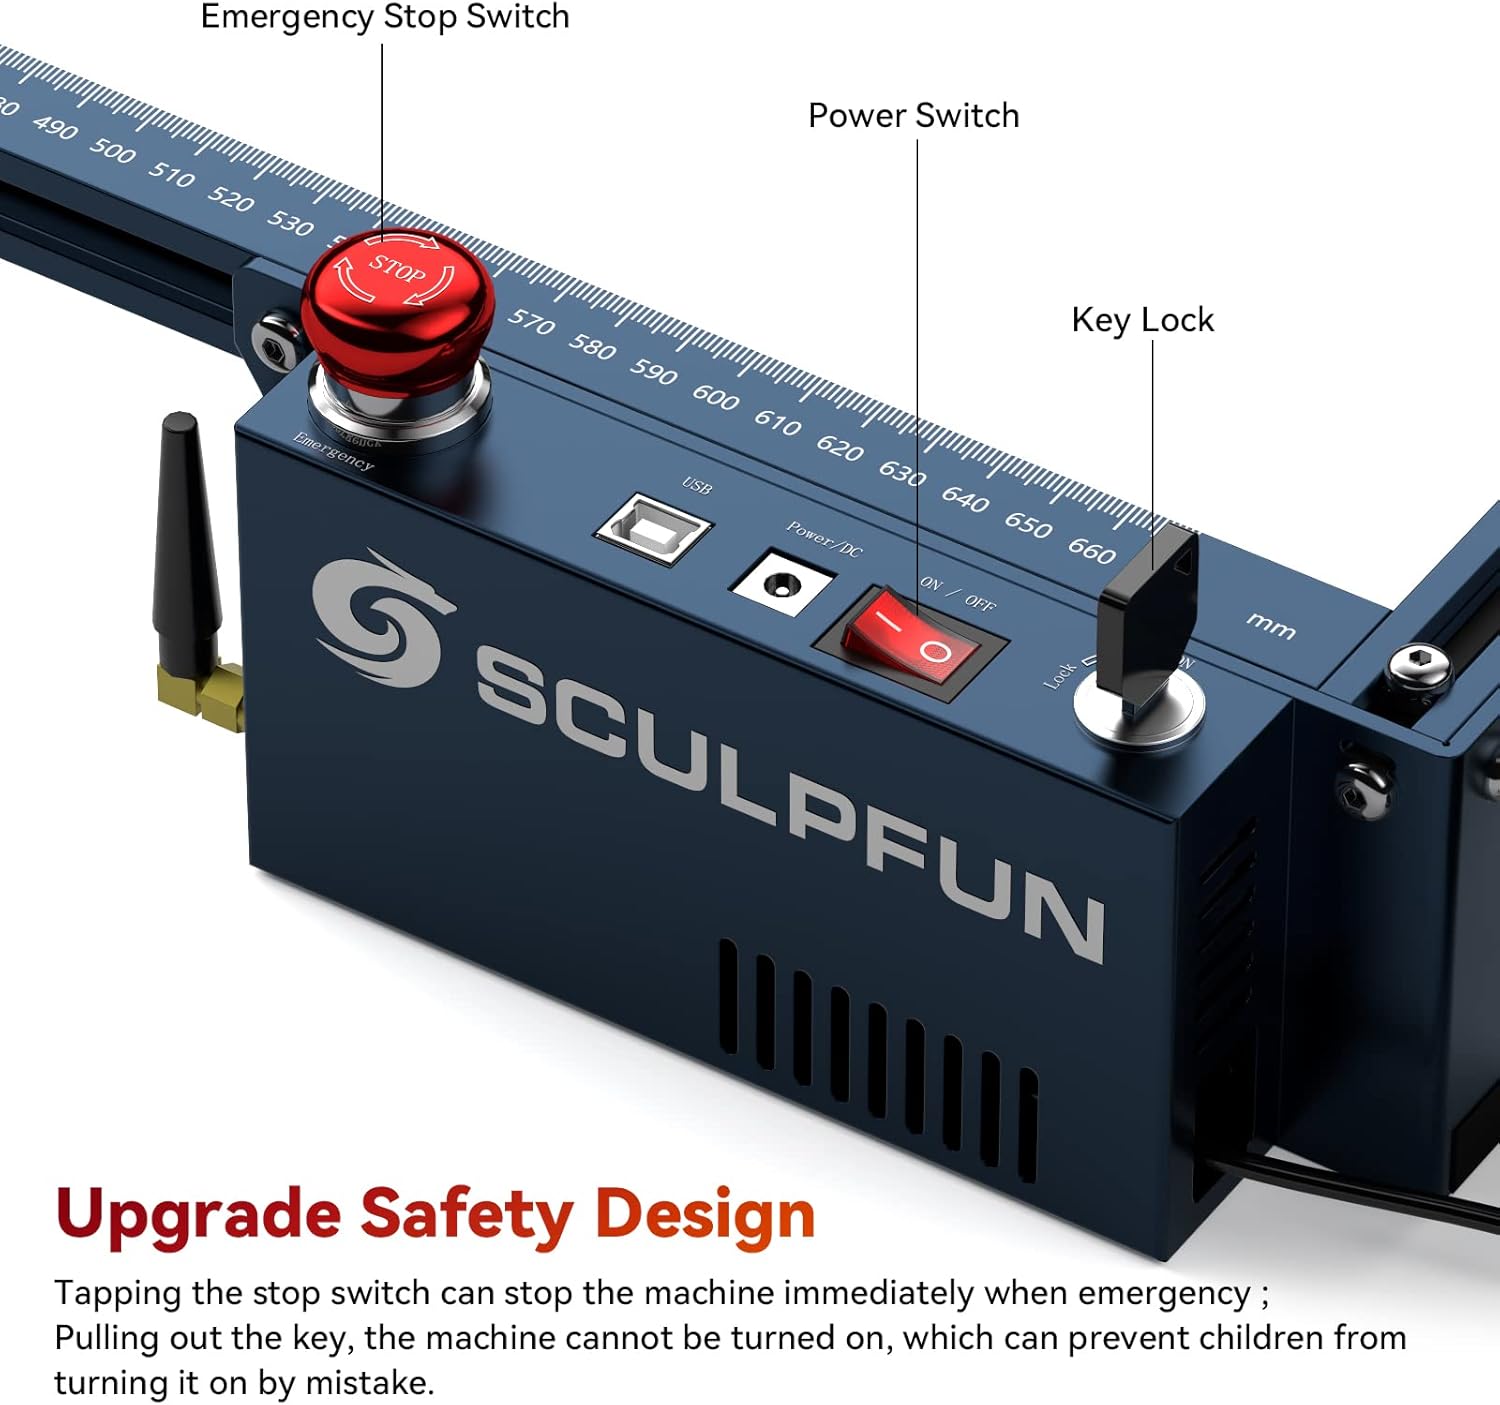
Figure 2.1: Safety features including Emergency Stop Switch and Key Lock for enhanced user protection.
3. 제품 특징
- 강력한 33W 레이저 출력: Utilizes upgraded 6*6W diodes for superior cutting and engraving capabilities, capable of cutting 20mm lightweight wood, 15mm paulownia wood, or 0.05mm stainless steel in a single pass.
- 넓은 조각 영역: Features a generous 600x600mm engraving area, accommodating large-scale projects.
- 32-bit Air-Assisted Motherboard: Equipped with an advanced motherboard supporting Bluetooth wireless connection and intelligent control of the air assist function via LightBurn's M8 button.
- Industrial-Grade Cutting Accuracy: Achieves 0.005mm high-precision engraving with an upgraded V2.0 X-axis linear slide rail, minimizing moiré patterns.
- Replaceable Protective Lens: Innovative design allows for easy replacement of the laser lens, significantly extending the laser's lifespan. A free lens is included.
- Enhanced 42-bit Stepping Motor: Provides robust power for high-speed movement, with a torque of 4.2 Kg·cm, ensuring stability even with heavier loads.
- Built-in High-Pressure Air-Assisted Nozzle: Generates powerful airflow to improve cutting efficiency by over 5 times and ensures clean cutting surfaces.
- Solid and Durable Frame: Constructed from high-strength aluminum alloy, capable of withstanding up to 50KG, ensuring long-term precision and durability.

Figure 3.1: Demonstrating the 33W laser power, cutting capabilities, and metal colorization feature.

Figure 3.2: Automatic Controlled Air Assist (M8) in action, improving cutting quality.
4. 설정
Unpack all components carefully and verify against the packing list. Assemble the machine according to the detailed instructions provided in the separate assembly guide (not included in this manual). Ensure all connections are secure and the machine is placed on a stable, level surface in a well-ventilated area.
- 프레임 어셈블리: Connect the aluminum alloy frame components securely.
- 레이저 모듈 설치: 레이저 모듈을 X축 캐리지에 장착합니다.
- 에어 어시스트 연결: Connect the air hose from the air pump to the laser module's nozzle.
- 전기 연결: Connect the power adapter to the machine and a suitable power outlet (100-240V AC, 50/60Hz).
- 소프트웨어 설치: Install the recommended operating software (LightBurn or LaserGRBL) on your computer.
- 초기 초점 조정: Use the fixed-focus column to set the correct laser focus for your material.

Figure 4.1: The S30 Ultra series maintains a consistent structure for easy upgrades, requiring only laser head replacement for power upgrades.
5. 사용 설명서
The SCULPFUN S30 Ultra supports various operating software, including LightBurn (with M8 air assist function) and LaserGRBL. It is compatible with both Windows and MAC systems. Supported file formats include NC, BMP, JPG, PNG, DXF, and other picture formats. Data transmission can be done via USB connection or Bluetooth wireless connection.
- 소프트웨어 출시: Open your preferred laser control software (e.g., LightBurn).
- 기계 연결: Establish a connection between your computer and the engraver via USB or Bluetooth.
- 하중 설계: Import your desired design file (e.g., NC, JPG, PNG).
- 재료 배치: Place the material to be engraved or cut on the working area. Ensure it is flat and secured.
- 매개 변수 설정 : Adjust laser power, speed, and passes according to the material type and desired outcome. Refer to the software's documentation for detailed parameter settings.
- Air Assist Control: If using LightBurn, utilize the M8 button to intelligently control the air assist for optimal cutting and to prevent material yellowing/blackening.
- 작업 시작: 소프트웨어에서 조각 또는 절단 공정을 시작하십시오. 작동 중에는 기계를 면밀히 관찰하십시오.
- 비상 정지 : In case of any emergency, immediately press the red emergency stop switch on the machine.

Figure 5.1: The SCULPFUN S30 Ultra supports popular software like LightBurn and LaserGRBL for versatile operation.
6. 유지관리
정기적인 유지관리는 레이저 조각기의 수명과 최적의 성능을 보장합니다.
- Laser Lens Replacement: The S30 Ultra features a replaceable lens. If the lens becomes damaged or its performance degrades after long-term use, replace it with a new one to restore cutting power. One free lens is included with your purchase, and additional lenses can be obtained from SCULPFUN.
- 노즐 청소: Regularly clean the high-pressure air-assisted nozzle to prevent blockages and maintain efficient airflow. A nozzle cleaning tool is provided.
- 레일 청소: Keep the linear slide rails clean and free of dust and debris to ensure smooth and precise movement of the laser module.
- 일반 청소: Periodically clean the entire machine, especially the working area, to remove any residue from engraving and cutting.

Figure 6.1: Essential maintenance tools for your SCULPFUN S30 Ultra.
7. 문제 해결
This section provides general guidance for common issues. For detailed troubleshooting, refer to the comprehensive instruction manual or contact SCULPFUN support.
| 문제 | 가능한 원인 | 해결책 |
|---|---|---|
| 레이저가 작동하지 않거나 출력이 약합니다. | 초점이 잘못되었거나, 렌즈가 더럽거나, 전력 설정이 낮거나, 연결이 헐거워졌을 수 있습니다. | Adjust focus, clean or replace lens, increase power setting in software, check all cables. |
| 기기가 컴퓨터에 연결되지 않습니다 | USB cable issue, Bluetooth not paired, driver not installed, software not recognizing port. | Try a different USB port/cable, re-pair Bluetooth, reinstall drivers, restart software/computer. |
| 조각/절단 품질이 좋지 않습니다. | Incorrect speed/power, material issues, dirty lens, misaligned laser. | Adjust speed/power settings, ensure material is suitable and clean, clean lens, check for mechanical alignment issues. |
| 에어 어시스트가 작동하지 않습니다 | Air hose kinked/blocked, pump not powered, software setting incorrect. | Check air hose for obstructions, ensure air pump is connected and powered, verify M8 setting in LightBurn. |
8. 사양
- 제품 모델: SCULPFUN S30 Ultra-33W
- 레이저 출력 전력: 33W (light energy)
- 레이저 초점: 0.08x0.08mm
- 레이저 파장: 455 ± 5nm
- 초점 방법: Fixed focus column + sliding device
- 조각 정확도: 0.005mm
- Engraving Area Size: 600x600mm
- Machine Electric Power: 약 156W
- Air Pump Type: Main board controlled, 24V, 30L/min flow rate
- Air Hose Inner Diameter: 7.5mm
- 마더보드: 32-bit air-assisted, supports Bluetooth wireless connection
- 운영 소프트웨어: LightBurn (with M8 air assist), LaserGRBL, Benbox, GrblController, LiteFire
- 지원됨 File 형식: NC, BMP, JPG, PNG, DXF, and other picture formats
- 데이터 전송: USB connection or Bluetooth wireless connection
- 전원 입력: 100-240V 교류, 50/60Hz
- 전력 출력: 24V 7A
- 제품 크기: 34.06 x 9.72 x 9.25 인치
- 패키지 무게: 9.9kg
- 인증: CE, FCC, RoHS, FDA, ICE

Figure 8.1: High-precision linear slide rail for superior engraving detail.

Figure 8.2: Expanded working area of the S30 Ultra compared to standard models.
9. 보증 및 지원
For warranty information, please refer to the documentation included with your product or contact SCULPFUN customer service directly. SCULPFUN provides support for product inquiries, technical assistance, and replacement parts such as laser lenses.
For further assistance, please visit the official SCULPFUN web사이트를 방문하거나 고객 지원 채널에 문의하세요.
10. 공식 제품 영상
No official product videos from the seller were found that met the criteria for inclusion in this manual.


